
Connecting to the Internet may be easier than you think; Tony begins this two-part series with how to configure your modem.
Connecting to the Internet may be easier than you think; Tony begins this two-part series with how to configure your modem.
by Tony Mobily
Today, many people install Linux on their desktop computers. Unfortunately, quite a few people seem to get stuck as soon as they try to do the one thing that apparently no one is ready to give up: connecting to the Internet. Why do they get stuck? There are several reasons, but the main one is that there is no official equivalent of Windows' “remote access” or Mac's ConfigPPP. As a result, many users end up having some similar programs available on their system (GNOME dial-up, Linuxconf, KDE dialer, etc.) without knowing anything about them.
It is also quite possible that no automatic configuration program is available (for example, if the user chose not to install either GNOME nor KDE when he or she installed the system). So why not take on the challenge of learning how to establish an internet connection by hand? This article explains how to set up a modem on your Linux system—a crucial step that many users seem to have trouble with. In the next article I will talk about how to configure pppd itself, assuming that the modem is configured correctly.
To get the most out of this article you should first be fairly familiar with the basics of using the shell (how to change directory, list the files in a directory, etc.), editing a file using any editor, running a program and using virtual consoles or several terminals in the X Window System.
This article will assume that you have a real modem, not a Winmodem. Configuring a Winmodem is possible but can be tedious and is outside the scope of this article.
The first thing you have to do is know where your modem is. What we are looking for is the serial port to which the modem is connected. This is true even if you are using an internal modem, as the modem card itself will contain a serial port. Your computer is likely to have two serial ports. Quite possibly, one is being used by your mouse (unless you have a PS/2 or USB mouse). In UNIX, every device is represented as a file in the directory /dev. This directory contains an entry for every device you possibly could have installed on your computer. The serial ports are called ttyS, followed by a number between 0 and 3. Let's have a look:
cd dev
ls -l ttyS*
crw-------  1 merc   tty    4,  64 Aug  3 10:24 ttyS0
crwxr-xr-x  1 root   tty    4,  65 Aug  3 10:25 ttyS1
crw-------  1 root   tty    4,  66 May  6  1998 ttyS2
crw-------  1 root   tty    4,  67 May  6  1998 ttyS3
Which is the one the modem is connected to? The answer is, it depends on where you plugged in your modem (or, if you have an internal modem, it depends on how it is configured). If you are used to calling serial ports COM1, COM2 and so on, you should know that the equivalents here are COM1 = ttyS0, COM2 = ttyS1, COM3 = ttyS2 and COM4 = ttyS3. And, if you don't know which serial port your modem is plugged into (or configured for) don't worry, because we will find that out in a little while.
Usually, there is a symbolic link (that is more or less the equivalent of a Windows shortcut) called “modem” that points to one of the serial ports. For example, on my system I have:
ls -l modem
lrwxrwxrwx  1 root  root  5 Feb  7  2000 modem -> ttyS1
In my case the modem is connected to the second serial port, ttyS1 (the symbolic link you can see above basically means that any program that uses the file /dev/modem is actually dealing with /dev/ttyS1).
Please remember that your system might be different, and you might not have a symbolic link that points to ttyS1 or ttyS0. In fact, the goal of this section is to have a symbolic link in /dev called modem that points to the right serial port (that is, the one your modem is connected to).
First we are going to determine to which serial port your modem is connected. Type the command minicom. To see if minicom is already talking to your modem, just type at and press Enter. If you see an “OK” response, minicom is using the right file in /dev to access the modem. Otherwise, for some reason minicom was unable to talk to the modem.
If there was no OK response from the modem, the first thing to do is to find out where the modem is (that is, to which serial port the modem is connected). This is done easily from minicom: press Ctrl-A and then O. Please note that sometimes minicom is configured so that it uses the Alt key. If that is the case, you should remember that every time I write Ctrl-key, you should press Alt-key (e.g., instead of Ctrl-A and then O, you should press Alt and then O).
The minicom configuration screen will pop up. Select “Serial port setup” and press Enter. Now, press A and choose a different serial port. For example if the current port is /dev/ttyS0, change it into /dev/ttyS1 (Figure 1). You will now have to exit minicom and run it again. Press Enter and select “Save default as dfl”. Then select “Exit” (you will exit the configuration screen) and quit minicom (Ctrl-A and then Q).
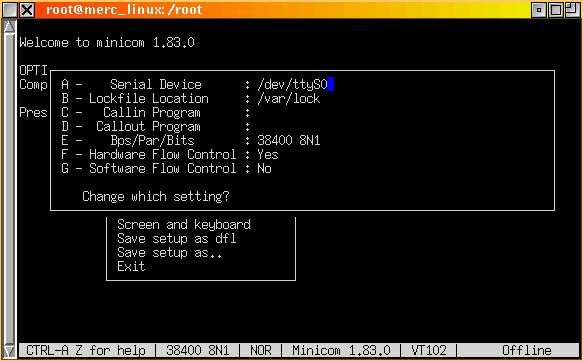
Figure 1. From this screen you can tell minicom which serial port it should use to talk to the modem.
Now, run it again. minicom will talk to the serial port you chose. Type at and press Enter. If you receive an OK as a response, you have found the modem (see Figure 2). Otherwise, you will have to repeat the steps outlined in this section until you find the serial port (that is, when you receive an OK response from the modem when you type at after running minicom). Please remember that normal debugging procedures should be followed when you try to figure out where your modem is. In particular, make sure your modem is switched on, is connected to the computer, is using the right power supply and that its connection with the computer is firm.
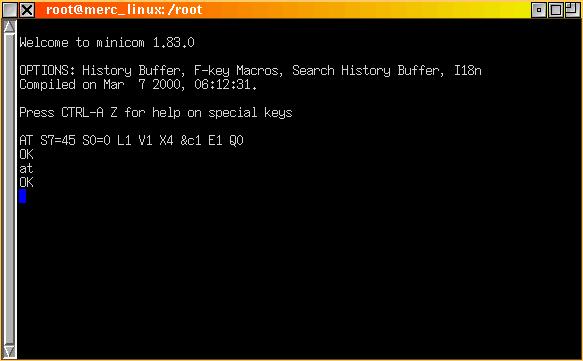
Figure 2. This is what minicom should look like when the modem responds with OK.
They seem to be trivial checks, but it is because of their triviality that they are often ignored. As a result, you can spend hours trying to configure a modem that actually is not connected or switched on.
If there is an OK response from the modem, everything is working, and it's only a matter of sorting a few things out. From minicom, press Ctrl-A and then O. The minicom configuration screen will pop up. Select “Serial port setup” and press Enter.
On the first line, you will be able to see what file minicom is using to communicate to the modem. If it is /dev/modem, everything is configured properly on your system, and you can skip to the next section of this article (“Talking to the Modem”).
If you received the OK response, but minicom is configured to use a different port (such as /dev/ttyS0), then you have to create a symbolic link called modem in /dev in order to make sure you have a working /dev/modem entry in your system (remember, this was the primary goal of this section). Write down which port minicom actually is using (let's suppose it is /dev/ttyS0). Quit the configuration screen (pressing Enter and selecting “Exit”), and quit minicom (by pressing Ctrl-A and then Q). Now you are back to your shell. Go into the /dev directory and create the symbolic link for “modem” like this:
cd /dev
ln -sf ttyS0 modem
ls -l modem
lrwxrwxrwx  1 root  root  5 Aug  3 12:32 modem -> ttyS0
Of course, you will have to substitute ttyS0 with the port you found in the minicom configuration screen.
Now, run minicom again. Make sure everything still works by typing at and pressing Enter. You should receive the reassuring OK response (see Figure 2). Go to the minicom configuration screen again (Ctrl-A and O) and select “Serial port setup”. Now change the default device by pressing A and substituting /dev/ttyS0 with /dev/modem (see Figure 1). Press Enter, then “Save setup as dfl” and select “Exit” to exit the configuration screen. In order to have minicom work with the new configuration you have to exit minicom (Ctrl-A and Q) and run it again.
Now minicom is using the device /dev/modem. Type at. You should receive an OK response (see Figure 2). If that is the case, congratulations!
Configuring the modem is the most critical step when you try to connect to the Internet. Many users do not know to which serial port their modem is connected. As shown in the previous section, it is clear that the modem was already configured; you only had to find out where it was and create a symbolic link in /dev that pointed to the right device file.
It is interesting to notice that minicom itself doesn't have any idea about the at command or the OK response. In fact, minicom's main tasks are very simple: to display the characters that come from the serial port and to send the characters the user keys in through the keyboard to the serial port.
In a sense, the modem is like a robot that talks to the computer using the serial port. That is why using minicom allows you to, in a sense, have your own private conversation with the modem. In the previous section, for example, you sent the modem the string at<Enter>, and the modem responded with the string OK<Enter>.
What kind of conversation can you have with the modem? As a matter of fact, every modem understands the Hayes command set that is based on the at command set. Some manufacturers also offer some very interesting extensions. If you want to find out what they are, all you have to do is look up the commands available for your modem in your modem manual. For example, the commands ATL-1, ATL-2 and ATL-3 are common to every modem; they set the speaker volume to low, medium or high.
Even though you don't need to know many of these commands to use the modem effectively, you might want to try out a few commands to understand a bit more about how your modem works. Remember that it is always possible to type the commands at&f and at&w to reset the modem to the manufacturer's configuration in case you send the modem a few unsafe commands that compromise its configuration and prevent it from connecting.
The command ATDT93355100 is used to dial a number, in this case 93355100. DT stands for dial tone, as opposed to DP, which stands for dial pulse. You might have to use the latter if you live in a rural area and are connected to an analog telephone exchange. Try to send the modem the command ATDT, followed by the number of your internet service provider, to see what happens.
In my case, the connection looks like the one in Figure 3. As you can see, after the hardware handshake (with a lot of whistling on both sides), the modem responds with a nice CONNECT 52500 message, which means the connection was established without any trouble. Of course, there are other messages you may get as a response: NO DIALTONE (there is no phone line attached to the modem), BUSY (the line is engaged), NO ANSWER (there was no answer) and so on (see Figure 4).

Figure 3. My screen after I have established a successful connection to my ISP.
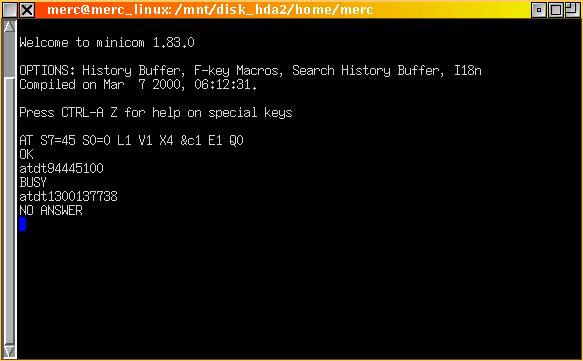
Figure 4. My screen after dialing two numbers. The first one was engaged, and the other one didn't answer.
In my case, the connection was established successfully and my ISP sent me the cryptic string as soon as I connected (the one that starts with ~}#.!}!±} }4}``}&} }*} } }%). In fact, my ISP is expecting to have a conversation with my PPP dæmon, whereas I am only running minicom, which will show exactly what my ISP would have sent to my PPP dæmon.
It is very important to remember that from now on the modem is going to stop responding to any at commands; all the information sent to the serial port will be modulated and sent to the other side of the line. At the same time, all the information coming from the other side of the line will be demodulated and sent to the serial port (hence, the word modem). The computer (or, better, the serial port) is not aware of all this. It runs exactly as if there was a serial cable running from your computer to the computer on the other side. In fact, if you have two PCs at home, you can network them together quite easily using pppd and connecting their serial ports with a serial cable (you have to make sure it's an inverted cable so that the send pin of the first computer is connected to the receive pin of the second computer, and vice versa).

