
Build a personal blog aggregator using the same code that powers many “Planets” sites, such as Planet Apache.
The Planet Project allows on-line communities to build a central Web page easily, aggregating blogs from people in their community. The Planet code powers such community blogs as Planet GNOME and Planet Apache. Such on-line uses of the Planet code provide a low cost of entry for people to keep an eye on a community. This article focuses on using the Planet code on your local machine to create your own custom blog aggregator.
The Planet code requires Python 2.2 or later. The simplest method to install Planet is to download a nightly snapshot tarball from the planetplanet.org Web site and extract it to your home directory. I tend to rename the extracted planet-nightly directory to include its day of download and use a handy link to the current version of Planet Me.
In this article, I've used references to the path of my home directory a few times; remember to substitute your own home directory in the examples.
The two final commands in Listing 1 show how to fetch current news feeds and set up your initial Planet. The commands will vary depending on things such as whether or not you have to use a proxy server to access the Internet. After running these commands, you should have a Planet Me viewable in your Web browser at ~/planet/me/index.html. After doing these steps, your planet should look similar to Figure 1.
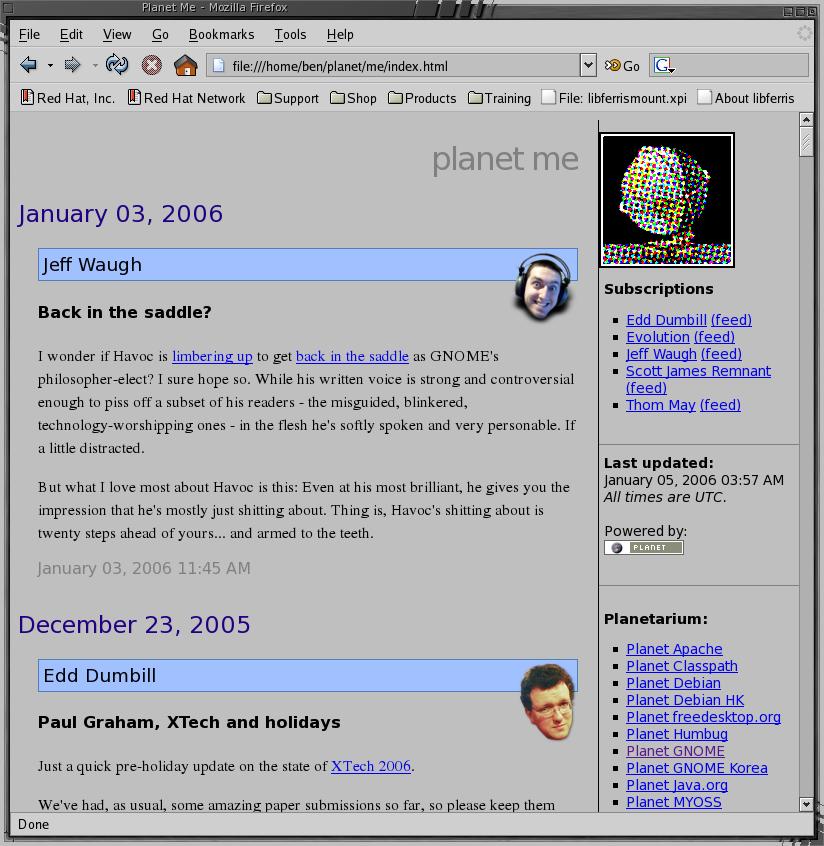
Figure 1. A New Running Planet Installation
You'll want to customize which news feeds you are viewing. This is done at the end of me-meta/config.ini. The configuration file defines a section by text surrounded by square brackets. Options for a section follow its initial definition as key=value pairs. You define each blog to aggregate in a section where you specify the URL of the RSS feed for the section name. See Listing 2 for an example from the default config.ini file.
The name will be shown in the header for each aggregated post from that blog, and the face image will be on the right side when using the default HTML templates. The facewidth and faceheight are optional by default.
Many sites provide handy topic icons that can be used to spruce up your Planet Me. For example, in Listing 3, I use one of the Slashdot section icons (see the on-line Resources) for news items taken from Slashdot's RSS feed.
Assuming you use the Planet setup as described in this article, the topic icons are stored in ~/planet/me/images. You can see the setup for my Slashdot topic icon in Listing 3.
Listing 4 shows the new section to append to the config.ini to integrate the Slashdot icon into your Planet Me.
Now you need to have the Planet code run to aggregate blogs, and make it easy to modify the list of blogs to aggregate.
You can solve the regular aggregation by using cron. Listing 5 shows how to have Planet Me updated every night.
It is easy to add and remove blogs if you keep a list of blog definition files instead of trying to manage the configuration file itself manually. You can use the generate-config script shown in Listing 6 to move the blog name and URLs into very simple files in a blog subdirectory.
You can use a file manager or the command line to add or remove files that determine the configuration of your aggregation scheme. This also paves the way for a simple Firefox extension to allow new RSS feeds to be added to Planet Me from a context menu. Handling archives as shown later is also simplified by moving the blog information out of config.ini.
The two files that control how your planet will look are me-meta/index.html.tmpl, which is the template for the page content, and me/planet.css, which is the cascading stylesheet.
By default, the face, entry, date and sidebar all define styles that can be changed using the stylesheet. You can use custom fonts by modifying the font-family CSS tag.
The index.html.tmpl template has extra tags that the Planet code uses to generate the final index.html file. The main tags of interest are TMPL_LOOP, TMPL_IF and TMPL_VAR. The news feeds are placed into the output page using the <TMPL_LOOP Items> HTML-like tag and its corresponding close tag. The HTML elements between these two tags will be output once for each news item to be displayed. These elements define what and how output is generated for each news item.
The Planet code uses these variables to get at the news feed content. For example, it replaces the <TMPL_VAR title> tag with the actual title of the current news item. Note that TMPL_VAR doesn't have a corresponding close tag.
The TMPL_IF tag is used to check whether information exists or to set specific conditions. For example, sometimes news items do not have title information. The code in Listing 8 will output title information if it exists, and output nothing if a title does not exist. The escape attribute on the TMPL_VAR tag tells Planet to make sure that the value of the link variable is in a form that is a legal HTML attribute.
You'll have to edit both the me-meta/index.html.tmpl and CSS files to move the channel icon to the left of the news item with Planet Me.
By default, your index.html.tmpl will display the channel icon only when the current news item is from a different channel than the one preceding it.
I've removed the <TMPL_IF new_channel> tags from around the outputting of the face image information in the fragment of index.html.tmpl shown in Listing 9. I also used a CSS class of news-item-icon for the channel image and news-item for the main news post section and a new class of embedded-face for the actual channel image.
Shown in Listing 10 is the new stylesheet code to set the channel image on the left of the news item. Your Planet Me should now appear like Figure 2. If you prefer your channel icons to the right of the news item, change the stylesheet to have news-item-icon's float tag be right and news-item's margin-left be 0px.
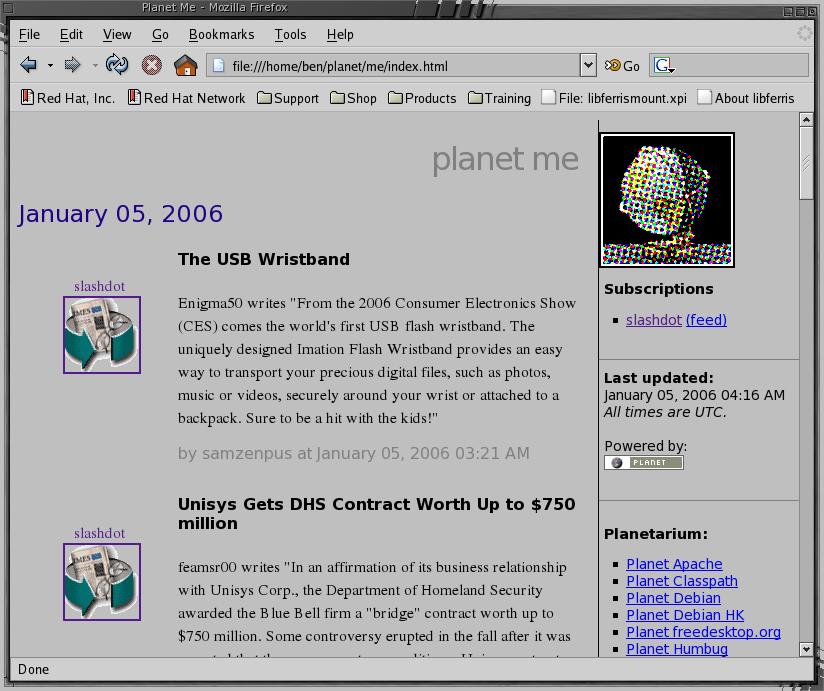
Figure 2. My Sample Planet Site with a Customized Template and CSS File
The face=whatever.png line used in the channel definition files is not special to Planet. You can define any other variables you want on a per-channel basis, and they will be available for use in your index.html.tmpl. For example, Listing 11 shows the use of an optional variable foo, which might be defined for a channel as foo=bar after a channel description in your config.ini file.
Another great way to learn how to customize your Planet Me is by visiting other Planet Web sites. Examine their HTML and CSS files to learn how they modified the look and feel.
The Planet code was designed to aggregate news feeds from many sources and supply a recent history of them on a single page. For local use with Planet Me, it is nice to be able to see a news feed for an arbitrary period in the past.
Your Planet Me will create a valid RSS RDF news feed that you can use to archive your Planet. All things in an RDF file revolve around triples. The three parts of a triple are referred to as the subject, predicate and object. An example triple might say that a news item has a given publication date, for example, item57 has-date 3-Jan-2006. An RSS news feed defines a news channel, associates that channel with a list of news items and defines interesting properties for each news item, such as its title, publication date and text content. Usually things like has-date are defined using long URIs to avoid two triples accidentally having the same literal value.
An easy, yet powerful way to archive your Planet's RSS is to use the Jena Project. Once you have a Java virtual machine installed, all you need to install Jena is to download a tarball, extract it and add it to your classpath.
Shown in Listing 12 are the installation steps and repeatable archiving process for news feeds. You could place your news feed archive into a database using Jena if you are collecting many feeds over a long time.
Jena gives you the ability to use very powerful queries against your archive to re-create your Planet.
Listing 13 shows a simple time interval query for news feeds. This query is in the SPARQL query language, which is used for querying RDF repositories. The core of the query links the channel, news item and date components before applying a filter to which news items are to be returned based on the date attached to that news item.
We can now easily change Planet Me to use only your query results as input, as shown in Listing 14, because we moved the blog URLs and metadata into separate files as explained above.
The channel icons will all be the same using the above query, because you are querying a single news feed, your own. Another expression that can be used in the FILTER section is regex(). The example shown in Listing 15 filters all news items and shows only those that match the case-insensitive regular expression.
Planet Me is designed to be used for on-line community blog aggregation, but the Planet code can make a very effective blog aggregator for personal use. The Planet code is designed to create on-line blog aggregates that are viewed by a large amount of people. With some tinkering, the Planet code can make a very effective personal blog aggregator giving you the freedom to choose explicitly who is in your community as well as easily creating archives of your Planet and searching past news using a very powerful query language.
Resources for this article: /article/8830.
