
Stephan Müeller has been working on updating the code that implements /dev/random. As new technology has become popular, such as solid-state drives, fully virtualized systems and highly parallelized systems, the ability to find enough entropy to produce truly random numbers has declined.
Good random number generation is crucial on modern systems in an era where security exploits are commonplace and governments throughout the world often are the ones wearing the black hats. It's also important for the Linux kernel to guarantee a sufficient source of random numbers on all systems, regardless of any particular hardware configuration. This can prove complex to implement, as the kind of entropy available on a given system is often related to the kind of hardware available to it.
Stephan implemented LRNG (Linux Random Number Generator) to address the existing problems associated with /dev/random. The big goals were to provide a good source of entropy even during boot-up and to reduce entropy-related slowdowns on parallelized systems, where security measures must be implemented across the full set of CPUs, whether physical or virtual.
There were a number of objections to Stephan's code, none of which are likely to keep it out of the kernel. The reason is that the old mechanism for generating random numbers is out of date, so any incremental improvement will be better than the status quo. Also, LRNG is intended to exist side by side with /dev/random for the present, so no features will be overtly lost.
But, for example, Theodore Ts'o objected that some of Stephan's entropy sources weren't providing true entropy and should be removed from the calculation. Stephan was happy to comply.
Another objection was that glibc might not export the getrandom() system call, as it was a Linux-specific call and wouldn't exist on operating systems like the Hurd. In which case, Ted said, there might have to be a special liblinux library alongside glibc, that could catch all the Linux-specific entries.
Just as an aside, it's so cool that glibc is taking account of projects like the Hurd and other operating systems. Now that Linux runs the world (seriously—it does), it would be tempting for glibc and other projects to cater only to Linux. But no! We still see similar struggles as were going on in 1995 and thereabouts. It's like the perennial C compiler debate: “The compiler should produce this machine code!” “No, the kernel should use this source construction!” “That source construction sucks! It doesn't work with other compilers!” “What other compilers! If it's a problem, use #ifdef!” “We're trying to get away from #ifdefs, not pepper the code with them!” “Well, la dee da!” “La dee da yourself!” And so on.
A prime attack vector against any operating system is the concept of knowing where in RAM a particular data structure or code sequence resided. It won't necessarily give you a full security exploit on its own, but it can combine with other security holes to trick a system into thinking it's doing something secure, when really control has been handed over to Dr. Evil.
The solution is to make sure that no one ever can tell what's in a given portion of RAM. But, that's tricky. The kernel itself has to know where everything is, so there has to be some rhyme and reason to the RAM layout, but it has to be a rhyme and reason that user code can't figure out.
Thomas Garnier recently came out with ASLR (Address Space Layout Randomization) for x86-64 systems. It's essentially an enhancement to security features that have been in the kernel since 2005. Security-centric Linux distributions have been rolling their own enhancement patches for a while now, and Thomas wanted to bring that level of security to the official kernel.
No one had any major objections, so it looks like the code will go forward into the official tree. This won't eliminate security problems on Linux, but it'll greatly strengthen Linux's defenses against certain attack vectors.
These are rough days for Linux security. Linux essentially runs everything in the whole world except consumer desktops. It's a huge target. All the nations of the world are engaged in massive amounts of cyber warfare against each other and in some cases against their own citizens. Nongovernmental hactivist groups also derive a significant portion of their power and voice from Linux security exploits. And, the entire corpus of source code is freely available for everyone to pore over in search of the elusive zero-day exploit.
Back in 2014, I highlighted Waze, which is a turn-by-turn GPS navigation program created by a startup in Israel. That company was bought by Google, but it still remains independent, at least for now. (It does share some data behind the scenes, but it functions differently when it comes to routing.)

(Image from https://www.waze.com)
Although I had very bad luck with Waze early on, I recently used it on a cross-country trip, and it was amazing. I still have unpleasant memories of Waze trying to force me to turn off an overpass and having it rout me to an off-ramp only to get back on the on-ramp immediately. I'm happy to say, however, those issues seem to be resolved. In fact, it was a very pleasant experience!
Not only was the navigation reliable (and murder-free), but it has a unique way of saving time by taking less-traveled routes. Last year when I was driving through Atlanta, Georgia, I got stuck in traffic for hours using my Garmin GPS. This year, Waze took me into corn fields in order to avoid traffic jams in Nashville. I'll admit, I was a bit worried when GPS advised me to turn on a poorly maintained country road, but in the end, it saved me hours of monotonous city traffic.
The TL;DR truth is, Waze has gotten to the point where it's now my favorite GPS app. Plus, if your passenger is bored, it's fun to report speed traps and hazards on the road. All that input makes for better driving, which makes family vacations far more enjoyable! Check it out in the Google Play store today. Waze is still free, and you'd be silly not to give it a test drive.
There are hundreds of applications for OS X that place information in the menu bar. Usually, I can find one that almost does what I want, but not quite. Thankfully I found BitBar, which is an open-source project that allows you to write scripts and have their output refreshed and put on the menu bar.
I personally use it to fetch Bitcoin and Ethereum prices, but because you're limited only by what you can get Bash to output, it's extremely flexible. Even the method by which you change update frequency is elegant. By adding a refresh rate to the name of your script, the program refreshes only as often as you desire. You can see an example of my Bitcoin price-fetching script in the screenshot (Figure 1). Also notice the file format for my additional scripts (Figure 2).

Figure 1. Bitcoin Price-Fetching Script
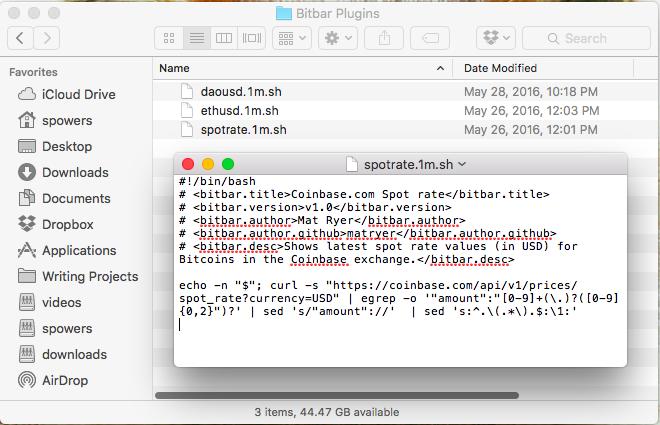
Figure 2. File Format for Additional Scripts
If you head over to getbitbar.com, you can download the binary or the source code. There is also a huge library of user-contributed scripts so you don't have to start from scratch. My Bitcoin script is actually from this repository, and I based my other scripts off that. Whether you want to pull text from an API like me or possibly grep the temperature from a weather page, BitBar is simple and elegant at the same time. In fact, BitBar is so useful and well designed, we're giving it the Editors' Choice award for this month.
In past articles, I've looked at several libraries or specialist applications that can be used to model some physical process or another. Sometimes though you want to be able to model several different processes at the same time and in an interactive mode. This is especially helpful in educational situations where you are trying to learn how those processes work. So in this article, I introduce an application named Step from the Edu section of the KDE Project (https://edu.kde.org/step).
The one major limitation is that the simulation runs only in two dimensions. Aside from that, you can model almost any system you can imagine. You can create discrete systems that are made of particles connected either with rigid rods or springs. You can apply external gravitational or electrical forces to your system. There is a molecular dynamics portion that allows you to model gases and liquids, including condensation and evaporation, and there is support for units and error values in your numbers. Several solvers are available to handle the actual calculations, so you should be able to find one that is best for your particular application.
To install Step, you should have a package available within your distribution's package management system. For example, with Debian-based distributions, you can install Step with this command:
sudo apt-get install step
One thing to be aware of is that Step is part of the KDE Project. So, if you install it on a different desktop environment, such as GNOME or Unity, you also will need to install a large number of KDE support libraries. It will run fine on other desktop environments, so you don't actually need to run KDE.
To start Step, you either can find it within your desktop's menu system or open a terminal window and run the step command. When it starts up, you'll get a new, empty project in which to build your simulation.
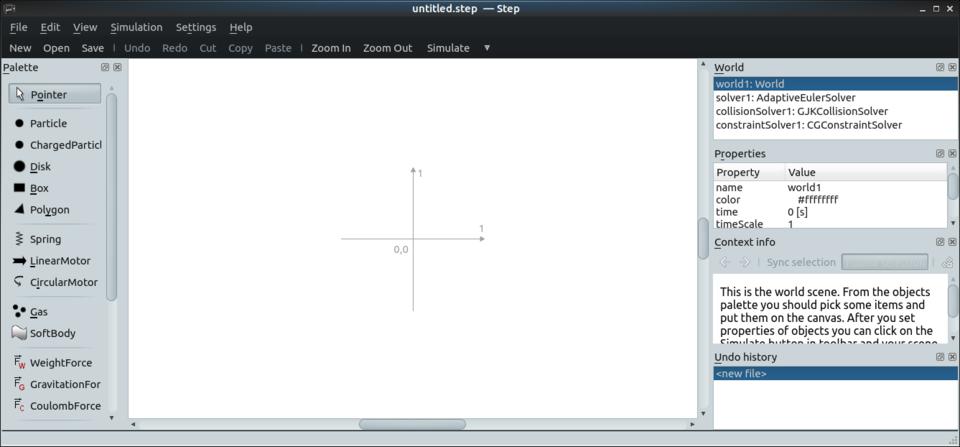
Figure 1. When you start Step, you get a new blank project to start your simulation.
In the center of your window is the main pane where your system of particles and forces is displayed. On the left-hand side is a palette of elements you can use to build the system you want to model. On the right-hand side, you can see a series of panes that give information about the system as a whole, along with details about specific selected elements.
It might be rather daunting to look at all of this functionality and have to start with a completely blank canvas. Luckily, Step comes with a number of tutorials to walk you through the first steps of building and simulating systems within Step. You can access them by clicking the menu item File→Open Tutorial. This pops up a dialog window where you can select and load one of the five provided tutorials. When you select one, you get a system of elements along with a description of activities that you can follow along with to help you learn a bit more about each of Step's sections.
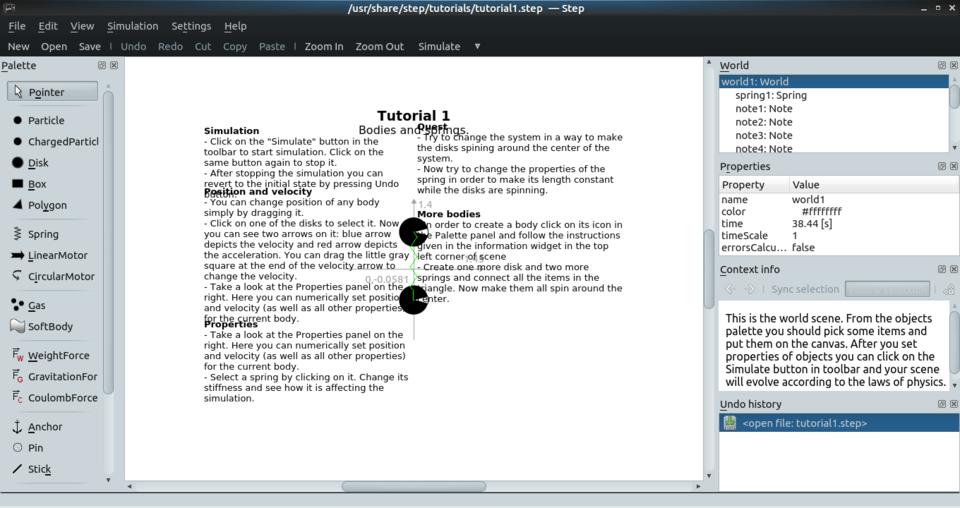
Figure 2. Step comes with a set of tutorials to walk you through some of the available functionality.
When you want to move on to developing your own models, several example projects are available that cover a large number of physical systems. You can access them from the File→Examples→Open Example menu item. This will pop open a dialog where you can select and load systems, such as the double pendulum model.
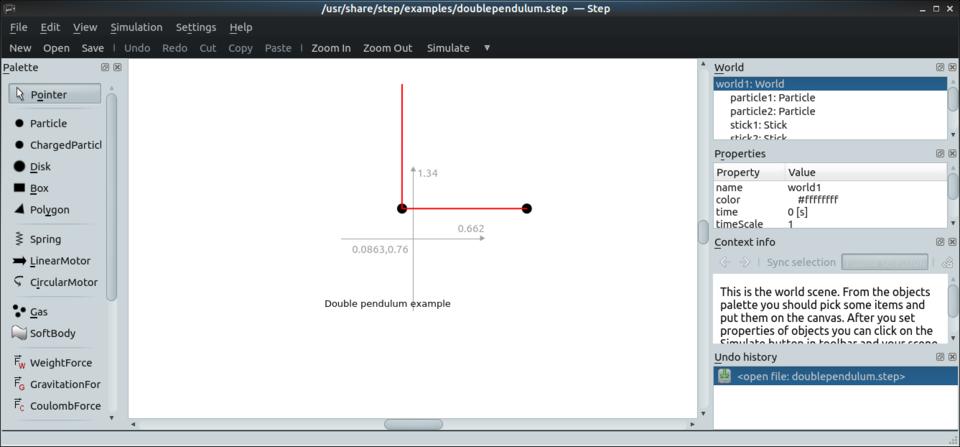
Figure 3. Step comes with a number of example projects, such as the double pendulum.
These examples provide a starting point that you can alter to create your own model. In order to make changes, you either can select the element in question within the main pane or you can select from the top pane on the right-hand side. Either of these steps will populate the middle pane on the right-hand side with the details for that element. Then you can go ahead and make your alterations. For example, for a particle, you can change the position, velocity or mass. Once you have your own system built, you can save it as a Step file by clicking File→Save As.
All I've described to this point is setting up the model of the physical system. I've yet to cover any simulating of the physical processes. To start the simulation, click on the Simulate button at the top of the window (just below the menu bar). You should notice a button next to that (with a down arrow on it) that lets you set the speed of the simulation. This lets you see your system in motion, which can be very illuminating in trying to understand how your system will behave.
Sometimes, however, this isn't good enough. You may need to have numbers tracking what various elements are doing within the simulation. Luckily, Step provides three measurement objects: meters, graphs and tracers. As an example, let's add a meter to monitor the speed of the first particle in the double pendulum example.
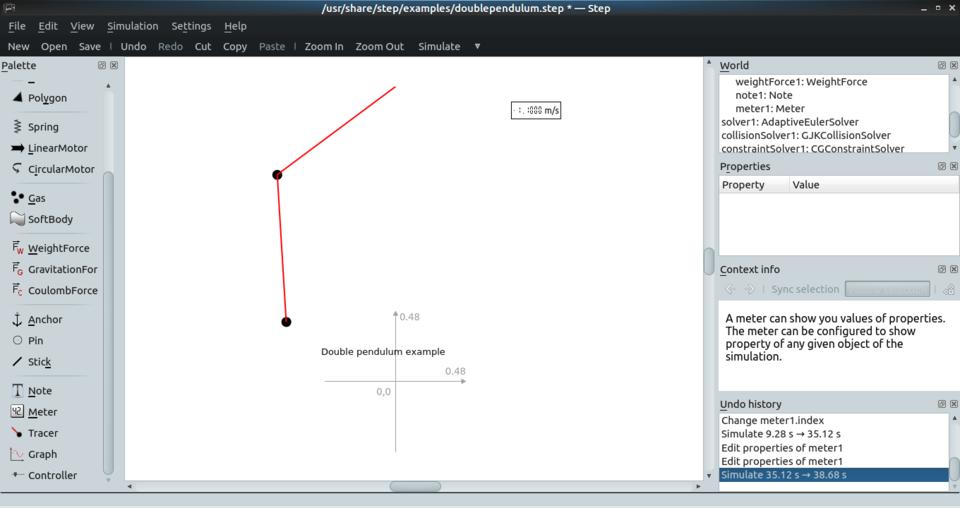
Figure 4. You can add elements, like meters, to track the behavior of elements in your simulation.
Start by clicking the meter option in the object palette. Step then asks you to select where this meter will be displayed. Once it's created, you still need to configure it so that it's monitoring a certain property of some object. You either can right-click on the meter and select Configure meter, or you can select the meter object from the top pane on the right-hand side.
In the example given in the screenshot, I chose the velocity of the particle1 object. When you first do this, you may notice that the meter isn't actually displaying anything. Don't forget that you also need to select the index of the property. In this case, you would need to change it from the default of 0 to 1.
Once you start creating your own systems, you may decide that the default solver isn't appropriate. Each solver is better or worse, depending on the details and constraints for your system. The details of the numerical analysis involved are too much to cover for such a short article, but you should know that you do have some control over this. You can select the solver1 object from the top pane on the right-hand side. The middle properties pane lets you select the solver type from among the 16 available solvers. You should be able to select one, along with its other properties, that is appropriate for your simulation.
I've covered only the most basic elements available within Step here, but hopefully you've seen enough to spark your interest in playing with it further—especially if you need a good tool to teach these types of physical processes to your students. They'll get a much more intuitive feel for them when they can play with the relevant parameters and see what effects they have.
In my Open-Source Classroom column in the May 2016 issue, I discussed how to set up Gmail as your SMTP provider for outgoing email. The problem with email is that sometimes the sheer quantity of it makes important messages slip past my radar. So for really important error messages, I like to get SMS messages. Thankfully, I get several orders of magnitude fewer text messages than I do email messages. That means if a text comes, I almost always notice, and I always check it. (“Inbox Zero” is far more attainable with my SMS inbox!)
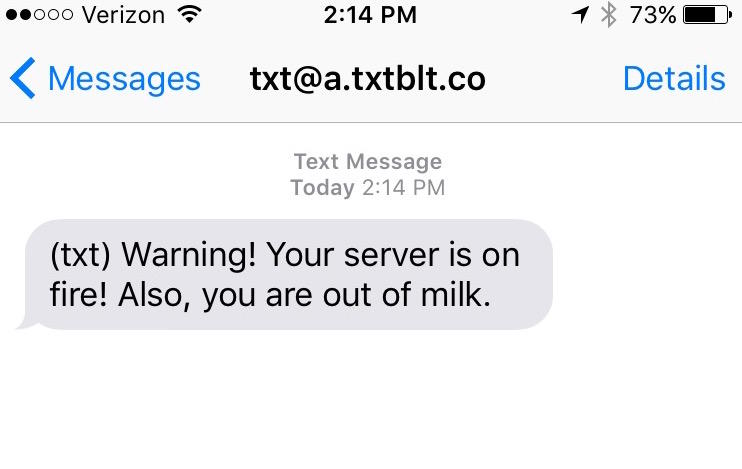
Most providers have an email gateway for sending text messages, but figuring out what format to use for what number is frustrating. I prefer a simple way to add a one-liner into a script that will send a text message. Thankfully, Ian Webster provides TextBelt free of charge! You can download the source code and host it yourself if you prefer, but Ian graciously offers a running instance of TextBelt that is free as in beer and free as in speech to use. To send a text, simply use curl:
curl -X POST http://textbelt.com/text -d number=5551234567 -d
 ↪'message=Warning! Your server is on fire! Also,
 ↪you are out of milk.'
The code above will send a text message to any of the major carriers in the US. You'll get a response on the command line showing either success or failure. There's also an international gateway that is available; see textbelt.com for more information.
Note: there are a still a few goofy carriers. My Android phone is on Cricket Wireless, and although I do get a success message, the text never arrives. I suspect this is because Cricket recently changed its email gateway; hopefully the TextBelt code will be updated shortly. The moral of the story is, test first before relying on the service to work!
Love all, trust a few. Do wrong to none.
—William Shakespeare
I'd rather look ridiculous when everybody else does than plain and sensible all by myself.
—L. M. Montgomery
We don't receive wisdom; we must discover it for ourselves after a journey that no one can take for us or spare us.
—Marcel Proust
The only people who can change the world are people who want to. And not everybody does.
—Hugh Macleod
Never let the fear of failure be an excuse for not trying. Society tells us that to fail is the most terrible thing in the world, but I know it isn't. Failure is part of what makes us human.
—Amber Deckers
In last month's issue (June 2016), I described my Raspberry Pi outdoor camera build. Since then, however, I've discovered a different way to stream video from it. Although capturing images with “raspistill” and serving them out via Web server is perfectly fine, I'd prefer to have an actual video stream coming from the little RPi. Thankfully, there's UV4L.
I had to add a line to my sources.list file in order to download the software, but it was well worth it. Add this to your /etc/sources.list file:
deb http://www.linux-projects.org/listing/uv4l_repo/raspbian/
 ↪wheezy main
And then you'll need to add the key:
curl http://www.linux-projects.org/listing/uv4l_repo/lrkey.asc
 ↪| sudo apt-key add -
Once that is done, simply install the program:
sudo apt-get update && sudo apt-get install uv4l uv4l-raspicam \
uv4l-raspicam-extras uv4l-server uv4l-uvc uv4l-xscreen \
uv4l-mjpegstream uv4l-dummy
And finally, you can add a line like this to your crontab that will turn your RPi into a streaming IP camera! These are just the settings I use; check out the man pages for your options:
@reboot /usr/bin/uv4l -nopreview --auto-video_nr --driver
 ↪raspicam --encoding jpeg --quality 90 --metering matrix
 ↪--drc low --width 1280 --height 720 --framerate 10
 ↪--server-option '--port=9090' --server-option
 ↪'--max-queued-connections=10' --server-option
 ↪'--max-streams=5' --server-option '--max-threads=15'
Browse to raspberry.pi.ipaddress:9090 to see the various things UV4L provides.
