Firewall configurations with Guarddog
The Watchdog
by Holger Junge
Firewall configurations with GuarddogThe Watchdogby Holger Junge |
|
The IPChains (Linux 2.2) and IPTables (Linux 2.4) tools configure the Linux firewall, but these command-line tools can be slightly cryptic for Linux newcomers. Simon Edwards developed Guarddog [1] to simplify the task of firewall configuration. Guarddog is a GUI-based configuration utility for managing firewalls. The Guarddog utility is licensed under the GPL and runs on either KDE 2 or KDE 3.
Users can download the stable version 2.2.0 at [2]. Besides the sources, the site has ready-to-run binaries for Mandrake, Red Hat, and Debian. If you want to try out the latest features, try version 2.3.2 from [2]. But before you do, check out the pros and cons in the "For the Brave" box.
Guarddog is primarily designed for home or private network use. Although vendors such as Red Hat, Mandrake, and Suse have simple GUI-based firewall tools, these tools often lack granularity. Power users who require a more detailed setup may prefer to use Guarddog on these distributions.
Inexperienced users need to be very careful when setting up a firewall with Guarddog. The ability to point and click within the GUI often leads users to allow more ports than necessary. At the other extreme, it is quite easy to "harden" a machine to an extent where some services become unusable.
Also, Guarddog is a KDE application and should not be running on a server machine in the traditional sense of the word. If you have a dedicated server on your LAN, it makes sense to create a Guarddog configuration on a desktop computer and copy the resulting script to the server.
Because Guarddog is based on IPChains or IPTables, users need to ensure that the necessary kernel modules are actually available on the server. Most distributions take care of this automatically. If your distribution doesn't, you may need to re-compile the kernel to include IPTables or IPChains.
Guarddog uses protocol-oriented filter commands. Users do not need to specify port numbers, which helps to avoid configuration errors. Guarddog also supports machine groups, or zones, and this gives users the option of setting up a demilitarized zone (DMZ).
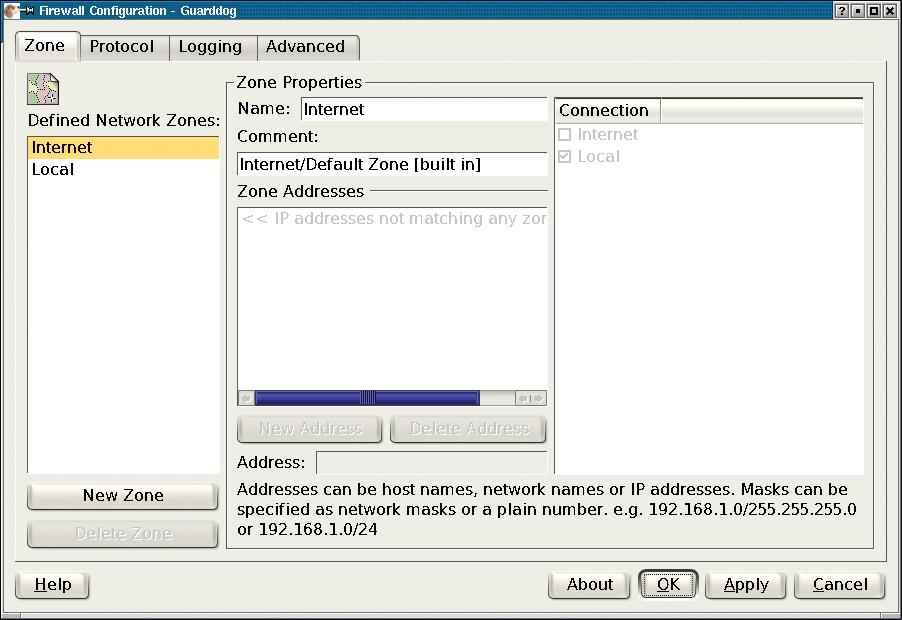
You must launch Guarddog with root privileges to allow the program to apply the firewall rules. Figure 1 shows Guarddog immediately after launching. Unfortunately, the GUI for Guarddog is not very intuitive in parts. The Guarddog GUI has four tabs. The first of these tabs, the Zone tab, allows users to group computers into zones.
Zone properties expects IP address or address range entries for the zone. There are two preconfigured zones called Internet and Local that the user cannot delete. The Internet zone automatically includes any IP addresses that are not included in any other zone. Local includes the addresses of the local network adapters. A standalone system will be fine with just these two zones.
| For the Brave |
|
The current developer version of Guarddog is 2.3.2. There are a few drawbacks to using this version in production environments. On the upside, the brave can look forward to a few new features. Version 2.3.2 supports port areas for user-defined protocols. The developers have also modified the version to support Linux 2.6 and added several new protocols to the list, such as RSync, Distcc, GKRellm, Bittorrent, PGP Key Server, Jabber over SSL, and the Microsoft Media Server protocol. |
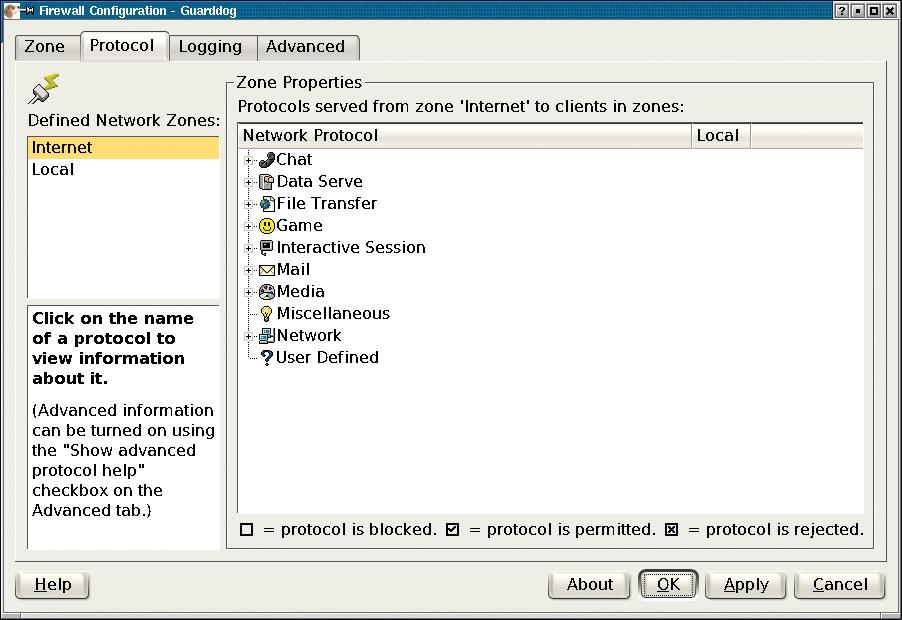
You can use the Protocol tab (Figure 2) to allow or deny specific protocols. The tree structure on the right hand side of the window organizes protocols by category. DNS is typically the first service you need to allow. The DNS entry is located in the Network category. Clicking the DNS - Domain Name Server checkbox puts a checkmark in the box to indicate that the service is allowed. (Make sure you enable the changes by clicking Apply.) If you click the checkbox again, the checkmark toggles to an X to indicate that the firewall will explicitly deny connections that use this protocol. An empty checkbox indicates that the firewall will ignore any requests for the port.
HTTP, the FTP protocol (in the File transfer category), and the SMTP and POP3 mail protocols are other frequently required protocols.
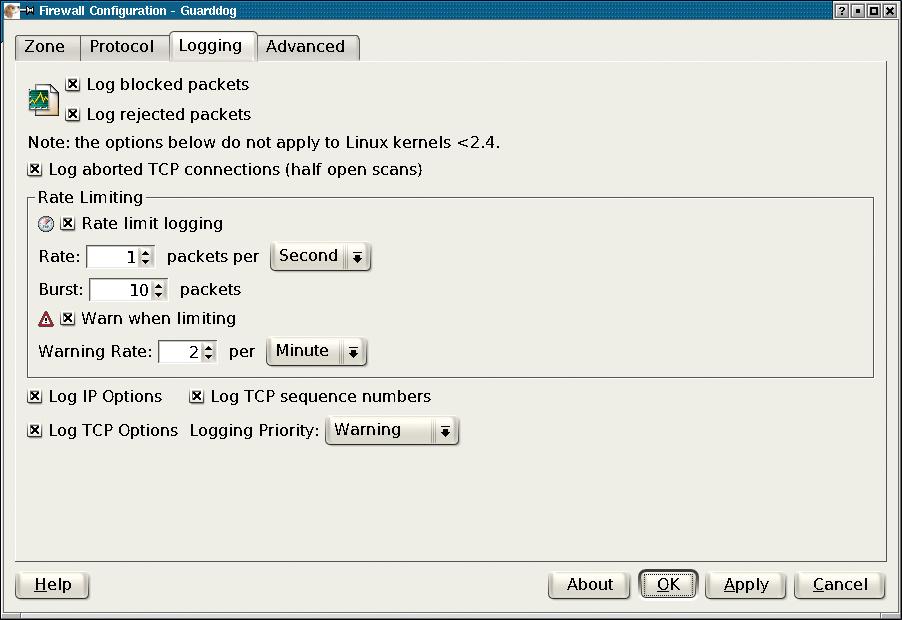
The Logging tab (see Figure 3) provides detailed options for Guarddog logging in the syslog. Logging gives users a tool for detecting port scans. Guarddog users can set the logging rate to restrict the number of entries in the firewall logs. A limit for the maximum number of entries will help you avoid potential denial of service attacks, which are sometimes caused by an IP packet storm that fills up the syslog and overloads the hard disk.
If you need details on all incoming IP and TCP packets, you can select the option to log all packets and TCP sequence numbers at the bottom of the window.
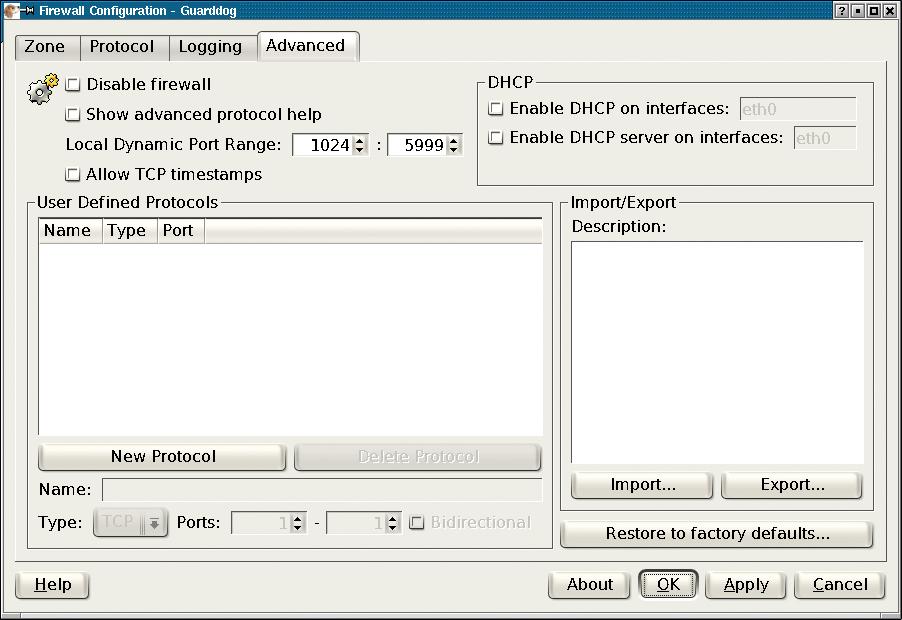
The Advanced tab (see Figure 4) gives experienced admins options for fine tuning the firewall to reflect their needs. If something goes wrong, don't worry: you can always click on Restore to factory defaults... to restore the default Guarddog settings. The defaults for Local Dynamic Port Range are fine in most cases. They specify the port range Linux is allowed to use for outgoing connections.
If you are missing a protocol in the Protocol tab, you can click New Protocol and then type the protocol name, state whether the protocol speaks TCP or UDP, and specify the port numbers the protocol uses.
Guarddog has a useful option for importing and exporting firewall scripts created with the Guarddog tool. Guarddog can export the current settings to a simple shell script and store the script below /etc/rc.firewall. Because servers do not typically run KDE, admins can simply click the Export button to export a script, copy the script to the server, and run the script on the server.
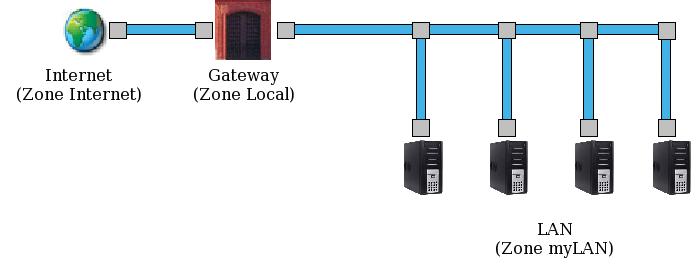
Of course, Linux firewalls are not typically used to protect standalone systems, but are, instead, used as part of the security structure for a complete network. In this case, the Linux computer acts as a gateway and has two network interfaces, one facing the Internet, and the other facing the internal network (see Figure 5). It is quite simple to set up Guarddog for this scenario, however, you do need a system with kernel version 2.4. You also need to set up IP masquerading before deploying the firewall. Guarddog can't help you with this step, but the Guidedog tool at [4] can.
The first step is to create a new Guarddog zone for the local network. To do so, click New Zone in the Zone tab. You can call the zone "LAN," for example. Then click New Address to set the IP addresses, such as 192.168.1.0/24. Now click on Internet and Local below Connection to ensure that the LAN is connected to the Internet and the local computer.
Select the Internet in the Protocol tab and check the boxes for the required protocols in the LAN column. Finally, click Apply to store the settings in /etc/rc.firewall and launch the firewall.
| Info |
|
[1] Guarddog: http://www.simonzone.com/software/guarddog [2] Download: http://www.simonzone.com/software/guarddog/#download [3] Online Manual: http://www.simonzone.com/software/guarddog/#manual [4] Guidedog: http://www.simonzone.com/software/guidedog/ |
| The Author |
|
Holger Junge works for Lifemedien, where he looks after Linux domain hosting servers, Web servers, MySQL database servers, and Oracle databases. |