Working with Software Suspend
Deep Soft Sleep
Simon Rutishauser
Working with Software SuspendDeep Soft SleepSimon Rutishauser |
|
The theory behind Software Suspend is simple: Linux writes the memory content, and other memory buffers such as the graphics memory, out to the swap partition, and then switches the computer off. The next time the computer boots, Linux checks the swap partition, discovers that the computer operating system was not shut down in the normal way but was, instead, stopped by Software Suspend, and restores the memory from the existing files. The approach mainly ignores the BIOS and its power management system, so there is no need to worry about BIOS errors. This is good news for users whose computers do not support internal APM or ACPI-based suspend.
In a perfect world, software suspend would work perfectly - wouldn't it be great if life were that simple? The biggest obstacle for the operating system is capturing the memory data. To do this, Linux needs to launch a new process that actually changes the memory content. In other words, the system needs to be in as stable a state as possible before you put it to sleep. And there are some drivers that refuse to cooperate (for instance, the NVidia and ATI graphics adapter drivers).
At this time of writing, there are actually three different software suspend solutions rather than just one. They all originated with the same project and are all based on the same principle.
Software Suspend (Swsusp), the original, is implemented in kernel 2.6, which removes the need for time-consuming installation. On the downside, it needs an ACPI-capable BIOS.
The PMDisk project was forked from swsusp to add a few enhancements. PMDisk is also in kernel 2.6. The advantage PMDisk offers is that it does not need ACPI. The kernel team merged the advances made by both projects under the original name of Swsusp [1].
Software Suspend 2 (Swsusp2) [2] is another enhanced Swsusp version. Just like PMDisk it does not rely on a BIOS-based power management system, and it has a few extra features. For example, it saves space by compressing the memory file. Instead of using the swap partition, it can use a swap file on a data partition. Additionally, Swsusp2 works with multiple CPU systems. On the downside Swsusp2 is not included in the plain vanilla kernel and that means manually patching and rebuilding your kernel.
The question is: which of these three software suspend systems is the right choice for you? The kernel-integrated tools are definitely the easier options, as they remove the need to patch and rebuild the kernel. However, as none of the three systems is really mature, you may find that your preferred software suspend tool does not support your choice of hardware; so the whole process involves some trial and error.
All three software suspend systems assume that your swap partition is big enough. Twice your computer's RAM size should give you a big enough safety margin. Fortunately, your computer should not crash if it runs out of space, but should simply quit the suspend process.
Kernel 2.6 includes swsusp by default, but not all distributors actually enable the option in the kernel they provide. Suse and Mandrake enable swsusp, whereas Debian and Fedora users will need to fire up their compilers. You need to enable the CONFIG_SOFTWARE_SUSPEND option below Power management options (ACPI, APM) and build a new kernel. Also, note that swsusp needs ACPI.
You also need to add a parameter to your boot loader. Assuming that you use grub, which is now the standard boot loader for Suse and most other distributions, you need to edit the /boot/grub/menu.lst file. Locate the kernel line for the kernel you typically use, and add resume=/dev/hdaX, replacing /dev/hdaX with your swap partition, for example /dev/hda6. You can type fdisk -l /dev/hda | grep swap to identify the swap partition for your system.
Just to be on the safe side, copy the complete entry, and create a new menu entry in your boot menu. Assign a different name to this entry, for example, by adding noresume in the title line. Now delete the resume parameter in the kernel line of the new entry, and add pmdisk=off noresume noresume2 instead. This entry will allow you to reboot your system if it fails to resume correctly after entering suspend mode. After we completed the changes, the content of /boot/grub/menu.lst was as shown in Listing 1.
The first entry is the one we need when we reboot (this is the SuSE Linux entry on our lab system). The entry boots the computer normally and resumes after software suspend. The second entry, SuSE Linux noresume, is our life-jacket just in case things go wrong. Swsusp does not actually need the pmdisk=off and noresume2 options; they do the same thing as noresume for the other two software suspend systems.
On Suse, the powersave program will handle power saving by default, but not swsusp. To change this, you need to locate the /etc/powersave.conf file and change the entry for POWERSAVED_DISABLE_USER_SUSPEND from yes to no.
Just in case things go wrong, it makes sense to enter single user mode; so type init 1 to go there. Now type your root password before putting the machine into suspend mode. On Suse you need to type /etc/init.d/powersaved start to launch the powersave daemon, and then enter powersave --suspend. Other distributions will be quite happy with a single command: sync && echo 4 > /proc/acpi/sleep.
If this test works out okay, keep working your way up through the runlevels, starting with multiuser mode without the GUI (init 3). Debian users will need to use init 2 instead; stop the GUI-based login manager manually by typing /etc/init.d/kdm stop, assuming you use KDM.
If this test also works out, type init 5 and repeat the process with the GUI; Debian users can launch the login manager again by typing /etc/init.d/kdm start.
If you are just running the GUI without memory-intensive applications, your computer should take somewhere in the region of 10 to 20 seconds to suspend and about 30 to 40 seconds to resume. These delays can vary depending on your computer's speed and how much memory it is using when you enter suspend mode.
Just like swsusp, PMDisk was introduced with version 2.6 of the standard kernel. The major difference between the PMDisk project and swsusp is that PMDisk does not rely on ACPI, which is good news for computers that use APM. Also, PMDisk often works on computers that have ACPI but will not enter suspend mode using swsusp.
| Listing 1: Grub Menu List |
|
01 title SuSE Linux 02 kernel (hd0,1)/boot/ vmlinuz root=/dev/hda2 vga=791 resume=/dev/hda6 03 initrd (hd0,1)/boot/initrd 04 05 title SuSE Linux noresume 06 kernel (hd0,1)/boot/vmlinuz root=/dev/hda2 vga=791 pmdisk=off noresume noresume2 07 initrd (hd0,1)/boot/initrd |
Because PMDisk is a close relative of swsusp, there is very little difference in the way the programs are used. Most distribution kernels have the required functions by default. On Debian, you need to enable the CONFIG_PM_DISK option and then build a new kernel.
Then go on to edit the boot manager file, /boot/grub/menu.lst, just like for swsusp, but using pmdisk=/dev/hdaX instead of the resume option:
title           SuSE Linux
kernel          (hd0,1)/boot/U
                  vmlinuz root=U
                 /dev/hda2 vga=U
                    791 pmdisk=U
                    /dev/hda6
initrd          (hd0,1)U
                   /boot/initrd
Add a safe pmdisk=off like the one described previously in the section on swsusp.
You can now type sync && echo -n "disk" > /sys/power/state to enable PMDisk. The sync command is included for safety reasons; it puts the data in a temporary file on your hard disk, just in case your computer crashes when you enable PMDisk.
Software Suspend 2 [2] is also based on the original software suspend, although it has many new features. Instead of writing to the swap partition, Software Suspend 2 can store the memory data in a file on your file system; it compresses the memory data before storage; and it supports both multiple CPU systems and systems with more than 1 Gigabyte RAM. swsusp2 can even handle encrypted swap partitions.
Software Suspend 2 includes some advanced features under the hood. For example, swsusp2 uses so-called freezers, which support more reliable execution of the hibernation process under heavy load. Additionally, the program removes superfluous data from the memory cache to save space on the swap partition.
Unfortunately, Software Suspend 2 has not made its way into the official kernel 2.6 thus far. To use swsusp2, you need to patch the kernel source code and then rebuild your kernel.
Kernel patches for Software Suspend 2 are available at the Software Suspend web site [2]. You'll find the latest patch, as well as older versions.
Distributions that use a modified kernel can be tricky, as distribution-specific changes often conflict with the swsusp2 patch, so it makes sense to base your experiments on the plain vanilla kernel. The following description is based on the version 2.6.8.1 kernel, which you will find (among other places) on the November, 2004 Linux Magazine DVD .
Working as root, change the directory to /usr/src/ and unpack the kernel first by typing tar xjf linux-2.6.8.1.tar.bz2. Then type tar xjf software-suspend-2.0.0.105.tar.bz2 to unpack the swsusp2 patch.
Now add the patch to the original kernel. To do so, change to the /usr/src /linux-2.6.8.1/ directory and enter ../software-suspend-2.0.0.105-for-2.6.8.1/apply. The script gives you the option of adding a few extras. Most of these extras are unnecessary, so you can typically accept the default settings by pressing [Enter]. If everything works as planned, the output you see should be similar to the output in Listing 2.
The next step is to configure the new kernel. To use your current settings, copy the configuration file for your current kernel to the new kernel directory by typing cp /boot/config-X /usr/src/linux-2.6.8.1/.config. Make sure that you replace the X with the name of your current kernel version.
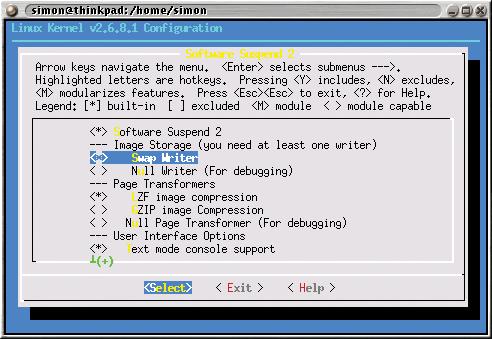
Then go on to modify the configuration to suit your needs. If you have installed the ncurses-devel or ncurses-dev packages, typing make menuconfig will take you to a text-based, menu-driven configuration system. Use the arrow keys and [Enter] to navigate the items. Select the menu entry for Power management options (ACPI, APM) and disable the Soft- ware Suspend (EXPERIMENTAL) and Suspend-to-Disk Support entries by pressing the [n] key; these entries are for the other software suspend systems.
Below these entries, you should see the Software Suspend 2 menu. Press [y] to enable the Software Suspend 2, Swap Writer, LZF image compression, Text mode console support and Compile in debugging output entries. The last of these options provides more comprehensive debugging output (Box 1), and this can be useful for troubleshooting. Assuming that you do not want to modify anything else, now press [Alt+e] three times to quit configuring the kernel.
To build the kernel you just configured, now enter make bzImage && make modules modules_install. Depending on your processor speed and the configuration, this may take a few hours. When you are done compiling the kernel, copy the new kernel to the boot /boot/ directory: cp arch/i386/boot/bzImage /boot/vmlinuz-suspend2.
Then type mkinitrd to create an initial ram disk for your new kernel; that is, unless you have built all the drivers you need to read the root file system into your new kernel.
You need to add a new boot loader entry to boot the new kernel; if you use grub, add the following lines to /boot/grub/menu.lst, making sure that you modify the partitions to reflect your system setup:
title     SuSE Linux - U
              Software SuspendU
              2.0.0.105
kernel        (hd0,1)/boot/U
              vmlinuz-U
              suspend2 root=U
              /dev/hda2 vga=791U
              resume2=swap:U
              /dev/hda6
initrd        (hd0,1)/boot/U
              initrd-suspend2
Our example uses the /dev/hda2 partition as the root file system. In grub-speak, this partition is referred to as hd0,1, where hd0 is the first hard disk, that is hda, and the 1 that follows the comma refers to the second partition, that is hda2. Our swap partition sits on /dev/hda6. We used Suse conventions for the menu entry names, although you can type whatever you want in the title line. If you followed the example, you should have an entry for SuSE Linux - Software Suspend 2.0.0.105 in your boot menu when you boot the new kernel.
| Listing 2: Software Suspend 2 apply script output |
|
01 /usr/src/linux-2.6.8.1 # ../software-suspend-2.0.0.105-for-2.6.8.1/apply 02 Apply KDB patches (for serious debugging capabilities) [yN]? 03 Apply Bootsplash patches (includes bootsplash.org patch) [yN]? 04 Apply Win4Lin support patches [yN]? 05 Applying 20-software-suspend-linux-2.6.8.1-rev1-whole ... 06 Applying 21-software-suspend-linux-2.6.8.1-rev2-incremental ... 07 Applying 21-software-suspend-linux-2.6.8.1-rev3-incremental ... 08 Applying 30-software-suspend-core-2.0.0.104-whole ... 09 Applying 31-software-suspend-core-2.0.0.105-incremental ... 10 All happy! |
The Software Suspend site [2] also provides the Hibernate package. Hibernate contains configuration files and the hibernate script, which initiates suspend mode. Working as root, type rpm -Uvh hibernate-0.98-1.i386.rpm to install; on Debian, type dpkg -i hibernate_0.98-1_all.deb.
We need to take a look at the Hibernate script configuration file in /etc/hibernate/hibernate.conf to ensure that Software Suspend 2 will work as we expect it to work. In most cases, you can just stick to the default configuration values. But you might like to add the following lines:
RestartServices hotplug
StopServices alsasound
StartServices aumix
LeaveXBeforeSuspend yes
The RestartServices hotplug line tells the hibernate script to stop the hotplug service before suspending, and restart the hotplug service after resuming; this means that devices such as USB mice and keyboards will work fine after resuming. The next two lines stop the sound system before suspending and restore the volume settings after resuming. And finally, LeaveXBeforeSuspend tells the system to switch to a text-based console before suspending and reenter the GUI after resuming. Without these options, we experienced a number of issues with window displays and the keyboard.
After completing these steps, it's time to launch the test. Type init 1 to enter single user mode. Then type hibernate to enter suspend mode. If all goes well, your system should return to the same state on resuming. Then follow the procedure we described previously to run hibernate in multiuser mode without the GUI, and finally with the GUI.
You need root privileges to enter suspend mode, although non-privileged users could benefit from the ability. To permit non-privileged users to use a machine's suspend and resume capabilities, first install the sudo package, if you need it - most distributions include sudo by default. Working as root, modify the /etc/sudoers configuration file as follows:
User_Alias USERS = U
 simon, whoever
Cmnd_Alias HIBERNATE = U
/usr/sbin/hibernate
USERS   ALL=NOPASSWD:U
HIBERNATE
This change allows the users simon and whoever to launch /usr/sbin/hibernate by calling sudo /usr/sbin/hibernate without entering a password.
| Box 1: Troubleshooting Software Suspend |
|
A number of issues can prevent software suspend from working, and most of them are not system-specific. If the suspend process quits, or if your machine freezes, type free to check if you have enough free space on your swap partition; you may need to reboot before you can do so. If free swap space is not your problem, check the boot parameters to see if you have entered the correct partition for resume. If your machine fails to resume the result can be an unusable swap partition; in this case the partition will not be shown as free. To reformat and re-enable your swap partition, type mkswap /dev/hdaX, followed by swapon /dev/hdaX. Low-level kernel modules are another potential source of errors. To check if this is the case, type init 1 to enter single user mode. Then enter lsmod to display the list of active modules, and remove as many of them as you can by typing modprobe -r. The usual suspects are the sound, USB, and AGP modules. The dmesg output after an unsuccessful suspend attempt often tells you more about the reason for the failure. If Software Suspend 2 freezes after displaying the progress indicator on screen, pressing [Esc] will typically abort the suspend process and take you back to the running system. If dmesg does not tell you anything about the error, you might want to enable the integrated debugging function, as follows:
thinkpad:~# cd /proc/software_suspend
thinkpad:/proc/software_suspend# echo 3 > default_console_level
thinkpad:/proc/software_suspend# echo 1 > log_everything
thinkpad:/proc/software_suspend# echo 7 > debug_sections
thinkpad:/proc/software_suspend#echo 1 > pause_between_steps
Then type the following command to launch the suspend process:
sync && echo 1 > /proc/software_suspend/do_suspend This gives you verbose screen output, where you can press the space key to confirm at each step. Armed with individual error messages, you can now surf to the swsusp2 homepage at [2] and check the FAQ, the Wiki, the mailing list archives, and the remaining documentation for an answer. If Software Suspend works in single user mode, but not at your normal runlevel, you should attempt to locate the service that is causing the error. To catch the culprit, first stop whichever service you suspect is causing the issue: e.g., type /etc/init.d/alsa stop if you suspect alsa. If this initial attempt fails, keep stopping individual services and relaunching suspend mode until you find the culprit. Of course, you may not be able to identify a single service that causes software suspend to crash; in this case, a kernel module may be to blame. Type lsmod to list the enabled modules, and - working as root - start removing them one by one by typing rmmod modulename. If a piece of hardware, such as a sound card or USB device, fails to resume with the rest of the system, you can stop the device before entering suspend mode. Working as root, stop the daemon and remove the appropriate kernel module. After resuming, you will need to restart the daemon or load the module using modprobe. If you are unable to load a module after resuming, you can try building the module into the kernel. In the case of Software Suspend 2, dropping down a version may help, as the project is still at the development stage. Version 2.0.0.93, in particular, introduced major changes in comparison to previous versions. Some laptops work more reliably after the changes, but your hardware may be happier with an older version. If issues persist despite all of these workarounds, you might have more luck with one of the other software suspend implementations: if not, try writing to one of the mailing lists. |
| Info |
|
[1] The future of Swsusp and PMDisk: http://kerneltrap.org/node/view/3485 [2] Software Suspend 2: http://softwaresuspend.berlios.de |