Setting up SuxPanel
Desktop Sideboard
Andrea Müller
Setting up SuxPanelDesktop SideboardAndrea Müller |
|
A sideboard or panel groups a collection of practical desktop extensions like a clock and a start menu. The major desktop environments, such as KDE and Gnome, have a panel by default, but users of more simple window managers often need to add a panel. SuxPanel [1], by Leandro Pereira, has an amazing list of features, including an extended clipboard, plug-in support, and automatic menu generation.
SuxPanel has no RPM or Debian packages at this time, so you will have to build the panel from the source code. To build SuxPanel from the source, you need gtk2 version 2.0 and the matching developer package. Most distributions add a -devel<$> or -dev<$> tag to help you identify the developer packages. Unpack the suxpanel-0.3.tar.bz2 archive file, and change to the directory created by this step, suxpanel-0.3. Then type the following commands:
./configure
make
su -c "make install"
to build and install the panel. The install command copies the panel to the directory tree below /usr. There is no way to change this, not even if you run ./configure with the --prefix=/other/installation/directory<$> parameter set. If you want to remove SuxPanel later, you will need to manually delete the executable, /usr/bin/suxpanel, and the /usr/share/suxpanel directory.
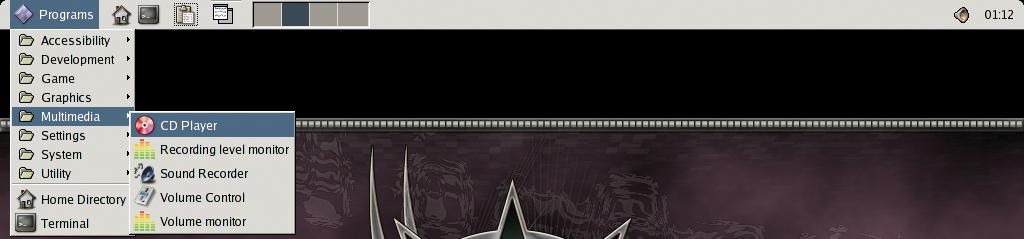
Before you launch your new panel for the first time, you will need to run the suxpanel-install.sh script in the source code directory to create a user configuration in ~/.suxpanel. When you run the script, it will not only create a configuration file with default settings, but it will also check the /usr/share/applications folder for Gnome desktop entries. It creates an entry in the SuxPanel start menu for any files ending with .desktop. If you have installed Gnome, this gives you a head start with a good selection of programs (Figure 1).
Suse Linux users are out of luck. Suse installs Gnome programs in /opt/gnome, where suxpanel-install.sh will not find them. The good news is, you can use an editor to modify the script, allowing it to discover the Suse Linux start menu entries. In lines 75, 81, 87, and 107, replace /usr with /opt/gnome. Do not change the other instances of the /usr string, as they refer to SuxPanel and its plug-in directory.

After running the setup script, you can launch the panel by typing suxpanel. The panel will set up shop at the top of your screen (see Figure 2) and load the plug-ins supplied by the program's author. On the far left, you will see two quickstart icons for a terminal window and a file manager. The target application for the file manager depends on what suxpanel-install.sh discovered on your box. It looks for Rox first, before going on to look for Nautilus, Konqueror, and gmc (the Gnome Midnight Commander). It uses the first match as the default file manager.
The clipboard (hiding behind the clipboard symbol) is particularly useful. You can hold down the left mouse button when selecting a section of text to store the text in SuxPanel. The text is not replaced if you select something else; instead, the panel saves up to six blocks of text. To insert a block of text, click on the clipboard icon, select the required entry, and then press the center mouse button.
To the right of the clipboard, the panel has a list of active windows. As window managers use different approaches to managing windows, this will not work on any desktop. Whereas fvwm, icewm, and kwin show you all application windows, blackbox, fluxbox [2], and window maker show nothing at all. Your best approach is to check and see if the task list plug-in works with your window manager.
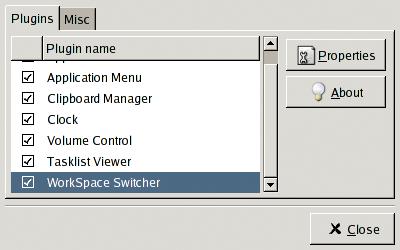
There are similar issues with the pager, which does not let you switch virtual desktops under Window Maker. The pager works fine with blackbox and its derivatives, fluxbox and openbox, but it does need a little help to get started. Open the configuration dialog box by selecting Settings in the panel context menu. Then select WorkSpace Switcher and click on Properties (Figure 3). In the dialog box that appears, change the setting for the number of virtual desktops. You need to do this even if you happen to work with four desktops - the default pager setting. Change the value to 3 and then back to 4. After this push in the right direction, blackbox and its derivatives will switch virtual desktops at the click of a mouse.
The clock and the volume control share a spot on the right of the panel. Clicking the mixer pops up a slide controller that sets the volume. Don't be surprised if the control does not disappear when you make a change: SuxPanel waits for five seconds before closing the mixer.
If you cannot get the window list to work, you might like to disable the plug-in. There is no way of disabling the plug-in in the configuration dialog at present. You cannot remove the checkmarks in the plug-in checkboxes. But there is a workaround to this problem via the ~/.suxpanel/modules.ini text file. This file has the path to a plug-in in every line; the line for the window list looks like this:
l=/usr/share/suxpanelU
/plugins/sux-tasklist-applet.so
To disable the module, delete the line from modules.ini. The l= and r= prefixes specify whether the plug-in will launch on the left or right side. The first line, which starts with l=, loads the plug-in on the left. To view the program menu rather than the quick start icons, simply move the line with l=/usr/share/suxpanel/plugins/apps.so to the top. It is quite simple to edit the menu. The place to edit the menu is the ~/.suxpanel/apps directory. To add a new category to the menu called Internet, for example, create a directory with this name. Then create a directory below this level for each program you want to group below Internet. For example, you might create a directory called ~/.suxpanel/apps/Internet/Mozilla to add the browser to the menu. Then create a script called AppRun in the Mozilla folder, and add the command to launch Mozilla:
#!/bin/sh
mozilla
Type chmod +x AppRun to make the file executable and ensure that the panel will accept the file as a start script. The next time you launch SuxPanel, you should see a new submenu with an entry for Mozilla. If you want to add an icon for the menu entry, copy an XPM-formatted graphic to the Mozilla folder, and rename the image file to AppIcon.xpm. Instead of copying the icon, you could simply create a link. You'll find a big collection of program icons in the /usr/share/pixmaps folder.
| Info |
|
[1] SuxPanel: http://www.linuxmag.com.br/~leandro/suxpanel/ [2] Andrea Müller: "Opening Pandora's Box: The Fluxbox Window Manager," Linux Magazine #43 / June 2004, p 80 |
| The Author |
|

After nearly two-years as an independent journalist, Andrea Mueller works as a new editor for the Linux New Media AG. When she is not taking care of articles or wrapping packages for the EasyLinux download area, she looks beyond Linux and is involved with other operating systems like QNX, BeOS and NetBSD. |