Testing USB WLAN Adapters
USB Radio
Marcel Hilzinger
Testing USB WLAN AdaptersUSB RadioMarcel Hilzinger |
|
The new year is upon us, and it is far too cold to sit out in the garden with a laptop, but Wireless LAN adapters are not only designed for outdoor use; they can provide really useful services in your apartment, at work, at the airport, and in many other public WLAN hotspots. WLAN USB sticks, which are no bigger than normal USB memory sticks and will fit nicely in your pocket or purse, have been around for a while now.
There are a few pitfalls to watch out for when buying a USB WLAN stick. In fact, Linux supports very few of the new 54 Mbit sticks, and even older models can cause you headaches.
As the WLAN boom continues, manufacturers and suppliers of USB WLAN sticks keep springing up. This said, the only adapters that will run Linux out-of-the-box are 11 Mbit USB adapters that use the Prism2 chipset. The Netgear MA111 and D-Link DWL-122 devices in our test (see Table 1) are just two examples. You'll find a list of devices supported by Linux-wlan-ng at [1].
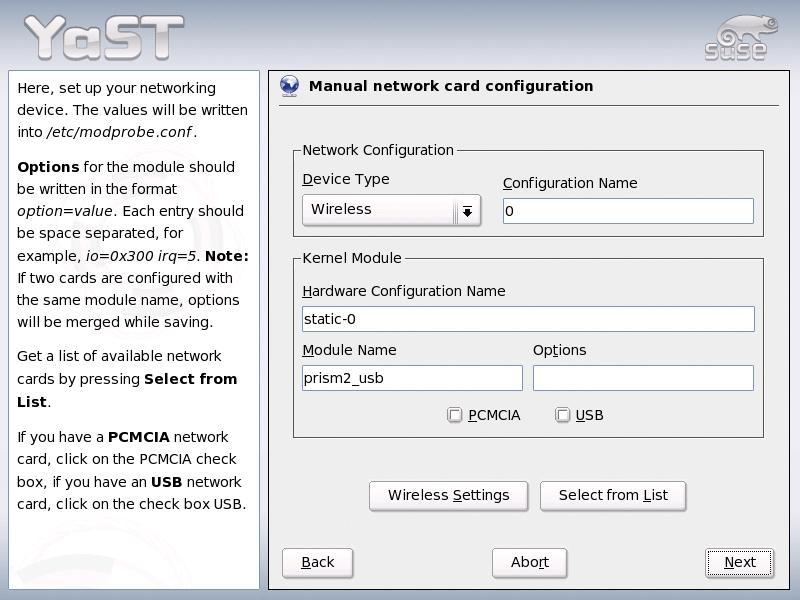
Suse Linux version 9.0 or newer gives you the easiest approach to operating these two adapters. After plugging in the adapter, simply launch the YaST network card setup module, select Other (not detected) and click on Configure.... Select Wireless in the Device type drop-down and then click on the Select from List button on the right. Now select the entry at the bottom of the list Wireless device using kernel module prism2_usb.o and click OK to confirm (see Figure 1). Then click on Wireless Settings and set up the ESSID and operating mode.
To use a public access point (for example, at your local airport) or your WLAN DSL router at home, keep the default selection (Managed). Now you just need to enter the ESSID and click on OK . This takes you back to the Manual network card configuration window. If your access point is also your DHCP server (which is the typical setup), you can simply click Next and then Finish to go surfing. If you do not have a DHCP server, you will need to configure a static network address. Check your access point or WLAN router documentation for more details.
If you just need to connect two PCs directly, select Ad-Hoc mode instead. In this case, you also need to select the communication channel. The Linux-wlan-ng project uses channel 6 by default - a safe choice. In the dialog box where you entered the ESSID, click Expert settings to select a channel from the list. Then click OK and Next to go to the window where you can set up the network address. Select Static address setup and enter the IP address. For example, you could use 192.168.1.1 on one machine and 192.168.1.2 on the other.
A final click on Next should have your USB adapter ready to run. Some distributions expect you to set up the adapter manually. Box 1 tells you how to do that.
| Table 1: USB WLAN Test Candidates | ||||||||
| Name | Manufacturer | Chip | Module | Speed | Linux drivers | Access Point | Ad-Hoc | Price approx. |
| MA111 | Netgear | Prism2 | prism2_usb | 11 Mbit/s | 3 | 3 | 3 | EUR 30 |
| DWL-122 | D-Link | Prism2 | prism2_usb | 11 Mbit/s | 3 | 3 | 3 | EUR 25 |
| DWL-G122 | D-Link | Ralink | rt2570 | 54 Mbit/s | 31 | 3 | - | EUR 55 |
| WL-U356 | Planet | ZyDAS ZD1211 | zd1211 | 54 Mbit/s | 3 | - | - | EUR 40 |
| WG111 | Netgear | Prism Frisbee | ? | 54 Mbit/s | - | - | - | EUR 55 |
| C54RU | Conceptronic | Intersil/Prism | ? | 54 Mbit/s | - | - | - | EUR 30 |
| SMC2862W-G | SMC Networks | Prism Frisbee | prism54u | 54 Mbit/s | 3 | - | - | EUR 50 |
| 1 Drivers not officially released | ||||||||
If the adapter fails to connect at first, you should first type iwconfig to check if the system has actually detected your wireless LAN adapter. Box 2 shows you the kind of output to expect. If the command does not show you a wireless device, type /sbin/lsmod | grep prism to check if the prism2_usb module is loaded. If not, you can try typing modprobe prism2_usb to manually load the module.
The kernel messages when you plug in your USB stick are also quite useful. To read them, working as root, type tail -f /var/log/messages in a terminal window; this allows you to watch the messages in the window while plugging in or unplugging the stick. Systems that support hotplug (such as Fedora, Mandrake and Suse) should load the module automatically when you insert the WLAN stick.
You should also check your firewall. Suse Linux 9.2 or newer launches the firewall automatically when a network device is enabled. You need to set the firewall settings to account for the new device, or disable the firewall initially to make sure that it is not causing any issues.
| Box 1: Setting Up the Prism2_usb Adapter |
|
To set up a USB WLAN adapter with the Prism2 chipset, you need linux-wlan-ng [2] and the wireless-tools [3]. Although most distributions use two packets to store these tools, linux-wlan-ng is part of the wireless-tools on SuSE, and there is no need to install it. SuSE also uses a different approach to setting up the Prism2 USB adapter, so SuSE users are advised to stick to the YaST-based approach. To compile the wireless-tools, first unpack the tar.gz archive, then change to the directory created by unpacking the archive and type make. You will normally want to su to root and type make install to place the tools in /usr/local. If you want to select a different path /usr for example), you will need to edit the makefile. The linux-wlan-ng install follows a similar pattern. In this case, make config launches a configuration dialog where you can select the drivers you need. For the USB stick, say no to the first three questions, and respond to Build Prism2.5 USB (_usb) driver? (y/n) by typing [y] and [Enter]. You can simply press [Enter] for all the other questions. Assuming that the kernel sources are installed, and correctly configured, make will launch into the build process, and make install, working as root, will install the program. After completing the install, add the following line
alias wlan0 prism2_usb to the end of your /etc/modprobe.conf, or /etc/modules.conf (for Kernel 2.4.x), and then type modprobe prism2_usb to load the kernel module. iwconfig should now have a wlan0 entry for the card (see Box 2). To enable the adapter, you still need to edit two files below /etc/wlan/. To allow two wireless cards running in ad-hoc mode to see each other, the cards need both an IP address and a unique network ID, or ESSID. Enter a value for SSID_wlan0 in your /etc/wlan/wlan.conf to handle this (in about line 80), for example
SSID_wlan0="wireless" The next step is to rename the /etc/wlan/wlancfg-DEFAULT file to your choice of ESSID (keeping to our example, this would be wlancfg-wireless), and change line 31 from IS_ADHOC=n to IS_ADHOC=y to use ad-hoc mode. Now launch the WLAN service by typing /etc/init.d/wlan start. If all goes well, you should be able to assign an IP address to your adapter using ifconfig wlan0 192.168.1.1 netmask 255.255.255.0 and then ping the other machine: ping 192.168.1.2. To use an access point, you need to select Managed mode instead of Ad-hoc. In other words, you would need to change the entry in /etc/wlan/wlancfg-wireless back to IS_ADHOC=n. As the access point assigns the channel in managed mode, you also need to enable channel scanning to tell the WLAN adapter to scan the channels. To do so, set the WLAN_SCAN variable in /etc/wlan/wlan.conf to WLAN_SCAN=y. If you know which channel your access point uses, you can delete the channels you do not require from the ChannelList to speed up the scan. |
The only device in the 54 Mbit class that will run with Linux at present is the D-Link DWL-G122. Unfortunately, the driver has not been released at this time of writing. For our Linux Magazine lab, we tested a beta version with kernel 2.6.7. Unfortunately, D-Link does not intend to release a version for kernel 2.4.
You first need to compile the driver by typing make -C /path/to/your/kernelsources SUBDIRS=$PWD modules, then (working as root) load the module by typing insmod rt2570.ko. Finally, enable the WLAN device by typing ifconfig rausb0 up; you can assign a static IP address or use the DHCP client if you have a DHCP server. According to D-Link, the official Linux driver for kernel 2.6 should be up for grabs on the FTP server shortly. Let's hope that the ad-hoc mode issues have been removed by then.
Developers and kernel hackers might like to check out the WL-U356 adapter by Planet and the SMC2862W-G by SMC Networks. There is a Linux driver on the Planet Homepage at [4] for the Planet adapter; the driver will build on kernel 2.4 and 2.6.
After building the driver, by typing make, again working as root, load the zd1211 manually, and enable the interface by typing ifconfig eth1 up. iwconfig should now list the device. In our Linux Magazine lab, this was as far as we got; any attempts to get the stick to talk to our access point or other computers were doomed to failure. The problem was that iwconfig did not allow us to set any other parameters, including the ESSID. Linux Magazine has approached the driver developer, although a reaction has not been forthcoming at this time of writing.
The SMC adapter is another task for the brave at this time. The drivers for the Prism Frisbee based WLAN device are under development and available from [5], along with the firmware. After unpacking the sources, follow the same steps as for the DWL-G122, that is (working as root), type make -C /path/to/your/kernelsources SUBDIRS=$PWD modules, then load the module by entering insmod prism54u.ko. The same thing happens as with the Planet stick. The adapter will be detected when you load the prism54u module, but, if you have the same experience as we did, you will not be able to talk to it.
| Box 2a: iwconfig examples without encryption in ad-hoc mode |
|
01 suse92:/home/marcel # iwconfig 02 lo no wireless extensions. 03 04 eth0 no wireless extensions. 05 06 wlan0 IEEE 802.11-DS ESSID:"wireless" Nickname:"suse92" 07 Mode:Ad-Hoc Frequency:2.442 GHz Cell: 02:0F:DA:B5:C1:3E 08 Bit Rate:2 Mb/s Tx-Power:2346 dBm 09 Retry min limit:8 RTS thr:off Fragment thr:off 10 Encryption key:off 11 Link Quality=0/92 Signal level=-100 dBm Noise level=-100 dBm 12 Rx invalid nwid:0 Rx invalid crypt:0 Rx invalid frag:0 13 Tx excessive retries:0 Invalid misc:0 Missed beacon:0 14 15 sit0 no wireless extensions. |
| Box 2b: iwconfig examples with encryption in managed mode |
|
01 client:/home/otto # iwconfig 02 lo no wireless extensions. 03 04 eth0 no wireless extensions. 05 06 wlan0 IEEE 802.11-b ESSID:"wireless" Nickname:"wireless" 07 Mode:Managed Frequency:2.462 GHz Access Point: 00:09:5B:2D:B8:98 08 Bit Rate:11 Mb/s Tx-Power:2346 dBm 09 Retry min limit:8 RTS thr:off Fragment thr:off 10 Encryption key:3BFA-1658-F26F-65BB-1015-0222-49 Security mode:open 11 Link Quality=92/92 Signal level=-40 dBm Noise level=-95 dBm 12 Rx invalid nwid:0 Rx invalid crypt:0 Rx invalid frag:0 13 Tx excessive retries:0 Invalid misc:0 Missed beacon:0 14 15 sit0 no wireless extensions. |
It makes sense to set up a non-encrypted WLAN connection for test purposes, but in a production environment, a WEP key is imperative. To set up an encrypted connection for the Prism2 USB adapter, you need to edit the /etc/wlan/wlancfg-ESSID file. Use the AuthType variable to specify whether linux-wlan-ng will be using a shared key. However, as this method is more prone to attack, you might prefer to opt for Open mode. Version 0.2.1-pre22 of the tools caused some confusion in our tests. Despite modifying the variable, iwconfig insisted on displaying Security mode:restricted as the mode. Tests with shared keys and in open mode demonstrated that the USB stick was not simply ignoring the variable, however.
Now change the #==WEP== section, as shown in Box 3. The first two variables allow you to specify if the client with be using hardware-based encryption (false) or if the client will use encryption based on the Linux-wlan-ng driver. The software-based variant is supposedly quicker, so set this variable to true. The dot11PrivacyInvoked=true entry enables encryption.
In the next line, specify the encryption key. The program will store a maximum of four decryption keys to allow you to associate with other wireless networks. To prevent your host from accepting unencrypted data, set the dot11ExcludeUnencrypted variable to true; this only works in shared key mode.
The second section indicates the key generation mechanism that linux-wlan-ng will use. By default make install installs the nwepgen tool. The add-ons subdirectory below the linux-wlan-ng source code directory also has the lwepgen and keygen tools, which you can build and then copy to /sbin/ or /usr/local/sbin/. Both of these tools can generate WEP keys, however, they are not compatible with all devices.
If you want to use one of these tools, you need to enter a password below PRIV_GENSTR; the password is used as a seed for generating the key. However, the normal case is to create a password on the access point and simply enter the key below dot11WEPDefaultKey0. Note that you need to enter the key as shown in the example, not in groups of four digits separated with minus signs or colons.
PRIV_KEY128 allows you to opt for the more secure 128-bit or the older 64-bit variant. As some older devices do not support 128 bit keys, 64 bit is the default, however, all the WLAN adapters in our test support 128-bit encryption.
Again, Suse Linux offloads some of this configuration work from the user. You simply need to select the key input type (Passphrase, ASCII or Hexadecimal) and type the encryption key in the text box below the radio buttons. The tools we mentioned previously also help you if you want to use a hexadecimal key; on Suse Linux, these tools are part of the wireless-tools package.
| Box 3: Setting up WEP encryption |
|
01 #=======WEP=========================================== 02 # [Dis/En]able WEP. Settings only matter if PrivacyInvoked is true 03 lnxreq_hostWEPEncrypt=true # true|false 04 lnxreq_hostWEPDecrypt=true # true|false 05 dot11PrivacyInvoked=true # true|false 06 dot11WEPDefaultKeyID=0 # 0|1|2|3 07 dot11ExcludeUnencrypted=true # true|false, in AP this means WEP is required. 08 09 # If PRIV_GENSTR is not empty, use PRIV_GENTSTR to generate 10 # keys (just a convenience) 11 # add-ons/ in the tarball contains other key generators. 12 PRIV_GENERATOR=/sbin/nwepgen # nwepgen, Nessus compatible 13 PRIV_KEY128=true # keylength to generate 14 PRIV_GENSTR="" 15 16 # or set them explicitly. Set genstr or keys, not both. 17 dot11WEPDefaultKey0=3B:FA:16:58:F2:6F:65:BB:10:15:02:22:49 18 dot11WEPDefaultKey1= # xx:xx:xx:xx:xx:xx:xx:xx:xx:xx:xx:xx:xx 19 dot11WEPDefaultKey2= # e.g. 01:20:03:40:05 or 20 dot11WEPDefaultKey3= # 01:02:03:04:05:06:07:08:09:0a:0b:0c:0d |
Although WLAN Stick manufacturers have a wide range of 54-Mbit products on the market, Linux users will need to bide their time and make do with an 11-Mbit device based on the Prism2 chipset. This kind of performance is fine for surfing the Internet. Don't lose hope; the D-Link DWL-G122 is a 54-Mbit USB WLAN adapter that works on Linux, and the drivers are quite advanced.
| Info |
|
[1] WLAN support: http://www.linux-wlan.org/docs/wlan_adapters.html.gz [2] Linux-wlan-ng project: http://www.linux-wlan.org [3] Wireless-tools: http://www.hpl.hp.com/personal/Jean_Tourrilhes/Linux/Tools.html [4] Planet driver: http://www.planet.com.tw/download.php [5] Prism54 USB driver: http://jbnote.free.fr/prism54usb/ |