Safe WLAN Networking with an Encrypted OpenVPN Tunnel
Wireless Secrets
Achim Leitner
Safe WLAN Networking with an Encrypted OpenVPN TunnelWireless SecretsAchim Leitner |
|
WLAN technology is insecure - most people are aware of that by now. The integrated encryption technology is easy to break - or even disable in a worst case scenario. Whereas a malevolent hacker would need physical access to your apartment to sniff data off a wired SOHO network, inquisitive strangers can wardrive the streets armed with laptops and WLAN adapters and easily associate with your wireless network. Signal boosters and special antennas extend the range to several hundred yards.
Despite the risk, wireless networks are here to stay. The ability to surf the Internet with a laptop from your balcony or garden, or to copy files from a desktop PC to a laptop, enhances the user experience. And this is a good thing, assuming you keep to a few basic security rules that take the risk out of wireless technologies.
Before you can decide what kind of protection best suits your environment, you need to take a closer look at how your computers are networked and the kind of traffic the wireless link will be handling. Built-in WLAN protection may be fine for some users, and others deliberately disable any kind of security. If you need more, VPN solutions such as OpenVPN [1] are a good choice - simple to use, but modern and safe. OpenVPN encrypts and authenticates the exchanges between two Linux or Windows computers.
Outside of the SOHO network, the Internet is fraught with the same kind of risks as the WLAN. Attackers can sniff or manipulate data, or inject malevolent content. We need to distinguish between two cases: stand-alone PCs or laptops that use the wireless network and a WLAN router for Web access (see Box 1), and protected SOHO networks where a WLAN is used to extend, or even replace, the wired network (Box 2).
WLAN networks introduce a whole new category of risks: total strangers can use open WLAN access points to gain free access to the Internet. The extent of the damage this can cause depends on what kind of Internet billing system your provider has. If you have a flat rate, you might not mind your neighbor sharing your WLAN to get onto the Web. If you are billed by traffic volume or airtime, sharing your account could really affect your wallet. The way to stop this happening is to enable MAC filtering on your WLAN router, and to additionally use WEP encryption.
Neither of these measures give perfect protection, but at least they give the hacker an extra obstacle and ensure that no one can pretend they just made a mistake or thought the WLAN owner didn't mind sharing his or her Internet account. Make sure that MAC filters and WEP are enabled at all times; not having them is an open invitation to malevolent hackers, scroungers, and spies.
More protection means a lot more work, but at least WEP has a designated successor now. In late June 2004, the IEEE introduced a more secure standard called 802.11i, also known as WPA-2. Unfortunately, this technology is restricted to newer adapters, and it is difficult to get things right. The new standard specifies a number of techniques, but not all of them are secure. AES-CCMP for encryption and 802.1x for authentication and key management are recommended.
| Box 1: Stand-Alone Computer |
|
The simplest of all scenarios has a stand-alone computer that uses an access point to connect to the Internet (see Figure 1). In addition to the risks that affect legacy wired networks, we have to consider connection hijacking, denial of service, wardriving, or inquisitive neighbors. Users who are paranoid about being hacked will typically view the wireless LAN as a potentially easy attack vector. But random attacks can come from the wild and woolly Web just as they can from the last few yards between your WLAN access point/router and your laptop.
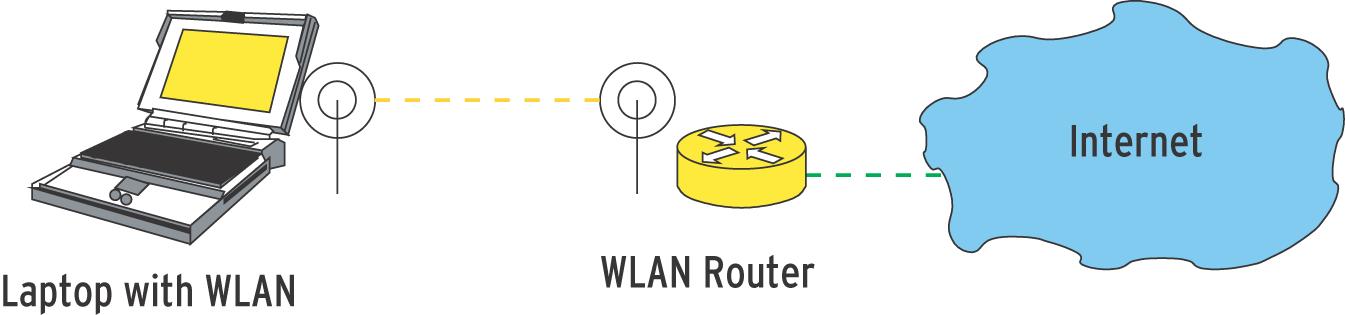
Figure 1: Connecting to the Internet with a WLAN router.It also pays to be slightly paranoid about any kind of data. The only way of being certain that your data has not been manipulated is to use cryptography and prevent unauthorized access. In other words, use SSL/TLS to fetch Web content, and enable SSL protection in your mail client. SSL encrypts and authenticates data during the transmission. To add another layer of security, use PGP or S/MIME. Both of these approaches encrypt the email message, rather than just protecting the data traffic. And use SSH for secure remote logins. |
Linux supports secure and scrounger-free WLAN operations without requiring a new WLAN card. If your hardware does not provide the kind of protection you need, the answer is to add protective software. VPN (Virtual Private Network) protocols encrypt and authenticate data in the IP Layer. A VPN endpoint accepts your data, encrypts and signs the data, and transmits it over the radio link. The receiver-side endpoint unpacks the incoming packets.
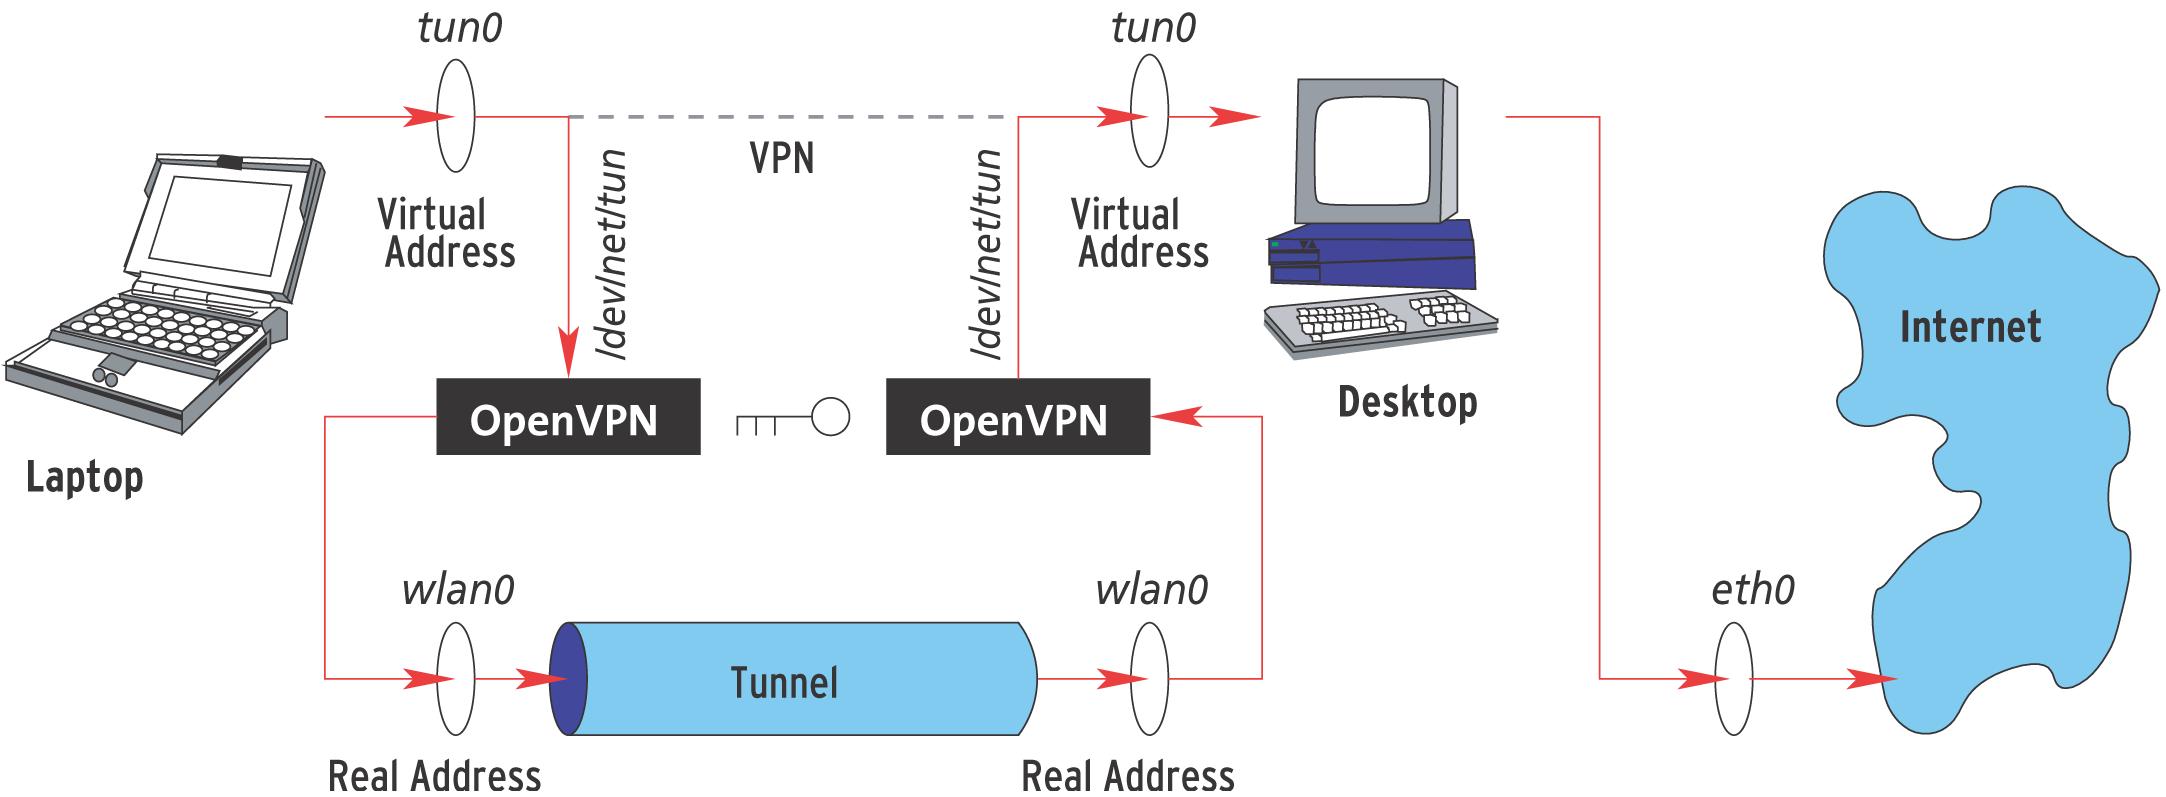
A VPN will use the resources of the traditional WLAN but look like an additional network - a virtual network - from the client's viewpoint. Figure 2 explains the principle: the laptop and the desktop have a WLAN connection. Both are accessible via their real IP address over the wireless network.
The VPN gives the laptop and the desktop additional IP addresses. Data addressed to the virtual address is encapsulated by the VPN and sent to the target's real IP. The target unpacks the data and treats it as if it had reached the target via the virtual address, thus creating a tunnel between the laptop and the desktop.
Firewall rules ensure that both machines only accept data that reaches them via the tunnel. This means that packets injected directly into the WLAN by a malevolent hacker are harmless.
| Box 2: SOHO WLAN |
|
A small office/home office network with a group of computers to protect is far more complex than the stand-alone scenario in Box 1. Networks of this kind typically use a firewall to protect the Internet connection, and users feel safe hidden behind the firewall. Firewalls often prevent any kind of incoming connection from the Internet. But this cosy atmosphere can put people off their guard. The potential dangers include NFS or Samba servers that allow anonymous shared access to private directories, print servers that transfer data in the clear, and Telnet or Rlogin based logins. The assumption is that each computer trusts the network and the computers attached to it. Trust is a dangerous thing in traditional LANs, but far more so in WLANs. The attacker is on the inside of the firewall and can launch insider attacks. In a traditional wired network, a spy or saboteur would need physical access to your apartment to launch an attack. With WLAN, the attacker only needs to be somewhere in the vicinity - wires or wall outlets are no longer necessary. The only way to protect wireless connections against attackers is to use cryptography. The first attempt to standardize cryptography for wireless LANs failed miserably: WEP is simple to break and does not do a good job. However, a VPN allows you to add an extra layer of protection. |
The VPN principle is used by many protocols, products, and projects. OpenVPN [1] is a tried and trusted approach that is stable and simple, and it does without kernel or IP stack hacks. As this program is based on the well-known TLS crypto-protocol, and the implementation is clean, OpenVPN has earned the reputation of being extremely safe.
At both ends of the tunnel, OpenVPN picks up the packets destined for the other side, using a local key to encrypt the packets before sending them. At the receiving end, the data is unpacked and its origin verified. The receiving end will only accept data that has been encrypted using the right key. Other packets are just ignored. Using this approach, data packets are transported in safe containers through a hostile environment.
The following example assumes that wlan0 is the wireless network connection. The desktop computer additionally has a wired NIC, eth0. Other machines on the network and the Internet are accessible via the Ethernet connection (Figure 2).
| Glossary |
|
S/MIME: Secure/Multipurpose Internet Mail Extensions is another approach to encrypting and digitally signing email messages, an alternative to PGP. WEP: Wired Equivalent Privacy was the WLAN developers' first attempt at standardizing a secure crypto-protocol to give wireless traffic the same kind of protection as wired traffic. It soon became apparent that the protocol was faulty and thus insecure. SSL/TLS: Secure Sockets Layer is a crypto-protocol developed by Netscape. SSL is a tried and trusted method for encrypted transmissions. Transport Layer Security is a development that builds on SSL. VPN: Virtual Private Network. Uses an existing network to emulate a different network environment within that network. The VPN software encrypts the data traffic before sending. SSH: The Secure Shell allows Linux users to log on safely to remote computer..The whole session, including the password exchange, is SSH encrypted. PGP: Pretty Good Privacy is used to encrypt and sign email messages. OpenPGP is a standard implementation, and GnuPG a more recent alternative. |
If you have not already done so, install the OpenVPN package before you do anything else (see Box 3). OpenVPN does not modify the kernel. Instead, to be able to reroute data packets, it uses the TUN/TAP driver [4]. The major distributions install the kernel module by default, so you just need to load the module. Working as root, type the following to do that:
modprobe tun
Linux normally does not use device files for network interfaces; that is, there is no /dev/eth0. This may seem inconsistent, but it is unnecessary as the socket interface handles communication. The TUN interface takes advantage of this and breaks the rules by creating a device file, which allows a userspace daemon to snap up the IP packets, repacketize, and forward the packets.
The daemon writes the packets to /dev/tun0 or /dev/net/tun (see Box 3), and they reach the kernel via the tun0 interface. Each packet that the kernel sends to tun0 reaches the daemon via /dev/tun0 or /dev/net/tun (see Figure 2). The interface works like any other normal network interface; you can bind an IP address to it, use it for routing, and apply firewall rules. The only difference is that it does not use the Ethernet card to put data on the wire; instead it uses a device to send data to a process.
OpenVPN needs keys to be able to provide security. In the simplest case, both computer users rely on a shared secret. The following command creates a key and stores it in a file called secret.key:
openvpn --genkey U
--secret secret.key
Only the two machines should know the key, and only root should have read access to it - if you know the key, you can easily break into the tunnel. It is very important to ensure that the key is not sniffed off the wire when you copy it between the two machines. Somebody could be listening in to your wireless link. The best approach is to use a floppy disk; and don't forget to format the floppy properly when you are finished! If you have OpenSSH, PGP, GnuPG, or a similar tool, you can use one of these programs to transfer the file securely.
The next thing is to create the tunnel. To do this, OpenVPN needs the (static) IP address for the target machine, the tunnel device name (which defaults to tun0), both virtual IP addresses for the VPN, and the key file. On the laptop, the command looks like this:
openvpn --dev tun0 --remote U
[Real_DesktopIP] --ifconfig U
[Virtual_LaptopIP] U
[Virtual_DesktopIP] U
--secret secret.key
You need to be root to run this command and all the following commands. On the desktop, the command with the modified IP addresses is as follows:
openvpn --dev tun0 --remote U
[Real_LaptopIP] --ifconfig U
[Virtual_DesktopIP] U
[Virtual_LaptopIP] U
--secret secret.key
The virtual tunnel addresses are more or less arbitrary; but they have to be private addresses. The virtual addresses should be in a different block than the real addresses to facilitate routing and make it easier to distinguish between the virtual and real networks.
Let's assume the WLAN card in the laptop has the real IP address 172.16.0.1 and the desktop has 172.16.0.2. The VPN needs addresses in a private address space, such as 10.0.0.1 as the virtual laptop IP address and 10.0.0.2 for the desktop. In this case, the command on the laptop is:
openvpn --dev tun0 --remote U
172.16.0.2 --ifconfig 10.0.0.1 U
10.0.0.2 --secret secret.key
And on the desktop:
openvpn --dev tun0 --remote U
172.16.0.1 --ifconfig 10.0.0.2 U
10.0.0.1 --secret secret.key
You can use the ping command to test if the tunnel is working. On the laptop, ping 10.0.0.2 should work and indicate that the virtual IP address for the desktop is reachable.
If everything works as planned, you will want to run the OpenVPN daemon in the background; the daemon can output messages via syslog. Use the --daemon<$> option to do this. Note that you need to specify the absolute path to the file with the secret key.
| Box 3: Installation |
|
OpenVPN is quite simple to install. The source code package for the stable version 1.6.0 is available from the project homepage [1] . The following commands unpack the package, build the software, and install the software with root privileges:
tar -xvzf openvpn-1.6.0.tar.gz
cd openvpn-1.6.0
./configure --disable-lzo
make
su
make install
You need to run configure with the --disable-lzo<$> parameter here to disable compression. As the data cannot be compressed after encryption, this library is mainly recommended for slower connections. The library is available from [2]. What you do need is the OpenSSL library and developer files, which are located in two separate packets on Suse: openssl and openssl-devel. Other distributions also contain the OpenSSL packages, or you can check the OpenSSL project site at [3] for more details on obtaining OpenSSL and related components. The current kernel has the tunnel device by default; the packet is available at [4] for older kernel versions. If you build your own kernel, the TUN module is located in the "Network device support" section "Universal TUN/TAP device driver support" of make xconfig. Of course, you can build and install the module without replacing the whole kernel. After configuring the kernel, type:
make modules
make modules_install
The next step is to create the /dev/net/tun device file. If the /dev/net/ does not exist, type mkdir /dev/net/ first, and then create the device:
mknod /dev/net/tun c 10 200 |
Your tunnel is up and the packets are reaching the other side. But your laptop and desktop still need to know what packets they should route over the tunnel. In other words, they need to know the virtual IP address for the other side. The OpenVPN command sets the route to reflect this address. All other addresses are routed as previously - around the tunnel.
The route from the desktop to the laptop will work fine, if you use the new virtual IP address to talk to the laptop. In fact, the old real addresses assigned to the WLAN cards in the laptop and desktop only serve one purpose: they are tunnel endpoints. They are not involved with normal connections apart from this.
The path from the laptop back to the desktop - and from there to the other computers on the wired network and the Internet - needs manual editing. The default route has to be reconfigured. The following command tells the laptop to send all packets through the tunnel:
route del default
route add default gw U
10.0.0.2
Packets that are addressed to the real WLAN IP address of the desktop (172.16.0.2) are not affected by this setting. And that is a good thing, because the tunnel itself uses this address. Now, the desktop just needs to know that it should forward the packets it has unpacked if necessary. The following command takes care of that:
echo "1" > /proc/sys/U
net/ipv4/ip_forward
| Glossary |
|
Private address: Normal, public IP addresses are globally unique. This is the only way to ensure that packets can find their way to destinations. In contrast to this, private IP addresses are only valid on the local network and are not routed into the public Internet. This allows multiple networks to use the same private addresses. The following IP address blocks are assigned to private network use: 10.x.x.x, 192.168.z.z, and 172.16.y.y through 172.31.y.y. |
We are nearly finished on both sides. The laptop and the desktop are happily using the tunnel; your data is protected, and nobody can sniff it. But it is still possible to inject malevolent packets, and this could allow an attacker to share your Internet connection.
Even if you pay for your service using a flat rate account, you may not want to share your bandwidth. All the network services that the laptop and desktop provide (Web, SSH, or FTP servers) can be attacked via the WLAN. And if you operate a network, there is another source of danger: any packets injected into the WLAN avoid the firewall, which typically resides between the Internet and the local network to which the WLAN is attached.
The solution is to provide some form of firewall protection for the WLAN. The OpenVPN distribution [1] has a sample firewall script. But you need additional rules for the WLAN tunnel combination. Figure 3 shows you where these rules apply.
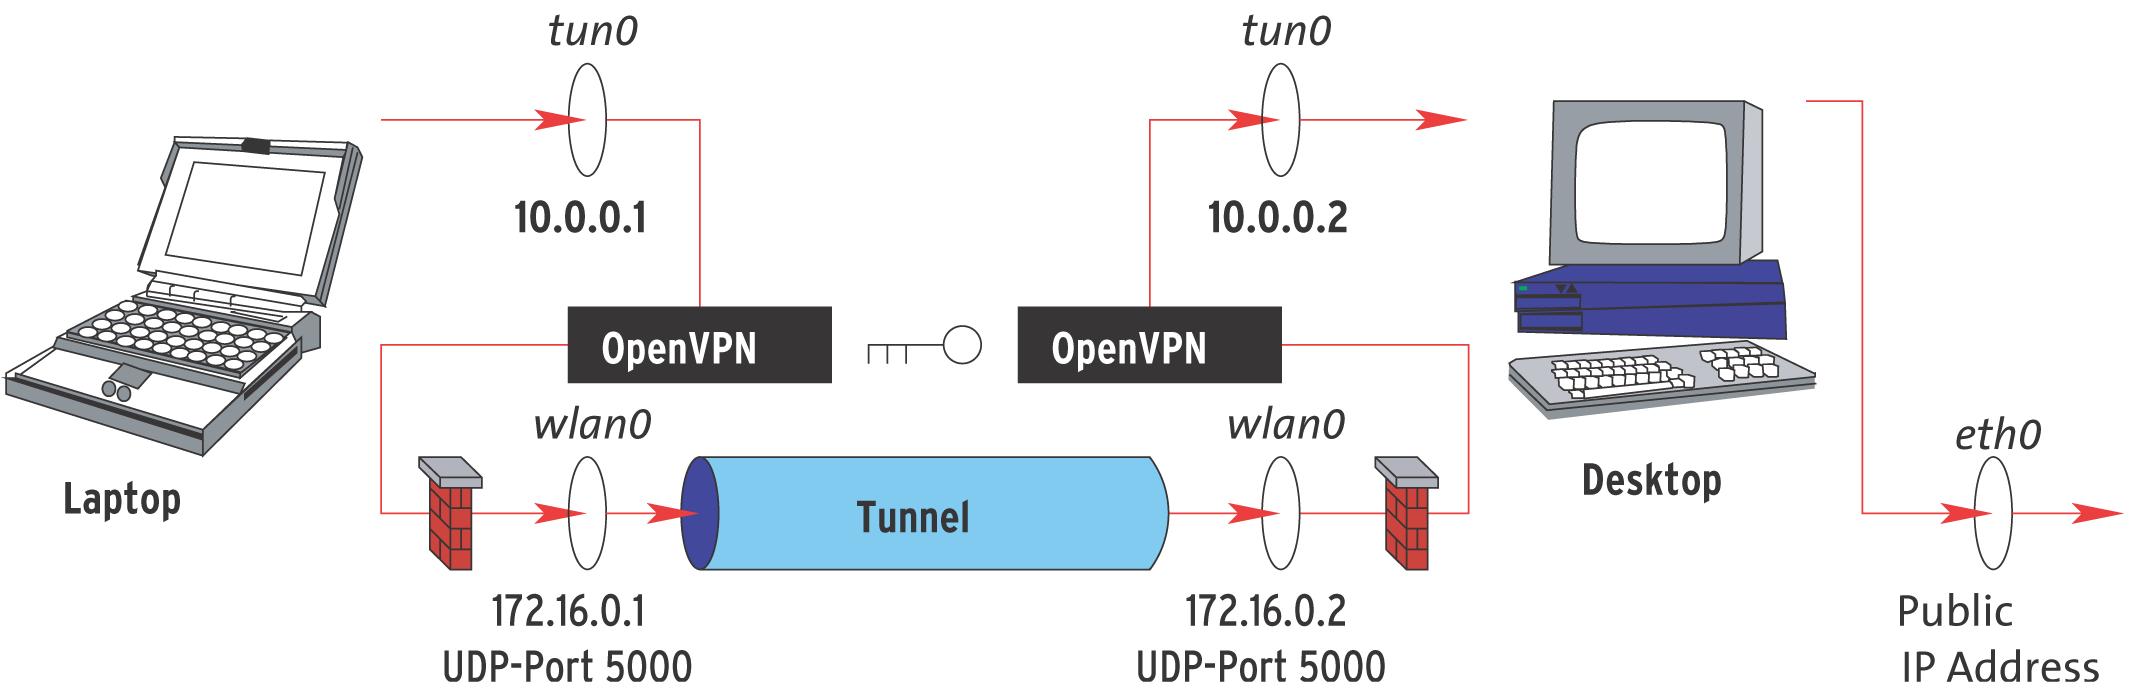
OpenVPN uses UDP to send encrypted packets to port 5000 at the other end of the tunnel. As it uses the WLAN interface wlan0 to do so, you need to allow UDP port 5000 for the interface. The following syntax handles this for incoming packets:
iptables -A INPUT -i wlan0 U
-p udp --dport 5000 -j ACCEPT
iptables -A INPUT -i wlan0 U
-j DROP
The last line ensures that the computer will not accept any other incoming packets. The first input rule could be even stricter and specify -s RealIP<$> to restrict the source IP address, where the packets are allowed to originate. This would need to be the real IP at the opposite end of the tunnel, that is -s 172.16.0.2<$> on the laptop. We also need restrictions on sending and forwarding packets:
iptables -A OUTPUT -o wlan0 U
-p udp --dport 5000 -j ACCEPT
iptables -A OUTPUT -o wlan0 U
-j DROP
iptables -A FORWARD -i wlan0 U
-j DROP
The tunnel endpoints only forward packets that originated with a known partner, and only if that partner has used the right (secret) key. This means you can trust, accept, and process packets that come from a tun device. Of course, we still need to allow the machines to send packets through the tunnel. The following commands enable receiving and sending packets:
iptables -A INPUT -i tun0 -j U
ACCEPT
iptables -A OUTPUT -o tun0 -j U
ACCEPT
That's all we need for the laptop; it does not attach to other networks and does not need to forward packets.
| Box 4: Variety of Functions in OpenVPN |
|
Besides the simple client-to-site VPN shown in our example, OpenVPN can also connect complete sites. Simply change the routing setup to do this. In bridge mode, OpenVPN can even connect two sections of a LAN transparently, allowing them to use the same address space. The shared secret approach described in this article does not scale well if the VPN has multiple nodes. But this is one of the best features of TLS. It is designed for use with X.509 certificates. Version 2.0 (which is currently beta) makes things even easier for admins: you do not need to create a server configuration for each VPN client; all you need are valid X.509 certificates. Additionally, the new server should perform far better under heavy load. In UDP mode, OpenVPN does not distinguish between clients and servers but runs as a peer-to-peer application. Setting the --float<$> option allows the tunnel to carry on running without interruptions even if the real IP address at one end changes, for example, due to a daily forced reset. TCP connections are kept up, which is useful if you need to transfer really big files via FTP. If you need to send large files through the tunnel, you might like to specify the --shaper [bandwidth]<$> option. The option restricts the input speed for the tunnel to a specific number of bytes per second. To restrict the bandwidth in both directions, you need to specify the option at both ends. OpenVPN can open multiple tunnels between two partners at the same time and assign different bandwidths to the tunnels: this could be useful for administrative tasks. Your routing configuration specifies which data is sent through which tunnel. Version 1.5 and newer of OpenVPN also support TCP. If you are sitting behind a firewall that only accepts TCP, you have no alternative but to use this approach. The disadvantage is, if problems occur on the network, the combination of VPN-over-TCP will make things worse. If at all possible, you should configure OpenVPN to use the traditional UDP-based approach. |
The desktop needs a forwarding rule, and it must use masquerading to allow the laptop to reach the outside world:
iptables -A FORWARD -i tun0 -j U
ACCEPT
iptables -t nat -A POSTROUTING U
-o eth0 -j MASQUERADE
The masquerading rule tells the desktop to insert its own public IP address instead of the private address from the VPN. The private address cannot be routed into the Internet, but with this setting, the desktop will route any packets that the laptop sends across the tunnel to its own LAN interface and onto the Internet. If the desktop has a DSL or modem connection to the Internet, simply substitute ppp0 for eth0.
A network is only as secure as the computers attached to it. An unauthorized person with access to the OpenVPN laptop can read the key and use it to break into the virtual network. Wireless devices need better protection against theft.
If you keep to the basic rules described in this article, you will find that OpenVPN is a secure but easy-to-use VPN product.
| Info |
|
[1] OpenVPN: http://openvpn.sourceforge.net [3] LZO library: http://www.oberhumer.com/opensource/lzo/ [2] OpenSSL Project: http://www.openssl.org/ [4] TUN/TAP driver: http://vtun.sourceforge.net/tun/ |