Perfect Panoramas with Hugin, Enblend, and Autopano-SIFT
360 Degree View
Oliver Frommel
Perfect Panoramas with Hugin, Enblend, and Autopano-SIFT360 Degree ViewOliver Frommel |
|
If you have more pictures than you can fit in one image, you may wish to try the old trick of combining multiple digital photographs into a pleasing wide-angle view. But you'll find it difficult to combine these photos into a seamless image using just the Gimp. This article discusses some alternative tools that you can use to automatically adjust and align images. These tools will help you create seamless panoramas from separate photographs.
It's easy to take a series of digital photos for a panorama, but this is where the problems start. It is difficult to achieve soft and invisible seams. Normally, photos are so distorted that it is impossible to correct them manually. The lens is partly to blame; lenses typically distort images, turning straight lines to curves that make photo composition difficult.
The other reason is the distortion caused by shooting a series of pictures. If you remain stationary and turn the camera left and right, the objects on the right of the image will appear too big, whereas the objects on the left appear too small.
Free software can help correct this kind of distortion, align the individual images, and finally, mount the images to create a panorama.
| Box 1: PanoTools |
|
For a long time, the PanoTools package was the only free software for creating panoramic images. The PanoTools license conditions have always been complex. The library and PTOptimizer are released under the free GNU Public License, whereas various licenses apply to some of the individual programs. Because the program's author, Helmut Dersch, no longer has the software on his own homepage, other people are offering the old packages. In fact, there are even some commercial offshoots, although they may not be quite legal. A Sourceforge project has since been founded to maintain the free parts of PanoTools [1]. |
The Hugin [2] graphics program displays the images, allowing the user to select neuralgic points for equalizing and aligning the images.
The program is easy to install, but it requires a few libraries that some distributions do not include. Check out the "Installation" box for more details on the install.
| Glossary |
|
Roll, Pitch and Yaw are all terms for spatial rotation about three axes. Roll describes a rotation about an axis perpendicular to the image plane, pitch is the rotation about a horizontal axis, yaw is the rotation about the vertical axis. |
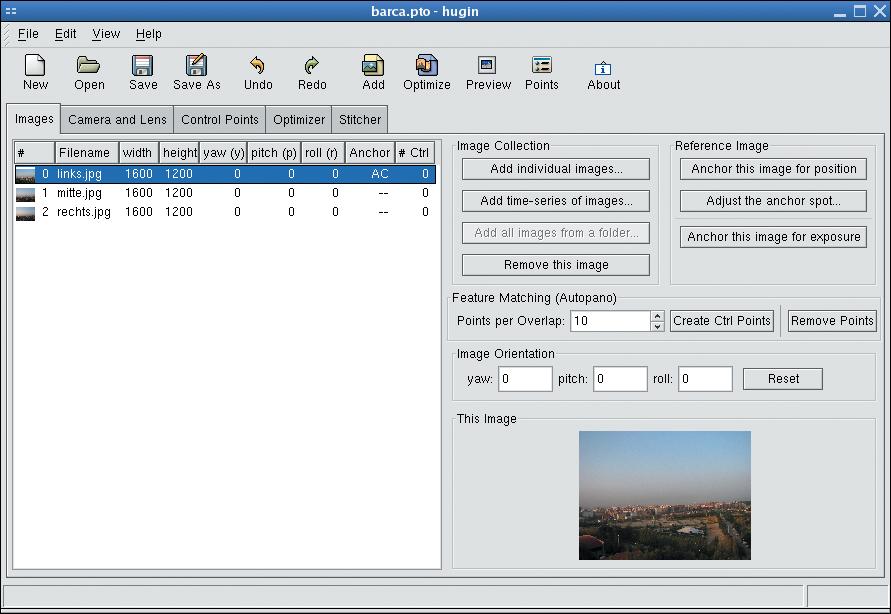
After you type hugin to launch the program, the main window shown in Figure 2 appears. Click on Add individual images... to select individual images. In the dialog that appears, you can hold down [Ctrl] and click to select multiple images.
Hugin displays a list of images in the panel on the left, adding some details, such as the width and height; the rotational values (Yaw, Pitch, Roll) are also displayed, although they default to zero. Hugin uses the first photo as a reference point for aligning the other images. The "Anchor this image ..." button allows you to select another image as the reference point.
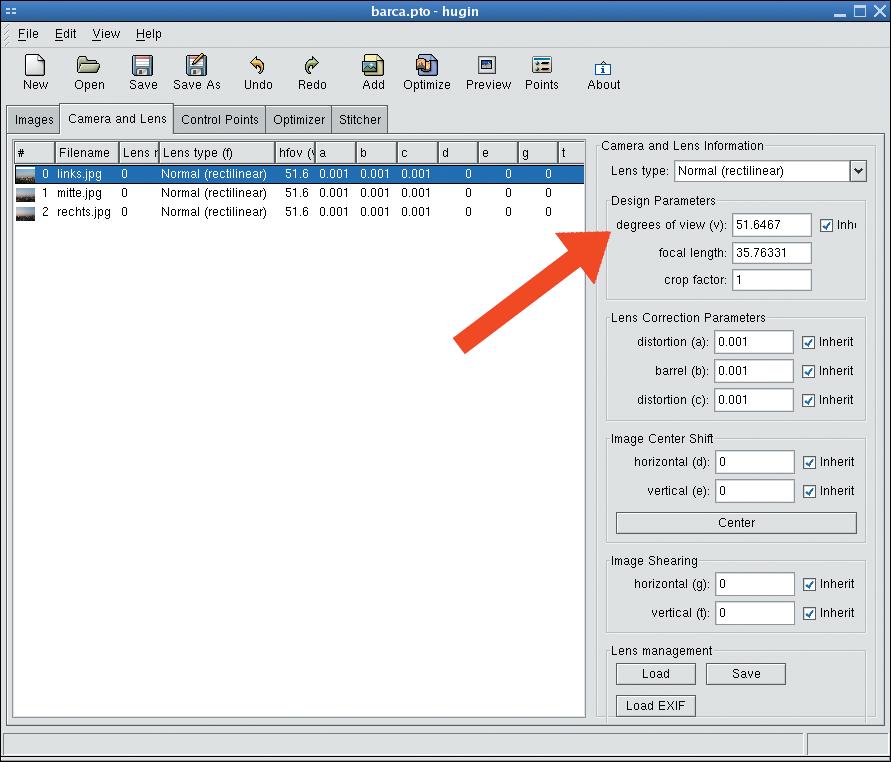
The second tab, Camera and Lens, is for correcting optical distortion caused by the camera and lens. If your images include EXIF information, Hugin can automatically extract the required data. If you do not know the angle of view for your lens, refer to Table 1 (extracted from PanoTools documentation).
The Inherit switch allows all the other images to inherit the settings from the current image. If you disable this setting, the program can handle images with different distortion values. After discovering the best values for your camera (by trial and error), you can store these values under Lens Management and load them for your future Panorama projects.
| Box 2: Installation |
|
Hugin needs the WxWidgets library (formerly WxWindows) and the WxWidgets-XRC extension. Most distributions include the other required libraries, such as Libtiff, LibPNG, and LibJPG. Besides the FFTW math package, Hugin also needs the Boost Library, if you intend to build Hugin yourself. Unfortunately, the version and name depend on the distribution. For example, the Boost developer library for Fedora is simply called libboost-devel; Debian users need three packages called libboost-graph-dev, libboost-dev and libboost-python-dev. The required files for Fedora are located in a subdirectory on the DVD. The following command installs the libraries:
rpm -iv panorama-tools-2.7a-1.U i386.rpm wxGTK-* fftw2-* The Panorama tools include libpano12, but this does not stop the package manager from complaining about a missing package because the package dependencies are wrong. The workaround involves specifying an RPM program option to disable the dependency check:
rpm -iv --nodeps hugin-0.4-cvsU 20041021.bp.fc2.i386.rpm Although Suse has a version of WxWindows by default, Hugin cannot use the default. Thus, you will need to remove the existing package and use the Fedora packages instead - don't worry, this worked fine with Suse 9.1 in our lab:
rpm -iv panorama-tools-2.U 7a-1.i386.rpm wxGTK-xrc-2.4.U 2-4.1.fc2.dag.i386.rpm fftw-2.1.U 3-1102.i586.rpm hugin-200409U 21-1.bp.fc1.i386.rpm wxGTK-2.4.U 2-4.1.fc2.dag.i386.rpm Debian does not have additional wxGTK packages that include "xrc" in the package names; look out for libwxgtk2.4-contrib-dev instead. You can use the following commands to install the required libraries, LibPano, and Hugin (both of which are on the DVD with this issue):
apt-get install libwxgtk2.4-dev U libwxgtk2.4-contrib-dev fftw2
dpkg -i libpano12_20040917-1_i386.U deb
dpkg -i hugin_0.4pre20040917-1_iU 386.deb
Whether this will work or not depends on the software and libraries you have installed previously. If you are still missing a package, you might like to try googling for the package name and required package format. The boxes for Autopano and Enblend give you more detail on the requirements. |
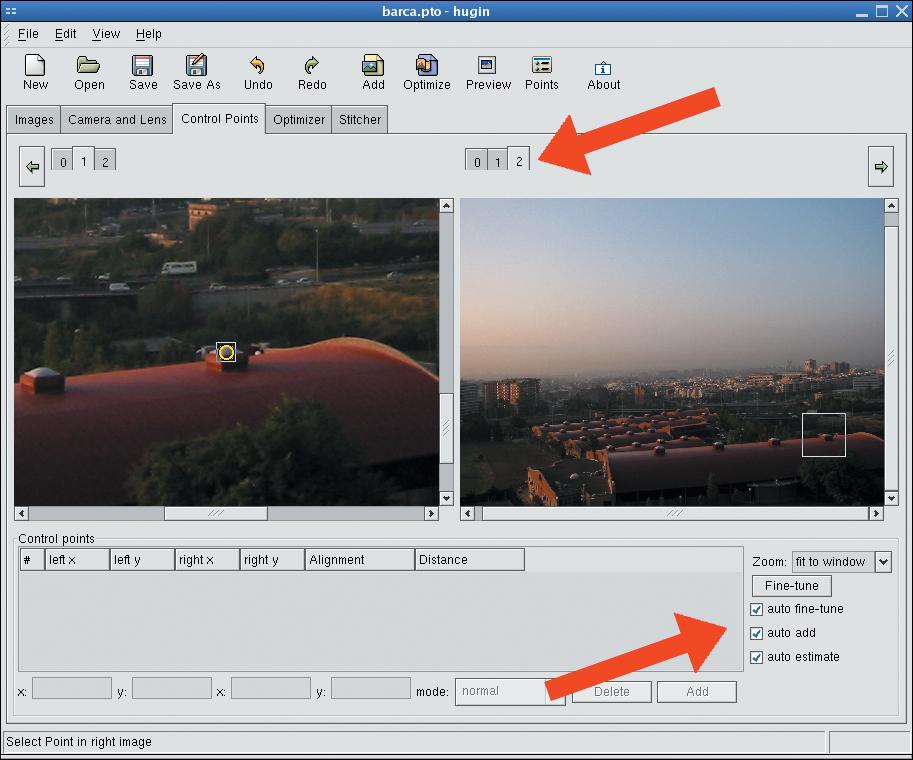
Hugin needs a few definitive image details to be able to align two adjacent images correctly. The Control Points tab handles this. The tab shows you two images, allowing you to click on significant points to create assignments.
First, set up Hugin to display two adjacent images by setting the number in the tab above the right-hand image one higher than the left-hand tab (Figure 3). In other words, if both are 0 when you start, you need to set the right-hand tab to 1. You can then use the arrow keys to flip through the images, and Hugin will show you consecutive images on the left and right.
You will want to check auto fine-tune and auto-estimate, as this tells Hugin to help you assign the control points. auto add tells the program to add each mapped pair at the specified points - you can do this manually by clicking the Add button.
If you have enough points, you can switch to the number crunching part by clicking Optimizer (Figure 4). Check the Positions (pairwise optim., starting from Anchor) option for the Optimizer, and then click Optimize now!. The three text boxes below display the image number and the value by which Hugin needs to correct the individual image, following the square brackets with or without a checkmark. If an image is not checked, this means that Hugin will not be modifying it, which is the case with the reference image (Anchor). If you select the Custom parameters below for the Optimizer, you can manually set the values for each image - this is a setting for experts.
The Preview in the bar at the top gives you a preview with the calculated values. You might want to select Auto in the preview window to tell the program to show you the latest results.

| Box 3: Mono for Autopano |
|
Autopano-SIFT is written in the C# programming language and needs the Mono project libraries [3]. To use the software, you do not need the complete Mono environment. You do need the interpreter, which runs the program, and a few libraries. The Suse packages are mono-core-1.0.2-1.ximian.9.1.i586.rpm, libicu26-2.6.2-1.ximian.9.0.i586.rpm, gtk-sharp-1.0.2-1.ximian.9.2.i586.rpm, libgtkhtml3.1_7-3.1.13.0.200405120525-0.snap.ximian.9.1.i586.rpm. Fedora users do not need the libgtkhtml package. Debian users should add the Apt repository to /etc/apt/sources.list, and install the mono, libgtk-cil and libglib-cil packages via the command line. The Mono website at Debian [4] gives you more detail. Exe files written in Mono are launched by typing mono program.exe. The kernel-based Binfmt-Misc module can execute Mono bytecode directly. Most distributions include the module by default. If your automounter does not load the pseudo filesystem required to use this functionality, try the following command:
mount -t binfmt_misc none /proc/U sys/fs/binfmt_misc Finally, you need to tell the kernel how to recognize Mono files and launch mono.
echo ':CLR:M::MZ::/usr/bin/mono:' U > /proc/sys/fs/binfmt_misc/register Assuming that your exe files are executable (chmod +x), you can now launch them directly. You still need to unpack Autopano-SIFT [5]. To do so, you can either launch right into /path/to/autopano-sift-2.0/bin/autopano.exe or use the Mono program mono /path/to/autopano-sift-2.0/bin/autopano.exe. If all of this works, Autopano should output a short help text. If the bin subdirectory is in your executable PATH variable, you do not need to enter the full pathname. This is also the best way of testing the GUI-based version, autopanog.exe. To allow the autopano-complete.sh script to work, you need to set up your PATH variable as described, otherwise the script will complain that it failed to find an "assembly." |
The final tab, Stitcher, is the heart of the program - and the biggest challenge at the same time; things don't always work out as expected. Stitching is the process of putting multiple images together to create a panoramic image.
This process typically implies aligning the images and correcting distortion beforehand. Hugin supports two so-called stitching engines; the stitching engines are the software modules that actually put the panoramic image together. The Nona stitcher supplied with the program works quite well, although the quality is not quite up to scratch. A visible seam appears in the final product in most cases (Figure 5).
| Box 4: Enblend |
|
Autopano-SIFT is written in the C# programming language and needs the Mono project libraries [3]. To use the software, you do not need the complete Mono environment. You do need the interpreter, which runs the program, and a few libraries. The Suse packages are mono-core-1.0.2-1.ximian.9.1.i586.rpm, libicu26-2.6.2-1.ximian.9.0.i586.rpm, gtk-sharp-1.0.2-1.ximian.9.2.i586.rpm, libgtkhtml3.1_7-3.1.13.0.200405120525-0.snap.ximian.9.1.i586.rpm. Fedora users do not need the libgtkhtml package. Debian users should add the Apt repository to /etc/apt/sources.list, and install the mono, libgtk-cil and libglib-cil packages via the command line. The Mono website at Debian [4] gives you more detail. Exe files written in Mono are launched by typing mono program.exe. The kernel-based Binfmt-Misc module can execute Mono bytecode directly. Most distributions include the module by default. If your automounter does not load the pseudo filesystem required to use this functionality, try the following command:
mount -t binfmt_misc none /proc/U sys/fs/binfmt_misc Finally, you need to tell the kernel how to recognize Mono files and launch mono.
echo ':CLR:M::MZ::/usr/bin/mono:' U > /proc/sys/fs/binfmt_misc/register Assuming that your exe files are executable (chmod +x), you can now launch them directly. You still need to unpack Autopano-SIFT [5]. To do so, you can either launch right into /path/to/autopano-sift-2.0/bin/autopano.exe or use the Mono program mono /path/to/autopano-sift-2.0/bin/autopano.exe. If all of this works, Autopano should output a short help text. If the bin subdirectory is in your executable PATH variable, you do not need to enter the full pathname. This is also the best way of testing the GUI-based version, autopanog.exe. To allow the autopano-complete.sh script to work, you need to set up your PATH variable as described, otherwise the script will complain that it failed to find an "assembly." |
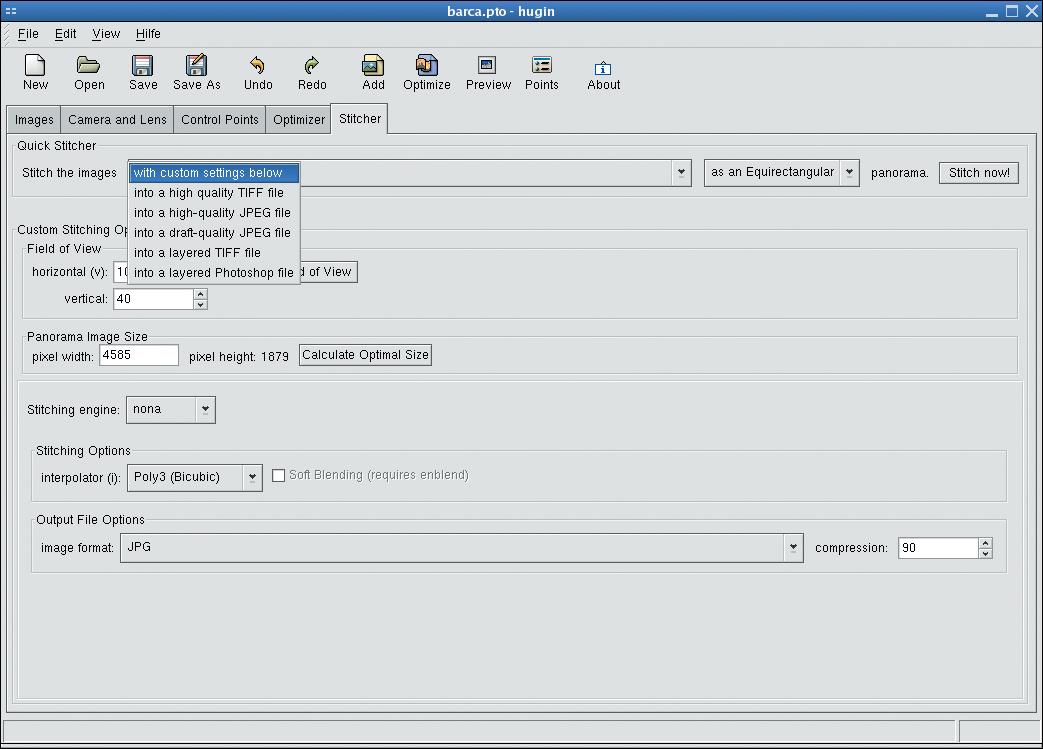
Before you start stitching, make sure you select Calculate Field of View to recalculate the field of view. Only the program's authors know why Hugin does not do this automatically. Similarly, you will need to modify the image size by selecting Calculate Optimal Size. If you use the Nona stitching engine supplied with the program, the JPG image format will be preselected, and you can simply click Stitch now!.
A short time later (or possibly a lot later, depending on the size and the number of images), you should have the final image on your hard disk under the name you selected.
The alternative is to use the external Enblend program, which Hugin does not support directly, and which entails an extra step. First, use Hugin to create a series of TIFF images, which are correctly aligned but not stitched. Then select the option into a layered TIFF file for Stitch the images (see Figure 6).
The program will then automatically select Multiple TIFF as the output format. Click on Stitch Now!, and Hugin will prompt you for a filename, appending a four digit number to the filename for each image. You can then pop up a terminal window to stitch the TIFFs using Enblend; use the -o to specify the output file name:
enblend -o panorama.tif U
pic0000.tif pic0001.tif U
pic0002.tif
The results are quite impressive. Enblend stitches the images without ugly seams .
If all of this involves too much clicking for your liking, you can use another program to automatically set the control points. Autopano-SIFT will even find matches that are invisible to the human eye in your images. To launch the tool, run the script and don't forget to specify the output file (using the -o parameter), which Hugin then parses later, as well as the individual images.
autopano-complete.sh -o output U
left center right.jpg
As an alternative, you might prefer to use the GUI-based autopanog.exe front-end, which does exactly the same thing but at least saves you typing the filenames. When you load the resulting PTO file with Hugin, you will need to set the degrees of view in the Camera and Lens tab. The Optimizer and Stitcher steps are as previously described.
| Table 1: Lens and Field of View | ||
| Focal length | Field of View Landscape | Field of View Portrait |
| 28mm | 65 | 46 |
| 35mm | 54 | 38 |
| 50mm | 40 | 27 |
These tips should help you get started with creating your own panoramic images. The fact that we have not even looked at many of the vast range of available options and menus just goes to show the potential of tools such as Hugin.
A friendly mailing list covers the latest Panorama software developments, with users who are quite happy to help newcomers. It is safe to assume that the minor bugs will be removed from the program shortly. And if you feel like helping out after reading this article, then why not?
| Info |
|
[1] New homepage for the orphaned Panotools: http://panotools.sourceforge.net/ [2] Hugin: http://hugin.sourceforge.net/ [3] Mono Downloads: http://www.mono-project.com/downloads/ [4] Mono on Debian: http://pkg-mono.alioth.debian.org/ [5] Autopano-SIFThttp://user.cs.tu-berlin.de/~nowozin/autopano-sift/ [6] Enblend: http://enblend.sourceforge.net/ [7] Packages for various panorama tools: http://bugbear.blackfish.org.uk/~bruno/panorama-tools/ |