Writing GIMP scripts
Painting by Numbers
Oliver Frommel
Writing GIMP scriptsPainting by NumbersOliver Frommel |
|
The GIMP image manipulation program has a variety of useful functions. But navigating a complicated menu tree can be a pain if you need to apply the same tools to a large number of images. Fortunately, the GIMP has an integrated programming interface that allows users to script recurring tasks. This said, the Scheme [1] programming language is not everyone's idea of fun; its bracket-oriented syntax is difficult to learn.
Little surprise that fans of other scripting languages have come up with alternatives. The Perl interface, GIMP-Perl, is fairly advanced and supports a server mode in which GIMP parses scripts without needing to run the GUI.
Perl mode is missing from the GIMP versions included with most Linux distributions. In contrast to this, GIMP Python has established itself as a genuine alternative to Scheme, and it is available for most Linux flavors. Suse users are out of luck, as they will not have GIMP Python on their system by default.
Fedora users can sit back and relax; Debian and Ubuntu users may need to install the gimp-python package.
The entries you need for the Python plugin are located in the main menu below Xtns | Python-Fu. You can run the Test | Sphere entry to test your installation. After confirming the prompt by clicking OK, the script should draw a red sphere with shadowing on your screen.
GIMP outputs any error messages that occur in the terminal window from which it was launched. If you launch the script via a GUI-based menu, you will need to open the GIMP error window by selecting File | Dialogs | Error console. Note that the console does not show you all the errors that have occurred. GIMP scripters will probably prefer to launch their programs in terminal windows to get the full story.
The most important tool for budding GIMP programmers is the browser for the procedural database, or PDB for short (Figure 1); the PDB browser is located in the main menu below Xtns | Python-Fu | PDB Browser. It lists the functions available to script programmers for GIMP scripting. For example, file_jpg_load loads a JPG file. You can run methods like this directly in the embedded Python console (Xtns | Python-Fu | Console).
| Building the GIMP |
|
If you prefer to build the GIMP from source code, you will find the source code for the current version 2.2 at the GIMP website [2]. After unpacking the archive file, run the configure script with the Python options: ./configure --enable-python.. To avoid conflicts, you should remove any existing versions of the GIMP before you run make install to install the new version. |
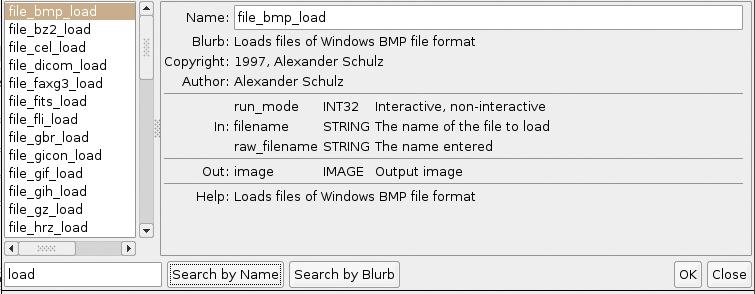
The browser is your major source of information about the functions that your version of the GIMP gives you. Many tutorials and HOWTOs on the Internet are out of date, so it is a good thing that the search tool allows you to restrict the choice of functions to the things you are interested in. If you search for layer, for example, the browser will give you the functions that match this name. You can then click on a function in the left-hand field to view the information on that function in the PDB browser on the right. Of course, the input (In) and return value (Out) parameters are just as important as the functions themselves.
The basic structure of a Python plugin is quite simple: a call to register to introduce the GIMP to the new plugin, and one or multiple functions that do all the work. Our first example will be a simple one that just pops up a dialog. Searching with the PDB browser takes us to the gimp_message function, which has only one parameter, the text the window is supposed to display.
The register method expects no less than eleven parameters in the following order: plugin name, description, help text, author, copyright, date, menu path, permitted image formats, plugin parameters, memory buffer for return value, and working function. After registering, the first call has to be to main().
Our example uses a plugin called python_fu_simple. This is the name that we (and other plugins) will use to call the plugin after registration. The next four parameters should be easy enough, as they comprise strings for informational purposes. The menu path is more important, as there are two basic flavors: for the GIMP's main menu, or for the context menu (right mouse button) in any image. The first part of the menu string for the main menu has to be <Toolbox>, whereas this is <Image> for the image drop-down. This prefix is then followed by the slash-separated path that the GIMP will access as required: <Image>/Python/Simple.
The next parameter specifies the image types (not formats) that the script can handle, that is, color images with (RGBA) or without (RGB) the alpha channel, or grayscale image (GRAY). If the plugin is not fussy, you can simply use a wildcard (*).
Finally, you have the input and output parameters and the name of the working function. Listing 1 has a minimal, but functional, example.
| Listing 1: A simple GIMP script |
|
01 #!/usr/bin/python
02
03 from gimpfu import *
04
05 def python_simple(img, U drawable):
06    gimp.message("Example")
07
08 register(
09    "python_fu_simple",
10    "Displays a dialog",
11    "Help: Displays a dialog",
12    "Oliver Frommel",
13    "LinuxMagazine",
14    "2005",
15    "<Image>/Python/Simple",
16    "*",
17    [],
18    [],
19    python_simple)
20 main()
|
The plugin function is called python_fu_simple (line 9), and the working function python_simple. The working function always has the parameters img and drawable (line 5), which the GIMP automatically passes to the function - the list of input parameters in line 17 is empty. Line 3 shows how to load the GIMP module in Python.
To follow along with the example, save the listing as simple.py below your ~/.gimp/plug-ins directory. Your directory may possibly be called .gimp-2.0 or something similar. Make the script executable (chmod +x) and launch the GIMP. Now, when you create a new image (File | New), there should be a Python | Simple entry for the plugin in the context menu.
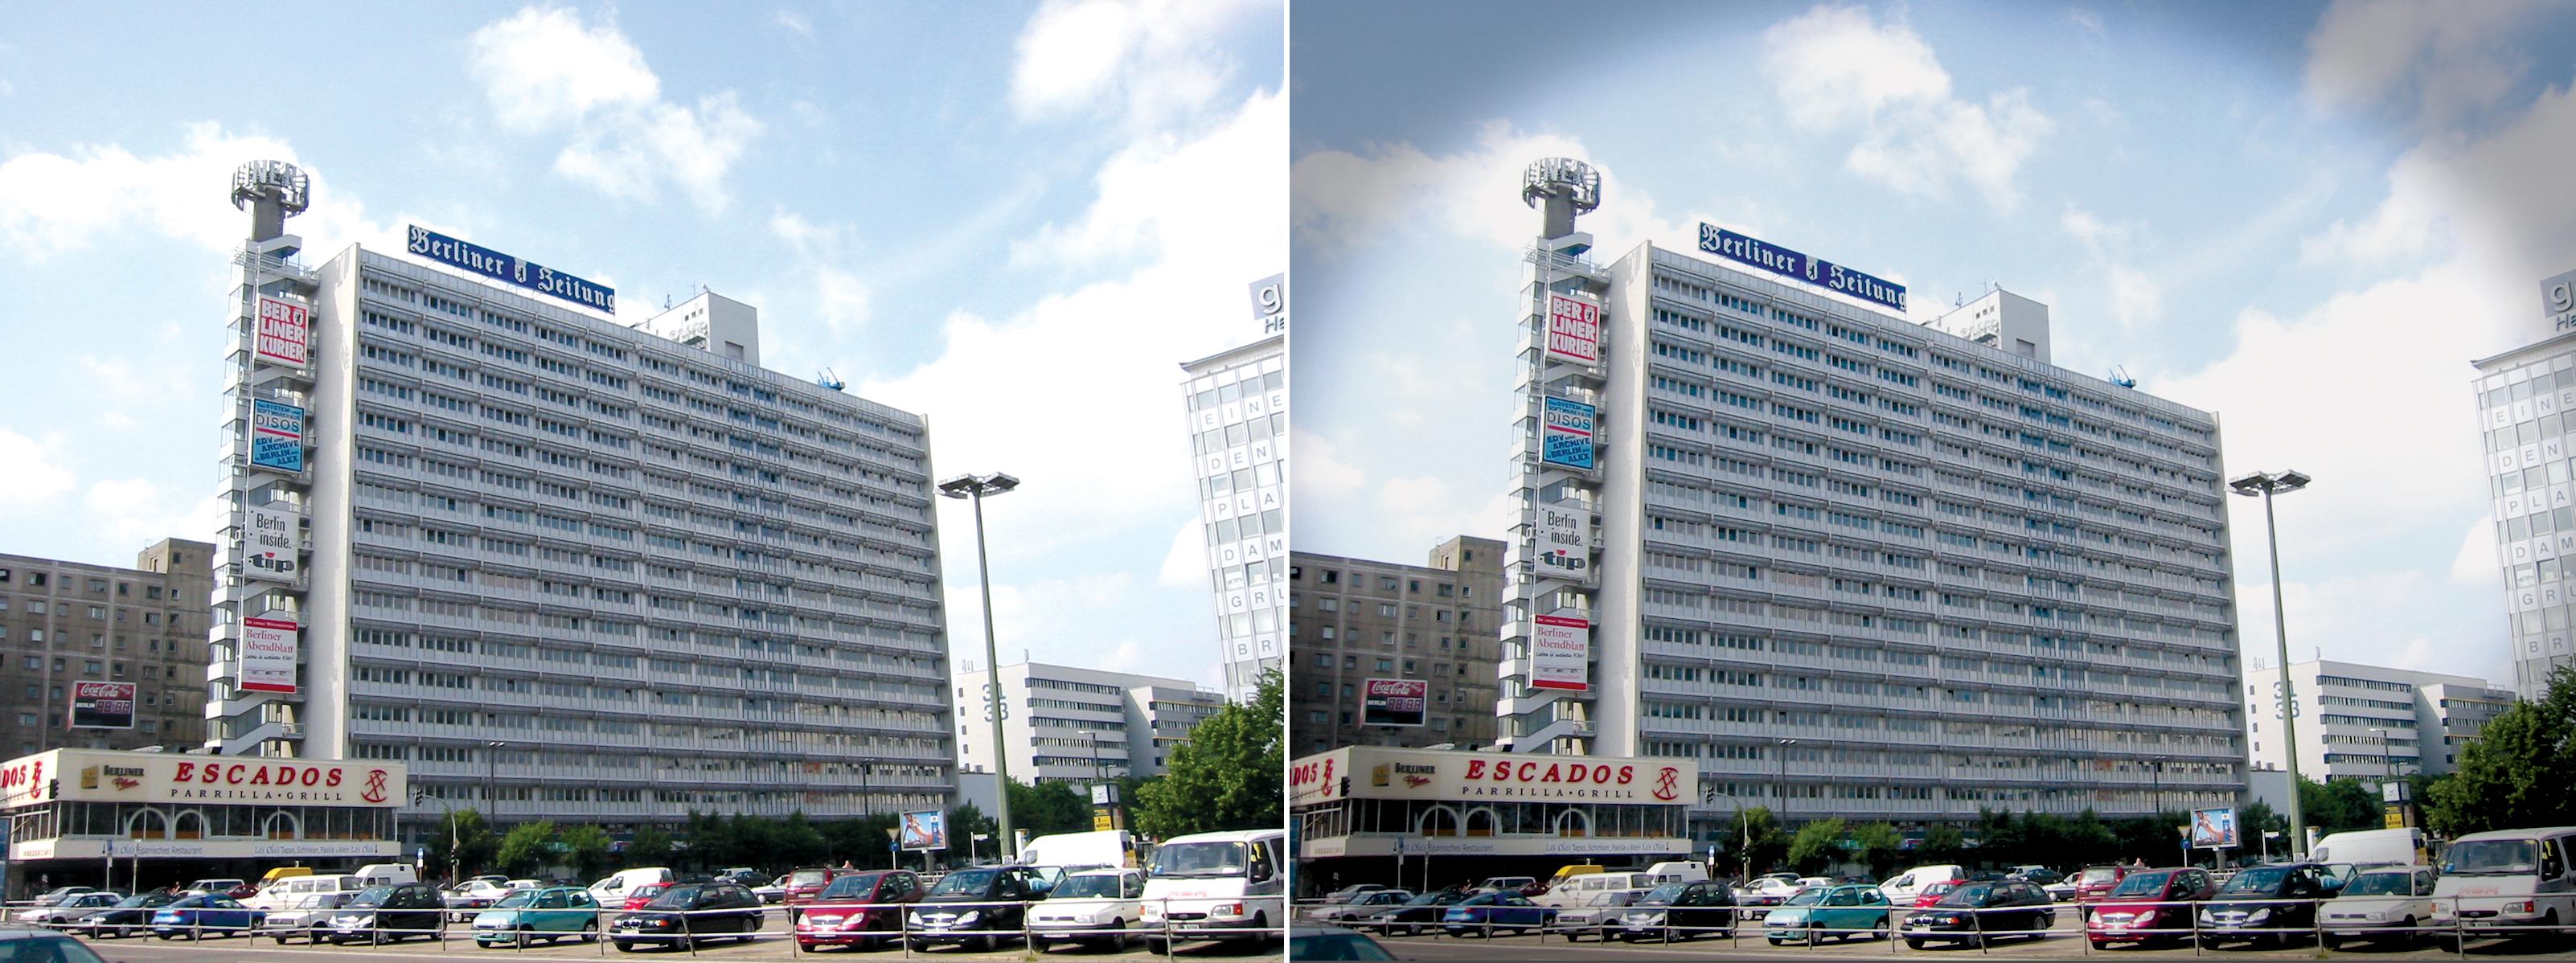
Of course, this minimal example does not do anything really useful, so let's take a look at a less trivial example to demonstrate a few useful aspects of GIMP Python. The plugin will be adding a so-called vignette to the image, that is, a shadow that hides the unimportant part of the image and highlights the important part. The example demonstrates plugin parameters and GIMP functions that use selection filters.
The basic idea is quite simple. The script uses a function to select an ellipse the same size as the image, then inverts the selection and fills it with the fill tool. Appropriate transparency values and a gradient make the border between the vignette and the image as seamless as needed for the effect.
Plugin registration is similar to our previous example, but this time we need a few input parameters. GIMP will automatically generate a matching dialog box for the input parameters. For each parameter within square brackets, we will have four values, which are enclosed in round brackets. The first value specifies the parameter type, the second is the string with the variable name. This will be used by the script, for example, by the working function. Another string follows - this is a description of the parameter, and finally we have a default value. The whole section with the input parameters is as follows:
[
   (PF_INT, "feather_in", U
        "Feather", 100),
   (PF_INT, "opacity_in", U
      "Opacity", 50)
],
PF_INT refers to an integer. The parameter types are described by the examples in the GIMP Python documentation at [3]; unfortunately the documentation is slightly dated; the plugin it contains will not even run under GIMP 2.x. You might prefer to check out the current GIMP-Perl website at [4]. At least the pages are up to date, although you may need to put some thought into migrating the techniques. On the positive side, the parameters are the same no matter which scripting language you choose.
The working function has not actually earned that title so far; time to change that. A PDB search for select reveals a few possible candidates. The one we need is called gimp_ellipse_select. Its first parameter is the image itself. The next four give you the size of the selection as X and Y values, the width, and the height. The option parameter specifies if you will be adding the selection (CHANNEL_ADD_ OP), or replacing an existing one (CHANNEL_REPLACE_OP), and so on. The PDB browser uses slightly different names here (as it does for other parameter types): for example GIMP_CHANNEL_ ADD_OP. In Python scripts, you need to leave out the GIMP_ prefix.
| Listing 2: Working Function |
|
01 def python_vignette(img, U drawable, feather_in, U opacity_in): 02 width = drawable.width 03 height = drawable.height 04 05 pdb.gimp_ellipse_select(img,U 0, 0, width, height, U CHANNEL_OP_REPLACE, TRUE, U TRUE, feather_in) 06 pdb.gimp_selection_invert(img) 07 pdb.gimp_edit_bucket_fillU (drawable, FG_BUCKET_FILL,U MULTIPLY_MODE, opacity_in, U 0, 0, 0, 0) 08 pdb.gimp_selection_none(img) |
Setting antialias to TRUE tells the GIMP to smooth the selection line. feather works in a similar way to provide a smooth transition. The last parameter feather_radius specifies the width of the transition area. The script does not have a fixed value at this point, but a user-definable input variable called feather_in (line 5 in Listing 2).
All of the methods we have used so far belong to the pdb object, that is, they are called by a pdb.method() call. This can hardly be referred to as object oriented programming, as object-orientation is characterized by an thematic relationship between the methods and objects. However, GIMP Python does support object-oriented formulations: for example img.add_layer(...) will work instead of pdb.gimp_add_layer(img, ...). This is a call to the gimp_add_layer() method of the img object, dropping the img parameter along the way. The PDB browser does not document this type of usage, so you may need to research this yourself.
The gimp_selection_invert method simply inverts the current selection. Finally, gimp_edit_bucket_fill fills the selected area with the current foreground color, as specified by the second parameter value FG_BUCKET_FILL. Specifying PATTERN_BUCKET_FILL instead would tell the tool to use the current fill pattern.
The next parameter specifies how to apply the new color layer to the background. The NORMAL_MODE value simply replaces the existing color layer. The MULTIPLY_MODE used in our example tells the GIMP to mix the existing and new colors. The Layer menu gives you a list of available modes, and the PDB browser gives you the matching keywords (again you need to remove the GIMP_ prefix). You might like to experiment with DISSOLVE_MODE.
The input value for the next parameter, opacity_in, specifies the opacity for the fill. A large number creates a darker border, and a small number a lighter one. Just for the sake of completeness, the script removes the selection, using a call to gimp_selection_none. You can undo all of these steps by calling Undo, by the way, as GIMP will note the steps just like in interactive mode although they are scripted. You can disable this function by calling gimp_image_undo_disable.
If you run the script on an image that you have opened, the effect will be something like the image in Figure 2. We slightly overdid the effect to make it more obvious in this image. Less opacity would have been preferable.
Automating GIMP with Python scripts should be an easy thing to do. Unfortunately, the obsolete documentation is an obstacle. And the development cycle adds more hurdles. Every time you change a script, you need to relaunch the GIMP. The ability to load scripts at runtime would be extremely useful
The documentation really needs updating. At the time of writing, Python GIMP programmers have no alternative but to browse the Web for various sources of information (such as GIMP-Perl) and adapt it. If this doesn't worry you, Python GIMP gives you a treasure-trove of functions to play with.
| INFO |
|
[1] Scheme: http://www.teach-scheme.org/Notes/scheme-faq.html [2] GIMP: http://www.gimp.org/ [3] GIMP Python docs: http://www.gimp.org/docs/python/structure-of-plugin.html [4] GIMP-Perl docs: http://imagic.weizmann.ac.il/~dov/gimp/perl-tut-2.0 |