Wireless Networking with KWiFiManager
Working Wireless
Chris Howells
Wireless Networking with KWiFiManagerWorking WirelessChris Howells |
|
Wireless networks are a very valuable addition to modern day computing. Wireless technology makes it easy to set up the network, and users can get online from a growing number of places, including pubs, train stations, libraries, and airports.
Although a wireless network is physically easier to install than a wired network, the software side of a wireless network is frequently harder to configure. For instance, for each wireless network connection, you must select the correct network name - commonly referred to as SSID (Service Set Identifier) - and you must specify whether to use encryption. If you are using encryption with the connection, you must specify the right WEP (Wired Equivalent Privacy) key. KDE's KWiFiManager utility helps you manage these and other wireless network settings and also monitors your wireless network connections.
KWiFiManager is part of the main KDE distribution, and as such, if you have KDE installed on your computer, KWiFiManager will probably also be installed already. If you don't already have KwiFiManager, use your Linux distribution's package management tool to install the kdenetwork package. Some distributions package KWiFiManager on its own, not as part of the kdenetwork package, so in that case, look for a package with a name similar to "kwifimanager."
Generally, KWiFiManager should work with any 802.11a, 802.11b, or 802.11g wireless network adapter for which there are Linux drivers. Frequently with modern Linux distributions and a PCMCIA/USB 802.11b card, all that is required is to plug the adapter in, and Hotplug will take care of the rest. Otherwise, it is best to consult the documentation for your distribution - the distribution's hardware management tool will often allow you to set up the driver.
When you first start KWiFiManager, you'll see a display similar to Figure 1. The main window gives the status of the active wireless connection. The Scan for Networks button initiates a scan that determines if you are in the range of a wireless network. The Settings menu (shown in Figure 1) leads to settings that help you configure and manage your wireless connections.
In order to connect to a wireless network, you must know the SSID for the network and whether WEP is in use or not. In a location such as an office, WEP will almost certainly be enabled, and you will need to ask the system administrator for details. In a public place such as a station or airport, WEP will not be enabled, and you will need to scan for available networks to find out the SSID - it will vary depending on which company is running the wireless network.
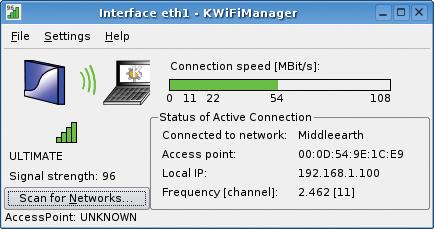
Scanning for all wireless networks is easy using KWiFiManager. Simply load KWiFiManager from the KMenu or by running kwifimanager. Click the Scan for Networks button (refer to Figure 1). A window will appear, giving the list of all networks nearby. If the wireless signal is a little weak, the Acoustic Scanning feature (under the Settings menu) can help to locate a stronger signal.
In Acoustic Scanning mode, KWiFiManager will periodically emit a tone. The higher the pitch of the tone, the stronger the wireless signal, and consequentially, the higher the likelihood of a successful connection. Therefore, if there are problems with the connection and KWiFiManager emits only a low pitch, it might be a good idea to wander around a little bit until the pitch rises.
Now that the name of the wireless network is known, you can use KWifiManger to connect to it.
KWiFiManager lets you pre-define network connection configurations. This feature is very useful if you travel to different locations, for example, if you roam between your home, your office, and another network.
To configure a connection, load KWifiManger from the KMenu and choose Settings/Configuration Editor option (see Figure 2). You'll need to enter the administrator (root) password in order to proceed, since the control panel will need to have root privileges to make configuration changes to the system.
One of the most important settings on this page is the Network name setting, where you will enter the SSID. Most wireless networks are based around an access point, and, in this case, the Operation mode should be set to Managed. However if there is no access point and you are simply connecting to other computers with wireless network cards, the mode should be set to Ad-Hoc.
Generally, the speed should be set to Auto. The Auto setting means that, when the signal is weak, the wireless card will automatically fall back to lower speeds in an attempt to facilitate communications. If the signal strength increases again, the speed should increase again. However, if an attempt is made to force a high speed and the signal becomes weak, the wireless card may fail to transfer any data due to transmission errors.
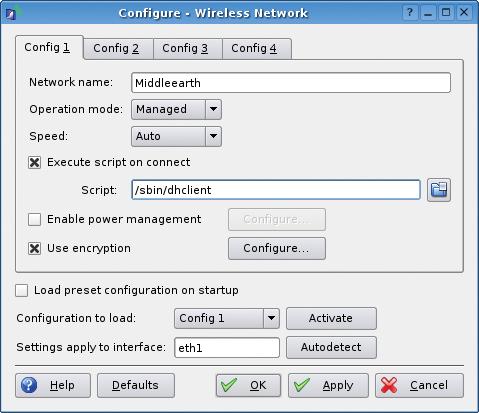
In the wireless networking world, DHCP (Dynamic Host Configuration Protocol) is typically used to configure the network interface. If this is the case for your network, you can enter /sbin/dhclient in the Execute script on connect combo box. The network interface will then be configured automatically once the connection to the access point has been made.
The Enable power management setting (shown in Figure 2) can be very useful for laptops. In the case that the signal strength from the access point is strong, the amount of power used by the wireless card can be reduced, which can help to save electricity. There are a few other tricks you can use to help conserve electricity. Rather than being switched on permanently, the wireless network card's radio can be configured to turn off periodically and for a configurable amount of time. This option is not without its drawbacks, though. If the radio is turned off, it is impossible to transmit any information, and consequentially, the response times of programs that use the network may be slow since the radio needs to be turned on again first. This will be particularly noticeable for tasks such as web browsing and using ssh. However, if the wireless connection is used only to check mail, this setting can be a very handy way of conserving electricity while you are on the move.
| Wireless Network Encryption |
|
Wireless networks usually use the WEP system to ensure that outside users can't eavesdrop on wireless communications. WEP is particularly important if data is being sent over a protocol that is not itself encrypted. In the past, WEP rightfully received a lot of bad press. In part, this bad press was because the first generation of wireless products contained a particularly poor implementation of WEP that allowed a brute force attack to be carried out against the encryption key when a sufficiently large number of data packets had been sampled. This risk is now lower, though a new encryption standard called WPA (Wi-Fi Protected Access) is starting to be introduced. |
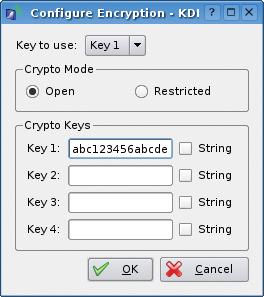
You can enable WEP with the Use encryption check box (see Figure 2). If you check the check box and click the Configure button, you'll reach the dialog shown in Figure 3. In the Configure Encryption dialog box, enter the 13- or 26-character encryption key used on the network. Sometimes wireless access points allow you to use a password instead of a hexadecimal key: this is, however, just a way of hiding the hexadecimal, and using this setting can be a bit of a hit-and-miss affair. Different manufacturers use different methods to calculate the hexadecimal from the text, and as such, it is possible that the wrong hexadecimal key may be used. If you have problems connecting to the access point, it is a good idea to try explicitly setting a hexadecimal string in both the access point and in KWiFiManager.
The configuration editor (see Figure 2) also lets you set up additional network configurations. Choose a different tab and enter the settings as described in this section. It is usually better to load the settings when KDE is started so that the wireless connection will be ready as soon as the system starts. To do this, select Load preset configuration on startup, and then select a wireless configuration. If you change your location and you wish to connect to a different wireless network, choose a different option in the Configuration to load combo box and press Activate to connect to that network instead.
KDE provides a few tools for monitoring the active wireless network connection. Monitoring the wireless connection is fairly important because the strength of the signal can vary even if the location of the laptop or desktop does not. Cordless phones, and even microwaves, can cause interference that may decrease the strength of the signal.
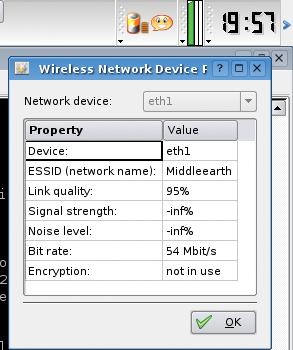
KDE provides an applet (Figure 4) that you can add to the panel to show the wireless signal strength at an easy glance. To load the applet, simply right click on the panel, then choose Add, Applet, Wireless Network Information. If this option does not exist, you may need to install the kdenetwork package, which should be part of the Linux distribution.
Unfortunately, depending on the driver used for the wireless card, some information about the network might not be available. In this case, a few of the fields in the information dialog might be empty.
KWiFiManager can also provide similar functionality. KWifiManger adds an icon to the system tray with a handy signal strength bar and a numerical indicator of the signal strength. Clicking on the system tray icon will hide the main window so that it does not interfere with normal work. Clicking on the system tray icon again will show the main window.
A few enterprising KDE users have written their own wireless network applications. These applications aren't part of KDE itself, but they can be found at the http://www.kde-look.org web site.
You'll find KWirelessMonitor at http://www.kde-apps.org/content/show.php?content=11576. Install a suitable binary or compile the source code as follows (assuming the KDE development files are already installed):
tar xvjf U
<kwirelessmonitor-0.5.4.tar.bz2
cd kwirelessmonitor-0.5.4
./configure
make && sudo make install
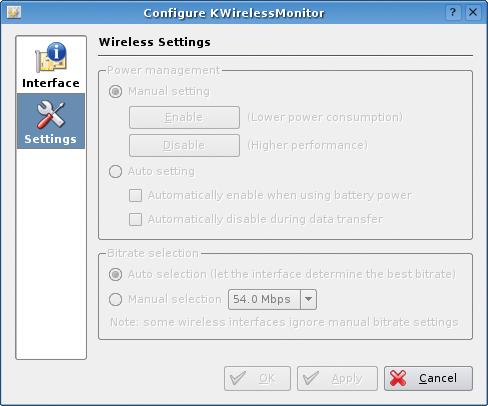
You can start KWirelessMonitor by running kwirelessmonitor. Right click on the icon in the system tray to apply configuration changes to the network interface (Figure 5).
Another nice program is Kifi, which you'll find at http://www.kde-apps.org/content/show.php?content=13858. Kifi displays information about available networks. Download the source code and compile it:
tar xvjf kifi-0.2.4.tar.bz2
cd kifi-0.2.4
./configure
make && sudo make install
After you compile Kifi, start it by running kifi. Kifi will load an icon into the system tray.
| THE AUTHOR |
|
In real life, Chris Howells studies Physics with Computer Science at the University of Liverpool, UK. The rest of the time he maintains KDE's screen savers, as well as working on a few other areas. You can reach Chris at howells@kde.org. |