Generating Video Titles with MainActor
Title Tool
Tim Schürmann
Generating Video Titles with MainActorTitle ToolTim Schürmann |
|
You're back from vacation, your purse is empty, and your video cassettes are full of vacation memories. You edit the vacation video on your Linux PC. To put a final polish on your movie, all you need to do is add the credits. If you use MainActor for video editing, you will discover that the title generator, 2D Text, is well-hidden and gives you only basic caption generating features. But never fear, a few tricks and a smattering of effects will help you create more pleasing titles.
MainActor is a commercial video editing program by MainConcept. The MainConcept homepage [1] has a test version; the only restriction is that the test version adds a watermark to the finished video. When this issue went to print, binaries for Suse Linux and Mandrake were available as downloads. If you do not use one of these distributions, you should test MainActor on your distribution before you buy.
After installing MainActor with your distribution's package manager, you can pop up a terminal window and enter mactor to launch MainActor.
Before you start, you might like to think about the structure and the material you have available. Titles are not only useful for the opening credits; they also help the viewer keep track of what is happening when the scene or the action changes. For example, if you visited different places on vacation, you could use a title to give your viewers the location of each scene. Ideally, you should start thinking about possible captions while shooting the movie. For example, it is far easier to shoot the town sign than to add an artificial caption later.
If you can't find a "natural" caption, view the raw material first before you start editing. Slow panning or landscape views will give you useful backgrounds for your vacation movie. As an alternative, use a monochrome background (typically black) or a still image. In any case, the material for the background should not be too dominant or it will distract the viewer. Professional TV documentaries or big screen movies can help if you are looking for inspiration. The example we will be looking at in this article is based on the opening credits for "Finding Nemo." Start by displaying the producer ("The Millers") in a simple soft-focus font. This is followed by the title itself ("Vacation 2004"), which is slightly more elaborate. The background is a pan shot from the vacation movie, which leads to the first scene. The following steps all assume the video for the background is already on your hard disk (see "Box 1: Welcome Aboard").
To help you stay organized, first create a new timeline by selecting Timeline / New. When you do so, MainActor will add a new tab to the Timeline window. You can assign the captions to the tracks in the first tab; the second tab has the remainder of the movie. This arrangement is optional, but it does help you keep track when performing more complex video editing tasks (see "Box 2: Merging Timelines").
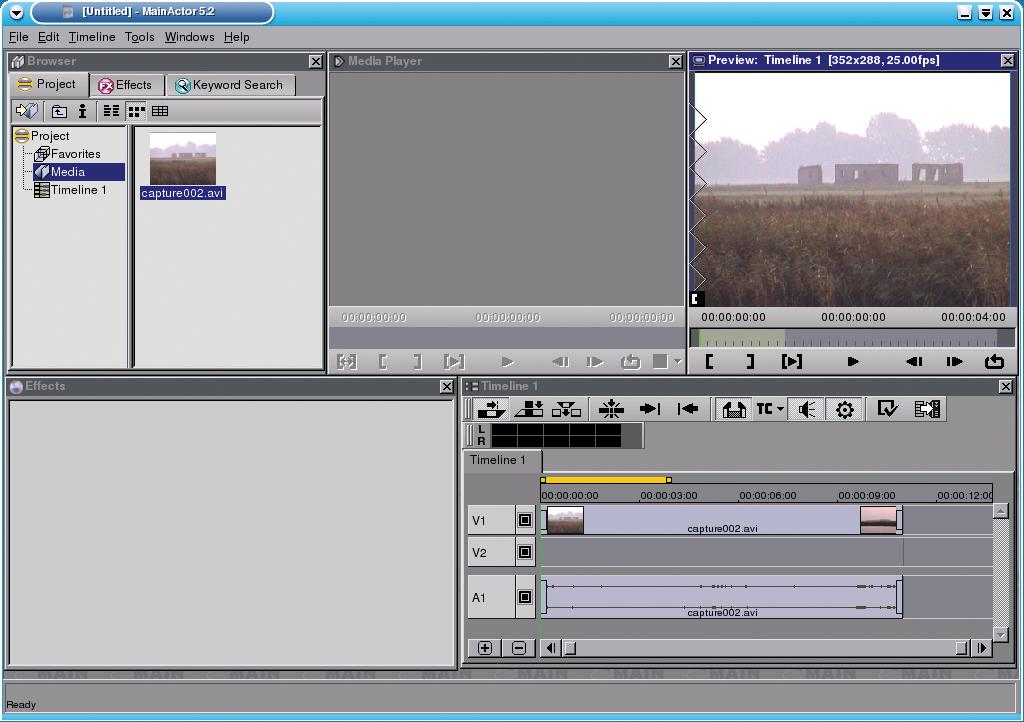
Now import the video material by selecting Add multimedia files from the context menu in the Browser window. The leftmost icon in the button bar also takes you to this window. Now browse for the file and click OK. MainActor will create a new folder called Media, which you can open by double clicking. Drag the video from this folder and drop it onto the V1 track in the timeline. A white frame shows you where the video landed when you released the mouse button. For our example, you need to place the frame as far left in the timeline as you can (see Figure 1).
| Box 1: Welcome Aboard |
|
MainActor's recording function is hidden below Tools / MainConcept / DV Capture. You need to attach your digital video camera to your computer's FireWire interface, and to set up your FireWire drivers properly, for this to work. Many modern computers have a FireWire port, and there are many sources for low-budget add on cards. After loading the drivers, select the interface and your camera model in Capture Driver and Capture Device, respectively. Enter the filename and path that MainActor will be using to store the data in the Capture File box. Then click on the record icon (a small red button) to launch into the recording. If your distribution does not load the drivers correctly, open a terminal window, type su to become root, and type modprobe raw1394, followed by modprobe ohci1394. Then restart MainActor. |

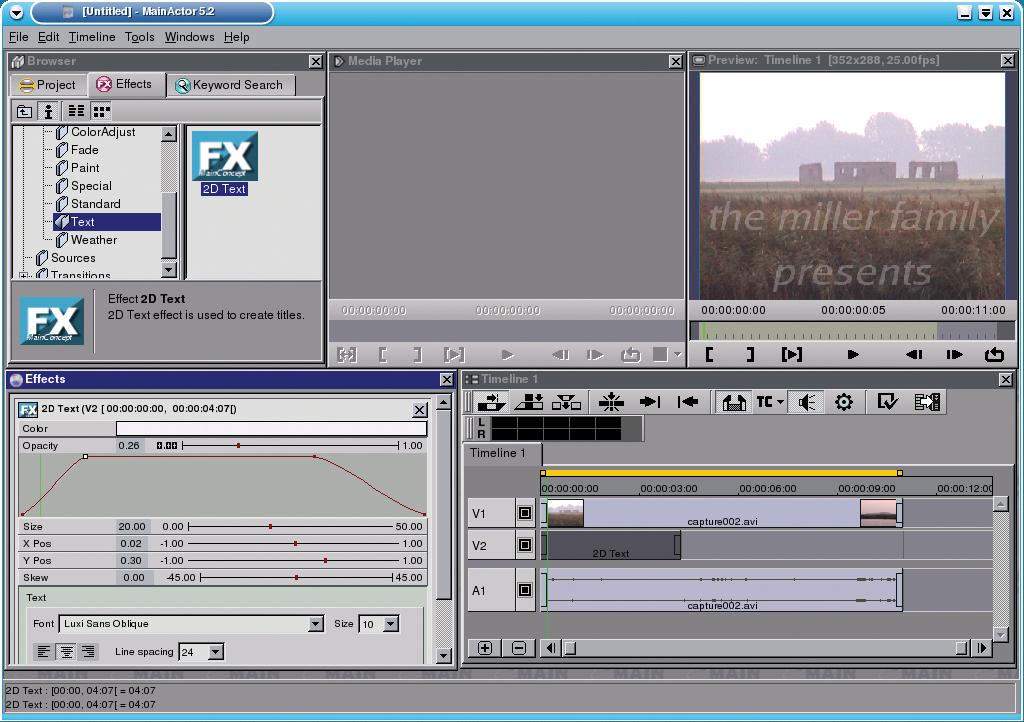
The functions that the integrated caption generator 2D Text gives us will be fine for the producer's name. The generator is located in Filters / Text in the Effects tab of the browser window (see Figure 2).
Drag the icon to the V2 track in the Timeline window. The object that MainActor created has handles in the form of small rectangles on the left and right-hand sides. Click the right-hand handle and hold down the mouse button. The rectangle turns gray. Drag the title to the right. The new start and end times, and the duration of the caption appear in a small, yellow tooltip window. Open up the element to display the whole text by holding down the left mouse button and dragging the mouse. When you can see the full text, release the mouse button.
| Box 2: Merging Timelines |
|
As mentioned earlier on in the article, MainActor allows you to create and manage multiple timelines. For each new timeline, MainActor adds an icon to the Project tab browser window. You can use these icons like other media data. For example, to merge two time lines for simultaneous output, just drag the icon for the current timeline into the Timeline window. |
As you can see in the preview window, the text still leaves a lot to be desired. To change this, double click on the 2D Text element in the V2 track. MainActor now shows you your options for the selected element in the Effects window (see Figure 3). First, type the text "The Millers" into the large text box and then, in a new line, type "present." Use the centering button to center the text, select a text without serifs, and choose a suitable font size. These steps are similar to working with a word processor.
At present, the text is somewhere down at the bottom of the screen; it may even have dropped off. To change this use the X Pos and Y Pos slide controls to move the caption into the center of the screen. Then select a Color that is easily distinguishable against the background.
If you now launch the movie in the preview window (by clicking the play symbol - a triangle pointing to the right), the caption suddenly appears and disappears. To make this transition smoother, you need to slowly increase and then decrease the opacity of the caption. However, just moving the slide control isn't going to help, as this would change the value whenever the caption is visible. MainActor has a more granular way of doing this; in the Effects window, click on Opacity. This displays a so-called polyline (shown below the Opacity indicator in the Effects window in Figure 3).
The line shows you how the assigned value changes over a period of time. If the line is just a straight red line at the top edge, the text will be displayed at full opacity 1.0 for the whole duration. You will notice a small handle on the polyline. You can click the handle, hold down the mouse button, and drag the handle to another position. Watch how this affects the transparency in the preview window. The whole of the polyline is affected by this change. To modify this behavior, you need to add another handle. To do so, right click and select Add Key in the menu that appears.
MainActor refers to handles as keyframes or keys for short. They represent the images within a movie where a new setting starts to apply. Both keyframes can be moved freely and independently of one another along the polyline. Add two more keyframes and use them to draw a curve. The first keyframe starts with full transparency for the text, and the second indicates the point where full opacity is reached.
| Box 3: Stack Processing |
|
The preview shows you how MainActor displays the caption over the video background. The timeline allows you to specify which elements are placed in the foreground and background. The tracks work like a stack of slides placed one on top of another. An object in track V2 will always cover an object in track V1, for example. If you added another track (by selecting Add video track in the context menu), the elements in this track would cover the elements in tracks 1 and 2; that is, they would cover the caption. |
Because the timeline and the polyline are displayed in separate windows, it is impossible to tell which image the keyframe reflects, and vice versa. A slider helps you avoid detective work; a slider is a small, vertical, green line with a counterpart in the Timeline window. If you click a section of the Timeline, the slider moves to where you clicked, and the image below the slider is displayed in the preview window. To assign a specific frame as the keyframe, first move the slider to the desired position and then drag the keyframe to the green line.
Let's use a trick for the main part of the title. The logo is a still image that we can cut and drop over the background. You can create the image with any graphics package, such as the GIMP. There are, however, a few things you need to watch out for. First of all, the image should be the same size as the video. Most home video cameras today use the Digital Video (DV) format, and this is 720 by 576 pixels in Europe. If the image is a different size, MainActor will forcibly change the size of the original, which may cause noticeable distortion.

To cut the image, MainActor uses the so-called bluescreen technique. This technique involves selecting a color that does not occur in the remainder of the image. MainActor replaces parts of the image where the selected color appears with the background image. The hues used for this are typically light blue or green, which do not occur in human faces, and that also explains the name. When you draw your title logo, you have to decide in advance which color you will be replacing later. The example in Figure 4 uses green.
After creating a title logo, save your logo and go back to MainActor. Use the browser window Project tab Add multimedia files drop-down menu to add the file to your project.
As you did with the text, drag the logo to the V2 track in the timeline and drag the handles to extend the duration. Move the slider to a frame containing the logo to display it in the preview. This allows you to monitor the changes you will be making.
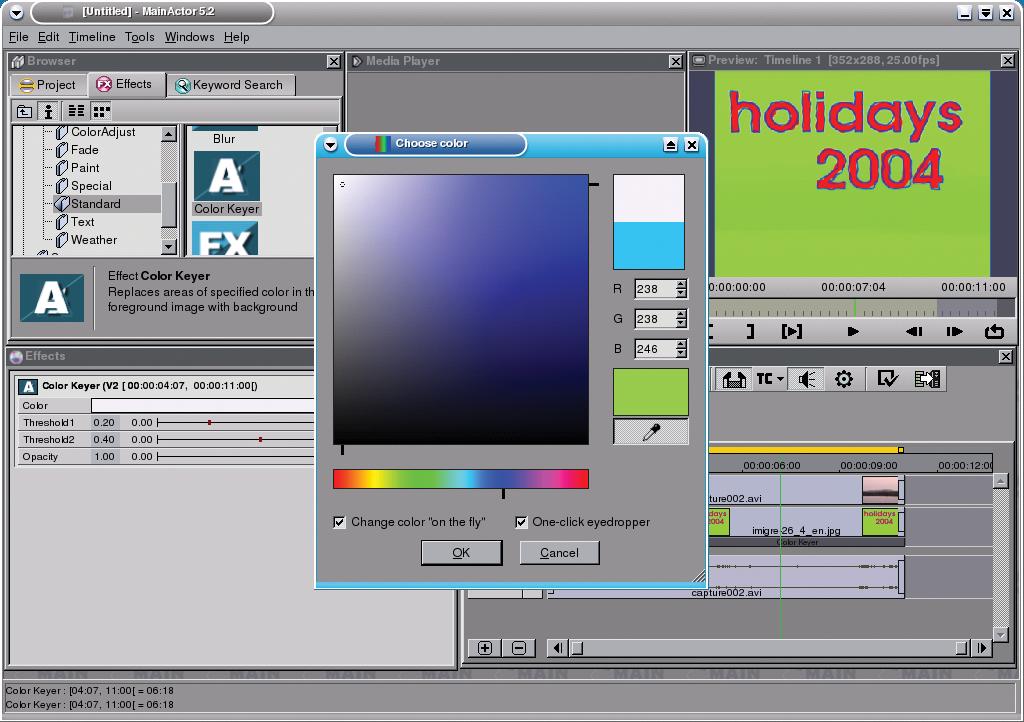
The Color Keyer effect, which is located below Standard in the browser window Effects tab, handles cutting the image. Drag the color keyer icon to the image with the title logo in the timeline. MainActor adds a small bar to indicate that an effect has been assigned. Double click the bar. Assuming that the properties of the 2D text are still on display in the Effects window, you can click on X to remove the entry. This moves irrelevant options out of sight.
First, choose the color that MainActor will be replacing with the background in the Color Keyer. To choose the color, first click on the color bar. You can then select a color directly in the window that appears, or grab the pipette and click on a part of the preview containing the color you need (see Figure 5). After you have chosen a color, click on OK. Don't be surprised if MainActor doesn't update the preview. If it doesn't happen automatically, you will have to update the preview manually.
Just like the producer's name, we want the title logo to fade in and out smoothly. You can follow the steps for the caption: once again, the polyline for Opacity is the one you need.
Now that we've entered the opening credits for the movie, we can output the results. MainActor has a selection of output formats below Timeline / Export. If you are creating a DVD, select Video+Audio, and MPEG, below Format. Click on the Format options and select DVD below MPEG Type. Frame size should show DV resolution. Click on OK to go back, and type the filename in the Export as field. Make sure you disable the Only export yellow In/Out segment option. When you have everything set up, click Export to export the results.
The method we have looked at allows a lot of creativity when designing captions. You could apply various MainActor effects to your logo. For example, to achieve a shimmering "Finding Nemo" style logo, drag the Glue effect from the Filter / 2D-Warp group in the browser window onto the logo in the timeline. Double click to open the settings in the Effects window and select Effect -> Original for Progress. This would make the logo shake the whole time, so to prevent this, add another keyframe to the polyline. The second keyframe should reach the bottom edge before the position where the logo disappears. This allows the viewers to read the content before it fades out.
You can apply the Color Keyer effect to complete video sequences if you are interested in creating a typical newscaster and background image sequence.
You should use effects sparingly and in small doses. Think about whether your captions are appropriate to the content: for example, a garish, rotating and bouncing logo might not go down too well with a meditation video.
| Box 4: Formats Supported by MainActor |
|
Import: DV AVI Multi File *.dzl (multiple type 1 files belonging to one movie); DV AVI Type 1 *.avi; DV AVI Type 2 *.avi; DV DIF *.dif, *.dv (RAW format); MJPEG *.avi, *.mjpg, *.mjpeg; MPEG *.mpg, *.mpeg, *.mmv, *mpv, *.dat (MPEG1 und 2, VideoCD);MPEG Audio *.mpa, *.mp2, *.mpg2; Wave Audio *.wav; PNG; JPG; TIFF Export video formats: MPEG 1 and 2; DV AVI Export graphics formats: Amiga IFF; Bio-Rad confocal; CompuServe GIF; DKB Ray Tracer; DPX; Explore (TDI) & Maya; Gimp Pattern; ImageMagick; JPEG|JIFF; Jeff's Image Format; Kodak Cineon; MTV RayTracer; PNG; Palm Pilot; Picture Gear Pocket; Portable Bitmap; Portable Greyscale; Portable Image; Portable Network Graphics; Portable Pixmap; Postscript; Psion Serie 3 Bitmap; Psion Serie 5 Bitmap; Qrt Raytracer; Raw; Rayshade; SciTex Continous Tone; Sillicon Graphics RGB; SoftImage TIFF Revision 6; Truevision Targa; VRML2; Vista; Vivid Ray-Tracer; Wavefront Raster file; Windows Bitmap; Windows Icon; Wireless Bitmap (level 0); X11 Bitmap; X11 Pixmap; YUV 16 Bit; YUV 16 Bits Interleaved; ZSoft Multi-Page Paintbrush; ZSoft Publisher's Paintbrush. |
| INFO |
|
[1] MainConcept (MainActor vendor) homepage: http://www.mainconcept.com/index_flash.shtml |
| THE AUTHOR |
|
Jörg Schumann originally studied music, intending to become a church musician, but then switched to mathematics and computer science to concentrate on programming. Jörg still spends a lot of his time investigating the music and computer science crossover area. In fact, whenever Jörg has time to spare, he enjoys tinkering with Linux computers and exploiting their sound-making capacity. |