Converting and Processing Video Files with Transcode
Handyman
Jörn Reder
Converting and Processing Video Files with TranscodeHandymanJörn Reder |
|
Transcode is a tool that converts files from one video format to another format. You can also use Transcode for other kinds of video file manipulation, such as resizing video frames.
If you expect a video conversion tool to give you a pretty GUI, you may be in for a disappointment with Transcode. Transcode [1] is a command line only program with a several command line based controls. Like most non-GUI tools, Transcode’s big advantage is its flexibility, and its major weakness is usability. Those who prefer the GUI approach can choose from a list of GUI-based front-ends that give a user-friendly interface to the special features of Transcode (see Table 1). But none of these programs can really harness Transcode’s full power.
Transcode follows a strictly modular approach. Critical functions reside in external modules that are only loaded when needed. Transcode provides three different types of module that correspond to the three steps of the Transcode file conversion process:
The input modules (see Table 2) have the task of decoding video and audio files and serving them up to Transcode in a raw data format. There are different modules for individual video and audio codecs, as well as for reading from video streams, such as those provided by a TV card.
The next step applies filter modules (see Table 3) to the raw input served up by the input modules. Filters not only modify existing image and sound data, but can also add or remove frames to change moving picture and sound track synchronization.
In the final step, Transcode passes the data to one or more output modules (see Table 4), which handle data encoding by applying a variety of video and audio codecs to create the required output file(s).
The following Transcode command converts an MPEG1 or MPEG2 file to an AVI file in MPEG4 format:
transcode -i sourcefile U
 -o targetfile.avi -y xvid4 U
 -w 500 -b 48
Transcode uses the native Linux XviD library for this job. The library is quick and reliable; quality-wise it can easily hold sway with commercial codecs. This simple example demonstrates the two most important options: -i and -o indicate the input and output files, -y sets the video export filter to xvid4, and -w sets the video bitrate to 500 kbps. Because Transcode exports audio as 128 kbps MP3 by default, all we need to do is to set the bitrate for the soundtrack to 48 kbps using the -b option.
The video bitrate is the factor that decides the quality of your video output. You need a number of parameters, such as the frame height and width and the number of frames per second, to calculate the so-called BPP (Bits Per Pixel) value: Bitrate * 1000 / (Height * Width * Frame rate).
Of course, the quality of a video depends to a great extent on the quality of the original video material (fast / slow scenes, high / low contrast, etc.), but as a rule of thumb, you can assume that a BPP value of about 0.20 will give you useful quality and avoid artifacts. Values below 0.15 will affect the image quality visibly. Transcode actually outputs the BPP value for the settings that you select (in the line V: bits/pixel). If the value is too low, you might prefer to quit Transcode by pressing [Ctrl]+[C], and try again with a higher video bitrate.
Transcode supports a multiple pass approach for MPEG4 codecs. To achieve optimum bitrate distribution over a video clip, the program first parses the video material and creates a logfile. The second pass parses the logfile and does the actual conversion work. You can enable multiple passes by specifying the -R option; you need to specify whether this is the first or second pass. Listing 1 has an example.
As the first pass will only be performing video analysis, -y xvid4,null disables the audio export function. This speeds up the process by up to about ten percent.
Because useful video conversion results depend on high quality source material, Transcode gives you a collection of tools for analyzing video files and outputting their critical technical characteristics. The tcprobe command gives you a quick overview (see the example “Listing 4: tcprobe Output.”)
According to tcprobe, the source file has a resolution of 320x240 pixels and an NTSC frame rate of 29.97 frames per second. Additionally, the file has a 44.1 khz mono audio track with a 16-bit sampling rate (as indicated by -e 44100,16,1 – stereo would use a 2). The audio track is MP2 encoded – unfortunately, we cannot see this but need to evaluate the -n 0x50 output. 0x55 means MP3, and 0x2000 AC3 encoding. The audio bitrate is set to 48 kbps. As Transcode uses 128 kbps encoding by default, it makes sense to manually drop the rate down to 48 kbps, as a higher value will not improve the output quality, although it will increase the file size.
| Listing 1: Example of Multiple Pass Encoding |
|
01 transcode -i sourcefile.mpeg -o targetfile.avi -y xvid4,null -w 500 -b 128 -R 1 02 transcode -i sourcefile.mpeg -o targetfile.avi -y xvid4 -w 500 -b 128 -R 2 |
The values in the square brackets in this tcprobe output indicate the default settings for Transcode. The program will use these values if you pass it raw data with formatting values it does not recognize.
The ability to scale image material is another useful feature – this feature allows you to create a preview of a large file that is available for downloading. Transcode has a number of functions on offer; the most simple of these uses the -Z flag and expects the width and height values. The following command would reduce the image size by half to 160x120 without using the multiple pass approach:
transcode -i sourcefile.mpeg U
-o targetfile_small.avi -y U
xvid4 -w 125 -b 48 -Z <@15_Li_Pfeil_(U)>U
160x120,fast
The fast parameter tells Transcode to use an internal scaling algorithm, which can affect the quality slightly and which also has a number of restrictions. For example, the width and height of the image need to be divisible by 8. If not, the program will fall back to the standard method. The -w 125 option is another important detail, which reduces the video bitrate. As the example halves the width and height, the image will only take up a quarter of the original size; this is equivalent to a quarter of the bitrate.
| Table 1: Transcode Front ends | |||
| Name | Homepage | Description | |
| dvd::rip | http://www.exit1.org/dvdrip/ | GUI front end specializes in copying DVDs. | |
| g4l | http://gv4l.sourceforge.net/ | Graphical Transcode V4L front end for manipulating TV video material. | |
| ripmake | http://www.lallafa.de/bp/ripmake.html | Command-line program that facilitates a number of common Transcode applications. | |
| kavi2svcd | http://www.cornelinux.de/web/linux/kavi2svcd/index.html | Kavi2svcd converts AVI files to super video CDs. | |
| Table 2: Transcode Import Modules | |
| Module | Description |
| dvd | Read directly from video DVD. The -i flag needs to point to a device file name or the name of the directory with the DVD file system. |
| vob | Read a DVD VOB file. You can create the file using the Transcode tccat command. |
| dv | Read DV video. |
| ffmpeg | Access all input codecs provided by the ffmpeg library. Format detection is performed automatically. |
| mplayer | Call m<\#000>player to decode the video. Transcode can thus handle any codec that mplayer supports. |
| v4l / v4l2 | Read a video signal directly from a Video4Linux device such as a TV card. |
| xvid | Read MPEG4 video. |
| mpeg2 | MPEG video import. |
Users with Linux-based digital video recorders – such as the VDR – might like to store TV recordings in a high compression format such as XviD or MPEG4 from time to time. Again, Transcode can help you here, however, it does need a little help from Vdrsync [2] for the VDR. Although Transcode can handle VDR files directly, issues with audio/video synchronization are quite common; and Vdrsync can resolve these issues before you start. The following command creates two files from a VDR recording to give you separate storage of the video and audio tracks:
vdrsync.pl U
/vdrdata/Dragonheart/U
2004-08-08.20\:13.50.50.rec/
The name of the output file varies. In this example, the script created a video file called e4.mpv and an audio file called c0.mpa. Transcode can now manipulate both of these files.
| Listing 2: Analyzing the Black Bar |
|
01 transcode --i e4.mpv -J detectclipping 02 ... 03 [detectclipping#0] valid area: X: 9..712 Y: 57..519 -> -j 58,10,56,6 04 ... |
| Listing 3: Checking for Interlaced Frames |
|
01 transcode -i e4.mpv -J 32detect=verbose=1 02 ... 03 (0) frame [000086]: (1) = 2141 | (2) = 2161 | (3) = 10 | interlaced = yes 04 ... |
If the movie material is in Letterbox format, you might notice a black bar at the top and bottom of your screen. As the black bar is a waste of space, you might want Transcode to remove it. This is a two step process: first Transcode needs to analyze the size of the bars, and then it needs to discover the exact positions. To do so, Transcode uses the detectclipping filter. Listing 2 has an example of this.
What Transcode actually does here is to inspect every single frame and output the results on the command line. When the output stops changing, Transcode has found the right settings. -j 58,10,56,6 tells the program to remove the black bar 58 lines up, 10 lines to the left, 56 lines down, and 6 lines to the right.
Unfortunately, you can not use these values “as-is,” because the final image size would not be divisible by 16. (Most encoders require the image size to be divisible by 16, and XviD is no exception.) Some simple math should help. For simplicity’s sake, let’s just ignore the few pixels on the left and right, and concentrate on the top and bottom. If we remove 56 lines instead of 58, we will be removing a total of 112 lines. 576 PAL lines, minus 112 leaves 464, which divides by 16, so that’s fine. This leaves us with -j 56,0,56,0; and we can use shorthand to pass this on to Transcode: -j 56. The program cuts symmetrically by default.
| Table 3: Transcode Filters | |
| Filter | Description |
| 32detect | Interlaced frame detection. You need to specify the verbose=1 option to discover if deinterlacing is required. |
| smartdeinter | RGB color space optimized deinterlacer. A port of VirtualDub’s smart deinterlacer. Requires the --use_rgb option. |
| smartyuv | YUV color space optimized deinterlacer. |
| modfps | Frame rate converter (for example PAL to NTSC). You need to specify the target frame rate: --export_fps |
| logo | Apply a fixed logo to the image. |
| logoaway | Remove a station logo from the image. |
| normalize | Normalize the volume level. |
| yuvdenoise | YUV color space optimized noise filter. |
| detectclipping | Detects -j or with option -Y removes black bars. |
| pv | Opens a preview window. The X server must have an XV extension. |
| Table 4: Transcode Export Modules | |
| Module | Description |
| xvid / xvid4 | The XviD codec writes an MPEG4 format. Transcode supports various versions of the library. Transcode 0.6.14 defaults to xvid 1.0. Use of the current 1.0 version of XviD is recommended with the xvid4 module. |
| divx5 | Uses the commercial divx.com codec. Although this codec is available in a native Linux format, it is not recommended due to a number of bugs and the fact that it is closed source. |
| ffmpeg | Any codecs supported by the ffmpeg library. To output a list of available codecs, type transcode -y ffmpeg -F list. You can select the codec you need by specifying the -F option. |
| mpeg2enc,mp2enc | MPEG2 video, MP2 audio. tcmplex merges the resulting .m2v and .m2a files to create a .mpeg file. The module supports all major profiles from VCD, SVCD through to DVD. |
| wav | Audio only export module for generating WAV files. |
Interlacing is a common word in video technology. Interlaced means that the even and uneven lines in an image are displayed separately – and this is quite normal for TVs. When you output an image on a PC display, the results are poor because moving objects tend to ghost. To counteract this, most video players or converters use a deinterlacing function to remove the lines.
| Box 2: Transcode Installation Guide |
|
If your Linux distribution has ready-to-run Transcode packages, you should definitely use them. Building Transcode from the source code requires a lot of experience, as the program draws on a number of libraries. According to the Debian package manager, Transcode has 44 dependencies. This article is based on version 0.6.14, which was published in January and which you can download from [1]. Binaries are available for the following distributions:
|
Transcode uses the 32detect filter (see Listing 3) to check if the video material comprises interlaced frames.
Transcode outputs a line for each frame. If you have frames with interlaced = yes, it makes sense to use the deinterlacing filter. On the downside, encoding takes a lot more time in this case. Transcode has a smartyuv filter, the speed-optimized version of the smart deinterlacer filter by VirtualDub for the YUV color space. VirtualDub is a widespread Windows program that does something similar to Transcode. Transcode’s filter has a number of options that you can tweak, but the defaults are fine in most cases.
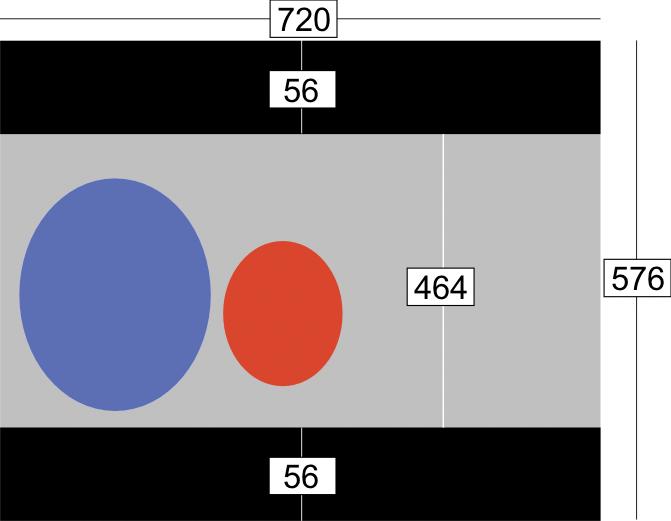
To save even more space, we not only want to remove the black bar, but also to scale down the image. PAL video material has an original resolution of 720x576 pixels, but the image size is amorphously distorted when displayed on a PC screen, as 720x576 pixels gives you a ratio of 5:4 rather than 4:3. Most media players will correct this automatically, but our aim is to produce an AVI file with the PC-friendly ratio of 4:3. There is even more distortion with 16:9 format media. Of course you can apply the calculations to 16:9 just as easily as to 5:4. Figures 1 through 4 show you the individual steps.
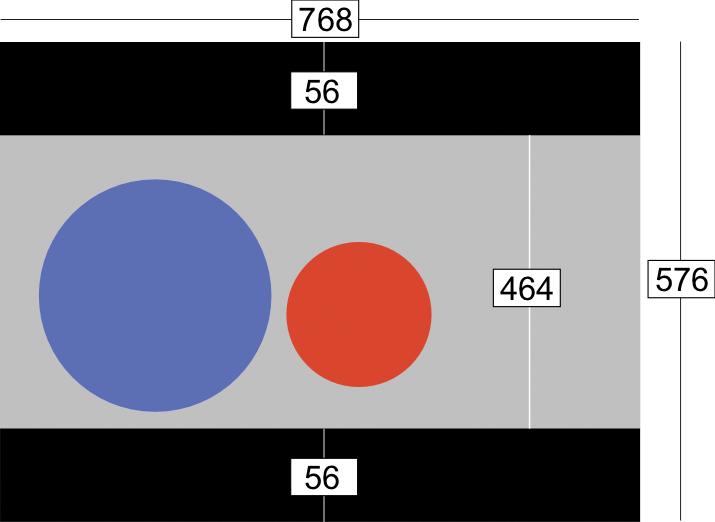
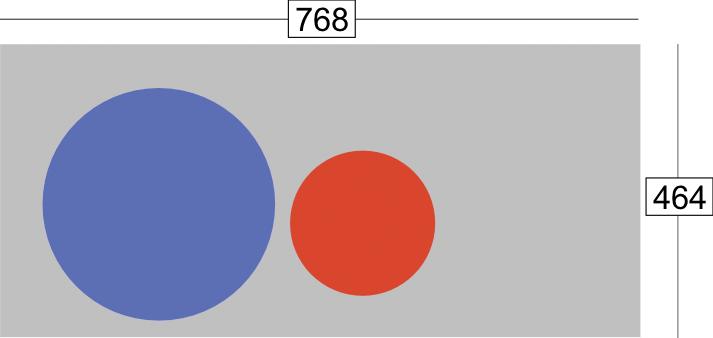
The first thing we need to do is to correct the ratio. We need to expand the image laterally by a factor of (4/3)/(5/4) (1.33/1.25= 1.06). The image grows by 6 percent and is now 768 pixels wide. The next thing is to tell Transcode to remove the two black bars that take up 56 pixels each; this results in an image with a height of 464 pixels.
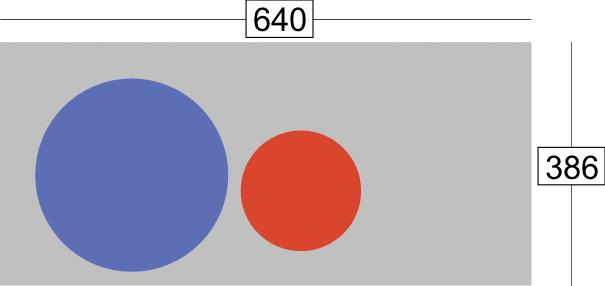
We then tell Transcode to scale the 768x464 image down to a width of 640 pixels; this is a factor of 1.2. The resulting image is 640x386 pixels, so we need to reduce the height to 384 to make it divisible by 16. The distortion factor is invisible to the human eye. Applying some simple math gives us the following command to covert an original VDR source to a small footprint XviD video format:
transcode -i e4.mpv -p c0.mpa U
-o targetfile.avi -y xvid4 -w U
1650 -j 56 -J smartyuv -Z U
640x384,fast
The -p flag adds the audio file. (The video and audio files are stored in separate files.) The video bitrate of 1650, in combination with the selected resolution, gives us a BPP value of 0.267, which is high enough in quality for our purposes.
This article just scrapes the surface of the full range of Transcode’s features. The Transcode distribution also comes with a collection of practical command-line tools. See the Transcode mailing lists [3] for a useful source of information on working with Transcode.
| INFO |
|
[1] Transcode homepage: http://www.transcoding.org/ [2] Vdrsync pre-processes VDR recordings for manipulation with Transcode: http://vdrsync.vdr-portal.de/ [3] Transcode mailing lists: http://lists.exit1.org/mailman/listinfo/ |
| THE AUTHOR |
|
Jörn Reder is a proponent of open source and an avid Perl developer. Jörn gained experience with Transcode while programming the dvd::rip front end. Jörn works for dimedis in Cologne, Germany, where he is mainly involved in developing Internet database applications. |