Hotplugging with Udev, HAL, and D-Bus
Hot Wired
Oliver Frommel, Marcel Hilzinger and René Rebe
Hotplugging with Udev, HAL, and D-BusHot WiredOliver Frommel, Marcel Hilzinger and René Rebe |
|
Is it really that difficult? You only wanted Linux to launch the right program when you attached your new digital camera, but the operating system has decided to sit this one out. This scenario is all too common, although the situation has started to improve. Linux should handle any kind of hardware correctly, but the ability to manage USB and Firewire devices plugged in or unplugged while the computer is running (known as hotplugging [1]) has become increasingly important. This article explains what a modern Linux system does with the devices you attach to it, and why not everything works as planned.
When you plug in a device that supports hotplugging, the kernel sends an event signal to the hotplug system. The hotplug system uses Udev to create a device file for the device and then calls the appropriate agent. An agent is a script, typically stored below the /etc/hotplug/ directory, that manages the actions associated with a hotplug event. In this case, the agent manages the task of adding and registering the new device.
The steps the agent performs may vary depending on your distribution and the type of hardware you are installing. Since most hotplug-capable hardware attaches to a USB port, the USB agent is perhaps a good example. The USB agent first checks if a driver is available for the new device (for example, isdn) and then calls modprobe to load the module. If the agent finds a script with the same name as the driver in the /etc/hotplug/usb/ directory, the agent runs that script.
The act of loading modules typically triggers a few more hotplug events, which in turn start other agents. It is common for multiple hotplug agents to work together. For example, when you connect an external hard disk, first the USB agent loads, then the SCSI agent loads to mount the individual partitions as SCSI devices with the help of the usb-storage module. If you attach a Bluetooth dongle, the USB agent runs first, followed by a Bluetooth agent called bluetooth.agent.
The /etc/hotplug/blacklist file has a list of modules that no agent is allowed to load. The list includes the modules that the system loads via other services, as well as modules that prevent power management.

Linux typically requires a device file in order to interact with a device. In a hotplug situation, that device file must be created on the fly when the new device is detected. As you learned in the preceding section, hotplug uses Udev to create the device file prior to summoning the agent.
Udev [1] is the designated successor to static device files, and most current distributions now use it. The purpose of Udev is to create device files based on rules specified in a Udev configuration file. For example, if you want to assign a device file other than sda1 to your MP3 stick, you could specify this requirement in your own Udev rule.
Udev rules are stored in /etc/udev/rules.d. If you look in that directory, you will find a file that describes typical devices: in Ubuntu this is udev.rules, whereas Fedora uses 50-udev.rules. Udev reads the files in alphabetic order. If you want to load your own Udev rule before the global rules, you will need to assign a filename to ensure that this happens, for example 10-local.rules. The following entry is good for a no-name MP3 stick:
BUS="usb", SYSFS{idProduct}=U
"1000", SYSFS{idVendor}="10d6",U
 NAME="mp3disk"
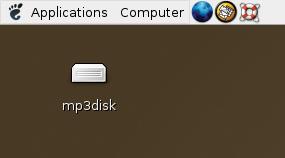
This stops the Gnome desktop from displaying the generic sda1 label; instead the label is a more intuitive mp3disk (Figure 1). The lsusb tool, which lists the attached USB devices, will help you find the USB IDs. If a device file exists, udevinfo -q path -n /dev/devicefile displays the path in the SysFS (see “Box2: Device files with Udev”), but it does not give you the mount point /sys. You need the path as a parameter (-p), with this command to get SysFS information:
udevinfo -a -p /block/hda/hda1
...
    SYSFS{idVendor}="10d6"
...
This command helps you discover the device-specific values you need for special configurations. There is a detailed how-to for creating Udev files at [2]. The Fedora site has a short overview of the Udev system [3].
A usermap file contains one or multiple IDs that uniquely identify a hardware component. When a device that matches one of these entries is plugged into the system, the subsystem automatically runs the specified program, which can be a script.
| Box 1: Hotplug on Suse Linux |
|
The Suse Linux approach to hotplugging is different in parts, and the current version does not use the HAL architecture. It distinguishes between (currently) unknown and configured devices and uses the hwup, hwdown, hwstatus, and hwscanqueue programs to support hotplugging. Suse stores a configuration file in /etc/sysconfig/hardware for configured devices. When the kernel registers a hotplug event, /sbin/hotplug loads the appropriate kernel module.
No HALAfter loading the kernel module, hwup checks if there is a configuration file for the device below /etc/sysconfig/hardware and, if so, loads the modules specified by the file. If hwup fails to locate a configuration file, it attempts to locate the required modules by reading the *.usermap files in /etc/hotplug/, just as other distributions do. In the future, Suse is looking to create a file below /etc/sysconfig/hardware for every hardware component and to completely do without usermap files. Comparing the last two Suse versions shows that Suse is already heading in this direction. Whereas 9.1 only creates configuration files for network devices, 9.2 also has them for hard disks, CD/DVD drives, and a variety of USB devices. After hwup has finished, the hotplug agent launches. In the case of a USB event, the agent will be the USB agent; for network events, the agent will be the network agent; and so on. If the hotplug system fails to find a suitable agent, it launches a generic agent to create the required device files. In Suse Linux 9.2, the agent also looks in /etc/sysconfig for a configuration file for the service and launches the appropriate service. Suse Linux has a simple approach to bug hunting that makes hotplug slightly more verbose. To enable this, set the variable HOTPLUG_DEBUG in /etc/syconfig/hotplug to yes or even to max. The latter setting tells the system to log every single step.
Desktop Icons on Suse LinuxSuse Linux Version 9.1 or later does not create desktop icons for drives. Instead, users are expected to use the My Computer icon (just like in Windows) or to access drives directly via the drives:/ URL. This solution can be a less than perfect for USB memory sticks. By default, Suse opens a Konqueror window with the content of the stick partition when you attach a memory stick, but if you have disabled this feature, or if you simply close the window, it’s back to My Computer. Suse Linux uses its own icons for the drives:/ URL. They are located below /usr/share/hotplug/DesktopTemplates/. KDE adds the name to the ~/.kde/share/config/kio_drivesrc file. You can edit the file to assign intuitive and unique names to your devices. For example, if you have two memory sticks, you can simply edit the entries below [Used Names] to distinguish between them. To enable the device icons for the KDE desktop in Suse, you first need to install the kdebase3-extra and kdemultimedia3-extra packages. Take care if you have Suse 9.2: the packages are only on the DVD version! After completing the install, right click on the KDE desktop and select Configure desktopÖ in the drop-down menu. In the Behavior window, select Device icons and then check Enable icons on desktop. You can then use the list to specify which device icons you want to display on the desktop. After installing kdebase3-extra and kdemultimedia3-extra, the devices:/ URL will also work in Konqueror. |
This allows you to enable a WLAN USB adapter that your distribution does not properly configure. In our lab, the hotplug system detected the adapter with the Prism2 chipset, but it failed to run the script that launches the required WLAN functions.
The lsusb command gives us the USB ID for the plugged in device. The vendor ID in our example is 0x0846, and the device ID is 0x4110.
You now need to add the following hexadecimal values to a new file called /etc/hotplug/usb/prism2.usermap:
prism2 0x0003 0x0846 0x4110
 0x0000 0x0000 0x00 0x00 0x00
 0x00 0x00 0x00 0x0
Most maps look like this and only use the first four values. The first value specifies which program the hotplug system should run if the values that follow in that line apply. The first numerical value is a bit field that specifies the required number of matching values. If you want hotplug to check the first two values, you need 0x0003 . The first bit represents a value of 1, the second is 2, and that makes 3 altogether. Hotplug ignores the remaining columns in this file, and that explains why the remaining values are 0x00.
The script we want to run, prism2, needs to be in the same directory, and we need to run chmod +x to make it executable. In our example, it runs the rc.wlan start script from the Prism2 package, configures the wlan0 network interface, and then asks the DHCP server for an IP address:
#!/bin/sh
/etc/rc.wlan start
/sbin/ifconfig wlan0 up
/sbin/dhclient wlan0
Following these changes, the USB WLAN adapter works immediately when plugged in. Unfortunately, our attempts to configure a DV video camera in the same way failed due to the sorry state of the Firewire subsystem. The IEEE1394 driver for the current kernel does not give us the SysFS information we need, so we have no alternative but to run mknod to create a device file.
| Box 2: Device Files with Udev |
|
In Linux, applications use device files to access hardware. These special files below the /dev directory are defined by reference to their type, as well as their major and minor numbers, which link them to the kernel. In the past, this directory has been a repository for all kinds of device files; for IDE and SCSI hard disks, USB, IEEE 1394, and virtual devices. This meant that the /dev directory typically had thousands of entries. This system has a few disadvantages: it does not tell you which devices really exist or have been correctly identified by drivers. Additionally, device files can change from case to case; in other words the random order in which the device was attached to the system decides which SCSI device will react to /dev/sg2.
New WorldsUdev [1] is the designated successor to static device files, and most current distributions now use it. Udev relies on the hotplugging mechanism that generates device files as required. When a device changes, the kernel calls the program specified in /proc/sys/kernel/hotplug; this is typically /sbin/hotplug. Depending on the device type, the program will load modules, modify access privileges, configure network devices, or in the case of Udev, manage device nodes. The Udev subsystem needs some details to be able to create a file: the device type (char or block) and the major and minor numbers. Udev on kernel 2.6 or later references the sys filesystem (SysFS, which is normally located below /sys) to discover this information. Block devices are located below /sys/block and character devices below /sys/class. The major and minor numbers are stored in a dev file. For example, the following command gives you the numbers for the first IDE hard disk, hda:
cat /sys/block/hda/dev

3:0
Udev can parse any SysFS information, such as the device class, name, numbers, etc., to create appropriate devices. If the names are stable, Udev can even run complex programs to check whether it should configure a printer that has just been switched on as /dev/usb/lp0 or /dev/usb/lp1, basing the decision on the serial number of the printer. It is even possible to use arbitrary names and call nodes, /dev/lp-epson and /dev/lp-kyocera, for example.
Setting up UdevUdev has two configuration options. Files in /etc/udev/rules.d/ specify the device file names, others in /etc/udev/permissions.d/ specify the privileges. The default rules create device files that use the familiar Linux names. At the start of each rule, there are one or more conditions that need to be fulfilled if Udev is to create a device file. The name then follows. The following is a typical entry for USB printers:
BUS="usb", KERNEL="lp[0-9]*", U

NAME="usb/%k"
If the device is attached to the usb bus, and the internal kernel name is lp with an arbitrary number, Udev creates a file with the kernel name (as indicated by the %k) in the /dev/usb directory. Besides static rules of this type, it is also possible to call external programs. The manpage has an example for IDE CD ROMs that checks if a directory called /proc exists to identify the device as a CD ROM:
KERNEL="hd[a-z]", U

PROGRAM="/bin/cat /U

proc/ide/%k/media", U

RESULT="cdrom", U

NAME="%k", SYMLINK="cdrom%e"
In this example, Udev calls /bin/cat for the /proc file for all devices with names that start with hd. If file specifies cdrom as the medium, Udev will remember the name but will additionally create a symbolic link for cdrom. The %e tells Udev to select the next free number if a file of the same name already exists. Using device serial numbers to assign an intuitive name is a useful approach:
BUS="usb", SYSFS{serial}=U

"HXOLL0012202323480", U

NAME="lp-epson"
This rule tells Udev to create a device file, /dev/lp-epson, if it finds a device with the above mentioned number in its serial file below the SysFS tree.
Udev and PrivilegesRules for access privileges comprise a single line with colon-separated values for the name, owner, group, and privileges.
usb/lp*:root:lp:0660 All device files called usb/lp* belong to the user root and the group lp. Access privileges are specified in octal notation. The new hotplugging model is so successful that it is even used to boot the system. It calls udev with appropriate variables for any known devices in /sys/class and /sys/block. |
Another layer of the hotplugging system provides an interface between the hardware and the application. The Hardware Abstraction Layer (HAL, [4]) has detailed information for hardware, which is stored in device information files (.fdi).
You can use the HAL layer to make changes for special devices. For example, one user solved the issue of his iPod not de-registering correctly [5].
FDI files are XML-formatted files that provide detailed device descriptions. The lshal command gives us the details. The hal-device-manager has the same data but with a neat GUI (Figure 2). Suse users will have to make do without HAL components, as Suse has a different way of handling hardware details (see “Box 1: Hotplug on Suse Linux”).
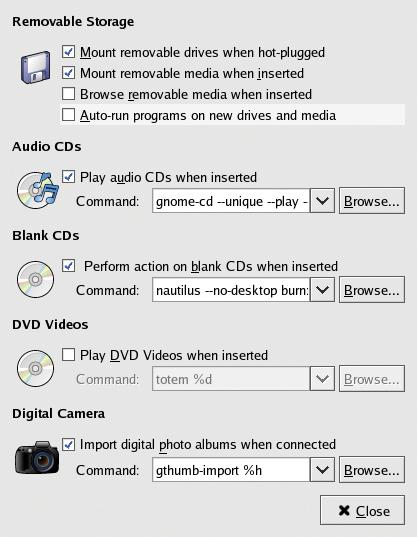
In the future, applications will be able to query hardware details via the D-Bus [6]. D-Bus is a software communication system into which applications can slot and register themselves for certain events. For example, a video editing program might need to know when a new camera is attached to the PC. The gnome-volume-properties program, which recent Gnome versions have, uses D-Bus and HAL to associate applications with hotplug events (Figure 3).
We can expect D-Bus to play an important role in inter-application communications under Gnome, although there are not many applications that leverage this ability at present.
Despite all the progress that has been made with respect to device detection, things are still not perfect. The hotplug system agents need detailed hardware information, and this information will be obsolete on a system that is a few months old. An online database for hardware components might help; users could contribute details they had worked out in FDI format.
The HAL project is moving in this direction, as it gives the hotplugging system information that the kernel can’t provide. A number of distributions have already started using it. We’ll hope that Suse will follow the trend; the more consistent hardware management is in Linux, the better.
| INFO |
|
[1] Linux Hotplug: http://linux-hotplug.sourceforge.net [2] Writing your own Udev rules: http://www.reactivated.net/udevrules.php [3] Fedora Udev documentation: http://fedora.redhat.com/docs/udev [4] HAL: http://www.freedesktop.org/Software/hal [5] iPod with Udev: http://www.kgarner.com/blog/archives/2005/01/11/fc3-hal-ipod/ [6] D-Bus: http://www.freedesktop.org/Software/dbus |