File sharing with MLDonkey and KMLDonkey
Donkey Business
Mirko Albrecht
File sharing with MLDonkey and KMLDonkeyDonkey BusinessMirko Albrecht |
|
Peer-to-peer file-sharing is one of the most controversial applications of our times. Users who put their complete CD collections on their hard disks, and invite other users to download them, have drawn the scrutiny of the music and movie industries. But when file sharing is used legally, it is an excellent way of making files available without the need for purchasing remote web space.
Some of the more prominent examples of file sharing networks are Morpheus, Gnutella, BitTorrent, and Donkey/eMule. Recent clients that can handle multiple peer-to-peer networks and give users more intuitive access. One such client is MLDonkey.
MLDonkey runs as a so-called core, just like a background daemon. Some distributions include the core and a GUI-based front end. Others, such as Suse Linux 9.2, simply include the KMLDonkey KDE GUI.
Experience shows that it makes sense to build your own version rather than using the program supplied by your distributor. The bravest of the brave will want to build the latest source code to keep abreast with MLDonkey development, which takes quite dramatic leaps and bounds at times. The developers of this file sharing technology are constantly improving the protocols and internal settings. And it also makes sense to keep up with changes to the individual peer-to-peer networks, all of which use their own protocols.
This said, most users will prefer a stable version; again, experience shows that some updates are sub-optimal. So if you have a stable version of MLDonkey, the word is to steer clear of dubious updates that can easily affect the functionality of your core.
If you prefer to avoid building the source, you can download binary packets from the homepage at [1]. The Spiralvoice page [2], which is another excellent source of downloads, has a patcher and package builder for MLDonkey. The site has a variety of versions including the required patches. When this magazine went to print, the latest official release was MLDonkey 2.5.28, and the latest unofficial version was number 2.5.29.
MLDonkey Forums (such as at [3]) will tell you that the version with the reputation for maximum stability in 24x7 operations and the best download rate is the 2.5.16t core. The “t” at the end of the version number identifies the release as a patched version. Spiralvoice itself states that this version is “mostly stable” and refers to the “experimental nature” of the current version [2]. I have tested lots of versions, and all I can say is, I agree.
To install MLDonkey, first unpack the package in a new directory by typing tar xvfz mldonkey-2.5.x.tar.gz. When you change to the new directory, you should discover a file called mlnet, which you can call directly by typing ./mlnet.
Generally, the pre-compiled versions that Spiralvoice has up for grabs tend to work quite well. These versions have modular support for major peer-to-peer networks. The code may be more bulky, but this should not faze a modern computer. Also, you can use the GUI front end to disable any modules you do not need at a later stage.
Building MLDonkey from the source gives you a software version that matches your hardware environment and intended applications. You should opt for the version mentioned previously, mldonkey-2.5.16, with the patch_pack16t patch.
Both of these archives are available as downloads from [2], and you can follow the normal steps to unpack. Move the contents of the patch package to the folder you created when you unpacked the main tarball, /mldonkey-2.5.16. Now change to this directory and type patch -p0 < patch_pack16t to install the patch.
You will need to configure the makefile in the same folder. We decided to restrict network support to BitTorrent, Fasttrack, and eDonkey2000. And we will not be using the GTK GUI for the time being. The configure command that gave us this is:
./configure --disable-gui U
--enable-batch U
 --disable-opennapU
 --disable-audiogalaxy U
 --disable-gnutella U
 --disable-gnutella2 U
 --disable-soulseek U
 --disable-openft U
 --disable-cymes U
 --enable-pthread
If you have different preferences, you can change --disable to --enable as required. For example, if you only require eDonkey2000 support, you can simply call ./configure -disable-multinet, not forgetting to specify your other preferences.
This article will be focusing on the eDonkey, BitTorrent and Fasttrack (Kaazaa) networks, which are the most popular and widespread among the file sharing community. Even mentioning all the peer-to-peer networks and their quirks would take up more space than we have for this article. But if you are interested in learning more, you can always check out the MLDonkey FAQ at [4]. This gives you a lot of help with the various network modules that MLDonkey implements.
To build MLDonkey, you need the Objective Caml tool (this is the programming language in which MLDonkey was written) version 3.08 and LablGTK 1.2.7. You can use your distribution’s wget function to download the required packages off the Internet during the ./configure phase and compile the packages. However, applying patch_pack16t means you need newer versions of both tools. To disable the automatic installation of both tools, remove the --enable-batch option from the configure command. If you opt to disable the GUI (--disable-gui), you will not need to update LablGTK anyway.
To build both ocaml and lablgtk before you start, first download the sources from [5] and [6]. Then run tar xzfv to unpack. Creating Objective Caml means a departure from the typical three-phase build:
./configure
make world opt opt.opt
make install
The syntax for lablGTK also departs from the norm. In fact, you need four steps:
make configure
make
make opt
make install
In both cases, you need root privileges to run make install. If you have Suse Linux 9.2, you do not need to go to the trouble of building these two tools, as the distro includes both in recent versions. You can run Yast to install the tools, if you have not already done so.
After taking this hurdle in your stride, you should be able to run configure in the /mldonkey-2.5.16 directory without any errors. If you do experience a few problems compiling MLDonkey, you could leave out the patch, or use the patch_pack16r variant instead. The make depend and make commands give you the executable; there is no make install. To run MLDonkey as a non-privileged user, simply run the MLDonkey core, mlnet, which should be somewhere between 3.0 and 3.5 MBytes.
To run MLDonkey from anywhere on your system, you can copy mlnet to your global directory by typing cp mlnet /usr/local/bin. Of course, you need to be root to do this. Now make the file executable for all users by entering chmod a+x /usr/local/bin/mlnet, or assign user privileges appropriate to your system.
Any user can now launch the MLDonkey core in a terminal window by typing mlnet. If you have not put the core in your path, change to the folder where mlnet resides, and type ./mlnet.
The first time you call the program, it creates a whole bunch of files and directories in your home directory. To avoid this mess and keep files at a central location, set the MLDONKEY_DIR environmental variable. To do so, open the .bashrc file in your home directory, and add a line for export MLDONKEY_DIR=”/path/to/mldonkey-directory”, making sure you create the directory before doing so. Now log on to the console again to apply the changes.
When you enter mlnet, the following lines should appear on your screen, besides a whole bunch of other information:
Welcome to MLDonkey
SAVING SHARED FILES AND SOURCESU
 on localtime: 12/ 9, 17:07:33
SAVED
Options correctly saved
Core started on localtime: U
12/ 9, 17:07:33
Disabling output to console, U
to enable: stdout true
You can press [Strg]+[C] to quit the program; MLDonkey also quits when you close the terminal window that launched the core. To remove the need to keep a window open to run mlnet, you can stipulate mlnet -daemon instead. This tells the core to run as a background daemon; users can actually log off the system without mlnet quitting. To stop the background process, enter killall mlnet.
Now that the MLDonkey core is running in the background, there are several ways of accessing the daemon. If you prefer a spartan approach, you can even use telnet. Typing telnet localhost 4000 gives you access to the MLDonkey interface.
Typing a question mark at the telnet prompt tells you that s searchkey will launch a search, vr will view the results, and d result number will launch a download. The q command quits the interface. Typing two question marks gives you more detailed help.
As an alternative to telnet, you can open the web-based GUI for MLdonkey by entering http://localhost:4080 in your Internet browser. You can also opt for one of the many GUI-based front ends instead. The pre-built version has a useful interface for the GTK library, as previously mentioned. Users with the Gnome desktop will probably opt for the well structured and intuitive GTK GUI.
If you prefer to manage MLDonkey with your web browser, check out alemule, phpEselGui, and Zuul. All three of these are useful PHP-based GUIs.
An MLDonkey front end for the KDE desktop has been around for a while now: KMLDonkey has developed into a really useful program in the course of the last few months. As a genuine KDE tool, KMLDonkey uses the Qt library, and this guarantees seamless integration with the KDE desktop. You can add kmldonkey to your KDE panel and integrate ed2k links (links to eDonkey downloads on the Internet). KMLDonkey also has a logically structured interface, which is self-explanatory for the most part.
If you prefer to install a KMLDonkey binary, Suse users will discover a current version for Suse 9.1 and 9.2 on the Pacman [7] page. The version supplied with the current Suse 9.2 distribution is the fairly ancient kmldonkey-0.9.1.
The current version of KMLDonkey when this magazine went to print, kmldonkey-0.10, is available as a download from [8]. This said, building the application from the sources is quick and painless. To do so, first download the source tarball, then build and install the program using the following commands
tar jxvf kmldonkey-0.10.tar.bz2
cd kmldonkey-0.10
./configure --prefix=$KDEDIR
make
su -c "make install"<I>
The KDE directory for Suse Linux is /opt/kde3, for example, so the call here would be ./configure --prefix=/opt/kde3. The link for the program build slots in below the “Internet” subheading in the KDE menu. You can press [Alt]+[F2] and enter kmldonkey to call the application directly. This assumes that the MLDonkey core is already running.
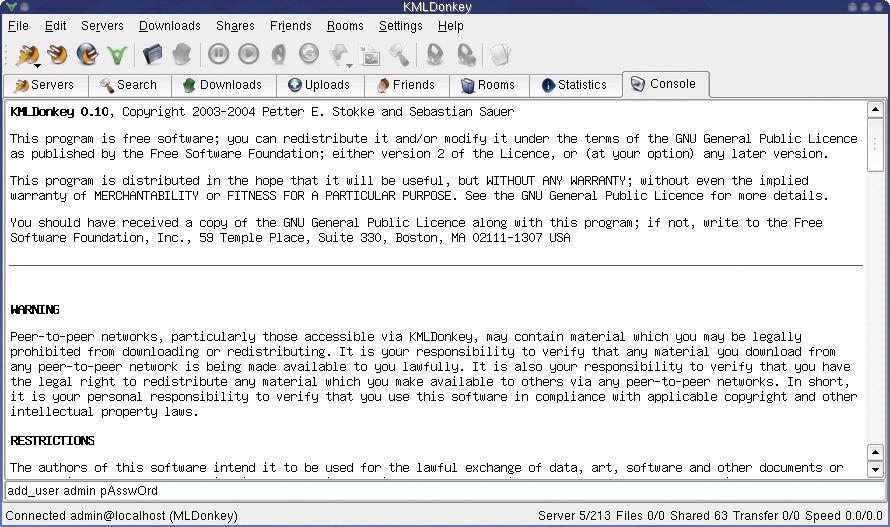
After launching KMLDonkey, the first thing to to is to set up the program interface in the last tab, Console. Right at the bottom of the tab you should find the console prompt, which you can now use to set a password for access to the core – so far anyone on your local network could have accessed your core using telnet or HTML. For example, to set the password to pAssw0rd, type the following at the console prompt add_user admin pAssw0rd (Figure 1).
You will need a few more settings in Settings | Configure Connection and Preferences | Configure MLDonkey. In the first submenu, enter the password and user credentials you just set. You can also configure the KMLDonkey startup mode to launch the core with the front end. This will save you the trouble of launching the core manually, as described above.
The second menu gives you the options for the various file sharing networks that MLDonkey supports. The Networks area allows you to enable and configure individual modules. You can assign a value of false to a network to avoid using that network. If you need to enable a network, such as the eDonkey2000 network, select true instead.
KMLDonkey has useful defaults for most peer-to-peer protocols. This said, the values for the eDonkey2000 do need some attention. Look for the force_high_id entry in the right-hand panel below Network | Donkey, and set the value to true. This tells the client to drop connections to servers that only support low IDs and to look for servers that allow high IDs.
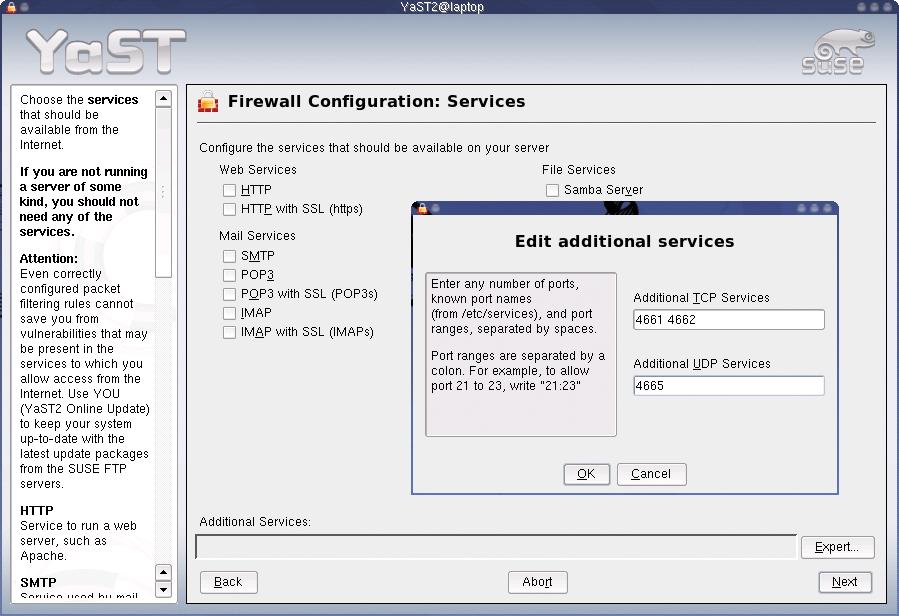
A low ID will not get you far in a file sharing network. The ID means more administrative work for the Donkey server, as the Donkey-specific ports 4661/tcp, 4662/tcp and 4665/udp are blocked by a firewall or not router by a router. You need to allow these ports for your own core by adding them to your SuSE-Firewall2 configuration below Services | Other services (Figure 2). If your MLDonkey system is hiding behind a router, note that most devices have a convenient web interface that will allow you to redirect connections for these ports to your machine (the entry is typically called “Virtual Servers” or something similar.) Check your router documentation for details.
The core should assign you a high ID; you can check this using a simple MLDonkey console command, id. If the output is your own IP address, the high ID assignment has worked, and this means you will no longer be down at the bottom of the list of clients.
Some users suggest setting the value for max_connected_servers as high as possible. This means some files download more quickly and – at the start at least – search requests are handled more generously. However, this stresses the network and other users may not like you doing so. Each slot you occupy with a server connection is one less for the other users. However, setting a value higher than the default of “3” will not guarantee quicker downloads, so this value is best left as is.
The Bandwith entry allows you to specify the maximum upload and download bandwidth. The max_hard_upload_rate should not be below 5 kbps for DSL and not above 3 kbps for ISDN. The reason for this is that choosing too high an upload rate will affect your download rate enormously. For example if an upload over a 1000 kpbs DSL connection reaches the upload limit of 128 kbps, this will possibly block your connection, and even normal Internet access will slow to a crawl. You need to set your download rate to reflect your environment; after all, you know your Internet connection better than anyone else. Incidentally, a value of 0 here means no limits.
Path allows you to specify where to store temporary files and downloads. This concludes the major settings, so there is nothing to stop you swapping files for the first time. Of course, the MLDonkey core has a lot of bells and whistles you can tweak to your heart’s desire. For more information, check out one of the MLDonkey Internet forums, such as the one at [3].
The program interface is extremely intuitive and spreads the program functions over a collection of tabs.
Servers takes you to a list of the individual file sharing servers and allows you to open or close connections to these servers.
Search allows you to seach for files in various networks; you can specify the file type and restrict the file size.
It also makes sense to check the Statistics tab from time to time. The tab gives you interesting information on your client’s download performance.
One of KMLDonkey’s outstanding features is that you can integrate the program into your KDE panel. To do so, right click the Kicker area of the panel and select Add | Applet | MLDonkey Applet to add the program. You can also configure a few critical core parameters here (Figure 3), including the maximum upload and download rates. The applet actually displays the current rates to give you a quick overview. If the download rate is too low for the current tasks, you can press the pause button to tell the MLDonkey core to wait until you click on Play again to re-enable the core.
As previously mentioned, the Konqueror web browser now recognizes the ed2k URI as a valid protocol. If you stumble across a link of this type on the Internet, the browser will add the download to the current core at the click of your mouse.

After you negotiate the installation phase, swapping files over a file sharing network is very easy. Thanks to convenient front-ends with intuitive functions, such as KMLDonkey, anyone can offer files to the community and access the downloads that other people have put up for grabs.
Both the core and the GUI are mature; interoperability is typically no problem, and crashes are virtually unknown. This said, the MLDonkey package could still use some attention to detail. One thing I would like to see is an automatic RPM-based install that removes the need for users to do things like copying the application to the right position in the directory tree.
Let’s hope the entertainment industry will not demolish the file sharing community with its current opposition to any kind of file sharing, but will instead recognize how valuable a file sharing community can be and support promising tools like MLDonkey.
| INFO |
|
[1] MLDonkey homepage: http://www.mldonkey.org [2] MLDonkey binaries by Spiralvoice: http://download.berlios.de/pub/mldonkey/spiralvoice/ [3] MLDonkey forum: http://mldonkey.berlios.de/modules.php?name=Forums [4] MLDonkey FAQ: http://www.nongnu.org/mldonkey/faq.html [5] Objective Caml: http://caml.inria.fr/ocaml/ [6] Source files for lablGTK: http://wwwfun.kurims.kyoto-u.ac.jp/soft/olabl/lablgtk.html [7] Suse binaries for KMLDonkey: http://packman.links2linux.org/?action=451 [8] Source files for KMLDonkey: http://savannah.nongnu.org/download/kmldonkey/kmldonkey-0.10.tar.bz2 |