Learning Vocabulary with KVocTrain
Language Lessons
Kevin Donnelly
Learning Vocabulary with KVocTrainLanguage LessonsKevin Donnelly |

|
KVocTrain [1] is a tool that helps you learn foreign language vocabulary words. The KvocTrain program is part of the KDE Edutainment suite and was originally written by Ewald Arnold. It works on the same principle as flashcards. All you need to do is input words and information about them, then ask KVocTrain to run a test for you – it will ask you the words and record your success rate.
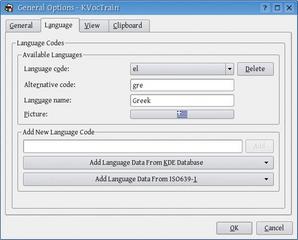
To set up KvocTrain, open the application (K -> Edutainment -> Languages -> KVocTrain) and select Vocabulary -> Append Language -> Another Language, then click Yes. Click the button Add Language Data from KDE Database to add a language (see Figure 1). In this case, I’ll select Europe, Southern -> Greek. In this article, I’ll use Greek as an example language, but you can follow similar steps to configure KvocTrain to test you in another language. Use the same process to add UK English, selecting Europe, Western -> United Kingdom at the end.
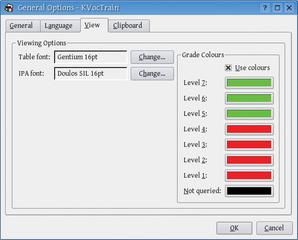
Click the View tab, and change the Table font to your chosen Greek font (see the box titled “Greek Font and Keyboard Layout”). Greek is fairly phonetically spelled, so it doesn’t really need International Phonetic Association pronunciation aids, but if you need these for the language you are learning, change the IPA font accordingly. The Doulos font, available on the same site as Gentium, is a very good choice. Click OK to leave the dialog. You can access it again if necessary from Options -> General Options (see Figure 2).
In the main window, adjust the columns by clicking and dragging the header dividers until they are arranged nicely on the screen. To change the order in which the languages appear, use Vocabulary -> Set Language -> Original -> Greek to put Greek in the first column, and Vocabulary -> Set Language -> Translation -> English to put English in the second column. You can actually have as many languages as you want, so if, for instance, I want to test Greek/Welsh as well, I can add Welsh as a third language (using Append Language, as described earlier in this section) and use Set Language to assign it to a column.
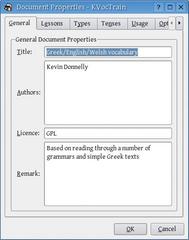
You will be building up a new vocabulary list, so go to Vocabulary -> Document Properties and fill in some summary information about your document on the General tab (see Figure 3). Leave the other tabs for the time being. Next, save your vocabulary list under an appropriate filename – the file extension will be .kvtml, which can also be read by other KDE edutainment programs such as KWordQuiz.
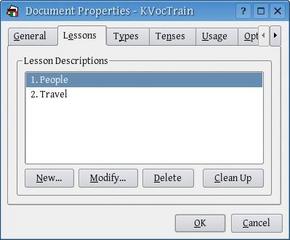
We can now do some setup for Greek itself. Under Vocabulary -> Language Properties, fill in the basic features of each language (e.g., definite article, personal pronouns). Although there is nothing to stop you entering all the vocabulary in one big list, it makes sense to segment the list in some way, so that you can revise particular chunks of it. KVocTrain uses the concept of lessons for this, so we’ll add a lesson. Go to Vocabulary -> Document Properties, and on the Lessons tab, click the NewÖ button (see Figure 4), and enter a name for the lesson.
When it comes to naming lessons, I tend to choose themes rather than parts of speech, so I’ve put in People for the lesson name. The People lesson will hold words relating to occupations. I have also created a lesson called Travel. Of course, if you change your mind about what type of words you wish to associate with a lesson, you can come back to the Lessons tab later to change the description. The lesson to which an individual word has been assigned is listed in the first column of the main window, and you can reassign the word to another lesson either there or in the word’s own dialog.
| Greek Font and Keyboard Layout |
|
This article uses Greek as an example of a language you can learn with KVocTrain. The first step is to set up the necessary fonts and keyboard layout for the language you are using. First, we’ll install a font that will show Greek characters and set up a Greek keyboard. A number of fonts include Greek characters, but as with Latin characters, some look better than others. The best-looking GPLed font I have come across is Bitstream Charter, but by far the most beautiful font is Victor Gaultney’s Gentium [2], which, although not GPLed, has no restrictions on non-commercial uses. There are a number of other fonts on the same site that are specially crafted for Greek. Whatever font you decide on, download it to a directory and unzip it if necessary. In the KDE Control Center, select System Administration -> Font Installer and click the Administrator Mode button so that the font will be available to all users. Enter your password and click the Add Fonts button. Navigate to the location of the font file, select it, and click OK. KFontInstaller will place the fonts in /usr/local/share/fonts. Note that you may have to log out and log in again in order for all applications to see the new font. The next thing is to set up the keyboard so that it will be possible to enter words using both Latin and Greek character sets. To do this, go to Regional & Accessibility -> Keyboard Layout in the KDE Control Center. On the Layout tab, tick Enable keyboard layouts. Roll down the list until you come to the Greek keyboard layout, click on it, and then click Add. You should now have two keyboard layouts listed in the Active layouts pane. Once you click Apply, a flag icon will appear in the system tray. Clicking on this icon will switch between the two keyboard layouts. It is annoying having to move from the keyboard to the mouse just to change the keyboard layout, so the next thing to do is to assign a keyboard shortcut. A shortcut (Ctrl+Alt+K) is already set up by default, but while this will allow you to switch from the UK layout to the Greek layout, it will not allow you to switch back again, because the Greek layout does not yield the right combination for these keys. To get around this, highlight the Greek layout in the Active layouts pane, and then tick Include Latin layout at the bottom of the screen, followed by Apply. The keyboard shortcut will now switch between both layouts. One more thing is advisable – on the Switching Options tab, tick Application under Switching Policy. This will combine any keyboard switch to the application you make the switch in, so that if you have changed to the Greek layout in KVocTrain, and then open a terminal to do something, you won’t find yourself typing in Greek characters! The Greek keyboard layout is close enough to the English layout not to need any special key stickers, but if you want to make it even easier to use, you could put together a hybrid UK/Greek keyboard layout, with a little-used key like the Windows key generating Greek letters on the keys you specify. |
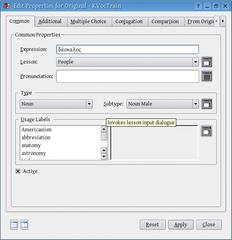
Now we can start entering words. First, check under Options and ensure that Inline Editing is not checked – if it is, uncheck it. I know that I have a few people words to enter, so I can set that lesson as the default by selecting it in the dropdown list at the top of the main window – that means I won’t have to select it separately for every new word. Press the Insert key on your keyboard to get a new entry line, and then double-click on the new cell in the Greek column. You will get a large window in which to enter details about the word. Use Ctrl+Alt+K to change to Greek, and in the Expression field of the Common tab, enter d-a-s-k-a-l-o-w (see Figure 5). If you are using SUSE, you can press Alt+;, and then the letter, to get the accented letter.
Select Noun from the dropdown list under Type (which actually refers to parts of speech), and then select Noun Male from the dropdown list that becomes available on the right. (Note that you can add further lessons, parts of speech (types), etc., on the fly by clicking the icon to the right of the entry fields.) Click Apply, move the window out of the way, and you will see that the term is now entered in the cell. Double-click on the English cell, press Ctrl+Alt+K, enter teacher in the Expression field, select Noun as the type, and click Apply again.
If you are entering a series of words at once, which is most likely the case, it becomes annoying having to peek behind the dialog window every few seconds. To get around this, you can dock the word dialog by clicking the second button at the bottom of the window – this places it neatly on screen, side-by-side with the main window.
Using the dropdown lists to enter the noun’s gender allows KVocTrain to test you on it later (Learning -> (language) -> Article Training), but it may be that you have been taught in your language lessons to write the definite article down with each word, so that you can more easily remember its gender. If so, just insert the definite article as well when you are entering the word into the expression field. I was indeed taught that way, so I went back and added it to the entry.
Continue adding words in the categories (lessons) you have chosen to use. If by mistake you enter a word that you didn’t intend to enter, just click on the line in the main window and press the Delete key (see Figure 6). And remember to save your work periodically.
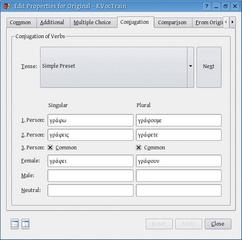
Although the word dialog window has a number of tabs, you don’t need to think much about them at this stage. The tabs allow you to enter lots of relevant information about the word, and they might be of benefit to you later, but how far you go here really depends on yourself. The Additional tab allows you to enter examples, synonyms, etc., and the Multiple Choice tab lets you enter words of similar sound or meaning, so that KVocTrain can give you a multiple choice test (Learning -> (language) -> Create Multiple Choice). Perhaps the most important tab is the one labeled Conjugation (see Figure 7), which is only active if the word’s type is Verb. You can select the verb’s tense from the dropdown list and add the forms for each person in the singular and plural. Seven tenses are set up by default, but you can add more by going to Vocabulary -> Document Properties and selecting the Tenses tab.
If you really want nothing more than just a list of words to learn, you can speed up the data entry process by choosing Options -> Inline Editing. This option makes KVocTrain behave rather like a spreadsheet – you can enter the words by double-clicking on the cells without bothering with any of the additional information in the word dialog. This is probably the easiest thing where phrases are concerned, since they will not fit neatly into the word dialog anyway.
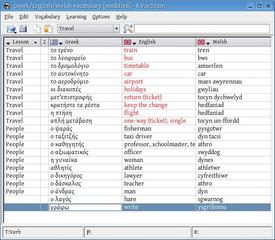
Now it’s time to start on the hard work. First, we have to set up a query. Go to Options -> Query Options, and go on the Groups tab. Click the New button. I want to test myself on the travel words, so I enter Travel as the name for my query. This query profile system allows a number of queries to be set up to test you on specific chunks of your vocabulary list.
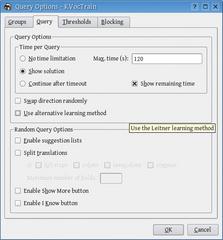
On the Query tab (see Figure 8), you can set a timelimit (in seconds) within which you must give the answer, and also decide whether or not KVocTrain should show you the answer at the end of that time or just display the next item. I have set the time limit to 2 minutes and have elected to display the answer.
The Thresholds tab allows you to specify which segments of your list are to be included in this test. From the Lesson dropdown list, select Contained In, and then click on Travel in the right-hand pane. By using the dropdown lists in the lower half of the dialog, you can choose to see only certain words (e.g., nouns) from the lesson, choose how often the word should be queried, and so on.
The last four lists may be grayed out because they are overridden by the Blocking tab, which specifies how soon the word should stop being tested. For the time being, go to this tab and uncheck both Blocking and Expiring. To save all the settings for the travel query, click Retain on the Groups tab, and then click OK to close the dialog.
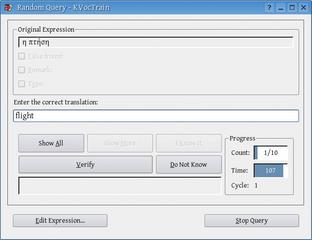
Now select Learning -> English -> Create Random Query (if you have more than two languages set up in KVocTrain, you will get a further menu option allowing you to choose which language will be the “target” language). The Greek words will be shown one at a time (see Figure 9), and you have two minutes to type in the answer and press Return. If you get the answer wrong, you get a message to that effect, and your entry will be shown in red. Retype your answer, or press Return, to go on to the next word. If you don’t know the answer, you can click Do Not Know. KVocTrain will go on to the next word and ask you the unknown word again at the end. If you want to be reminded of the English translation, click on Show All; the correct answer will appear in green, and you can press Return to go on to the next word.
At the end of the test, all the words that were tested will be marked with a green checkmark, to show that they are still in the pool of words to be asked. Every time you run this Travel query, you will be asked all the words in the Travel lesson. But of course, after a while you will know most of the words, and you will want to skip them to concentrate on the ones you don’t know. To do this, open the query again, go to the Blocking tab, and tick Blocking and Expiring. At the default settings, any words you get right on the next test will be “blocked” (not asked again) for a day, and will then be asked again once the period is over. You can change these settings to suit your own needs. Run the test again, and this time (if you get all the answers right), none of the words will be marked with a green checkmark – they are no longer in the pool of words to be asked. However, they will appear in red to show that they are currently “blocked.”
If this testing method does not offer you enough options, KVocTrain also offers a test based on a method developed by Sebastian Leitner. This method aims to test every word at least four times, with words you are uncertain about being tested more. The method is explained in the KVocTrain handbook. To enable this method, tick Use alternative learning method on the Query tab of the Options -> Query Options dialog.
KVocTrain is a very useful program for those who are trying to extend their vocabulary. However, it does have some shortcomings. Perhaps the most important is that it has not been updated for some time, although there has recently been some discussion on the KDE lists about doing a revised version. Its design is not perfect – for instance, there appears to be no way to delete the seven preset tenses, and ideally it should be possible to select a separate font for each language. Moreover, the font chosen for the main window is not the one used in the word entry dialog, which will use the default KDE font.
If you are looking for a simpler flashcard program, KDE also offers Peter Hedlund’s KWordQuiz [3]. If you have followed this article, you should find your way around KWordQuiz without a problem. The KWordQuiz program is more lightweight, and it cannot segment your wordlist into sections or allow the range of testing KVocTrain allows. Moreover, with KWordQuiz you can only use two languages, whereas in KVocTrain you can use as many as you want.
Both KWordQuiz and KVocTrain use the same .kvtml format, but note that opening a KVocTrain file in KWordQuiz and saving it there will lose some information (e.g., the verb conjugation data). It is important to note that the information that can be tested in these flashcard programs is not limited to languages. On the KVocTrain site, you will find downloadable files teaching Japanese script, musical scales, human physiology, and so on.
| INFO |
|
[1] KVocTrain website: http://edu.kde.org/kvoctrain/ [2] SIL website: http://www.sil.org/computing/catalog/show_software_catalog.asp?by=cat&name=Font [3] KWordQuiz website: http://www.peterandlinda.com/kwordquiz/ |