
By Achim Leitner
Today's PDF files not only include text and images, but also features such as links, bookmarks, and author's notes that will not appear in the printed version. These goodies are not intended for printing, but they do improve the user experience for someone who is viewing the file on screen with Xpdf, Kpdf, or Acrobat Reader. Unfortunately, the native PDF export function in OpenOffice [1] is very simple and does not include some of these advanced PDF features. OpenOffice 2.0 will provided enhanced PDF export features ([2] and Box 1), but in the meantime, if you want to create more user-friendly PDFs in OpenOffice 1.1, you can use an OpenOffice extension called ExtendedPDF [3].
ExtendedPDF is implemented as a macro. The Open edition of ExtendedPDF is released under the GPL. The commercial "Professional" and "Universal" versions cost GPB 20 each and add copy protection (PDF refers to this as "Document Security"), email support by the manufacturer, and a simpler installation procedure, but the free Open edition has everything you need to create attractive PDF output.
| PDF Export in OpenOffice 2.0 |
|
The specification for PDF export in OpenOffice 2.0 [2] introduces a number of improvements that allow users to create elegant PDF documents. These improvements include:
Later versions will support encrypted PDFs, that is, documents with copy protection ("PDF Security"). At this time of writing, the OpenOffice development team is looking to complete Version 2.0 by May 2005. Most new features are already in place, such as extended PDF export. Our test with the Snapshot Build 1.9.m71 (released 01/24/2005) demonstrated that ExtendedPDF will be redundant when the new version is released. ExtendedPDF has more configuration options; for example, you can specify which paragraph formats to use as bookmarks. On the other hand, the macro is a lot slower than integrated PDF export. |
As ExtendedPDF is a macro, its format is fairly unusual: an OpenOffice file. The document describes the installation and includes the required functions at the same time. Unfortunately, the Open Edition does not have an installation routine, and this makes the whole procedure a bit clumsy. But keep to the guide, and you should get there in the end.
The most critical requirement for ExtendedPDF is not to be found on the webpage or in the installation guide, although it is in the downloadable user guide. The macro only works in OpenOffice 1.1. Although you can install it in version 1.0, it will not work. In a test with the current OpenOffice 2.0 snapshot (Version 1.9.71.1), the macro did not perform as expected.
A link to the user guide is on the homepage [3], and the guide itself is PDF formatted. The chapter on "Installing ExtendedPDF on Linux or Unix" gives you an installation guide, however, it was written for the commercial version. The installation of the free Open edition is only described in the OpenOffice document.
ExtendedPDF needs its own pseudo-printer to convert the document to PostScript. (The box titled "How ExtendedPDF Works" explains why). The OpenOffice spadmin tool handles administrative chores such as printer management (Figure 1). If you can't locate the tool in the start menu, and it is not in your path, check out your home directory. You should see a directory called OpenOffice, often with a version number appended to the directory name. Pop up a shell, change to the directory, and type ./spadmin. If you fail to find the tool in your home directory, try /opt/OpenOffice.org/spadmin.
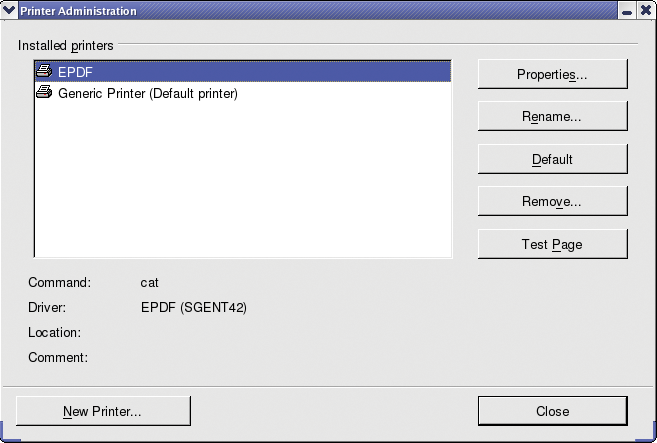
In the printer administration tab, click on New printer...(this is the button on the lower left). In the add printer wizard, select add a printer - but do not choose the PDF converter; ExtendedPDF will handle this. Then click Next >> and the wizard will take you to a long list of printer drivers. The driver you need is called Generic Printer (T42 enabled). The bit in the parentheses is important: the normal Generic Printer makes for extremely blocky fonts in the PDF in some cases. The wizard will prompt you for a command in the next step. Enter cat here.
Then type a name for the new printer. You will need to type exactly the same name later in the ExtendedPDF configuration, so make sure you choose something simple such as EPDF. Then click on Finish to close the wizard.
You still need to configure a few settings for the new printer in the printer configuration (Figure 1). To do so select the new EPDF printer in Installed Printers, and then click Properties... (top right). In the Device tab select Color in the Color drop-down - the default setting is from driver. In the Font replacement tab, uncheck Enable font replacement. And set the margins to zero for Other settings. Then click OK to apply these properties and click Close to close the printer management tool.
| How ExtendedPDF Works |
|
OpenOffice has two approaches to creating PDF documents. The traditional method is to print a PostScript file and then run ps2pdf from the Ghostscript package to convert the file to PDF. Version 1.1 introduced a PDF direct export feature to OpenOffice that avoids the detour via PS. ExtendedPDF avoids OpenOffice 1.1's integrated PDF export feature and outputs documents as PostScript files first. To do so, ExtendedPDF needs a printer driver, which is created when you install the package. The macro appends the details of cross-references, notes, and bookmarks from the document at the end of the new PostScript file. The macro needs to ascertain the exact position of each element to do this - it discovers this information on the fly. To do so, ExtendedPDF selects each appropriate element within the document and ascertains its on-screen position. This process is quite slow; you can actually watch it happen. Ghostscript then converts the PostScript file to PDF and parses the additional information. The result is a file with both the printing data and the required cross-references, bookmarks, and notes. |
The macros are stored in the same file as the installation guide. The presence of the Extended PDF macros explains why a warning is displayed when you open the installation guide in OpenOffice. As you need to install the ExtendedPDF macros before you can run them, select Do not run.
You need to set some preferences in so-called modal dialogs during the install. As there is no way of scrolling the document content while one of these dialog windows is open, you have no way of knowing what the next step entails. To avoid this issue, it makes sense to export the document to PDF using the existing OpenOffice export function and to open the PDF file for viewing.
To install ExtendedPDF, select Tools | Macros | Macro... in the OpenOffice menu; this pops up the macro window. Then click on Organizer... and click on the Libraries tab in the dialog that then appears. Select soffice for Application/Document, as you will need these macros in all document types later (Figure 2).
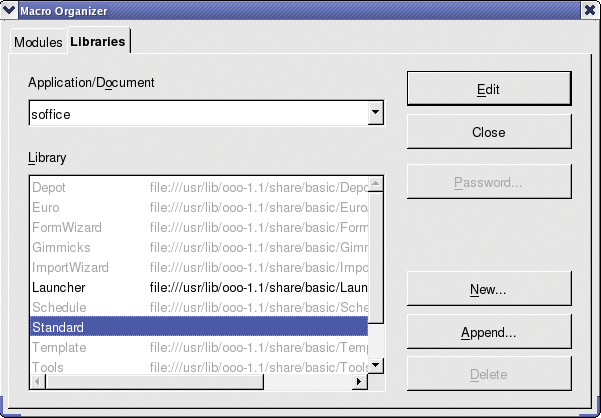
Click on Append... and select the installation document in the file browser dialog; this is the file that you just opened. After doing so, a new window appears, showing you a list of the libraries you can add. Select extendedPDF (but not Standard) and click OK to confirm. Finally, close both the macro organizer and the Macro window.
ExtendedPDF is now installed but more or less inaccessible. There is an easy way to change that; just add a button to the toolbar. To do so, right click the toolbar and select Configure..., then select the Customize button to open the window shown in Figure 3. The list on the left Available buttons has an entry for OpenOffice.org BASIC Macros.

Take care not to confuse with the extendedPDF Open Edition BASIC Macros entry. This latter entry only exists while the installation document is open, and it refers to the embedded macros in the document, not to the installed version. You need to add the installed version of the ExtendedPDF macros to the OpenOffice toolbar.
Click on the plus symbol, then on extendedPDF, and extendedPDF again, and select extendedPdf when you get there, to extend the OpenOffice Basic macro list - the developers might have chosen more inspiring names... To immediately start exporting a file when you click the new button, select extendedPdfNoUi, instead of extendedPdf.
The button bar for ExtendedPDF is the Function bar (top right in Figure 3). Click the Icons button to assign an icon to the function, which is then displayed in the toolbar (Figure 4).
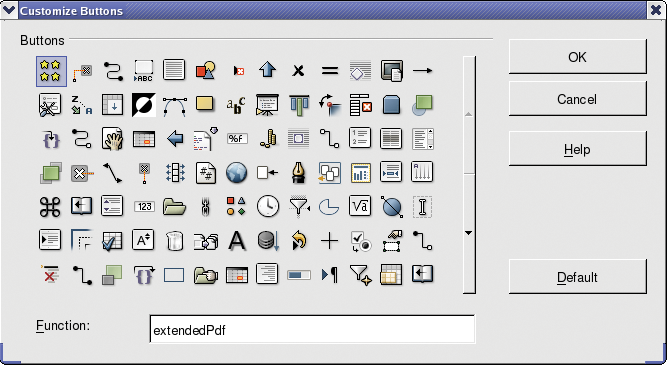
Don't let the Function field in Figure 4 confuse you. If you add an acronym such as EPDF instead of extendendedPdf, the button will still call the correct function.
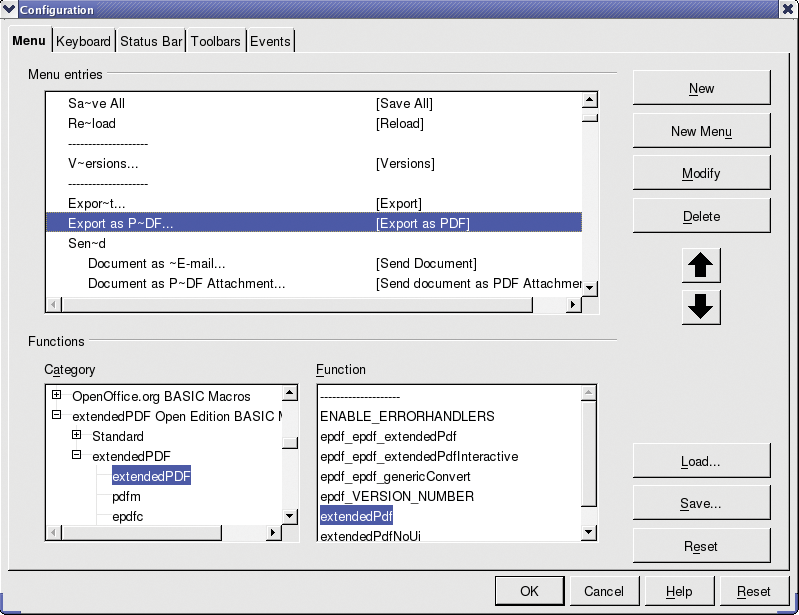
An entry in the File menu might not be a bad idea. To add one, select Tools | Configure and click on the Menu tab (Figure 5); look for the existing Export as ~PDF entry below Menu entries (top) and navigate the Functions below Category (lower left) till you find OpenOffice.org Basic Macros | ExtendedPDF | ExtendedPDF. When you get there, select the entry for extendendPdf below Function (lower right) and click on New. Unfortunately, you can't change the name of the menu entry; so you will have to live with extendedPdf.
The configuration window appears whenever you launch the ExtendedPDF macro. The configuration window has five tabs, apart from in OpenOffice Basic where the developers use five normal buttons at the top of the window to emulate the normal appearance. When you click on one of these buttons, the matching settings appear and the button that you clicked is disabled (gray).
This causes more than a little confusion, however, as the PDF Security tab is always disabled in the Open edition. Users see two disabled (grayed) buttons and have no way of knowing which one is responsible for the open tab. It would make more sense to display the selected button as pressed (using a 3D relief).
Important: In Configuration (Figure 6) type the Printer Name of the printer you created earlier on in spadmin - use exactly the same spelling. A selection dialog might be a good idea here, but at least you only need to type the name once. The setting for Path to GhostScript should be okay, assuming you have installed Ghostscript, but this is typically the case.
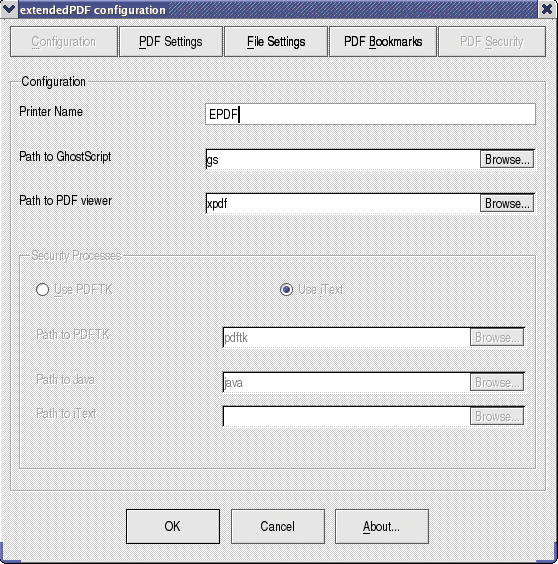
You will only need the Path to PDF viewer option if you want to automatically open any new files you export - this option is available with the View PDF when extendedPDF has finished checkbox in the PDF Settings tab (Figure 7).
The most interesting thing in the PDF Settings is the Copy notes into the PDF file field. You need to check this field if you want ExtendedPDF to convert your OpenOffice document format notes to PDF.
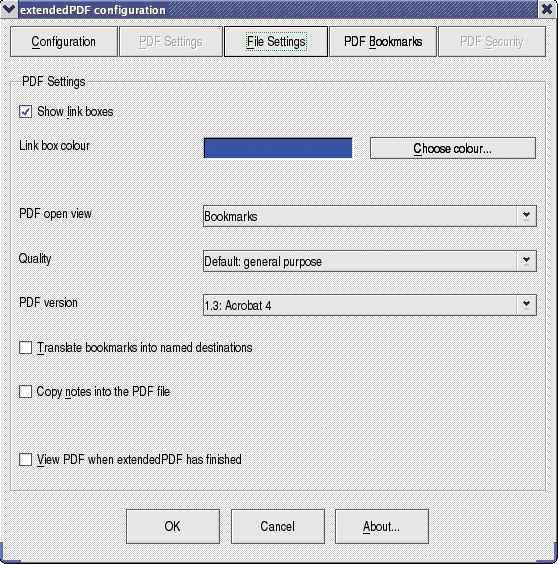
Pay close attention to the Temporary folder in the File Settings. This defaults to /tmp, which is not a good idea for security reasons. ExtendedPDF stores the PostScript version of the document here using the original file name with the suffix .ps. Depending on your umask setting, the file may be readable for all users on the system. Many people do not like this kind of laxness and to be quite honest, it is unnecessary.
To make things worse, the macro also follows symlinks, which might even allow a local attacker to overwrite your files. Imagine you are working on a file called /home/fjl/xy.sxw. The attacker could create a symlink called /tmp/xy.ps, which points to /home/fjl/.profile, for example.
If you attempt to export the xy.sxw file to PDF, ExtendedPDF warns you that the temporary file /tmp/xy.ps already exists. You decide to overwrite the file - this option is available in the pop-up message window. Thanks to the symlink, the PostScript file actually overwrites your .profile
You can mitigate this danger quite easily. Create a subdirectory called tmp in your own home directory and make sure you have exclusive write privileges for that directory:
cd ~
mkdir tmp
chmod 700 tmp
Now specify this directory as your Temporary folder in the ExtendedPDF configuration. Because no other user can play around with this directory, you are now safe from spying eyes and sabotage.
Practical bookmarks take you to interesting parts of a PDF document. Acrobat Reader always shows the bookmarks on the left-hand side of the window; Xpdf has a similar feature, as do more recent Kpdf versions. Xpdf places the bookmarks in a part of the window that is hidden at first when you launch the program. To view the bookmarks, you need to expand the small box in the lower left corner of the window.
Bookmarks typically reflect the index points (headings) within a text. ExtendedPDF uses OpenOffice paragraph styles to recognize bookmarks. The PDF Bookmarks tab in the configuration dialog allows you to specify which styles and which index levels will be converted to bookmarks. The top two fields select the number of layers in the hierarchy, and how many of them to display when the document is opened.
The macro lists the paragraph styles that the document contains, but which will not be converted to bookmarks, in Document styles. The macro automatically assigns known and suitable styles correctly. The entries in the list on the right are converted to bookmarks. This list only ever shows you the entries for a specific level - the Level option allows you to select which level that is. Levels 1 through 10 map a selected paragraph style to a specific bookmark hierarchy level. For example, Heading 1 should be assigned to level 1.
ExtendedPDF assigns the paragraph styles collected by the Auto level to the hierarchy level in which it last placed a bookmark. This is really useful for figures or tables.
This approach sounds more complicated than it is. Let's assume that Chapter 5 (the top structural level) of a fictive text is divided into sub-chapters 5.1, 5.2, and 5.3 (second level), and that 5.1 additionally has the sub-layers 5.1.1 and 5.1.2. Chapter headings are mapped to a specific layer. Figures can occur at any level, however; so you would select Auto here to tell ExtendedPDF to map captions to the appropriate level.
Some confusion is caused by the fact that the PDF settings have another option concerned with bookmarks: Translate bookmarks into named destinations (Figure 7). This option refers to OpenOffice bookmarks created by selecting Insert | Bookmark. These bookmarks appear in the OpenOffice Navigator (press the [F5] key to access them) and make it easier for the reader to find important parts of a document.
If you enable the translate option, ExtendedPDF will convert the bookmarks to so-called named destinations. This allows a website to point to a specific entry within a PDF document. The HTML syntax is like the syntax for a normal web page link: <a href=".../xy.pdf#target"> - unfortunately, this did not work in our lab.
OpenOffice users can add comments in the form of notes to text passages. To add a note at the current cursor position, you simply select Insert | Note.... OpenOffice then displays a small yellow box. If you want to export your notes to the PDF file, you first need to check Copy notes into the PDF file below PDF Settings in the ExtendedPDF configuration (Figure 7). Acrobat Reader displays a stylized sheet of paper in this case. In both programs double clicking the note symbol pops up a window containing the note content.
Hyperlinks to web pages (inserted by selecting Insert | Hyperlink in OpenOffice) will also work in converted PDFs; ExtendedPDF automatically exports cross-references within a document as local links. To allow readers to recognize these links at a glance in the PDF file, the macro draws a frame (in blue by default) around each link. You can specify whether to keep the frame, and choose a color, in the PDF Settings. The document is more attractive without frames, and easier to use with frames.
It is more difficult to create cross-references within documents than links to websites. The OpenOffice interface is less than intuitive at this point. To add a cross-reference, you first need to mark a target, and assign a name to that target. To do so, select Insert | Cross-reference; then select Set reference below Type, add a Name, and click Insert.
You enter the link to the reference you just set in the same window. To do so, first move the text cursor to the desired position, select Insert reference below Type, then choose the name you just assigned from the Selection list, decide on a Format (for example Reference text) and finally click Insert.
It is even more complicated to add links for the individual document chapters to a table of contents. By default, OpenOffice will create a table of contents without any hassle (Insert | Indexes and Tables | Indexes and Tables...) and even add accurate page numbers; however, this is not a cross-reference in the sense of a hyperlink.
Unfortunately, ExtendedPDF relies on cross-references to be able to add them to the PDF file. To make this happen, you first need to modify the entries in the table. You can do this when you create the table of contents or at a later stage: move the cursor to the table of contents, press the right mouse button, and select Edit Index/Table.
Click on the Entries tab. Below Structure and Formatting you can see the field order for each level of the hierarchy. Tooltips that appear when you hover the mouse over the boxes tell you what they mean. E# is the chapter number, E the entry (that is the heading text), T a tab stop, and # the page number.
To use the name of a structure element as a hyperlink, you need to move the text cursor to the white box between E# and E, and then click on Hyperlink. An LS box appears at the selected position; LS is short for Link Start. We want the end of the link to follow the E, so let's move the cursor to the white field between E and T and click on Hyperlink again. This displays an LE box which, as you might have guessed, stands for Link End. To remove any boxes that you have positioned incorrectly, simply click the offending box and press the [Del] key.
If you want to apply these changes to all the other layers, click the All button. You can add an arbitrary label to the white boxes; the text is then inserted into the table of contents.
ExtendedPDF offers many options. For example, you can specify whether Acrobat should display bookmarks on opening your document, or simply display the page.
However, the quality parameters are probably the most important settings. The higher the image resolution, and the less compression, the better your document will look, and the bigger its footprint will be.
If you just want to output the PDF to a printer, you don't need the extra features included with ExtendedPDF. But publications you will be releasing in PDF format will definitely benefit from features such as bookmarks and hyperlinks.
| INFO |
|
[1] OpenOffice: http://www.openoffice.org
[2] PDF Export in OpenOffice 2.0: http://specs.openoffice.org/appwide/pdf_export/PDFExport.sxw [3] ExtendedPDF by JDI software: http://www.jdisoftware.co.uk/pages/epdf-home.php |