
By James Mohr
Even if you are running a small, non-commercial website, the data you store in a MySQL database is very important to you. If that database is frequently changed on a live system, a reliable backup becomes even more important. Unfortunately, the tools that web hosters provide to backup your data are often cumbersome at best.
I recently made a number of major changes to the database on my test system and became concerned about what would happen if I really hosed that database. I make regular backups myself on my local machine, by simply copying the MySQL files. This option works, but recovering from a crash has its own problems. So I started looking for other solutions. After considering several of the alternatives for backing up an SQL database (see the the box titled "MySQL Backup Alternatives"), I settled on indexsoft's MySQL Backups Manager utility [1].
You can run MySQL Backups Manager on a web server using any browser, or you can run it as a command line script. It would be accurate to call MySQL Backups Manager a front-end to the mysqldump program, but this handy backup tool definitely does a lot more. For example, connection information for your databases is stored within the primary configuration file, and you need only reference that database in order to back it up. Plus, MySQL Backups Manager includes a number of additional features that simplify the task of managing backups on multiple machines.
MySQL Backups Manager is distributed under a commercial license, but at a cost of around US$15, it is well worth the investment. The MySQL Backups Manager utility is written in Perl using standard MySQL tools, and it can run on any system that supports Perl and MySQL. Although Apache is not required, you will also need an Apache server if you wish to take advantage of MySQL Backups Manager's web interface.
The MySQL Backups Manager package comes as a small zipped archive. When you unpack the file, you have the backupsmanager.cgi script and a modules directory which contains the perl modules for FTP and mail. Although the instructions tell you to copy the CGI script into the place from where it will be executed (usually the cgi-bin directory of your web server), this will not work unless the modules directory is in your perl path. The easiest approach is to simply copy everything into your cgi-bin directory.
The first step in configuring the package is to run the CGI script in a web browser. For example: http://linux.local/cgi-bin/backupsmanager.cgi. This step creates the configuration file (backupsmanager.pm) and brings up that configuration file in a text area within a standard HTML form.
All the default values for the various configuration options for both the Web interface and the command are defined within this file. By default, only one database is defined; the database looks like this:
$mySQLDBName[0] = 'mydb0';
$mySQLHost[0] = 'localhost';
$mySQLUser[0] = 'root';
$mySQLPassword[0] = '';
$mySQLDBEmail[0] = '';
Make sure the permissions are set correctly on the configuration file to prevent unwanted access.
There are additional variables, such as variables defining the default directory for the dump files and options to the various auxillary programs. In general, the function of each is easy to identify.
Once you are done configuring the program, you create backups from the Web interface or simply run:
backupsmanager.cgi --db=#
Where # is the number of the database as defined in the configuration file. The location is defined by the $DBDumpsDir variable, and by default this is the dumps directory underneath the directory where backupsmanager.cgi resides. You can't change the target directory, but you can use the --filename= option to specify a file other than the default, which is YYYY-MM-DD.sql.
Even if you can run a cron job on your web server to start MySQL Backups Manager, storing the files locally might not always be the best option. If you want to keep several backups, but you have limited space on your server, you probably need a way to get the files to another machine. As I mentioned, you can send the dump files via email. Even if you cannot send email to other machines you might be able to send the email locally (i.e., to your "webmaster" address). Note that setting the email address to something like just webmaster probably won't work. Instead you need to specify a host name (i.e., webmaster@localhost), even if you are sending the dump to a user on the local host.
MySQL Backups Manager uses the SendMail.pm module to actually send the email. If that does not work, you can set the $SMTP variable to a command to send the email. For example:
$SMTP = '|/usr/sbin/sendmail -t';
Sending the dump file by email can be done either from the web interface or the command line using the --mail option. Note that, if the $mySQLDBEmail[] variable is set in your configuration file, then its value is always used, even if you specify the email address on the command line using the --email option. If the $mySQLDBEmail[] variable is empty, then you need to specify the address on the command line or set the $DefaultEmail in the configuration file.
In addition to sending the dump file via email, you can also use FTP to transfer the dump file. MySQL Backups Manager uses the default connection information in backupsmanager.pm to transfer the file.
As of this writing, you cannot specify different FTP servers for the individual databases, as you can individual email addresses. However, as you might guess, there are command line options to specify the FTP connection information. Thus, you can still get your database dumps to whatever server you want.
Also included in the default configuration file is a template for you to dump all of your databases. It works basically the same way as for the individual database, except that you specify the database name like this:
$mySQLDBName[1] = '--all-databases';
Note that this does not mean dumping all the databases that MySQL Backups Manager knows about. Instead, it means dumping all of the databases for the given host and user. So, if you are trying to do dumps from multiple servers, you need to have multiple "all-databases" blocks. Also, this only works as the root user, so you probably won't be able to use it on your web hoster's machine.
Having a front-end for the mysqldump command means that you can basically use any option that mysqldump supports. This is what the $DumpDBOptions variable does, and by default, it has the two options --quote-names and --add-drop-table. Here, you can add any option you like. For example, if you want to create a dump that does not use extended inserts, you could add --extended-insert=FALSE. The problem here is that the $DumpDBOptions applies to all databases. So you either have extended inserts or you don't.
You can get around this limitation if you consider the fact the actual mysqldump command is built by simply concatenating the different variables. So, you could do something like this:
$mySQLPassword[0] = 'PASSWORD --extended-insert=FALSE';
When the mysqldump command is generated, you simply have the -extended-insert option following the password, and the mysqldump command does not notice any difference. Theoretically, you could add it as an option to the $mySQLDBName[0] variable. However, this ends up creating a dump directory that looks like this:
$DBDumpsDir/localhost-----extended-insert=FALSE linkbat
instead of
$DBDumpsDir/localhost---linkbat
simply because the directory name is created as $mySQLHost[]-$mySQLDBName[]. Note that the ability to define different options for different databases is something that is in the planning for a future release.
If you automate the process of doing database dumps, there are a couple more variables to take a look at. The first is $ArchiverCommand, which defines the archive or compression command and options to use. The default is to use gzip and a compression level of 9. By default, the dump file is not compressed. However, you can enable it from the command line using the --pack option.
Next, is the $OldBackups variable, which tells MySQL Backups Manager to delete dump files that are older than the specified number of days. You can use the --old option in the command line to specify the number of days. Note that there is no mechanism that deletes the old files independently of the actual dump. Instead, old files are deleted as part of the dump process.
So far, I have only really mentioned the command line, but the main reason I started looking at the indexsoft MySQL Backups Manager was because I wanted to automate the process of backing up my data. To start the web interface, you use the same URL as mentioned above for configuration. This brings you to the web page you see in Figure 1.
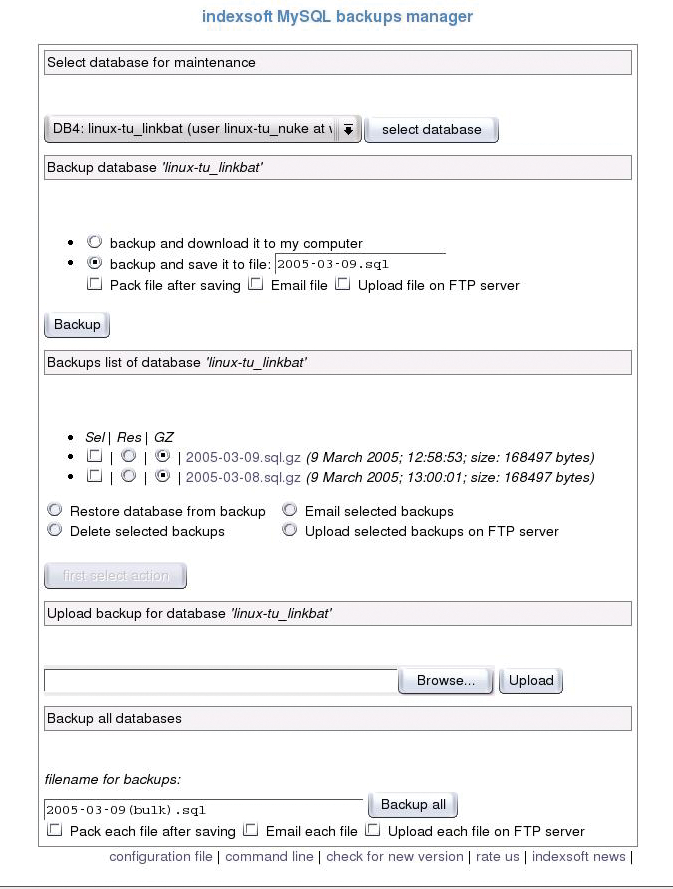
The first section allows you to select the appropriate database (as listed in the backupsmanager.pm file). In the second section are the backup options. By default, dump files are stored in sub-directories of the directory defined by $DBDumpsDir. (one sub-directory for each database) However, by selecting the backup and download it to my computer option, MySQL Backups Manager creates the file and sends it to your browser, which usually gives you the standard "save as" dialog window.
The next section (Backups list of database) shows you the dump files listed in the respective dump directory. Dump files end up here, whether created from the command line or the web interface. In both cases, the owner of the file is the user executing mysqldump. Note that, if the files are created from the web interface, the owner is the user under which the web server is running. If run from the command line, the owner of the file is the normal user. If you use both mechanisms to create the dump file, you may run into problems with the permissions.
Here, you can perform several different operations on the files. For example, you can load the data into your database from an existing file. Be careful, because MySQL Backups Manager simply uses the mysql command with the specified file. Since the default is to use the --add-drop-table, by default, the tables are dropped and then re-created before the inserts are done. If you don't use the --add-drop-table option, you will get an error when trying to create the table, and the inserts will add the records to the table. You can also send existing files via email to the default address, as well as upload the dump files to your default FTP server.
The Upload backup for database section allows you to upload a file from the local machine to your web server. For example, if your web hoster does not backup your data for you and something happens to the database. Another case would be when making changes to the database structure. You download the entire database to your local machine, make the changes, and create a new dump, which is then loaded to the live server. You can then restore this copy with both the most recent data and the database changes.
A problem arises if the dump file is compressed, because mysql cannot deal with it. So, you need to uncompress it first. You will see that, in front of each dump file, there is a radio button labled GZ. This means the file is compressed. By unchecking the radio button, you uncompress the file. If you check the button, then the file will be compressed.
By default, you cannot upload files from one database to another. If you have a test system and you want to synchronize the data from the live system. you can either use the mysql command directly, or you move the files manually from one directory to another (watch out for duplicate file names!).
Although indexsoft MySQL Backups Manager is a commercial product (a single license costs US$ 15), I have found it well worth the investment. I could have created this script on my own, but when I consider how long it would take me to write the code on my own, a homegrown solution is not even worth discussing. Time is money, and indexsoft MySQL Backups Manager has saved me many times its price.
Within just a few minutes, you can configure automatic backups of your MySQL data. No need to spend hours or even days programming the necessary features. The indexsoft MySQL Backups Manager provides a ready-made solution.
| MySQL Backup Options |
|
My hoster provides a means of making a dump of each of my databases using a web front-end that I need to start manually. This tool is very useful for backing-up data, however, I am too forgetful to make backups with this method as often as I should. So I need another way. MySQL itself provides a couple ways of backing up your data, such as the mysqldump command. You can use mysqldump either locally or from a remote machine: /usr/bin/mysqldump -host=node.domain.com -user=username --password=password database What this command gives you is all of the SQL commands needed to restore your database. The downside is that you often need to start with a completely empty database. You can address this problem when the database is created by simply telling MySQL to drop the table first, before it tries to create it. This can be done automatically by using the --add-drop-table option to mysqldump. Granted, all of the data in any existing tables will disappear, but that's more or less the point. If your database contains millions of records, you might be concerned with how long the process takes. One way of increasing the speed of the recover is to increase the speed of the inserts. In MySQL 4.0 and earlier, the default behavior was for the mysqldump command to generate one insert line per record. With millions of records, this would take ages. The solution is to use the --extended-insert option to mysqldump. This packs all of the inserts into a single statement. Note that you may not always have a choice of using extended inserts. Some web hosters force the newer versions of mysqldump to not use the extended inserts for compatibility reasons. Also, it is possible that your hoster only allows mysqldump access from the local host. An alternative is to create a script on your local machine that runs mysqldump. This script can be a CGI script you start from a browser or a local cron job (provided your web hoster allows this). Maybe you have ssh access, which can easily be used to create automated backups. I wrote a short script that uses mysqldump to dump each of my databases to standard out and redirect the output of ssh. Something like this: ssh user@node.domain.com "mysqldump --user=user --password=PASSWORD database" > backup.date I have run across some very inexpensive (read: cheap) web hosters that provide you with a MySQL database but absolutely no guarantee that your data is safe. They provide no direct backup mechanism, no cron access, no shell access, and you cannot use mysqldump remotely. In such cases, are you out of luck? Well, it still depends on your web hoster, but also on your own ingenuity. |
| INFO |
|
[1] The indexsoft Homepage: www.indexsoft.com
[2] The mysqldump command: dev.mysql.com/doc/mysql/en/mysqldump.html [3] Professional web hoster using the MySQL Backups Manager: www.imagelinkusa.net |