
By Marc André Selig
A full backup on separate media is a vital part of any backup strategy, however, the task of restoring backups from tapes, CDs, or DVDs is often too time-consuming. It sometimes makes sense to also perform online backups. There are a few ready-to-run solutions for online backup, such as Rsnapshot [2]. This month's Admin Workshop will discuss a scripted approach that uses Rsync and SSH.
The practical Rsync tool, combined with SSH, takes care of transporting your backup data across the network. These tools solve two problems for admins. First, they save bandwidth, as Rsync will compress your data if asked to do so. Second, SSH ensures that sniffers on the network will be unable to grab your backups off the wire. An additional advantage of Rsync is that it transfers only the changes across the network and merges them with the last full backup on the target machine, thus providing the simplicity of a full backup with the efficiency of an incremental backup.
To find out which data has changed since the last backup, Rsync either compares a combination of file size and timestamp or the MD4 checksum of each file. One of Rsync's special features is a sophisticated mechanism which, when faced with a large file, does not copy the whole file, but only the changed parts.
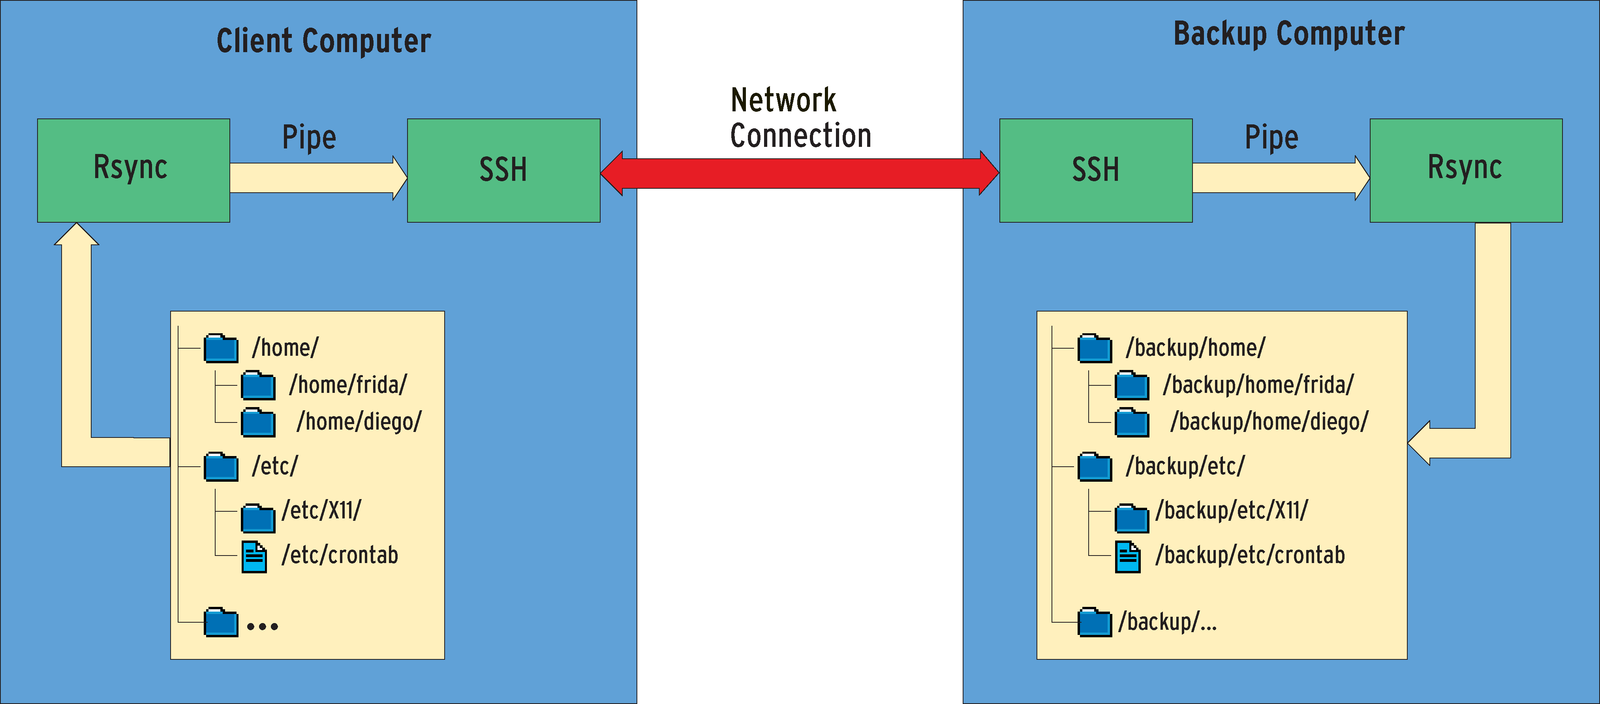
Rsync does not handle data transport across the network itself; instead users can set up an arbitrary tunnel. The traditional approach to this was to use the remote shell, rsh, but now SSH is far better suited to the task, as it encrypts the data in transit. Figure 1 shows you how a backup with Rsync and SSH works.
To give Rsync maximum protection in hostile environments, you will need to configure the SSH service for maximum security. If you make a mistake here, you might expose your systems to unauthorized access. As the legitimate successor to the remote shell, SSH is mainly used for remote administration. Invoking ssh user@hostname will take the user to a shell prompt on the computer hostname.
Without specific instructions, SSH will default to checking the user password for authentication purposes. Additionally, the server where the user is logging in will be expected to identify itself. SSH uses cryptographic algorithms to handle this. Assuming the entities involved in the transaction have all authenticated correctly, the data is encrypted and pushed across the wire.
Admins do not typically want to launch backup scripts manually just because they need to enter their SSH passwords. Launching backup jobs is typically the domain of cron. A password prompt is a big drawback here. To avoid the prompt, admins can opt for an authentication mode that uses an asymmetric keypair for authentication rather than passwords. The keypair, which comprises a public and a private key, uniquely identifies a specific user.
The ssh-keygen -t dsa command generates an asymmetric DSA keypair. The private key, which the program stores in ~/.ssh/id_dsa by default, stays on the local machine. Users need to copy the public key, ~/.ssh/id_dsa.pub, to all computers where they need to log on. To do so, simply store the content of the public key on the target machine as ~/.ssh/authorized_keys. This file can hold multiple keys, to account for scenarios where users have multiple keypairs.
From now on, authentication will be handled by the more secure asymmetric key approach. The root user is not typically allowed to log on remotely. The SSH daemon will ignore a file called /root/.ssh/authorized_keys. If admins want to allow a remote SSH root login, they can set the PermitRootLogin variable in the /etc/ssh/sshd_config file to yes.
The ssh-keygen program prompts the user for a passphrase when generating keypairs. The passphrase is used to encrypt the private key. This prevents an attacker who has compromised the user's home directory from using the private key to log in to other machines.
Of course, you can't supply a passphrase to an automatic script. For this reason, ssh-keygen is quite happy for the user not to enter a passphrase, although this does leave the private key exposed on the local hard disk. A more secure approach would be to use an SSH agent. The agent decrypts private keys after entering the passprhase and stores the keys in RAM. If you have access to the sshagent running on the system, you can use the private key. But attackers would need to read the main memory to compromise the passphrase.
If you want to use the agent for cron and other scripts, you can either call ssh-agent once at boot time, or after booting, and pipe the results into a file. The file will then have the two environmental variables that SSH needs to access the agent. Admins will normally want to add the file to their environments using the . command; this is then followed by ssh-add and the passphrase. The agent then has the private key safely stored in memory:
$ ssh-agent >~mas/tmp/agent.sh
$ . ~mas/tmp/agent.sh
Agent pid 21681
$ ssh-add
Enter passphrase for /Users/mas/.ssh/id_dsa:
$
Programs requiring access to the agent just need the simple file.
In addition to a simple login on a remote machine, SSH provides an extremely important service to the backup system. It passes any data it receives via the pipe across the encrypted connection to the remote SSH daemon.
This allows you to copy a directory to another computer with a single command: cd directory && tar cf - . | ssh user@computer tar xf -. The file created by tar is piped to SSH and SSH forwards it to the remote SSH daemon, which then calls tar to unpack the archive again. Rsync makes use of this approach. The -e ssh parameter tells Rsync to pass any files to SSH. As an alternative, you could set the RSYNC_RSH environmental variable:
$ RSYNC_RSH=ssh
$ export RSYNC_RSH
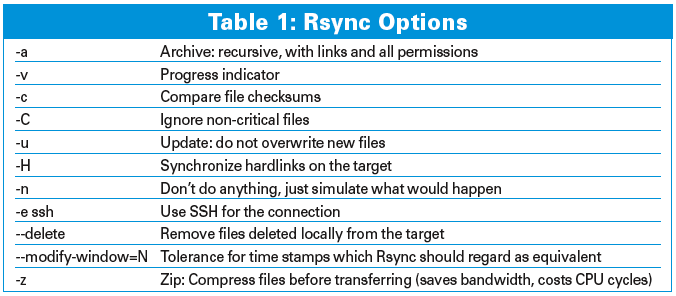
To avoid setting the variable manually, you can simply add the two lines shown above to .bashrc in the user's home directory. For cron jobs, admins need to set the variable in the appropriate crontab. -a, for archive mode, is another important Rsync option. This option tells Rsync to transfer all the specified directories, including subdirectories, files, symlinks, permissions and timestamps, owners, groups, and device files. -v is another useful option, which displays each file that is transferred correctly, as is -H, which performs a (time-consuming) check and transfers hardlinks.
You might also like to specify the --delete option, which removes any files deleted locally from the remote storage medium, thus giving you an exact copy of the directory without obsolete files. Table 1 has some more options.
Listing 1 shows a trivial example that copies the /Users directory to /export/backup on the backuphost machine. Line four of this program reads the file generated previously for access to the SSH agent. This is not required if the administrator opts for a key without passphrase protection.
| Listing 1: Unsafe Backup |
01 #!/bin/sh 02 03 . ~mas/tmp/agent.sh 04 /usr/bin/rsync -rlptH --delete /Users/ backupuser@backuphost:/export/backup |
The script then calls Rsync. The user backupuser is logged for access to the target directory. Instead of using the -a flag, the -rlpt options are now used to copy a directory recursively with all its links, permissions, and timestamps. To keep the ownership and group permissions for the backup, the script would need to log on to the backup host as root.
Additionally, -H and --delete tell Rsync to sync hardlinks and remove deleted data from the target computer. The script needs root privileges to perform a fully automated backup of all home directories. The following entry in the /etc/crontab file calls the script at 02:03 a.m. every night:
3 2 * * * root /usr/local/bin/Ursync-backup.sh
In Listing 1, the user mas created an agent.sh file and stored it in his home directory. Root regularly parses and executes this file. Any user with access to the mas account (including mas himself) can thus run commands with root privileges!
Listing 2 removes this vulnerability. The agent.sh file is moved from the user's home directory to root's home directory, which is (hopefully) protected against write access. Listing 2 also verifies the user and permissions of agent.sh.
| Listing 2: Better Backup |
01 #!/bin/sh 02 03 AGENT=/root/agent.sh 04 05 # $AGENT has to belong to me (root) and must not be writeable. 06 # Otherwise: cancel! 07 [ -O $AGENT -a ! -w $AGENT ] || exit 255 08 09 # If everything is okay, pars and allow connection to 10 # SSH agent 11 12 . $AGENT 13 14 /usr/bin/rsync -rlHpt --delete /Users/ backupuser@backuphost:/export/backup |
This said, it would be preferable for the backup program not to need root privileges. Unfortunately, this is typically impossible unless you simply want to back up a single home directory, in which case the program can run with the owner's privileges.
The clients are not the only computers with a possible vulnerability. The computer that holds the backup also needs protection. The scripts in Listings 1 and 2 avoid using the root account on the target machine and log on as non-privileged users.
The only thing this account needs to do is to store backups. Although the SSH key is adequately protected by a passphrase and the SSH agent, it is still a weak spot that an attacker could target to compromise the backup server. And if the backup program were to log in as root, the attacker would gain complete control over the server.
| Owners and Backups |
|
The backup system in our example creates a full image of the backup directories on the target machine. You can restore these directories on the fly, without having to swap tapes or wait for ages for jobs to complete. For reasons of security, the system will store the data with privileges equivalent to nobody on the target devices. This makes it impossible to backup file ownerships and group permissions. There is a workaround for this if you are backing up home directories, as the username and group for the files in a directory is typically part of the directory name: chown -R mas:users mas will restore the ownerships for a home directory belonging to mas. But this will only work on computers with identical accounts. The following miniature script restores the permissions for all the home directories on the backup folder by reference to the directory names: #!/bin/sh cd /backup for i in *; do chown -R $i:users $i done As an alternative, you could allow the root account to perform the backup - with all the security risks this implies. |
It makes sense to give the backup account minimal permissions, just enough to allow it to get on with its job. The account needs write permissions for any directories where it needs to store backups. This said, the account has fairly far-reaching privileges on the computers it backs up. In our examples, it is allowed to copy the full set of home directories.
Depending on whose data are stored in these directories, it might be all an attacker needs to break into one of the backup source machines. In other words, the target account and the target host are endangered by the data on the source machines, while at the same time, the host can facilitate an attack on those machines.
There is a special trust relationship between the backup source and target, and cautious administrators will not want to underestimate the significance of this trust. SSH allows you to restrict which programs specific users can run. And this kind of authorization will help mitigate the danger of an attacker hijacking your machines.
| INFO |
|
[1] Marc André Selig, "Admin Workshop": Linux Magazine 05/05, pg. 66
[2] Charly Kühnast, "Target Practice": Linux Magazine 04/05, pg. 59 |