
By Marcel Hilzinger
| KTools |
|
In this column we present tools, month by month, which have proven to be especially useful when working under KDE, solve a problem which otherwise is deliberately ignored, or are just some of the nicer things in life, which - once discovered - you would not want to do without. |
Gone are the days when you needed a degree in computer science to install new fonts in Linux. In fact, installing fonts in Linux became child's play when KDE went to version 3.
To install fonts in KDE, simply pop up a Konqueror window by pressing [Alt]+[F2] and typing konqueror, then type the fonts:/ URL in the location box. Now copy the fonts from any folder to your Personal directory to make them available to programs (see Figure 1). There is no need to relaunch the GUI or KDE. As an alternative, you can right click and use the context menu to save launching a second Konqueror window.
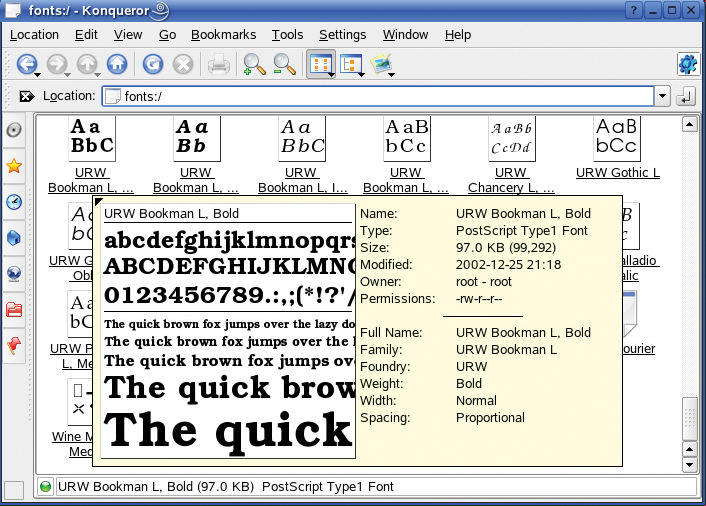
The easiest way to go is to use Truetype fonts, as they comprise a single file. For Type1 fonts you need to install both the Postscript Font Binary (which is identifiable by the *.pfb file extension) and the file with the font metrics information (which is identifiable by the *.afm file extension). Some Type1 fonts have a file in Postscript Font Metric format instead of the Adobe Font Metric file, but KDE can't use this. The workaround is to run the pf2afm tool to convert the PFM file to an AFM file, before you can install the font with Konqueror. As an alternative, you might prefer to use the Fontforge program instead [1].
To see a preview of a font, you can either hover the mouse over the font file for a few seconds, or select Font Preview. None of the KDE tools has a print function. To discover how you can print out a sample page with a number of fonts, without needing to keep changing the font in OpenOffice or Kword, read the "Creating a font catalog" box.
| Box 1: Creating a Font Catalog |
|
At this time of writing, KDE does not give users the ability to print individual fonts, not to mention a font catalog. However, newer versions of the Scribus layout program include a script that allows you to create a font catalog. To do so, select Script | Scripts for Scribus | FontSample within Scribus. In the new window, select the fonts you want to print out below Available Fonts, and then click the button with the greater than sign. If you want to print out all your fonts, click the button with the two greater than signs instead. Besides the page format A4, page numbering (want page numbers) and table of contents (TOC), you might also like to enable the Extra offset for binding option. This tells the script to use an extra offset to allow you to bind the pages to form a neat reference. And if your printer supports this, you can also select Double side printing. Now click on OK to tell the script to create the catalog. Depending on the number of fonts you have selected, and your computer's performance, this process may take a few minutes. You can then print out the complete catalog or use the PDF export function to create a high class PDF with the fonts embedded. |
Most distributions have a selection of about 30 fonts by default. If you happen to have a Windows partition on your machine, you can add the fonts below C:\WINDOWS\FONTS\ to your collection. If you are the hunter and gatherer type, you will probably have a large collection of fonts and find it increasingly difficult to keep track of the fonts in your collection. The free-ttf-fonts package in Suse Linux gives you over 300 fonts. And there are any number of free fonts up for grabs on the Internet, see the Fontfreak site [2], for example. Note the font licensing if you download from these sources, as many fonts are only free for your own personal use.
To take the headaches out of managing a large collection of fonts, KDE has a font management tool, which is located in the KDE Control Center below System administration | Font Installer. When you launch the tool, it initially displays all the fonts in the ~/.fonts directory. The left-hand side of the window shows you the font name, file name, and font size. On the right, there is a font preview, which you can scale up or down by clicking on the magnifying glass icon. If you would prefer to see a sample sentence in various sizes instead of the alphabet display, click on the Waterfall icon on the right. If you need special or accented characters from other languages, it makes sense to change the sample sentence to reflect this (see Figure 2). This allows you to see at a glance if the selected font actually supports the characters you need.
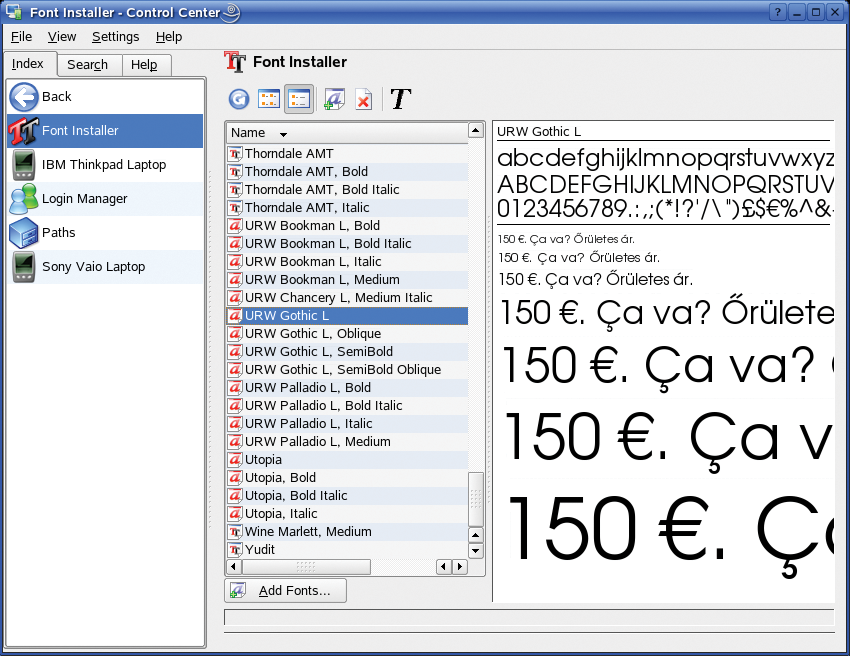
It also makes sense to disable fonts that you use only rarely. Disabling a font hides the font from the applications, which improves the application memory footprint and makes it easier to find the fonts you are looking for. To disable a font, select the font you want to disable, and then click on the icon with the red X. Clicking the red X icon tells the KDE font installer to tag the font as (Disabled) and dim the font icon. To re-enable a font after it has been disabled, simply select the font and click on the icon with the green check mark. What the KDE font installer does to disable a font is to put a dot at the start of the font filename. Linux will handle a disabled font file as a hidden file, although the fonts are still there.
Of course, you can also install fonts in the KDE Control Center font installer module. To install fonts using the Control Center font installer, click on Add... and then select the fonts you want to add. The KDE font installer supports major font formats such as Truetype, Opentype, and Type1.
To install, enable or disable fonts globally for your machine, you will need to click the button on the bottom left of the screen to switch to Administrator Mode. This tells KDE to open /usr/share/fonts (for Mandrake, Debian and Fedora) or /usr/X11R6/lib/X11/fonts (for Suse Linux).
| INFO |
|
[1] Fontforge: http://fontforge.sourceforge.net/
[2] Fontfreak: http://www.fontfreak.com |