
By Peter Kreußel
Although you may be a genius with pen and paper, drawing directly on your computer will not always give you the glossy results you are looking for. When lines turn to squiggles, professionals turn to Bézier curves to help them draw smooth lines, with anchor points to define the path of the curve and tangents to define radii.
Even though major bitmap editors such as GIMP support Bézier curves, it takes a vector graphics program to leverage their true power [1].
For years, Linux has been without a genuine replacement for major vector graphic drawing tools from the Windows or Macintosh world, but now an open source program called Inkscape has stepped in to fill the gap. Although Inkscape lacks many special effects found with pricey commercial programs, the current version 0.41 of Inkscape gives you everything you really need to put logos or artwork on your screen. Read the box titled "Installation" if you need help with installing Inkscape.
| Installation |
|
Suse 9.2 includes Inkscape version 0.40. Users with older Suse versions or other distributions, or users who would prefer to have the latest version, (0.41 at this time of writing, which mainly fixes bugs filed against 0.40), will need to download the program from the project homepage at [3]. The static-rpm below Official Releases is probably the best choice for most people. The package depends on Gtk 2.4.0, so this means updating Gtk on some distributions (including SuSE 9.1, Red Hat 9) [4]. Debian users can go to [5]. If you cannot find a binary package for your distribution, or if you are the adventurous kind, you can always build Inkscape from the source code [3]. |
As our first practical example, we will be attempting to draw the smiley shown in Figure 1. Completing this drawing will help you with many important techniques that you will need for more complex artwork.

When launched, Inkscape shows a new, empty document. Change the zoom factor by pressing the [+] and [-] keys until you can just about see the margins. Figure 2 shows the individual steps for the smiley.
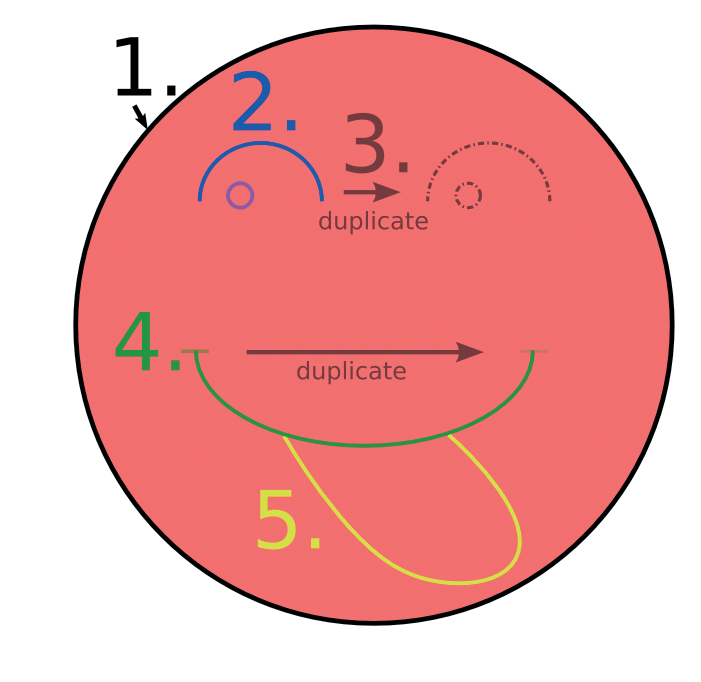
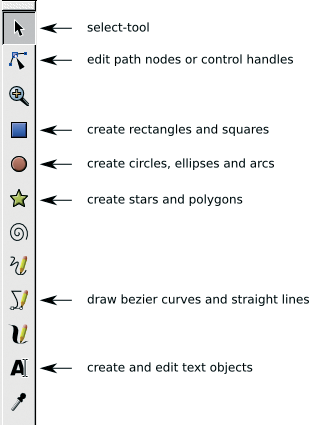
Select the circle/ellipse/arc tool in the toolbox on the left (see Figure 3). Now press the [Ctrl] key, click the top left of the drawing area with your mouse, hold down the left mouse button, and drag the mouse towards the lower right corner. This will give you a circle filled with red. Holding down the [Ctrl] key keeps the aspect, that is, the relationship between the height and width to 1:1, 2:1 or 1:2. If you make a mistake, you can press [Ctrl]+[Z] to undo the last step.
For the eyes, we need to draw an open semi-circle with the opening at the bottom. The two horizontal toolboxes above the drawing area will help us do this. The top toolbox gives you a set of standard commands (Figure 4); to find out more, hover the cursor over a button to see a tool tip. The lower toolbox changes to reflect the drawing tool you have selected.
![]()
You need to set the angles for the curve drawn by the the circle tool, which is currently enabled (Figure 5 shows you the toolbox). Values of Start: 180 and End: 360 will give us a semi-circle. To ensure that the semi-circle is open, we now need to check open arc. Now draw a circle just like in step 1, and the program will automatically give you the open arc you need.
![]()
If your arc is not in the right place, too big, or too small, you need to click on the selection tool in the toolbox on the left. When you drag the mouse over the arc, you will see that the cursor changes shape, becoming a move cursor. Hold down the left mouse button and drag the arc to the right place. When you let go of the mouse button, you will notice the handles around the circle. You can drag the handles to modify the height and width of the selected object. The [Ctrl] key works just like with the circle tool. If you hold the key down, any changes you make will keep the aspect, that is, the ratio between the X and Y axes.
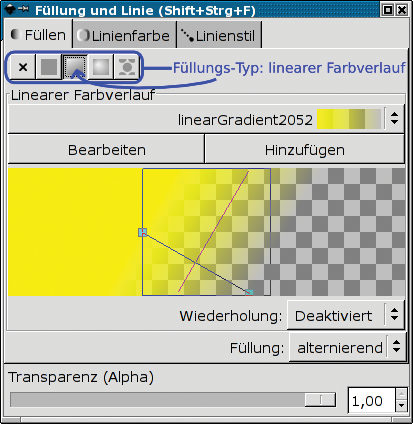
To liven up the boring red circle, let's enable the selection tool and select the big circle. Press [Shift]+[Ctrl]+[F] to go to the Fill and stroke dialog (Figure 6). You can set the [R]ed, [G]reen and [B]lue color components to set the fill color. If you drag the G slider (for the green color component) to the right, the circle will change to something closer to the color yellow.

If you now set the fill type to linear gradient, Inkscape will give you a gradient that starts with yellow and ends with transparency. To use a finer gradient, push the turquoise box as shown in Figure 7.
Follow these steps to set the gradient for the eyes: select the semi-circle, open the Fill and stroke dialog, set the color values to R=190,G=200,B=255, select Linear gradient and modify the gradient until you like what you see.
Now all you need to do is draw a small circle (circle tool, Start: 0, End: 0), click on the X button in the Fill and stroke dialog (to not use a fill), and you're all done with the left eye. Whenever you need to draw very small elements, like in this case, it makes sense to zoom in by pressing the [+] key. You can use the middle mouse button to move the current display section.
Pressing the [Shift] key and clicking on multiple elements with the selection tool adds those elements to the current selection. Use this technique to select the complete eye (that is the arc and the small circle). [Ctrl]+[D] duplicates the selected objects. Instead of using the mouse, you can move objects by pressing the arrow keys. Just to try this out, press the [Right arrow] key a few times, and watch the copy of the eye move to the right - pressing [Shift] will increase the step distance. The advantage this gives you over moving the object with the mouse is that the eyes are now at exactly the same level.
For the mouth we also need an arc which starts at 0 degrees and ends at 180. Don't hold down the [Ctrl] button while you are drawing the arc this time, as we need this arc to be wider.
You can use the drawing tool for any kind of free form drawing, but let's keep our sights low for the time being and just draw a horizontal stroke for the corner of the mouth. To do so, first enable the drawing tool, and drag the mouse to the position where you want the line to start. Then hold down the [Ctrl] key, drag the mouse slightly to the right, and click on the endpoint. Right clicking completes this action. What [Ctrl] does with this tool is to snap the angle of any straight lines you need to draw to 15° steps, making it easier for you to draw a completely straight line.
Now repeat the step you used previously to duplicate the eye: select the short line with the selection tool, press [Ctrl]+[D] to duplicate, and then press the [Right arrow] key to move the line to the right position.
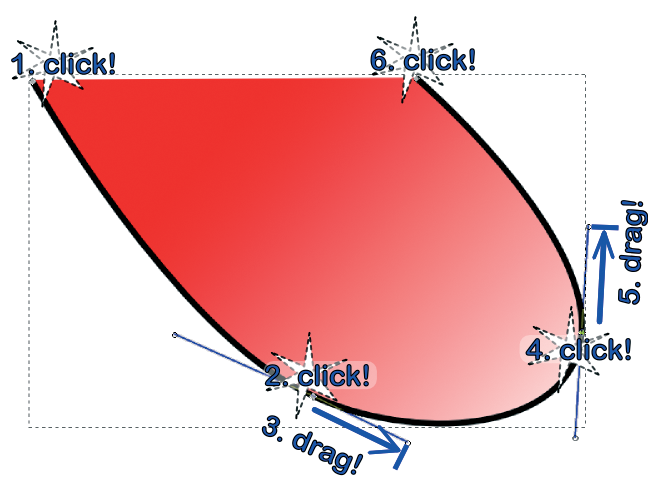
Before you attempt more complex forms, take some time to practice with the drawing tool by drawing a few arbitrary lines. Click with the mouse to mark the starting point, but when you get to the second click, hold down the mouse button and move the mouse at a tangent to the line you are drawing. You can draw a control tangent at any endpoint. Hold the button down and move the pointer to see how the length and direction of the control tangent affect the shape of the red line. Now release the mouse button and move the pointer again; you will see that you can now draw a new line section. Click, hold down the mouse button, and drag the mouse. After drawing a few segments, finish the line by right clicking or pressing [Enter].
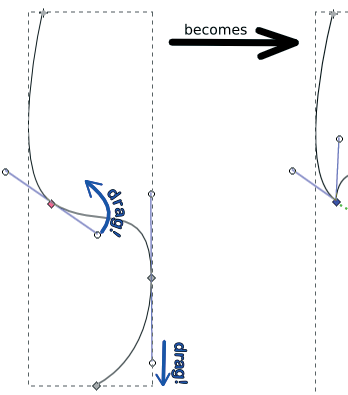
Inkscape also has tools that allow you to modify existing curves: Modify nodes and handles. These tools allow you to move the handles and modify the direction and length of the control tangents. Even professional graphic artists will typically create a rough line drawing first before tidying up the details. Just try it out: use the tool to select a handle and then use your mouse to drag the small circles at the ends of the tangents (Figure 8).
To complete the smiley, enable the selection tool, and select your line drawing experiments. Then press [Del] to remove these lines.
Figure 9 shows you how to use your mouse to draw the tongue. Click as shown in the drawing. Drag means hold down the mouse button after clicking and move the mouse in the direction of the arrow (control tangents will appear so you can change their length and direction), then release the mouse button. You need three lines for the tongue; add a node wherever the shape of the curve changes. Now fill the finished shape with a red fill and define a gradient.
The tongue fill hides the top edge of the mouth. Inkscape gives you another powerful tool to change this, allowing you to perform Boolean operations with paths.
First, select the mouth arc with the selection tool. Duplicate the arc by pressing [Ctrl] [D]. Additionally, select the tongue by [Shift] clicking. Then select the Difference entry in the Path menu.
There is just one step between you and a complete drawing. Use the selection tool to select all the objects, apart from the tongue. Then press [Ctrl]+[F] to open the Fill and stroke dialog. To change the stroke style, click on the tab at the top of the dialog box and set the stroke width to 6 Pt; you may need to type Pt as the unit in the input box. This gives you a uniform stroke width.
Although the smiley is no Mona Lisa, drawing it teaches you many of the fundamentals of SVG vector graphics: making basic shapes and Bézier curves, applying fills and setting stroke attributes, and applying Boolean operations to paths. These techniques are the basis for a large proportion of professional art, including many very complex drawings.
| Under the Hood |
|
The SVG (Scalable Vector Graphics) file format is an official W3C consortium file format [2] (although SVG has not been able to assert itself on the Internet thus far). Inkscape uses SVG format to store drawings. If you will be using Inkscape to create SVG files for use on the Internet, don't forget to select Plain SVG under Save as to make sure your files are standards compliant. |
| INFO |
|
[1] Vector graphics and bitmaps compared: http://www.inkscape.org/cgi-bin/wiki.pl?VectorAndBitmap
[2] SVG specification: http://www.w3.org/TR/SVG/ [3] Inkscape RPMs and sources: http://www.inkscape.org/download.php [4] Search for Gtk2 here: http://search.rpmseek.com/search.html?hl=com [5] ftp://ftp.de.debian.org/debian/pool/main/i/inkscape/ |