
By Manfred Schulenburg
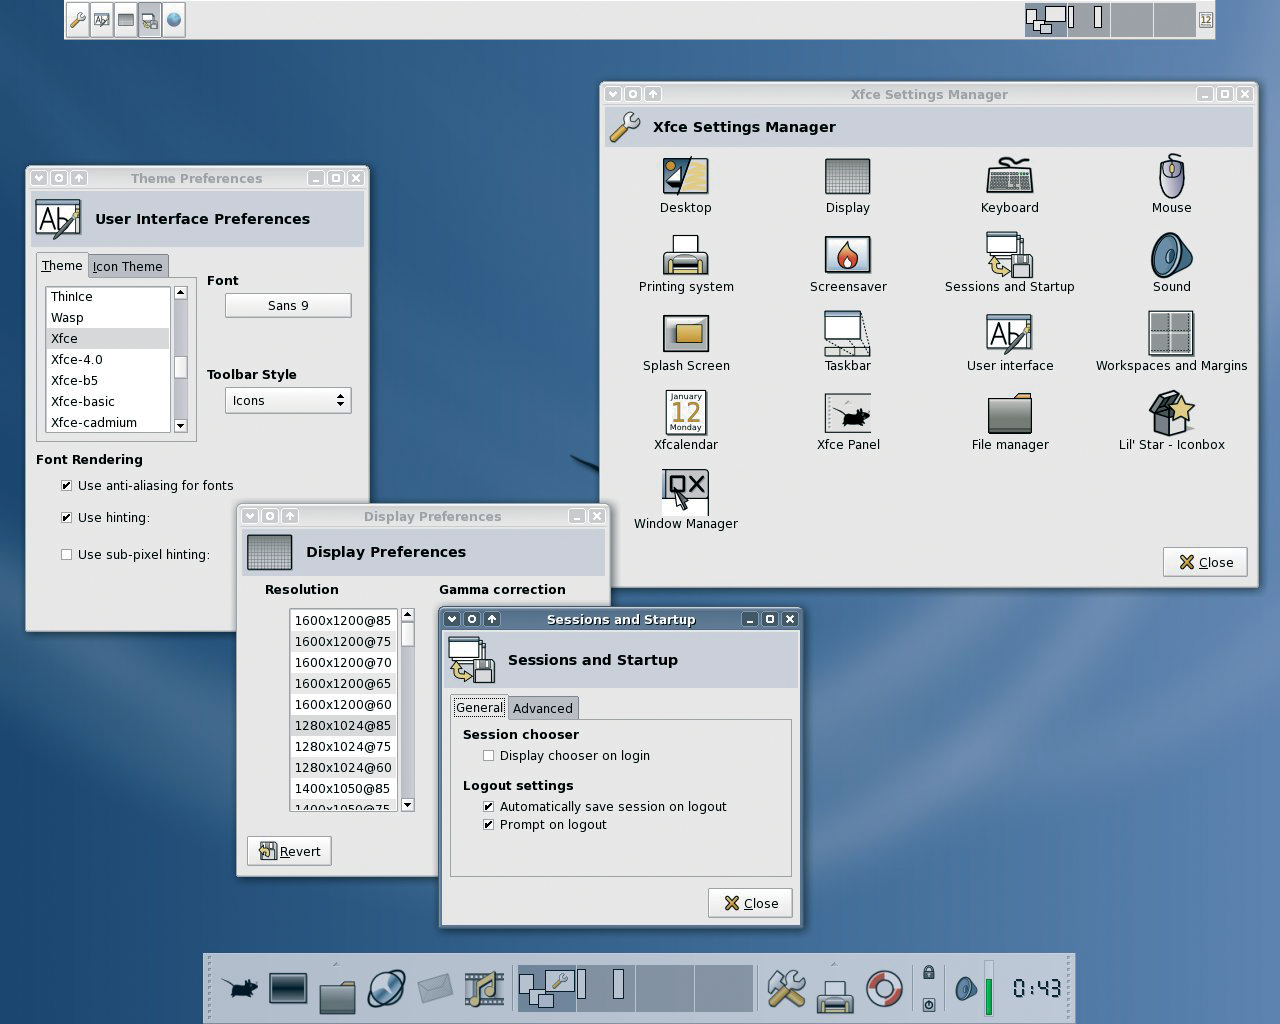
In January of this year, the Xfce project released version 4.2 of the Xfce desktop (see Figure 1). Like most alternative desktops, the Xfce desktop is faster and easier on resources than sprawling systems like Gnome and KDE. But Xfce is far more advanced than many of the alternatives.
The Xfce 4.2 desktop, which is compliant with Freedesktop specifications, provides several useful management utilities, a development framework for building applications, and support for more than 40 languages. Xfce 4.2 offers a unique blend of features and performance that make it an ideal alternative for many users who want to scale down from Gnome or KDE.
Just like Gnome, Xfce is based on the GIMP Multi Platform Toolkit. GTK+ is obviously one of the packages you will need in order to install Xfce 4. Besides GTK+, you will additionally need pkgconfig, libxml2, libdbh, and matching devel packages, dbh [1] and a2ps [2]. The Xfce homepage [3] has detailed information on what these required packages do.
Some distributions, including Suse Linux and Fedora Core 3, have their own Xfce packages that fulfill all dependencies. Users with Suse can run YaST to install Xfce. Users with Fedora Core 3 can run the package management tool by selecting System settings | Add/Remove applications in the main menu. This command gives you an Xfce 4 package for a point & click install.
Alternatively, change to the directory with the Fedora packages at the command line (for example, /media/cdrom/Fedora/RPMS/) and then enter system-install-packages xfce4*. If you opt for this approach, you will need to install the Xffm file manager manually as your next step.
For all other distributions - or if you want to try out the very latest version of Xfce - first install the Xfce binary or source code packages. Users with Ubuntu Linux can then launch the GUI-based package management tool, Synaptics, or give the following command apt-get install xfce4 to perform the installation. You will need an Internet connection in both cases; also make sure you have selected Universe as the package source. When you are finished installing, you can enter startxfce4 to launch Xfce. Mandrake Linux also has ready-to-run packages at [4]. Type the following commands
urpmi.addmedia eslrahc http://www.eslrahc.com/10.1/ with hdlist.cz
to add the URL to your existing installation sources. Now launch Rpmdrake, search for Xfce, and select the xfce-4.2.1 package. Rpmdrake automatically resolves any dependencies. Note that, by default, Rpmdrake does not install the huge collection of tools available for Xfce 4.2.1.
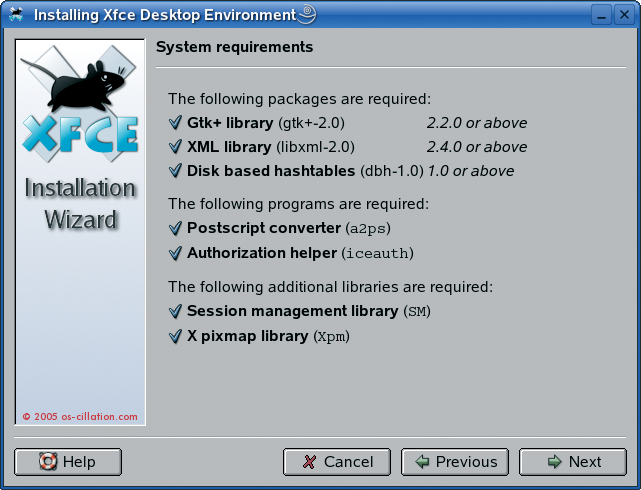
One of Xfce's special features is that the desktop environment has its own GUI-based installer (see Figure 2). If you want to use the installer, download the 15MByte xfce4-4.2.1.1-installer.bin file from [5] and make it executable by typing chmod +x xfce4-4.2.1.1-installer.bin.
Then pop up a terminal window while the window manager is running and enter xhost +localhost. Make sure you run this command as a normal user and not as root. You can then su to root and launch the installation by typing ./xfce4-4.2.1.1-installer.bin.
The Xfce Installer checks your existing software components, downloads any required programs off the Internet, and installs a complete Xfce environment. The program lets you know before it starts if it can't resolve the required dependencies.
The next step is to select the components you would like to install. Avoid the Debugging Support option here. If you enable this option, an error message is displayed at the end of the install. According to an Xfce developer, this issue is caused by a bug in the xf-calendar program that prevents users installing with debugging support.
Even though we disabled debugging support, an error message displayed at the end of our installation attempt: Software Uninstaller: Registering failed. Again, this is caused by a bug, but thankfully, the bug does not affect Xfce itself. The environment as set up by the GUI installer worked fine.
The full set of Xfce modules is available as a tar archive directly from SourceForge [6]. In order to install the Xfce modules, you need to download the xfce-4.2.1.1-src.tar.bz2 and a2ps.tar.gz files, although most distributions will already have the latter installed. If which a2ps returns the path to the program, you only need to download the Xfce package.
Install a2ps first, if needed. Then unpack the xfce-4.2.1.1-src.tar.bz2 file by giving the tar xvfj xfce-4.2.1.1-src.tar.bz2 command. The folder this step creates, xfce-4.2.1.1, contains a number of tar.gz archives that contain the program code. You can enter tar xfvz filename.tar.gz to unpack these archives.
Now change directory in turn to dbh-1.0.22, gtk-xfce-engine-2.2.6 and libxfce4util-4.2.1. While you are in each of the three directories, enter ./configure, make, and make install. You need to be root for the make install step. After completing the installation of libxfce4util, become root and launch the ldconfig program to set the path to Pkgconfig:
export PKG_CONFIG_PATH=/usr/local/lib/pkgconfig
Now continue the installation with the libxfcegui4, libxfce4mcs, and xfce-mcs-manager directories. You can then add more modules in any order you like. When you have finished adding modules, type ldconfig to ensure that Xfce will find its system libraries when it is launched.
If you install Xfce without setting any parameters, the desktop environment will be placed below /usr/local/. If you would prefer to install Xfce in /usr , you need to stipulate --prefix=/usr when calling ./configure. You will not need to export PKG_CONFIG_PATH= if you do this.
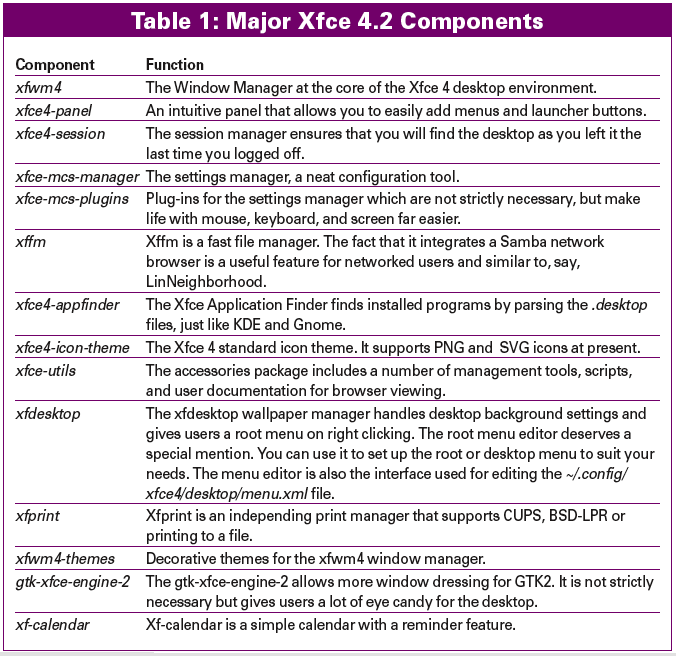
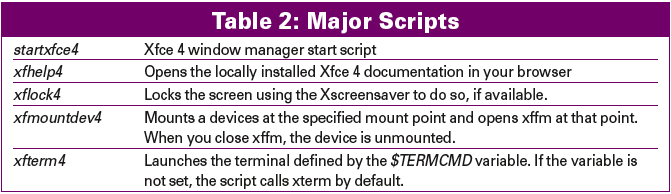
Xfce 4.2 includes a number of applications (see Table 1), a collection of scripts (see Table 2) and system libraries. The latter provide basic functionality to Xfce and are comparable with the DLL files used by Windows.
For example, the libxfce4mcs library allows you to manage various settings, although most Xfce4 applications do not use it. Libxfce4util contains a non-GUI help system. Libxfcegui4 handles interaction with the X Window system.
The intuitive Xfce 4 panel has icons for the terminal, file manager, web browser, email, media player, desktops, settings manager, printers (with drag-and-drop), help files, screen locker, logoff, and shutdown functions (see Figure 3). You can configure an icon by right clicking on that icon.
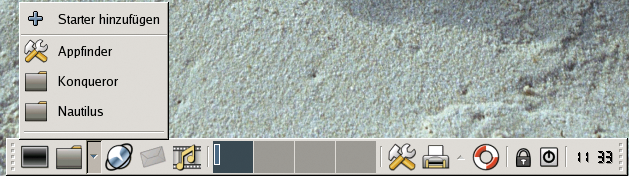
You can use the arrow buttons to the right of the file manager and to the right of the printer manager to add more entries to the kicker. For example, if you typically store your files below / data, you might like to have xffm point at this directory when launched. To do so, add a new launcher and type the / data URL as the Command:. Whenever you click on the entry in the panel, the xffm file manager launches and takes you directly to your /data directory. To add a new launcher to the panel, right click the panel and select Add new object | Starter.
The Settings Manager is a configuration panel that allows you to configure the appearance and behavior of various applets in a convenient way (see Figure 4).

Besides a number of cosmetic options, the Settings Manager also has tools for sound settings, printer settings, and calendar access. Some of the settings controlled by the Settings Manager are fairly rudimentary (for example, the Settings Manager does not provide an option for testing the sound when you set up the sound card), but the program is easy to use and intuitive.
The fast Xffm file manager uses a completely different design and looks a lot different from its competitors, Konqueror and Nautilus. This said, its functionality is easy to understand and should make life easier for users moving to Linux from Windows. Xffm comprises eight components, which you can launch individually via the Main Menu.
Xfce 4 is a stable and very fast desktop environment. It may not have as many features as the big guns, KDE and Gnome, however, it is excellent for older machines with restricted memory resources or for users who appreciate a fast desktop environment.
Working with Xfce is an intuitive process, which should make life easier for newcomers or users with Windows-only experience. To make things even more simple, support for desktop icons is planned. There is a detailed todo list at [7]. While the Xfce developers are completing this work, you might like to install the Rox Filer [8] tool to give you desktop icons on Xfce.
| INFO |
|
[1] Disk based hash tables: http://sourceforge.net/projects/dbh/
[2] PostScript Converter: http://ftp.gnu.org/gnu/a2ps/ [3] Xfce homepage: http://www.xfce.org/ [4] Mandrake packages: http://www.eslrahc.com/ [5] Xfce installer: http://www.os-cillation.com/article.php?sid=42 [6] Xfce source: http://sourceforge.net/projects/xfce/ [7] New features: http://www.myoo.de/xfce/index.php/4.4_TODO [8] Rox Filer: http://rox.sourceforge.net/phpwiki/index.php/ROX-Filer |