
By Frank Wieduwilt
Tellico [1], formerly known as Bookcase, was originally designed as a literature database. Now the program not only gives users a virtual bookshelf but also helps organize video, comic, coin, and stamp collections. You could even manage your wine cellar with a little help from Tellico.
Just recently, the program introduced a feature for user-defined collections, giving users a handy tool for small data sets. The only restriction is that Tellico does not support database relations.
Tellico stores its records in an XML file. In addition to its own format, the program also supports a number of external formats, making it easy to migrate existing databases. The application refers to databases as collections. A collection can contain any number of records, and each record can contain any number of fields.
Installing Tellico is surprisingly easy. The homepage has ready-to-run packages for Fedora, Suse, Slackware, and Mandriva. If you intend to build the program from source, you will need the source code package, tellico-0.13.6.tar.gz, and at least KDE 3.1, the Qt library version 3.1, libxml2 and libxslt, and the accompanying developer packages. Follow the usual steps to build and install program:
./configure, make, and make install.
When you launch Tellico the first time, the program shows you an empty literature collection; you could simply start entering your book records here (Figure 1). The tree view on the left side of the window shows you the records, which are organized by author. On the right, Tellico gives users a list of books sorted by title, with an overview of the selected record in a file card view on the lower right.
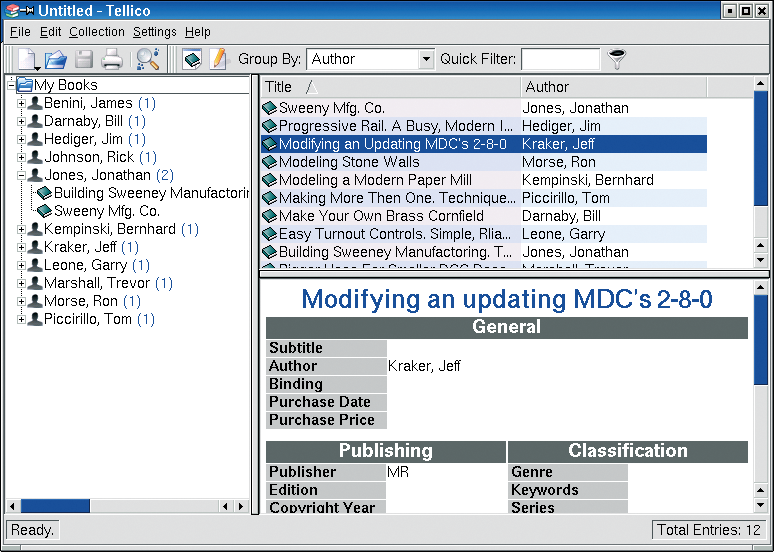
To help keep track, you can organize the entries in the tree view based on various criteria. The list view gives you the option of defining the fields you want Tellico to show you. This saves space and gives you a view of the most important details at a glance. To change the fields in the list view, right click a column header and use the drop-down menu for the column to define which columns you want to display.
To change the record grouping, right click the title of the collection and select Group selection | Name of group in the context menu. You can just as easily Filter by group by selecting the entry in the context menu.
Tellico takes the hard work out of populating the database by giving users a GUI-based input mask. To add an entry, select Collection | New Entry in the menu, or the keyboard shortcut [Ctrl]+[N]. The multiple page dialog prompts you to enter the data for the new book (Figure 2). If you prefer more detail, you can add an appraisal and even add a scan of the cover image.
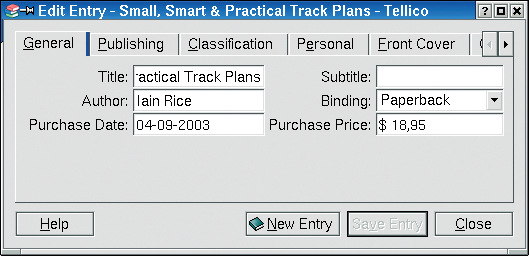
When you are finished, click the Save Entry button to add the book to your literature collection. If you need to modify the entry later, simply double click on the entry in the list view. The other database templates are just as well thought out, and can be used without any modifications.
Nobody creates a huge database just for the fun of storing digital information, so it is no surprise that Tellico's real strength is not burying information, but digging it up again. You can search any collection for a specific search key, without being restricted to simple strings. Tellico supports regular expressions, thus supporting sophisticated queries.
Select Edit | Search in the menu and type your query in the dialog box that appears. The query mask gives you the option of searching in one or all fields, and of specifying whether the search should be case-sensitive or not.
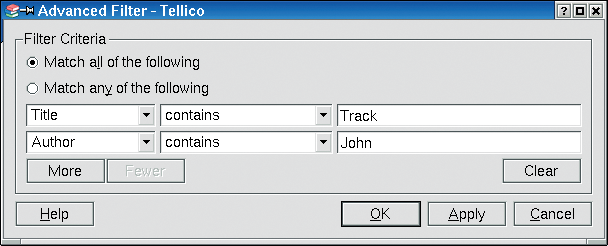
Filters allow users to restrict the number of records displayed as results. To apply a filter, select Settings | Extended filters in the menu and compile your filter conditions in the dialog that then appears (Figure 3). The first column is for the field; the second stores the condition that must apply, and the third is for the search key or regular expression that you will be filtering for. You can define a total of eight conditions. When you are finished, click Apply, and Tellico will show you the records that fulfill your filter conditions in the main window's list view.
In addition to including ready-made databases, Tellico now allows users to define their own collections. Clicking File | New | New user-defined collection tells Tellico to create an empty database. You can then press [Ctrl]+[U], or select Collection | Collection fields to open a dialog where you can define the fields (Figure 4).
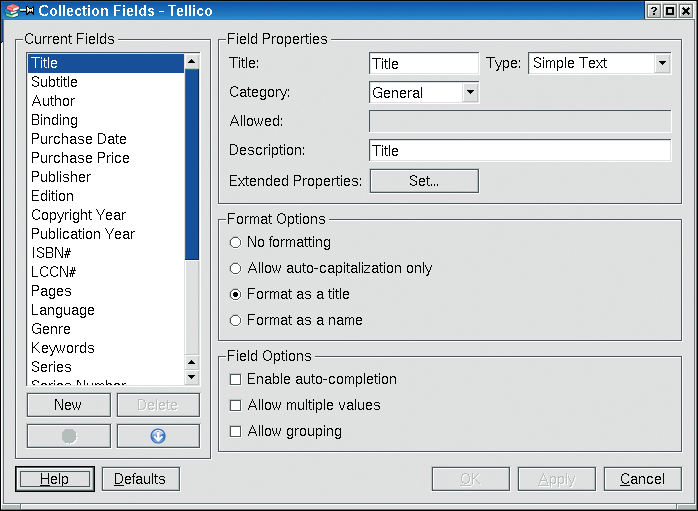
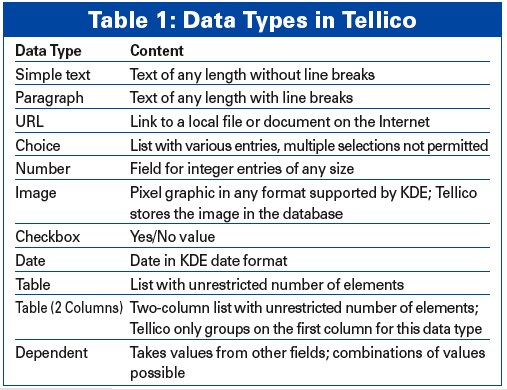
Click New to create a new field. Then type the field name in the Title text box and select a field type from the Type pull-down list. Table 1 gives an overview of the available types and the field content they accept. You can add a Description, which Tellico will store and display as a tooltip when you right click a field name and select What is this? in the context menu.
The Format Options section allows you to specify whether Tellico will allow field content to be modified after entry.
Allow auto capitalization only means that Tellico will capitalize any proper nouns; the Format as a title option removes articles at the start of a title and puts them at the end. For example, Tellico would turn The Return of the Goblin to Return of the Goblin, The.
This makes for easier sorting by title in the tree view, and avoids the issue of hundreds of entries starting with T. You can tell Tellico which words to put at the end in the settings dialog; click Settings | Configure Tellico. Add the words to the Articles field below General Options. The obvious choices are the definite article the, and the indefinite articles a and an. You can also add surname prefixes.
The Enable auto-completion option facilitates input. While you are typing, the program adds known content to the field. The Allow multiple values option allows you to specify two authors for a book. The names of both authors will be displayed as separate entries in the tree view. The input mask uses the semicolon as a separating character. Finally, Allow grouping allows you to specify whether Tellico is permitted to group a field in the tree view.
Tellico supports a number of formats to allow data exchanges with other programs such as databases and spreadsheets.
Besides the Bibtex and Bibtexml formats, which are of interest to librarians and book fans, Tellico also understands CSV formatted data. And more or less any spreadsheet can create or export CSV (comma-separated values) data. Even the KDE addressbook uses this common format to export contact data.
To import a CSV formatted file into Tellico, you first need to create a user-defined collection and define fields to reflect the data you are importing. When you are finished, select File | Import | Import CSV data in the menu, then browse to and select the source file. You should see the import menu (Figure 5).
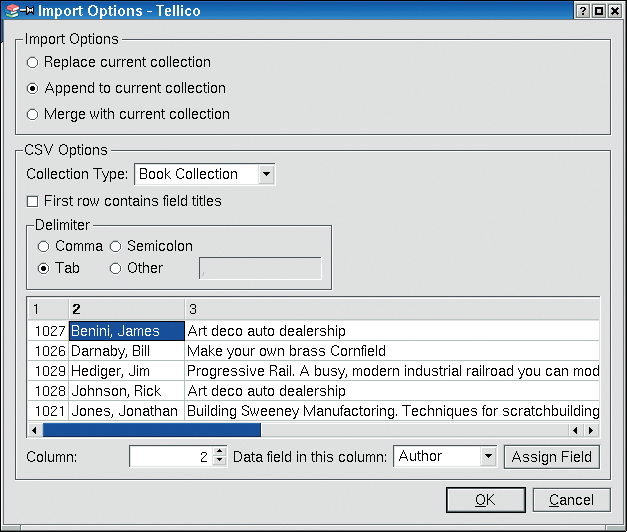
You can enable or disable the First row contains field titles option, depending on whether the first line in the CSV file contains a record or the field names. The character that separates the entries in the CSV is the Delimiter. Although the name CSV might imply that CSV files only uses commas as separators, most programs give you the option of selecting the separating character. And this makes sense if the data source includes commas - such as addresses where the name is written as Family_name, First_name. The lower part of the import window shows you a preview of the results, and allows you to check if you have assigned the Tellico database fields to the right columns in the CSV file.
Mapping fields is quite easy. The program shows you a list of fields in the lower part of the import dialog. You can click on a column header, select Data field in this column and then select the required field, and finally click Apply. If the data fields in the Tellico database and the CSV file use the same names, the program even gives you automatic mapping. Clicking on OK launches the data import.
Tellico has another neat trick up its sleeve, the ability to populate databases directly from Internet-based sources. To do the trick, select Edit | Internet Search and type a keyword or an ISBN number in the Search field. You can edit the list of Search Sources to tell Tellico which sources to search for the keyword. If the search is successful, you can store the results in the database by clicking on Add entry.
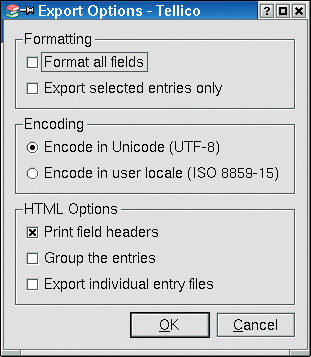
The data export feature is also highly configurable. To place a collection on your own homepage, you first need to convert your collection to a number of HTML files. To do so, select File | Export | Export to HTML. In the dialog box that then appears, you can decide which records to put on the HTML page and choose if you prefer grouped output (Figure 6).
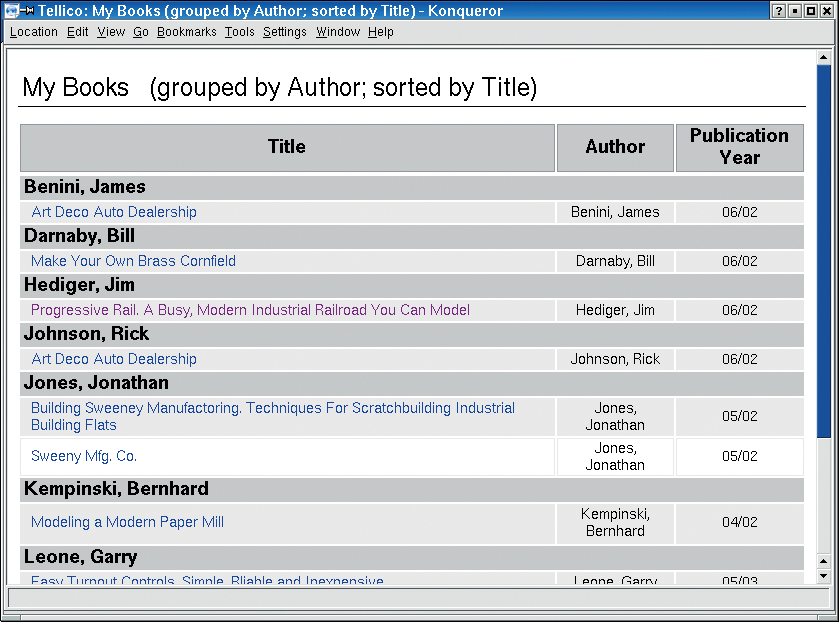
The result is an HTML file that contains the selected records, grouped just like in the main window tree view. The application only adds the fields shown in the list view to the file (see Figure 7).
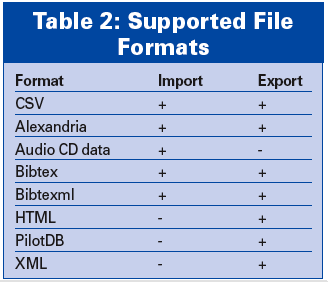
To support processing in Latex, Tellico can export records in Bibtex format. Users with the Alexandria literature manager on Gnome can exchange data directly with the program. Table 2 has a list of supported formats.
Tellico is a stable program that is easy to use. It is suitable for any kind of data collection that does not need to support simultaneous access by multiple users and does not have a particularly complex structure. Our test, which imported a literature database with over 3,000 records from a CSV file, also demonstrates that the program can handle larger files without any trouble. Running on a 1 GHz machine, Tellico imported the data in less than ten seconds.
| INFO |
|
[1] Tellico: http://www.periapsis.org/tellico/
|