
By Michael Schilli
There is probably no other decision in a programmer's life that is so important and so irrevocable as their choice of an editor. Once you opt for Vi or Emacs, you will tend to stick to your guns and attempt to coax the last ounce of performance out of your favorite tool. Once you decide on an editor, it is better to learn as much as you can about it. More effective use of an editor not only reduces the danger of Carpal tunnel syndrome, but also helps you code far more quickly and with fewer typos.
The Vim (Vi Improved) editor has a number of advantages over its venerable predecessor Vi. Over the years, Vim has been extended dramatically to support hard core programmers; it is highly configurable and plug-in extensible - in fact, Vim can be tailored to suit almost anyone's taste or style of working.
Vim stores a configuration file called .vimrc below the user's home directory; and this is right place to store the tricks we will be reviewing in this issue.
Linux distributions don't always come with the latest version of Vim, so it makes sense to run vim --version and check which version you have. You will need version 6.1 or newer. If your version is older, simply download the latest one from [2].
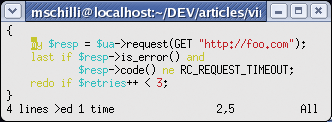
Highlighting keywords and constructs in program code is a great help for the sore eyes of anyone spending lots of hours reading it. Vim has excellent syntax highlighting for a variety of programming languages and gives you amazingly accurate results, even for a language that is as hard to parse as Perl. Figures 1a and 1b show how much easier it is to recognize code constructs with colored highlighting.
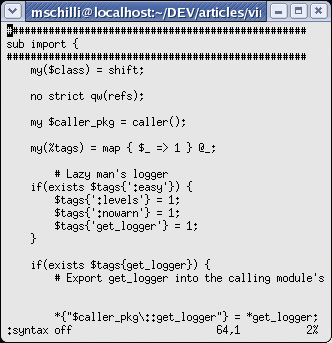
Of course, this assumes your Xterm supports colors. If syntax highlighting is not enabled by default in Vim, the :syntax on command will enable it. Vim evaluates the file extension (.pl or .pm) or even the #!/usr/bin/perl sequence in the Shebang line to detect Perl code and highlights the code according to the Perl syntax. When you start editing a new file that does not have a Perl-specific file extension or a Shebang line, you can tell Vim the file type explicitly by entering :set filetype=perl.
If you always use the same programming language, you will find yourself typing the same sequences over and over again. As an advocate of Log::Log4perl, I have lost count of the number of times I have typed use Log::Log4perl qw(:easy);. Fortunately, Vim has helped me put an end to that practice.
The command :abbreviate ul4p use Log::Log4perl qw(:easy); <RETURN> defines ul4p as a shortcut. Whenever I type the shortcut in text input mode, and then press something like the space or enter key, Vim automatically expands the string to give me the desired Log4perl line. The literal <RETURN>, which is located at the end of the shortcut definition simulates pressing the Enter key, and hence adds a line break. And if you want to quit input mode, and enter command mode, after expanding a shortcut, simply append <ESC>.
Another way of inserting a long text sequence using a shortcut is to read in a file: :abb ul4p<BACKSPACE><ESC>:r ~/.tmpl_l4p<RETURN> This command tells Vim to replace the ul4p shortcut with the contents of the specified file.
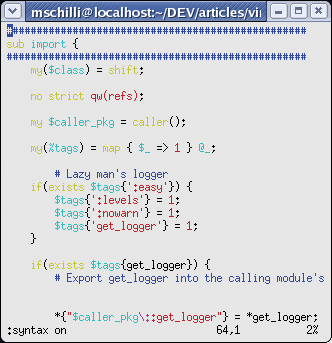
Macros can be used to repeat recurring editing steps that modify multiple non-contiguous areas. Figures 2a and 2b show three function headers to which I would like to add hashmarks.

The following commands are required: first use /sub to search for sub, then start the recorder for macro a, draw hashmarks around the first header, and disable the macro recorder. Then type n to search for the next sub, and replay the macro using @a. A list of commands is shown in Listing 1.
| Listing 1: Vim Commands |
01 # Search for 'sub' 02 /sub 03 # Start recording 04 # macro a 05 qa 06 # Insert one line above, 07 # Back to command mode 08 O<ESC> 09 # Insert 20 hashmarks '#' 10 20i#<ESC> 11 # Copy line 12 yy 13 # Go down one line 14 # Insert copied line 15 # below. 16 jp 17 # Disable macro recorder 18 q 19 # Search for next 'sub' 20 n 21 # Replay macro 'a' 22 @a 23 # ... repeat. |
If you prefer to add the hashmarks whenever you define a new function, you can define a keyboard shortcut for the F key, as follows: :map F o<ESC> 43i#<ESC>yyosub {<ENTER><ESC> Pk$i. Now, when you press the F key in command mode, Vim inserts a function header, switches to input mode, and sends the cursor to the right location to let you enter the new function's name.
The jumble of letters in the map definition again includes typical vi-style single-key commands for command mode; and I'm sure that vi fans recognize them. The number of hashmarks is a matter of taste; I used 43 in the above definition. In the case of recurring sequences such as function headers, map commands can save you a lot of time and hassle. If you like, you can use the same approach to type other common text sequences, for example, code for collecting function parameters as in my(...) = @_;.
Another common chore is saving the script that you are currently working on by pressing :w, and calling perl -c script.pl, to check the script syntax. The following command maps the save and syntax check actions to the X key in command mode: :nnoremap X :w <Enter>:!perl -c %<Enter>.
Using the :noremap command instead of :map ensures that "X" is not evaluated if it occurs on the right hand side of another map expression. Additionally, :nnoremap only expands the definition in command mode. The % placeholder represents the current file name.
If you are composing a longer text, such as POD documentation, for example, it might take you a while - such as seven or eight attempts - to get into the flow.
If you continually add and delete passages, you may end up with ragged looking paragraphs that are difficult to proofread. Word processors such as Word work hard in the background, continually reformatting the text, but genuine hackers have to polish the edges themselves.
You just need four keys in Vim's command mode to do this: {gq}. First, typing { takes you to the start of the current paragraph, the gq command gives you a left-justified text, and finally, } defines where the command applies - to the end of the paragraph in this case.
The Perl Text::Autoformat module by grandmaster Damian Conway provides a more elegant approach. Besides left-justification, the module understands all kinds of intelligent styles: for example, it can handle bulleted lists (the lines following a bullet are indented in the same way), and it handles email quotes indented using > or >>, or even more angly brackets, just like a human would.
To map the formatting command to the f key in command mode, use :map f !Gperl -Mtext::Autoformat -e'autoformat' <RETURN>. Later, while editing a paragraph, simply switching to command mode and pressing the f key with the cursor positioned somewhere in a text passage will format the passage automatically and correctly. Figures 3a and 3b show raw and formatted text.


If the default line width of 72 lines is too wide (or not wide enough) for your liking, you can use the right option to change this: :map f !Gperl -Mtext::Autoformat -e'autoformat {right=>65}` <RETURN> restricts the maximum line width to 65 characters.
Experienced Vim users will object that f is mapped by default in command mode; it takes the cursor to the next character you type, with fe taking you to the next e in the text, for example. If you really use this function, you can choose another key, or even map a two-character keyboard shortcut: for example, :map !f ... expects you to first press ! in command mode, before you press f.
There has been no end of discussion on the rights and wrongs of indenting program code. Where do you put the curly braces? How far do you need to indent nested code? Should you use spaces or tabs?
As programmers all have their own personal preferences, Vim gives you a choice of options.
Tab based indenting is a question of taste; many refuse to do this on principle. If you set the :set expandtab option, Vim will convert tabs to spaces. To set the number of spaces per tab, use :set shiftwidth=4.
But don't make the mistake of using expandtab without thinking about what you are doing, otherwise you will be in for an unpleasant surprise when you edit a Makefile. Make targets are followed by tab-indented commands, and replacing them with spaces provokes a syntax error. To avoid this, let Vim detect the file type, using autocmd, and set the expandtab option for Perl programs only:
:filetype on
:autocmd FileType perl :set expandtab
To track down issues like this, the :set list command lets you view non-printable characters in Vim. Tabs are displayed as ^I and the line end character is displayed as a blue `$`. :set nolist takes you back to normal display mode.
The shiftwidth option I mentioned previously has another function: in combination with the cindent option you can use shiftwidth to save a lot of typing. Whenever you type a conditional like if($really) { and press the return key, Vim will indent the next line by the values defined in shiftwidth and expandtabs. However, if you type } and press return, Vim will automatically push the closing brace outward, to the start of the line. As this behavior is not suitable for some file types, you might like to add an auto-command that identifies the file type first before setting the option: :autocmd FileType perl :set cindent
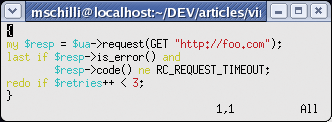
Sometimes you don't realize that a code segment needs to be indented until you have actually finished typing it. In this case, place the block in curly braces, as shown in Figure 4a, switch to command mode, and press >i{, to indent the `inside' block by the value defined by shiftwidth (Figure 4b).
The :set smarttab option adds another feature when you use the expandtab option: pressing backspace with the cursor placed over the first character in an indented line sends the line back to the left margin, and pressing the tab key indents the line again without using real tabs.
Another tip: to navigate from one curly brace to the corresponding curly brace, simply move the cursor to the first brace and press the percent key (%) in command mode. This makes it easy to find out where you are missing a curly brace if Perl indicates a syntax error.
If you are using a US keyboard and need to type a non-standard character such as an umlaut (Ä for example) with Vi, you can do so by typing Ctrl-K A : in input mode. To find out more about typing non-standard characters, enter the :digraphs command for a list of what is available.
The tmpl-Tool from [5] gets you off to a good start when you are launching into a new Perl script: for example, $ tmpl -p cooltool will create a new file titled cooltool. As you can see in Figure 5, the skeleton script includes a few header lines, a few typical modules, some code to parse script options, and a manpage display. tmpl reads a number of configurable parameters like the author's name from the .tmpl file in the user's home directory.
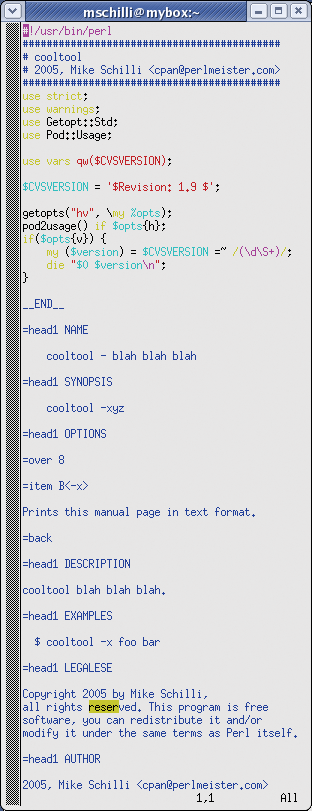
The cooltool skeleton already has two abilities: $ cooltool -v displays the current script version, which is stored in the $CVSVERSION variable and automatically updated by CVS. Also, Pod::Usage displays a short help file if the -h flag is set.
Of course, budding script writers will need to fill in the gaps, but the skeleton takes you a long way, giving you a template and a documentation framework, which are indispensable for any script.
Vim automatically remembers words you have written and completes them when you press CTRL-n in text mode. If you define a variable such as our $GLOBAL_SUPER_VARIABLE;, and then use the variable later on in the script, you do not need to retype the name; instead, you can simply type the first few letters, press CTRL-n, and let Vim read your thoughts.
If there is more than one way of expanding the letters you have typed, you can press CTRL-n multiple times to scroll forward, and CTRL-p to scroll back through a list of possible expansions. This feature can save you a lot of time and typing.
C programmers will be familiar with the ctags program, which creates a tags file for Vim. After ctags saw the file, a developer only needs to place the cursor somewhere within a function call, and press CTRL-] in command mode, to tell Vim to jump to the appropriate function definition, no matter which file it is in.
To tell Vim to go to the source file for LWP::UserAgent in Perl, for example, if the cursor is somewhere within the letters of LWP::UserAgent in a Perl program, users need to do two things. First of all, Vim needs to understand that keywords in Perl can include colons; you can type :set iskeyword+=: to do this. Second, Vim needs to parse the tags file, which provides an index for all installed packages, as in the :set tags=/home/mschilli/.ptags.txt command.
Pressing CTRL-] with the cursor located in the module name will then take you to the module source code. As an alternative, you can supply the module name as a command mode parameter, as in :tag LWP::UserAgent. Pressing CTRL-T while viewing the module file takes you back to where you started. The magic behind this functionality is stored in the .ptags.txt tags file, which Listing 2 creates.
| Listing 2: ppitags |
001 #!/usr/bin/perl -w
002 #############################
003 # ppitags - PPI-based ctags
004 # Mike Schilli, 2005
005 # (m@perlmeister.com)
006 #############################
007 use strict;
008
009 use PPI::Document;
010 use File::Find;
011 use Sysadm::Install qw(:all);
012 use Log::Log4perl qw(:easy);
013
014 my $outfile =
015   "$ENV{HOME}/.ptags.txt";
016 my %dirs  = ();
017 my @found = ();
018
019 find \&file_wanted,
020   grep { $_ ne "." } @INC;
021
022 blurt
023   join("\n", sort @found),
024   $outfile;
025
026 #############################
027 sub file_wanted {
028 #############################
029   my $abs =
030     $File::Find::name;
031
032   # Avoid dupe dirs
033   $File::Find::prune = 1
034     if -d and $dirs{$abs}++;
035
036   # Only Perl modules
037   return unless /\.pm$/;
038
039   my $d =
040     PPI::Document->load(
041     $abs);
042
043   unless ($d) {
044     WARN "Cannot load $abs" .
045          " ($! $@)";
046     return;
047   }
048
049   # Find packages and
050   # all named subroutines
051   $d->find(
052     \&document_wanted);
053 }
054
055 #############################
056 sub document_wanted {
057 #############################
058   our $package;
059   my $tag;
060
061   if(ref( $_[1] ) eq
062     'PPI::Statement::Package'
063   ) {
064     $tag =
065       $_[1]->child(2)
066       ->content();
067     $package = $tag;
068
069   } elsif(ref($_[1]) eq
070       'PPI::Statement::Sub'
071       and $_[1]->name()) {
072     $tag =
073       "$package\::"
074       . $_[1]->name();
075   }
076
077   return 1
078     unless defined $tag;
079
080   push @found,
081     $tag . "\t"
082     . $File::Find::name
083     . "\t"
084     . regex_from_node(
085         $_[1]);
086
087   return 1;
088 }
089
090 #############################
091 sub regex_from_node {
092 #############################
093   my ($node) = @_;
094
095   my $regex =
096     $node->content();
097
098   $regex =~ s/\n.*//gs;
099
100   while (
101     my $prev =
102     $node->previous_sibling()
103   ) {
104     last if $prev =~ /\n/;
105     $regex =
106         $prev->content()
107         . $regex;
108     $node = $prev;
109   }
110
111   $regex =~
112     s#[/.*[\]^\$]#\\$&#g;
113
114   return "/^$regex/";
115 }
|
Despite having a window manager, you might need to display two files simultaneously in a single window, and let's face it, Vim users are not the type of people to use a mouse when their hands could be busy typing.
If you type CTRL-W-], rather than CTRL-], with the cursor located within a keyword, the window will split into two halves with the lower half displaying the code for the file you are currently editing, and the top half showing you the code for the module you referenced. Pressing CTRL-WW toggles between the two panels. Typing the :quit command in the top window will close that window, leaving the text you were editing in the main window. Alternatively, you can type the :only command in the lower window to close the top window.
You can see a Vim session in Figure 6 with a test script that uses the LWP::UserAgent module in the lower window, and the new() method from the module's source code at the top.

If you are not sure how to spell the name of a module you are looking for, you can simply enter a regular expression. The tselect command will search for any matching tags and give you a list to choose from: :tselect /^LWP. This allows users to select the number for the required module from the menu, as shown in Figure 7.

How do you create a ~/.ptags.txt file? To do this, you need to read the modules that your local Perl installation uses at regular intervals. The script shown in Listing 2 investigates all your @INC paths, writes to a @ dirs array to help it remember where it has been, and to avoid rechecking overlapping paths.
Another option to create ppitags would be to use the program ctags, which, in its latest versions, handles Perl code quite well. But calling ctags -R -f ~/.ptags.txt /usr/lib/perl5 won't find tags that require more elaborate parsing of perl code than simple pattern matching.
To analyze Perl source, you really need perl, as Perl is extremely difficult to parse. However, Adam Kennedy recently attempted the impossible and wrote a "Good enough" parser for Perl - in fact, the parser is amazingly good. The PPI module from CPAN includes PPI::Document; its load() method reads a Perl module, divides it up into tokens, and stores them as nodes in a tree structure.
ppitags uses File::Find to parse the directories in Perl's global @INC array. For each entry it finds, File::Find jumps to the file_wanted function. If the entry is a directory rather than a file, line 34 updates the %dirs hash, to discover if the path has already been traversed. If so, line 33 sets the $File::Find::prune variable to 1 to tell File::Find that it can skip the rest of the directory and any subdirectories below it. Line 37 ignores anything apart from Perl modules that end with .pm.
Line 40 parses the current Perl module. Any errors that occur at this point are handled by line 43 (PPI is not perfect at this time of writing), issues a warning, and drops the module it could not handle.
After parsing a module, line 51 calls the find() method for the PPI::Document object, stepping through the tokens in the Perl source and calling the document_wanted function defined in line 56 for each token it finds.
The function checks if the token is a PPI::Statement::Package type or PPI::Statement::Sub type object, that is, a package or sub definition in the Perl code.
A package definition means a line such as package LWP::UserAgent;, which in turn means four tokens in the world of PPI: package, space, the module name, and the closing semicolon. Only the module name is of interest for ppitags, that is the third child in the node, which was passed by $_[1] to document_wanted(). The child() method with the child index starting at 0, digs out the "LWP::UserAgent" string: $_[1]->child(2).
Line 69 finds function definitions of the sub func { type and extracts the function and method names to allow the tag mechanism to identify constructs such as LWP::Debug::trace and jump to the location where the trace function in the LWP::Debug module is actually defined.
When a package definition is parsed, ppitags stores the package name as the current package, which is then used as a prefix for all parsed functions. Although this could fail with package definitions in blocks, it makes no difference in 99.9% of all cases.
The push command in line 80 pushes a new string to the end of the @found array, which is made up of the required tag (Package- or the fully qualified function name), the absolute source filename, and a regular expression, which locates the package or function definition within the source file. To do so, the function defined in line 91 ff., regex_from_node, composes a regular expression made up of all the characters in the line with the match from the beginning of the line to the required token. In the case of subroutines, $node->content() returns both the function header and the body. This is why line 98 removes all lines apart from the first one, and lines 100 through 109 skip back token by token until the beginning of the line is reached. At the end of the while loop, $regex will contain the source line from the start of the line to the token. Line 114 uses this data to generate a regular expression of the /^.../ type with an anchor for the start of line character. The search-and-replace operation in line 112 ensures that any non-standard characters in the Perl code will not conflict with regex meta-characters by escaping them with backslashes.
ppitags creates a ~/.ptags.txt file containing a list of three-column entries of the format: Package/Subroutine [tab] filename [tab] Regex, which Vim will parse using :set tags= as described previously, thus allowing it to jump elegantly from keywords to the matching source code.
It makes sense to run ppitags once daily as a cronjob to keep ~/.ptags.txt up to date. If you prefer, you can extend the script to allow Vim to identify fully-qualified our variables (such as $Text::Wrap::columns, for example), and to jump to their definitions within the module source code.
Vim reads the .vimrc file in a user's home directory when it is launched, and this gives users the ability to run a series of commands before Vim actually gets down to work. After tweaking the defaults interactively, you will probably want to keep your changes. Instead of retyping the commands to add them to your .vimrc file, you can simply type : mkvimrc to tell Vim to store the current settings in ~/.vimrc.
There is a sample configuration at [1] that gives you all the settings we have discussed in this month's article. Remember, saving time typing gives you more time for thinking!
| Listing 3: .vimrc |
01 version 6.0
02 :map !L iuse Log::Log4perl qw(:easy);<RETURN>Log::Log4perl->easy_init($DEBUG);<RETURN><ESC>
03 :map F o<ESC>43i#<ESC>yyosub {<ENTER><ESC>Pk$i
04 map f !Gperl -MText::Autoformat -e'autoformat{right=>70}'^V^M
05 set backspace=2
06 set fileencodings=utf-8,latin1
07 set formatoptions=tcql
08 set helplang=en
09 set history=50
10 set hlsearch
11 set ruler
12 set shiftwidth=4
13 :autocmd FileType perl :set cindent
14 :autocmd FileType perl :set expandtab
15 set smarttab
16 :nnoremap X :w<Enter>:!perl -c %<Enter>
17 :set tags=/home/mschilli/.ptags.txt
18 :set iskeyword+=:
|
| INFO |
|
[1] Listings for this article: http://www.linux-magazine.com/Magazine/Downloads/57/Perl
[2] The Vim project homepage: http://www.vim.org [3] Steve Oualline, "vi IMproved - Vim", New Riders, 2001 [4] Mike's Script Archive: http://perlmeister.com/scripts [5] tmpl Script: http://perlmeister.com/scripts/tmp |
| THE AUTHOR |
|
Michael Schilli works as a Software Developer at Yahoo!, Sunnyvale, California. He wrote "Perl Power" for Addison-Wesley and can be contacted at mschilli@perlmeister.com. His homepage is at http://perlmeister.com. |
