By Heike Jurzik
Multiuser systems neatly separate individual user workspaces. You can save your own files by assigning appropriate access privileges. The typical Unix/Linux paradigm of having a separate account for administrative tasks (root) helps prevent the possibility of user errors that might otherwise take down the whole system.
The system administrator, root, is the boss of the whole system; a user needs root privileges to run the commands for setting up and managing user accounts that we will be looking at in this article. After discussing the most important configuration files, we will take an in-depth look at the useradd, usermod, and userdel tools, which allow us to create, manage, and delete accounts.
| Command Line |
|
Although GUIs such as KDE or GNOME are useful for various tasks, if you intend to get the most out of your Linux machine, you will need to revert to the good old command line from time to time. Apart from that, you will probably be confronted with various scenarios where some working knowledge will be extremely useful in finding your way through the command line jungle. |
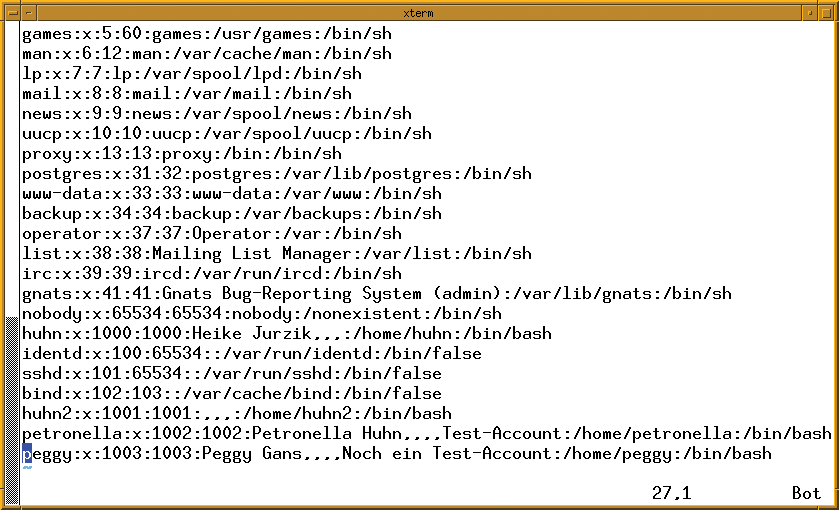
A quick look at the /etc/passwd file (Figure 1) tells you all about the user accounts on your system. Besides bona fide accounts, you will also notice entries for users such as lp or mail, the so-called pseudo-users created by the system to assign specific rights for specific files and directories to specific system processes. Generally speaking, the entries in /etc/passwd look like this:
petronella:x:1002:1002:Petronella Huhn,,,,Test-Account:/home/petronella:/bin/bash
The colon-separated fields, contain the following entries:
As I mentioned previously, modern systems tend to use shadow passwords. Shadow passwords enhance the security of the system by removing the encrypted password entries from /etc/passwd, which is globally readable, and placing them in /etc/shadow instead. (The shadow file is only readable for the administrator.) The shadow password feature also stores information on the last password change and offers users a control mechanism for changing their passwords.
The lines in /etc/shadow also have colon-separated fields. These colon-separated fields store the following information:
Note that only the first two entries for the username and password are mandatory; all the other fields are optional. Thus, an entry might look like this:
petronella:$1$RXbNLkU8$XULLOGFVs6LTxmSRqCS.P/:12872:0:99999:7:::
When you are creating an account, it makes sense to assign a few default values to every user. Besides creating a home directory, you might want to add a few configuration files (for the shell, for example). Most systems allow you to give users a basic framework specified in the /etc/skel (for skeleton) directory.
While Debian Linux only stores a few hidden configuration files (for various shells) in the skeleton directory, Suse Linux adds a number of files and folders. Most tools that help admins add new user accounts automatically copy the content of /etc/skel to the new user's home directory and assign matching permissions.
If you decide to manually add a user account by editing the /etc/passwd and /etc/shadow files, make sure you create a new home directory, copy the content of the skeleton directory to the new home directory, and modify the permissions as appropriate:
mkdir /home/newuser
cp -r /etc/skel /home/newuser
chown -R newuser:users /home/newuser
To include the subdirectories below /etc/skel, make sure you set the -r flag for recursive copying, and the -R flag for recursive permission changes, when you run the cp and chown commands.
users is the default group for new users with most distributions; if this is not the case for your distribution, you will need to replace the users entry with the correct group name.
If all that manual work is too confusing or too time-consuming for your liking, useradd is a fast command line tool that can give you a hand. The various Linux distributions install versions with different parameters. But don't worry: we will be pointing out the differences wherever they are relevant to the information in this article. Typing useradd or useradd -help gives you a parameter list.
Every new account needs a User Identifier (UID), which you can define by setting the -u UID flag. Make sure the UID is unique for each user - if you attempt to assign the same user ID twice, useradd will protest. If you omit the user ID, useradd will determine the highest UID in the normal user range and increment that number by 1.
You can also specify the -g parameter to set a primary GID. If you need to make the user a member of any other groups, add the -G flag and the appropriate group numbers. The /etc/group file tells you which groups exist on your system and which GIDs these groups have. Let's assume you want to add the new account to the users group (e.g., GID 100), and additionally to the cdrom group, which has a GID of 24. The following options would do the trick: -g 100 -G 24.
By default useradd chooses a home directory name to reflect the username associated with the account. To explicitly specify a different home directory, you need to specify the -d directory option. The -m parameter tells useradd to create the home directory if the home directory does not exist, and to copy the skeleton directory from /etc/skel to the new home directory. -c allows you to add some information for the user - note that you will need to put this information in quotes if the information contains blanks. The command line might look like this:
useradd peggy -u 501 -g 100 -m -s /bin/bash -c "Peggy Goose"
Your next step would be to type passwd peggy and set a password for the new user.
Default settings make useradd even quicker. The defaults can include details of groups, home directories, and the skeleton; the big advantage for you as the administrator is that you can leave out all these details at the command line, assuming you want to keep the defaults.
To discover the defaults for useradd on Debian Linux and Fedora Core, run the tool with the -D option:
debian# useradd -D
GROUP=100
HOME=/home
INACTIVE=-1
EXPIRE=
SHELL=
SKEL=/etc/skel
Suse Linux 9.2 calls this option --show-defaults. Suse uses the defaults to specify other groups to which new accounts are added:
suse# useradd --show-defaults
...
GROUPS=video,dialout
If you want useradd to use the defaults for a new account, you can simply type something like useradd <new_account>. Note that some Linux distributions expect you to specify the -m option if you want to create a home directory and copy the tree below /etc/skel to it.
There are a couple of approaches to changing the defaults. You could fire up your editor and modify /etc/default/useradd, or you could use the command line to define the values by specifying them as parameters. Different distributions take different approaches to this problem. Users with Debian or Fedora can change the useradd defaults at the command line by setting the -D parameter. Let's assume you need to define a different default shell. In this case, you would type:
# useradd -D -s /bin/csh
The syntax for specifying a different location for home directories is similar (-D -b /home2), as is the command for specifying a different default group (-D -g 101).
On Suse Linux, you again need to specify --save-defaults rather than the -D flag. Note that this option will not work for the full set of defaults, but only for the skeleton directory (as in --save-defaults -k /etc/my_skel) and the shell (e.g., --save-defaults -s /bin/csh). The parameters for modifying the home directory or GIDs mentioned in the manpage are missing in versions 2.6.90 (Suse 9.2) and 2.6.96 (Suse 9.3), but you could always modify /etc/default/useradd as a workaround.
The usermod tool allows you to modify account properties for a user account. usermod uses functions and parameters similar to those of useradd. For example, the following line would give a user a different shell:
usermod -s /bin/csh huhn
The next time the user huhn logs on to the system, he or she will be given a different shell.
One of usermod`s most practical features is its ability to disable user accounts. Debian administrators who wish to disable a user account (temporarily) without actually deleting the account, can type the following command:
usermod -L huhn
Again, note that, in Suse 9.2, this option is described in the manpage but not actually implemented. A quick look at the /etc/shadow file tells us that the account really is disabled, as the password hash now starts with an exclamation mark:
huhn:!MjBhdgr.6XkE6:12575:0:99999:7:::
This entry will effectively prevent user huhn from logging on to the system. To re-enable the account, type:
usermod -U huhn
It is just as easy to delete user accounts as it is to create them. The tool you need for deleting user accounts is userdel. There is one condition: the user you will be deleting cannot be logged on to the system, or have processes running, at the time you delete the account. Assuming this is not the case, you can remove the account by typing userdel peggy. If you want to remove the home directory at the same time, specify the -r parameter to tell userdel to remove Peggy's personal data.
Although most distributions have convenient GUI-based user management tools, the command line is a much faster way to make changes if you know what you're doing. Once you have gotten used to the syntax of useradd, usermod, and userdel, user management tasks require only a few seconds.
| THE AUTHOR |
|
Heike Jurzik studied German, Computer Science and English at the University of Cologne, Germany. She discovered Linux in 1996 and has been fascinated with the scope of the Linux command line ever since. In her leisure time you might find Heike hanging out at Irish folk sessions or visiting Ireland. |