
By Richard Baraban
System Configuration Profile Management (SCPM) is a tool for mobile users. SCPM stores a variety of system configuration profiles and switches profiles based on a command or mouse click.
Assume Ms. M. uses her laptop at the office and at home, and she needs different network settings to ensure Internet access from both locations. At work, she uses the Ethernet card to connect to the local network, with DHCP handling the details. Internet access is routed via a corporate proxy server. At home, she uses WLAN to surf the web and NFS to talk to a desktop machine.
Now let's assume Ms. M. wants to store company data on her laptop and use her Linux-based desktop PC at home to process that data. This adds another obstacle. The company server uses Windows, so Ms. M. actually needs two different network setups:
As Ms. M. is a busy woman who is often on the road, she needs a third profile for business trips; this profile has to disable all network services.
If you have Suse Linux and work in a similar environment to Ms. M., the YaST SCPM module is just what the doctor ordered. To launch the module, press [Alt]+[F2] and type kdesu yast2 to open the Suse Linux configuration tool. Then select Profile Manager below System.
The first time you launch the module, Suse Linux 9.3 pops up a window with a short introduction to SCPM. If you happen to close the window by mistake, you can click on Show Introduction to return to the intro. Of course, the excellent YaST online help, and the URL info:scpm in Konqueror, will give you additional details.
YaST stores user settings in so-called profiles. Before you can start adding profiles, you first need to enable the profile manager via Options. To do so, click the Enabled radio button, then click OK, and YaST will create a default profile for you. This profile contains your current settings and is a useful template for any further configuration work. To change the name of the profile, click Edit in the System configuration profile management window.
There are two general approaches to modifying profiles:
You will have to decide for yourself which is the more practical approach for you. The former approach involves deciding on the settings you need for your system environment and storing them in a profile. By default, SCPM uses the second approach. When you switch profiles or shut down your computer, YaST stores any settings you have changed. To prevent this, you would have to enable Drop changes for both Switch mode and Boot mode below Options.
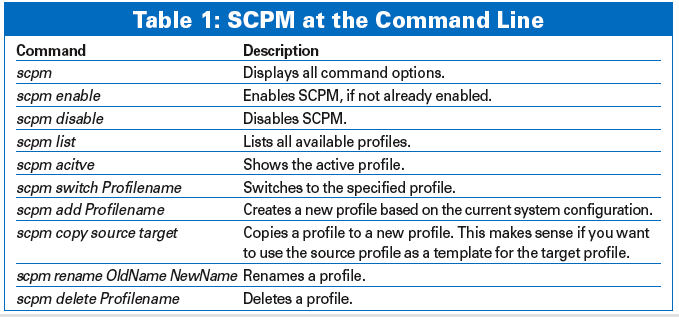
You can switch profiles in YaST via the SCPM icon in the kicker and by entering a command. The profile_chooser command launches the panel applet. Refer to Table 1 for more details of the command line options.
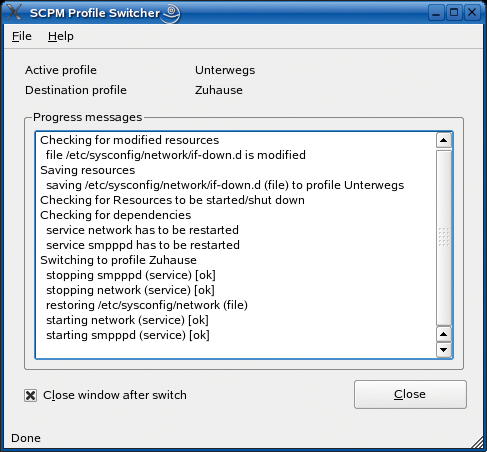
To define settings for a profile, you first need to switch to this profile. Clicking on the panel applet shows you which profile you are currently using. When you switch profiles, the applet displays a window with the files and services affected by the change (Figure 1).
To select a profile on booting, you need to press F3 in the boot manager while your machine is booting. This can save you time switching profiles after you have logged on. If you prefer to use the same profile every time you boot the system, add the profile to your boot loader configuration. To do so, add the following entry to the kernel line in /boot/grub/menu.lst: showopts PROFILE=Profilename (see Listing 1).
| Listing 1: menu.lst |
01 ###Don't change this comment - YaST2 identifier: Original name: linux### 02 title SUSE LINUX 9.3 03 kernel (hd0,2)/boot/vmlinuz root=/dev/hda3 vga=0x317 splash=silent showopts PROFILE=ontheroad 04 initrd (hd0,2)/boot/initrd |
The SCPM configuration file is stored in /etc/scpm.conf and gives you the paths to all SCPM system files. /var/log/scpm is the profile manager logfile. The profiles themselves are stored below /var/lib/scpm/profiles/ where the file names reflect the profile names. SCPM also has a database, which stores paths to modified files, below /lib/scpm/resource_sets/. For more details on SCPM go to /usr/share/doc/packages/scpm/. Novell has the source code at [1].
In SCPM terminology resources are elements that fulfill a system configuration role. The current version distinguishes the file (configuration files) and service resource types. YaST has a large number of pre-configured resources, and SCPM uses about a quarter of them by default.
If your changes affect a file or a service that the current resource groups do not have, you can use YaST to create a new group. File and service entries can then be assigned to the group. Of course, configuration entries and services should be organized in resource groups.
In cases where a problem cannot be solved just using resources, SCPM can additionally call a script when a user switches profiles, adding the ability to introduce user-defined settings. SCPM offers four options for when to execute the script:
These scripts must be executable by root to allow SCPM to run them. You can do this quite simply by entering chmod 700 script_name. If you use YaST to add the scripts, YaST also takes care of the permissions.
The profile manager stores network settings in the network resource, which is enabled by default. In other words, you only need to set up the WLAN card and save the settings. You can follow normal procedures to set up the card in YaST. To do so, select YaST | Network devices | Network card. You can then specify whether the network card will use DHCP to assign a network address or if you will be configuring a static IP address. If you opt to use DHCP, you obviously need to make sure that the system can actually reach a DHCP server. At home, a WLAN router typically assumes the DHCP server role. Figure 2 shows the setup for the WLAN connection. You also need to modify the network name and key to reflect your access point settings.

You can also use YaST to set up the NFS client. To do so, launch the Network services | NFS Client module. To store your NFS settings in your profile, you also need to enable the NFS resource in YaST. The resource notes any changes to the /etc/fstab file and to the NFS service. Depending on your Internet connection type, YaST may also automatically launch the Suse firewall in your home network configuration. You will need to enable the SuSEfirewall2 resource to allow the profile to "remember" the firewall settings.
After setting up the WLAN and NFS, launch the profile manager and allow YaST to generate a profile titled AtHome with the current settings. To prevent YaST from overwriting the profile, select Drop changes for Switch mode and Boot mode.
To prevent your computer from looking for the WLAN access point and the NFS server at the office the next day, you will want to undo the changes you just made using the appropriate YaST modules. Don't worry about saving the changes; switching to the AtHome profile will give you the right settings for your home network any time you need them.
At the office, set up the Ethernet card and the proxy server settings. Again, you will need to modify the profile manager settings. The network resource lists the /etc/sysconfig/proxy file, but does not enable this setting by default. To change this, go to Options | Configure resources, select the network group and enable the file by double clicking on the entry.
You are unlikely to need a firewall on the internal office network. Working as root, disable the firewall by entering insserv -r rcSuSEfirewall2. Finally, set up the Samba client for access to your Windows file server. To do so, add the required data to your /etc/samba/smbfstab file. Suse Linux 9.3 has a useful template to help you with this. When you are finished, save the profile under an intuitive name.
You will note that YaST lacks a Samba resource, and this means that YaST will not notice the changes to your /etc/samba/smbfstab when you switch to your home profile. Depending on your home network setup, your computer might spend a lot of time unnecessarily searching for Samba servers when launched; in fact, it might even freeze if you are unlucky. In other words, you need to set up a resource group for your Samba settings.
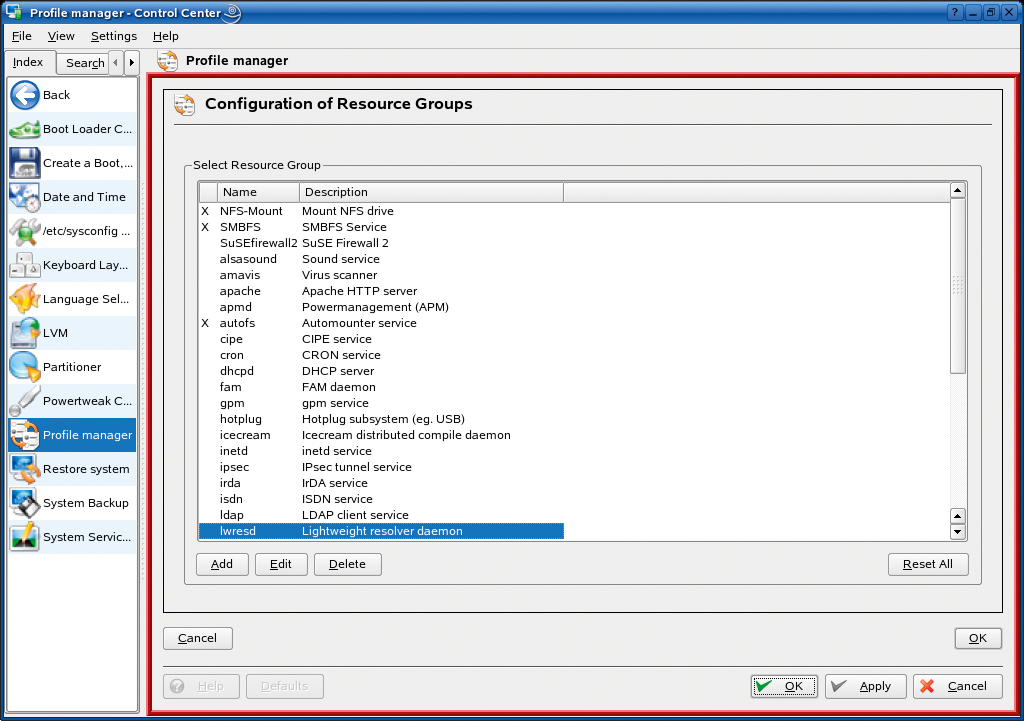
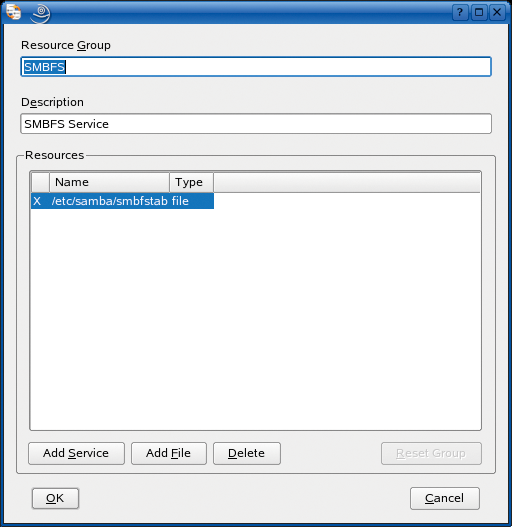
Change to the AtHome profile and select Options | Configure resources in the profile manager. Click Add to add a resource group, as shown in Figures 3 and 4. If your client is a member of a Samba domain, you will also need to add the files below /etc/samba/ to your resource group.
After completing this step, edit the /etc/samba/smbfstab file and comment the Samba drive lines by adding a hash sign at the start of each line. To store these changes, go to the profile manager and switch to the office profile. You will first need to enable the option for saving the profile on switching in YaST.
You now have two different smbfstab files that can then be parsed by the profiles as appropriate. When using the AtHome profile, Suse will not mount any of the directories you commented, whereas the Work profile will use the original smbfstab file.
The OnTheRoad profile is less work than any of the others. Just create a new profile in YaST and change to the profile to prevent any inadvertent changes to your current profile. Then launch YaST and undo all of the changes you have made thus far. When you are finished, change back to the "AtHome" profile, and YaST will automatically save the changes in the OnTheRoad profile.
| INFO |
|
[1] Project homepage: http://forge.novell.com/modules/xfmod/project/?scpm
|