By Gaurav Nawani
Most magazine articles written on the subject of GIMP (GNU Image Manipulation Program) start with the basics and don't get much further. In this article, we'll take you past the first steps and show you how the experts use the GIMP to address a very practical problem: turning a simple photograph into an image you can use to tile a surface.
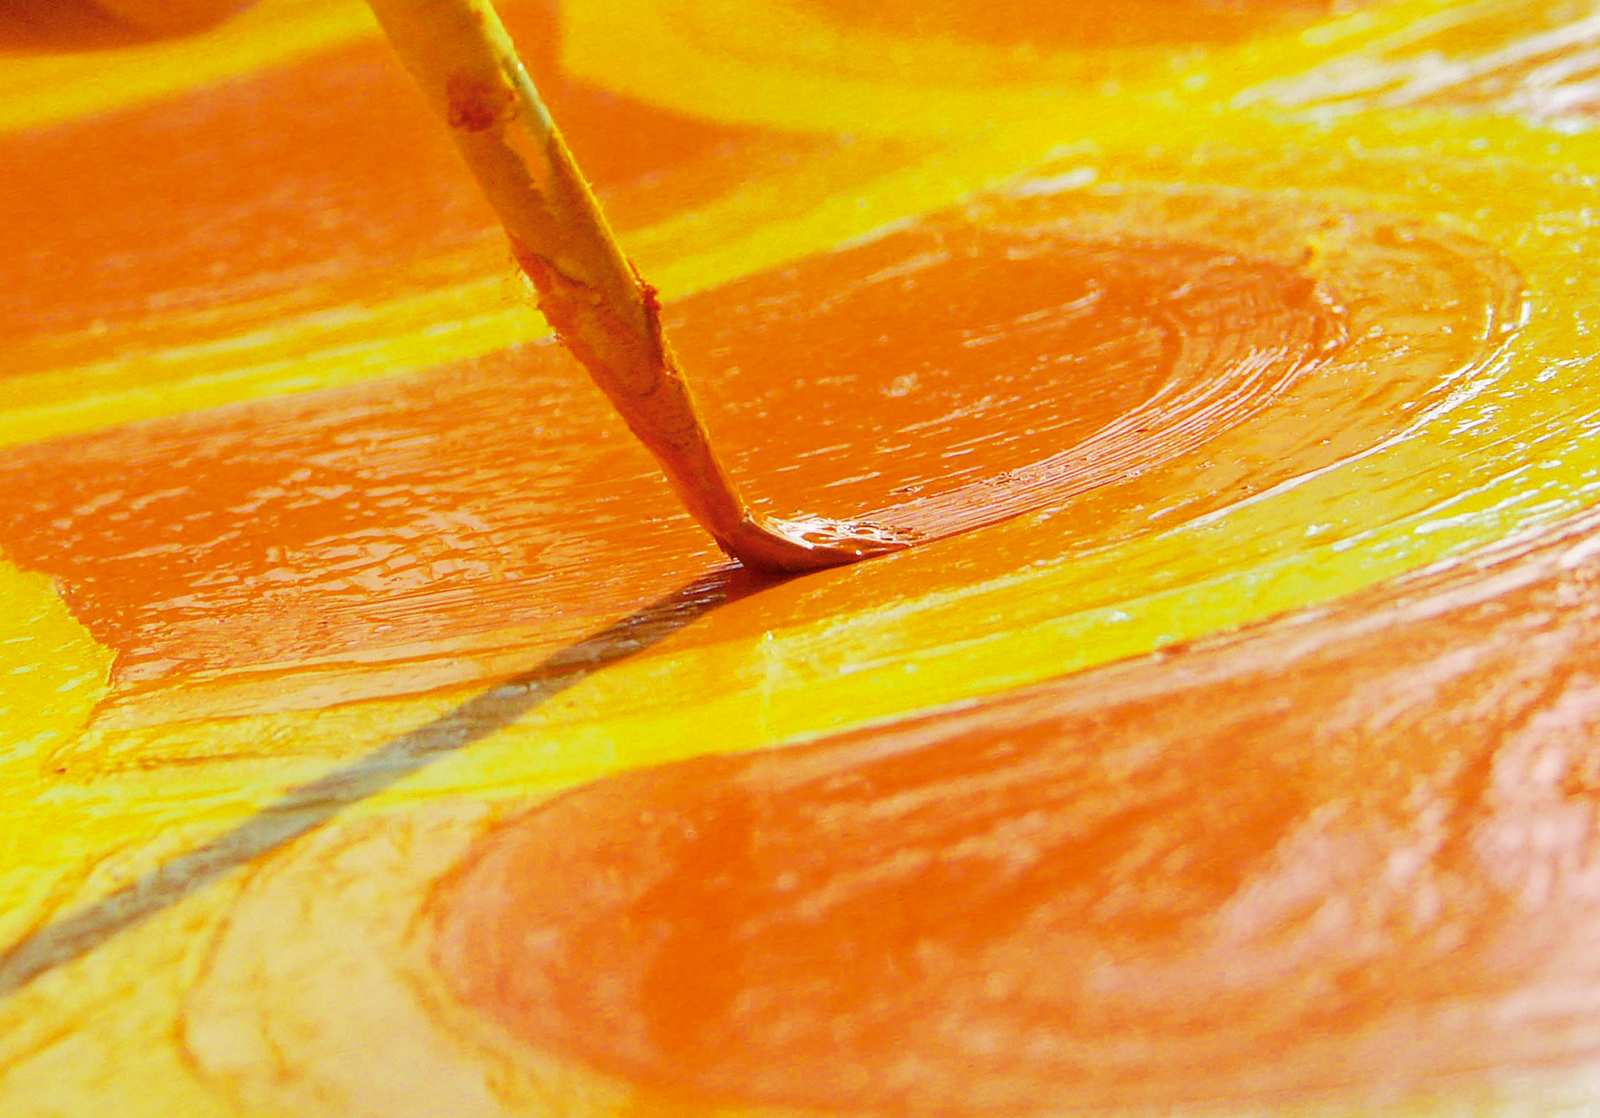
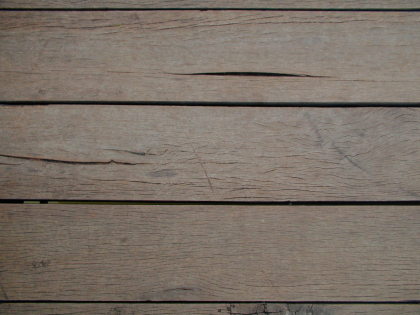
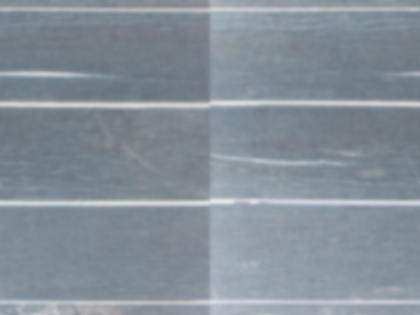
One of the most common defects in photographs is the presence of uneven brightness in the image. In Figure 1, for instance, the right part of the image is brighter, and the left part is darker in comparison.
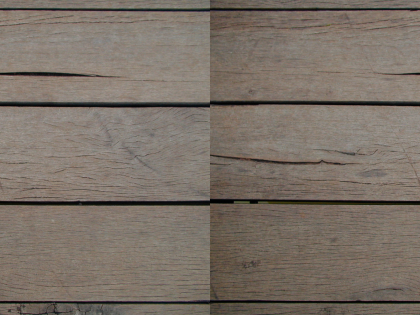
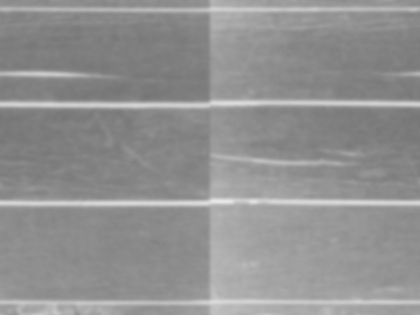
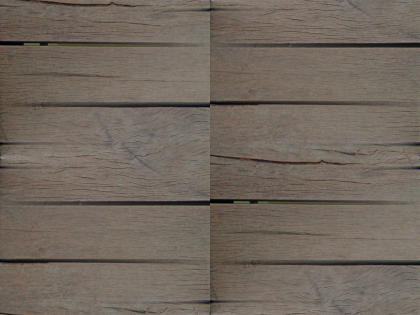
If you used the image in Figure 1 to tile a surface, you would soon notice the unwanted variations caused by uneven brightness. To explore this problem, I have changed the offset of the image. The previous edges (left and right) of the image are now wrapped at the middle of the image (Figure 2). The contrasting brightness at the centered edges is clearly visible. This image, if used directly as a tiled texture, would produce discontinuities that would catch the viewer's eye. Although you might be tempted to start working on the image seams right away, this may not a good idea. Even after you spend time modifying the image, you will still have to deal with the uneven brightness and the patches that might come up during modifications.
In order to simplify the tiling process, we first need to check whether the image is free from highlight/brightness defects. Reducing these defects to controllable limits will reduce the manual work later on because it is easier to create a seamless tile from an equalized image. To equalize the highlights, we will use the high pass filter technique on the image. (See the box titled "High Pass Filter.") Unfortunately, the GIMP does not have any built-in filter or external plugin for high pass filter filtering; however, the same affect can be achieved relatively quickly with few simple manual steps.
| High Pass Filter |
|
The idea behind our makeshift "high pass" filter is simple. The image contains the data that can be used to extract both the extreme highlight (brightness) and lowlight (darkness) information. Using this information, we can reduce the variance between the two extremes by applying the inverted highlight information over the original image. This will result in the canceling of opposite highlights, and the image thus formed will have a reduction in the brightness of previously bright regions and an increase in brightness of previously dark regions. This process is also called equalizing the image highlights. |
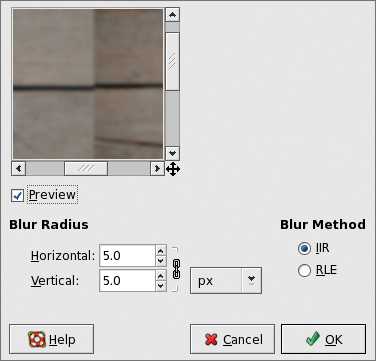
Open the image you want to make into a tileable texture. Duplicate the base layer once by clicking Layer | Duplicate Layer, select the new duplicated layer from the Layer dialog box, then click Filters | Blur | Gaussian Blur. Now either copy the values shown in Figure 3, or, depending upon the size of your image and the size of the highlights, modify the blur radius so that the distinct edges of highlights are smoothed out. Please note that this blurring will not result in loss of sharpness in the final image.
Now invert the color of the duplicated layer. Put simply, inverting the color of the layer is like getting back the photographic negative of the image. To do that, click Layers | Color | Invert. As you can see (Figure 4), inverting the color also inverted the highlights in the image. This information will be used to equalize the highlights of the original image. Notice that the inverted layer still holds the color information.
We do not require the color information in the layer, so we will run Desaturate. To do that, click Layers | Color | Desaturate. After we run Desaturate, the resulting image is in black and white shades, or it is a greyscale image (Figure 5). This color scale is sufficient to hold the brightness information that we require. The removal of color is also necessary, as it will make sure there is no unwanted color bleeding when the layer is used in the next step. Please note that the steps in this process need not be performed in sequence.
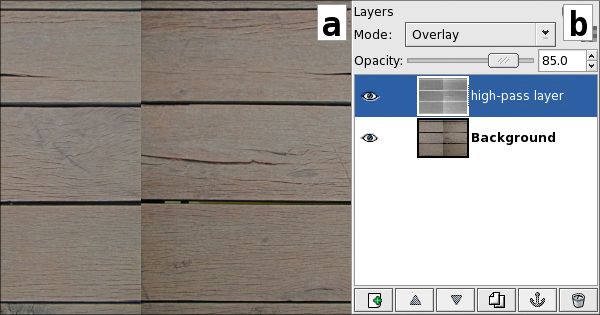
The final step in the high pass filter process is to change the layer mode of the top layer to Overlay. (See the box titled "Layers and Layer Modes.") Here you might have to adjust the opacity of the overlayed layer if the resulting image is too washed out.
Now we have effectively applied the high pass filter on the image. Upon comparing the filtered image (Figure 6) with the original (Figure 2), you will notice the difference that the high pass filter can make on the image highlights. The idea of using the high pass filter is to get rid of extremes in the highlight so that the texture has an even tone of highlights all over. So if you are not satisfied with the highlight difference, you can repeat the high pass filter process. But you should be aware that overdoing it will result in the image losing too much useful information.
The resulting sample texture after applying the high pass filter looks a little devoid of color. This color reduction or washout effect is a side effect of the high pass filter, although in this case, the difference has resulted in very little color reduction. But this effect might be more problematic or evident in colorful images.
Try out the high pass filter on any colorful image and observe the effect. Bad as it sounds, it is not difficult to get most of the color information back to a satisfactory level.
Save a copy of the image in native GIMP format before proceeding. Now to restore the color, you will first need to flatten the image. Flattening refers to collapsing all the layers present in the image into a single layer. To flatten the image, click Image | Flatten Image.
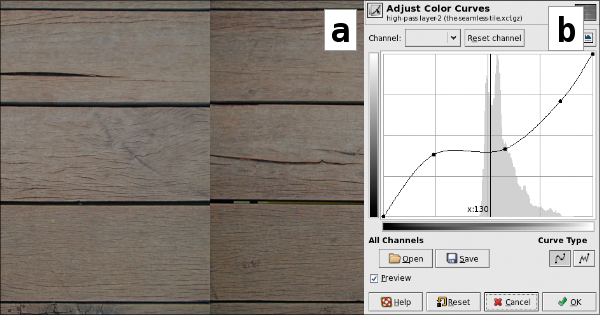
Now duplicate the flattened layer by selecting Layer | Duplicate Layer. Then click Layers | Color | Curve. Play with the curve levels in the pop up Color Curves dialog box (Figure 7b). Normally, three stops in the curve will do the trick - watch the image for reference. Just click once to put in a point, and drag the point to adjust the position.
The GIMP tiling tool is very simple; basically, it takes the four corners (quarter sized) from the layer, duplicates them, offsets them, and finally merges them down on the original texture with some blurring and transparency. Figure 8 shows the effect of the GIMP seamless plugin on the sample image. Although the image is now tileable, the plugin has destroyed the natural tileability of the planks, and the wood looks artificial. This is not good enough for professional work.
| Layers and Layer Modes |
|
Almost all the graphics applications allow you to work on the images in multiple layers, and GIMP is no exception. A layer is like a sheet of paper in a stack. The sheets can be transparent, opaque, or even semi-transparent - you can control these settings yourself. The Layer dialog box in the GIMP shows the preview of layers present in the image. A layer mode is another feature of the layers in the GIMP that allows you to change the way the current layer visually affects the layer below it. Let's say you change the layer mode of the top layer to Divide; this will instruct the GIMP to divide the color values of each pixels of the current layer from the color values of pixels of the layer beneath it. The various layer modes produce interesting results. There are about 23 different layer modes available in the GIMP. Please refer the glossary section of the GIMP documentation for more information. |
| Seamless Plugin |
|
One must remember that the GIMP also has a built-in tiling tool. It can be accessed from Filters | Map | Make seamless. A word of caution: although the GIMP tool can make an image or layer tileable, it is far from usable for serious tiling. The GIMP tool can destroy the natural texture of the image and, therefore, this tool is not very effective. However, it can work well for a simple texture with moderate variations. As one might expect, it performs better on images with highlights equalized. |
Now that I have applied the high pass filter, I will show you how to create a seamless texture manually. GIMP has several tools that can assist with creating a seamless texture. The following tools are particularly important:
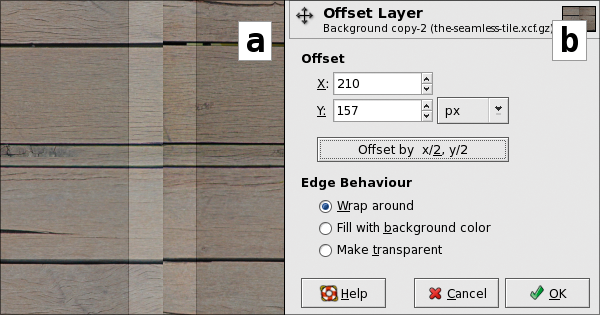
After you have used the high pass filter on the image and you are satisfied about the highlight equalization of the image, you are ready to start working on the texture to make it seamless. The first step is to use GIMP's Offset tool. The Offset tool allows you to shift the layer by a specific offset distance in both in the X and/or Y directions. The Wrap around feature allows the regions of the layer to be wrapped back inside the layer from the opposite direction if you offset the layer by more than its width or height.
Before proceeding, save a copy of the file, and make sure you have flattened all the layers of the image. Now click Layer | Transform | Offset. In the popup Offset Layer dialog (Figure 9b), click on the button labeled Offset by X/2.Y/2 (X and Y being width and height of image). Make sure that Wrap around is selected. The Wrap around option will bring all the four edges at the center of the layer. You can then very clearly see the problems with the seam of the texture, which we need to remove in order to create a tileable image (refer to Figure 9a).
| XCF: the GIMP Image Format |
|
If you want to save the layers in the image, you can do so only if you save the image in native GIMP format. The GIMP native format (with the XCF extension) also stores lots of other information like text layers, paths, layer modes, and lot more. Under GNU/Linux, you can follow the suffix .xcf with .gz, like filename.xcf.gz. This will automatically compress the image with standard gzip compression. Similarly, you can also use the .bz2 extension. |
| Tip |
|
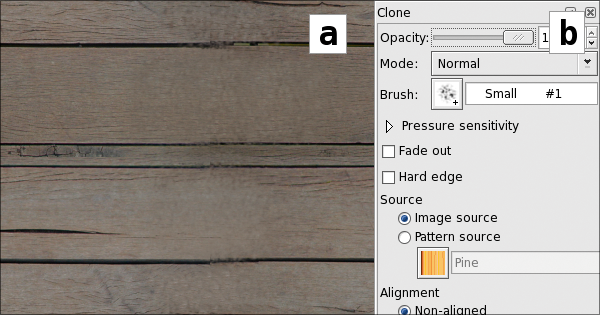
The GIMP provides extra options with each tool available in the GIMP Toolbox. You can access the extra options from the Tool Options dialog just below the GIMP Toolbox. Check out the Tool Options dialog for special features. Figure10b shows tool options for the Clone tool. |
The next step is to try and find regions in the layer that are similar in color tone and can be used to copy and paste over the edges so as to dissolve the edges and seams without filling the layer with odd patches.
The Clone tool allows you to "clone" or copy regions of image and place the cloned (or copied) regions anywhere on the image using the selected brush. The Clone tool uses the current brush shape for picking a region to clone. First you will need to select the Clone tool by clicking Tools | Paint Tool | Clone or by pressing [C]. This act of selecting the Clone tool will turn the cursor into a stamp icon.
Now place the cursor over the region you want to clone and, keeping [Ctrl] pressed, left click once to pick the clone. Place the brush by left clicking. I have also picked and stamped a few clones (Figure 10a) using one of the GIMP-extra (See link box) brushes. I have not used the normal brushes, as they all have either sharp or blurred edges, and they might not be of the right shape and size. For this texture, we need more natural grunge brushes. There are many brushes available for the GIMP; if you are interested in exploring brush options, you can do a Google search to look for brushes.
This clone stamping has to be repeated with varied brushes, shapes, and sizes, and clones have to be picked from various regions of the layer so that the texture does not lose its complexity. Make sure you don't use clones of contrasting brightness, or they will attract the eye during tiling.
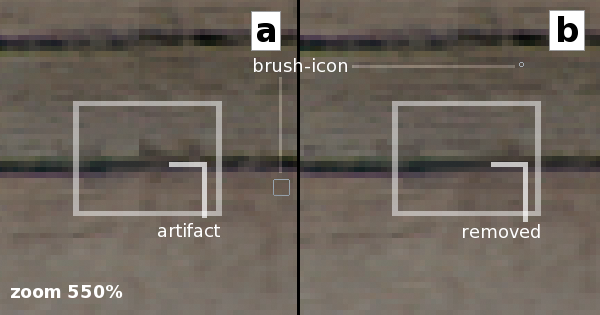
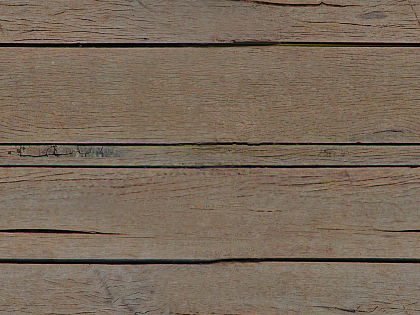
The layer is now starting to look good for a tilable texture, but some smaller artifacts remain. We can notice them better if we zoom into the image. In Figure 11a, I zoomed up to 550 and chose a region where we can clearly see a distorted seam where the two wooden planks are close. The image has horizontal texture variations, so we will remove the seam using the Smudge tool in the horizontal direction.
The Smudge tool is used as a brush modifier. It acts by moving or stretching the pixels currently under the brush towards the direction of the stroke. It behaves much the way an artist mixes the colors on the canvas, by stroking the color pigments with the brush.
I choose the Circle (03) brush for this purpose. Select the Smudge tool through the menu Tools | Paint tools | Smudge. Now place the brush before the artifact on the black part and drag it horizontally so that the black line looks continuous. Press [Ctrl+Z] to undo if necessary. Here I also repeated Smudge over the brown part of the artifact to get something like the image in the Figure 11b. Repeat smudging wherever you deem it necessary to remove artifacts from the image.
Looking at Figure12a, you will notice that the Smudge tool has made the part inside the white box a bit blurry. We can correct such mistakes in the layer by a tool in the GIMP called the Convolve tool (Figure 12b). The Convolve tool provides the blur/sharpen capability to the selected brush. You are allowed to use either blur or sharpen at one time on the image.
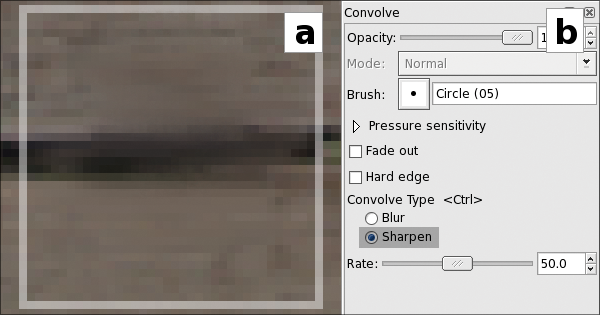
To use this tool, select Convolve tool from Tools | Paint Tools | Convolve or press [V]. Now look at the Tool Options dialog, select the convolve type as sharpen (Figure 12b), and leave the other settings at the defaults. Now, if you move the brush over the part of the image, the GIMP will sharpen the path where the brush moves. This way, you can clean up small blurriness areas to cover up occasional blurs caused by the Smudge tool itself.
You can hold down [Ctrl] to toggle between blur and sharpen. The Convolve blur is different from the Smudge equivalent, as the Convolve option just applies blurring to the part under the brush without moving the pixels along with the stroke.
Work with the Clone tool, the Smudge tool, and the Convolve tool as long as necessary to remove the seams and edges. This process will give you a seamless, tileable texture. Now that you are acquainted with the steps, below are a few tips that will allow you to have better control over the tiling process.
After you have removed the edges from the image, again offset it by -X/2 and -Y/2 to get the original position of the image back. Now click Filters | Map | Tile, double the width value, and press the OK button. This will create a new image window where you can see the image tiled twice in both directions. Tiling this way will allow you to see how the texture looks when tiled. If you feel that the texture is not finished, you can play with the tools and image to get the desired texture.
Finally, you might need to increase the sharpness of the texture. To increase the texture's sharpness, click Filter | Enhance | Sharpen. Don't choose the maximum setting to sharpen the image; instead, choose a smaller value for the sharpness and repeat it a few times until you are satisfied.
| INFO |
|
[1] The GIMP: http://www.gimp.org/
[2] Plug-ins and scripts: http://www.registry.gimp.org [3] GIMP Manual: http://docs.gimp.org [4] Textures: http://www.mayang.com |
| THE AUTHOR |
|
Gaurav Nawani is a graphic artist at IronCode Software. He has a keen interest in open source technologies. Gaurav's website can be reached a http://www.geocities.com/gauravnawani. He can be contacted at nawani_g@yahoo.co.in |