
By Alexander Reiterer
For some users, the powerful Gentoo is the ideal Linux, but for many, Gentoo is an inaccessible system for the experts. Whatever your impressions of this daunting distro, once you know your way around, you'll find that Gentoo provides some very convenient tools that make the system as easy as any other Linux.
Many users consider Gentoo Linux synonymous with "hard to install," "a system for geeks," or "unfriendly to newbies." It is hard to deny that there is a smattering of truth in these prejudices, but even if you are new to Linux, it is still worth your while to investigate this young distribution. In this article, I will try to take the fear out of Gentoo [1].
We will start by looking at Gentoo basics, focusing on the installation, which is completely different from any other distributions you may be familiar with. We will then go on to explore how to manage software on your Gentoo system.
Although you can install Gentoo from prebuilt packages, it is more typical to build the system directly from the source code. This gives you the advantage of being able to tailor the system perfectly to match your needs. This is why Gentoo is often referred to as a meta-distribution. Both the system setup and the installation of new programs are normally quite different from most other popular distributions.
Before we move on to look at the install, let's first review some of Gentoo's advantages and disadvantages. One of the advantages should be fairly obvious by now: as a user, you maintain complete control of the system. This went without saying in the early days of Linux; users were more or less forced to explore their own systems, editing configuration files, and searching forums for answers to any problems they encountered. GUI-based install wizards, and central system administration tools (such as Yast on Suse Linux, for example), have really taken the hard work out of installing, configuring, and managing today's Linux systems. At the same time, these tools obscure the underlying processes. Gentoo brings more light into the gloom.
Of course, this flexibility comes at a price. If you are set on getting to know Gentoo, you should be prepared to read lengthy manuals and not be afraid of firing up your editor to modify configuration files. In daily life, these apparent disadvantages often turn out to be less of a hindrance than you might expect.
The Gentoo Linux install starts with downloading a Live CD image. There are two different installation media available for the current version (which is version 2005.0 at the time I am writing this article): a minimal image and a universal image. You should not use the universal image unless you want to avoid building the system from scratch. The installation process itself is divided into three stages. Which stage you will need to start from depends on how much of the system you will be building from scratch, and which prebuilt components you will be using.
Stage 1 gives you the full gamut of system optimization options; on the downside, the install takes a long time to complete. A Stage 2 install gives you fewer optimization options, but the whole process is far quicker. This makes Stage 2 a good compromise between optimization and speed. Stage 3 is the quickest approach to installing Gentoo; you only need to accept the defaults for optimizing the basic system. Additionally, Stage 3 fulfills the requirements for using prebuilt packages for the install. In the following sections, we will assume you are using the minimal image for the remaining installation steps and that you have opted for a Stage 1 install.
You only need the Live CD to boot the system, detect the hardware, and set up a network connection. To give you a better overview, I have divided the installation into 12 steps.
Download the minimal image from [1], burn a CD with the image (you can use k3b to do so), and boot your system from the CD.
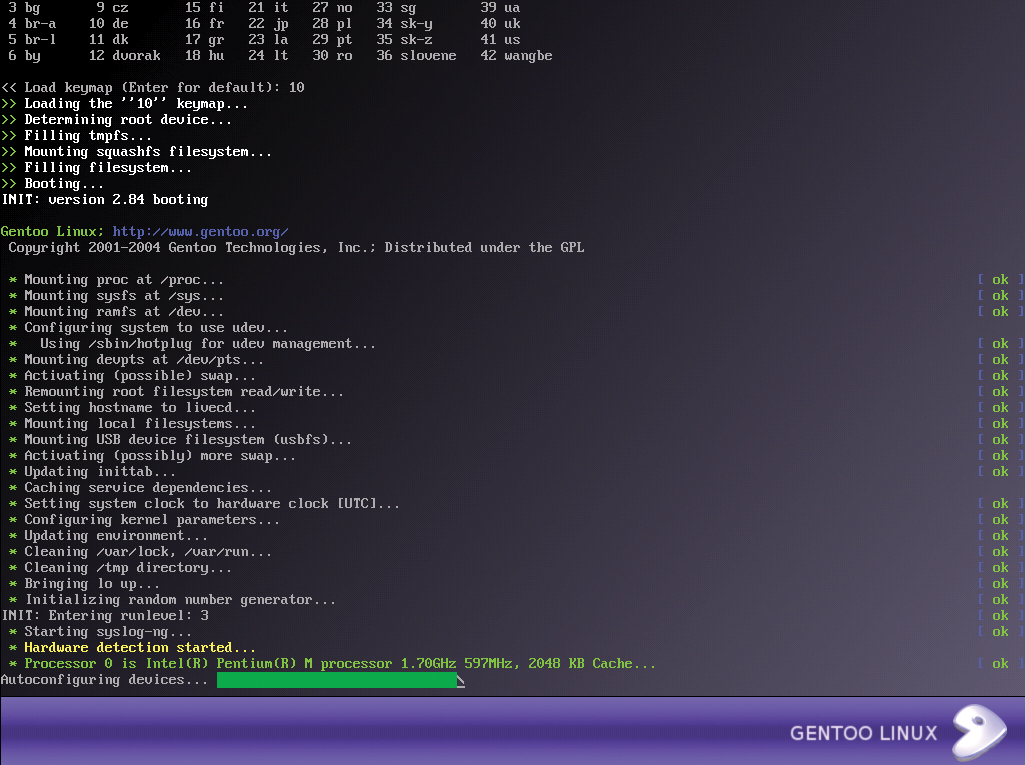
After booting (Figure 1), you should see a prompt. You are automatically logged on as root and can now start configuring the network settings. If your machine is on a network with a DHCP server, Gentoo will typically get these settings right.
Enter ping -c 3 www.google.de to check if you have an Internet connection. If you don't, you will need to run net-setup (adding the name of your network interface) or adsl-setup (for ADSL connections) to set up your network environment. You can install Gentoo over a WLAN, if needed; if you intend to do so, refer to the online documentation at [2].
The next thing to do is to set up hard disk partitions for Gentoo. We will be assuming your hard disk is /dev/hda. Give the fdisk /dev/hda command to launch the partitioning tool. You can now press p to display the current partition table or d to delete all the partitions on the disk. Create a boot partition by pressing n, and then press p. Assign this partition as number 1, and set the size (e.g., 32M for 32 MB.) The next thing to do is to create a swap partition. To do so, enter the following in this order (press Enter after each entry): n, 2, +512M, t, 2, 82. Then set up a root partition by pressing p and 3. When prompted for the partition size, press Enter to accept the default setting (this uses the remaining hard disk space for the root partition). When you are finished, press [W] to store the partition table.
Now format the newly created partitions with a filesystem of your choice, for example, by typing the command mke2fs /dev/hda1 (boot partition using ext2) or the command mke2fs -j /dev/hda3 (root partition using ext3). Finally, create and enable the swap partition by entering mkswap /dev/hda2 and swapon /dev/hda2. mount /dev/hda3 /mnt/gentoo, mkdir /mnt/gentoo/boot, and mount /dev/hda1 /mnt/gentoo/boot will mount the partitions you just created in your filesystem tree.
Now type cd /mnt/gentoo to change the default directory to the Gentoo mountpoint, and enter links2 http://www.gentoo.org to select a mirror server. There is a list of mirrors in the navigation bar on the left below Resources: | Download Mirrors.
On the selected mirror server, change the directory to releases/x86/2005.0/stages/x86, select the Stage 1 archive, and press [D] to download. Then change to the snapshots directory and download the current Portage archive - at this time of writing, the current Portage archive is portage-20050331.tar.bz2.
Unpack the Stage archive by entering tar -xvjpf stage?-*.tar.bz2. The option -p is important here, as it tells tar to keep the file permissions when unpacking the files. When you are finished, extract the Portage branch in the right directory by entering tar -xvjpf portage-20041022.tar.bz2 -C /mnt/gentoo/usr.
As mentioned earlier, Gentoo has a variety of system optimization options. We will just be scratching the surface here, so you might like to check out the online documentation at [2] if you need a more detailed description. To make changes, first enter nano -w /mnt/gentoo/etc/make.conf to open the make.conf file. To keep this simple, let's just say the file contains all the system optimization options.
The CHOST variable specifies the processor type, i686-pc-linux-gnu, for example, or x86_64-pc-linux-gnu (if you have an AMD64.) The CFLAGS and CXXFLAGS variables define the C and C++ compiler optimizations. The following settings would work for an AMD AthlonXP CPU:
CFLAGS="-march=athlon-xp -pipe -O2"
CXXFLAGS="${CFLAGS}"
You can also use MAKEOPTS to specify how many processors your system has. For a single CPU system, type MAKEOPTS="-j2".
Before you can build the basic system, you need to select a mirror server from which you will be downloading the required Gentoo packages. The following command handles this for you automatically:
mirrorselect -a -s4 -o | grep 'GENTOO_MIRRORS=' >> /mnt/gentoo/etc/make.conf
The system then needs DNS information, and you need to mount the proc filesystem:
cp -L /etc/resolv.conf /mnt/gentoo/etc/resolv.conf
mount -t proc none /mnt/gentoo/proc
You can now enter the environment and update the Portage branch. Use the following commands to do so:
chroot /mnt/gentoo /bin/bash
env-update
source /etc/profile
emerge -sync
When you are finished, go on to make some more changes using the USE variable, which contains a few general compiler options. To do so, open make.conf again. The Use variable for a KDE-based system might look like this:
USE="-gtk -gnome qt kde dvd alsa cdr"
Then go on to enter the following commands to build the basic Gentoo system:
cd /usr/portage
scripts/bootstrap.sh
emerge system
To build the kernel, you first need to download the current kernel sources: give the emerge gentoo-sources command to do this. Besides this typical variant, there are a few other kernel sources, such as gentoo-dev-sources or vanilla-sources.
Then type cd /usr/src/kernelsource and make menuconfig for the configuration. Instead of "kernelsource" in the following commands, specify the name of the kernel source you are using. You can then build and install the kernel:
make && make modules_install
cp arch/i386/boot/bzImage /boot/kernelsource
cp System.map /boot/System.map-kernelsource
Before you can use your system, you still need to complete two important configuration steps. First, you need to modify /etc/fstab to bind the partitions. Second, you need to configure the network connection. As neither of these points is Gentoo-specific, you may already know how to do this; if not you can find out by reading the how-to at [4], for example.
The bootloader ensures that the kernel loads when you boot your machine. In this example, I'll use the Grub bootloader [5]. Enter emerge grub to build the bootloader before going on to configure and install:
nano -w /boot/grub/grub.conf
cp /proc/mounts /etc/mtab
grub-install --root-directory=/boot /dev/hda
This completes the steps required to boot the system for the first time. Enter the following commands to boot the system:
exit
cd
umount /mnt/gentoo/boot /mnt/gentoo/proc /mnt/gentoo
reboot
Your system should now boot cleanly, and you should be able to log on as root. This actually completes the installation of your basic Gentoo system.
Once you have installed Gentoo, you can use the Portage software management tool to install additional packages (such as KDE, OpenOffice.org, etc.). The Portage tool is the control center for all software management tasks on Gentoo Linux. Portage has an incredible number of options and is regarded by many (not without good reason) as being the best software management tool for Linux.
When we refer to programs that are available to Gentoo, we mean programs that are available in the Portage branch. In Gentoo-speak, these programs are also known as ebuilds. An ebuild contains all the information Portage needs to handle the program in question (download branch, version, etc). Ebuilds are stored in /usr/portage on your system, and you can expect the content to change continually as new program versions are released. Before you start to work with Portage, you should always update the Portage branch. The following command does this: emerge --sync.
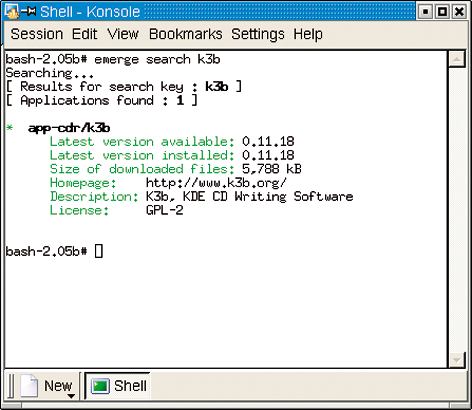
After completing the update, you can install a program by entering emerge program_name (e.g., emerge kde); to uninstall, enter emerge unmerge program_name. To search the Portage branch for a specific software package, type emerge search program_name. The output is a list of the latest program versions available in your Portage branch and details on the program versions installed on your system at present (Figure 2).
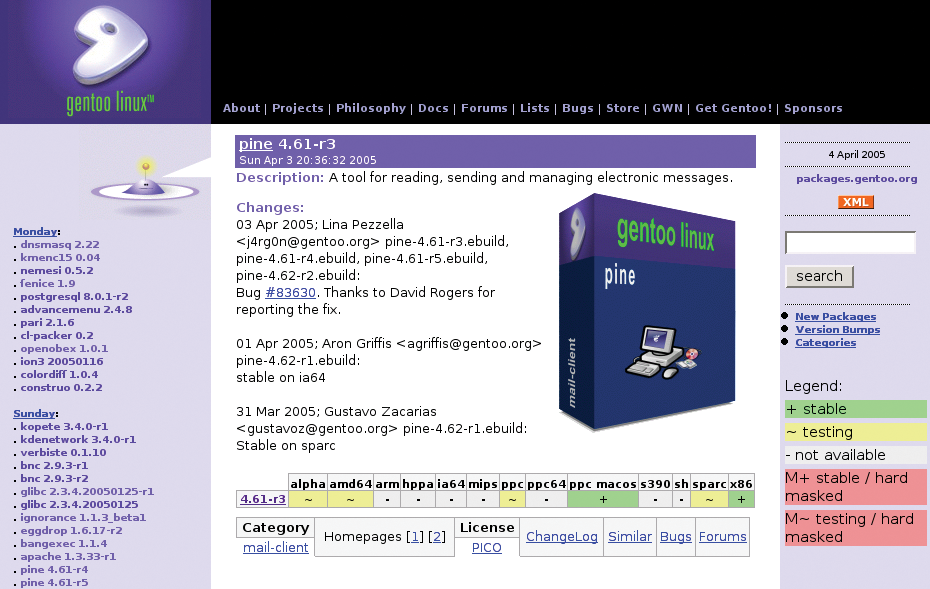
As an alternative, you could use the web interface on the Gentoo project page (Figure 3) to search for programs. This lets you know all about the various development stages of a project from masked (developer version), via testing, through to stable. You will also find useful links for the program in question (project page, license, etc.).
As previously mentioned, Gentoo normally doesn't use prebuilt packages, but so-called ebuilds with all the information you need to handle the program in question (download branch, version, etc.). To keep this simple, let's say that the Portage branch is the sum of all ebuilds available for Gentoo.
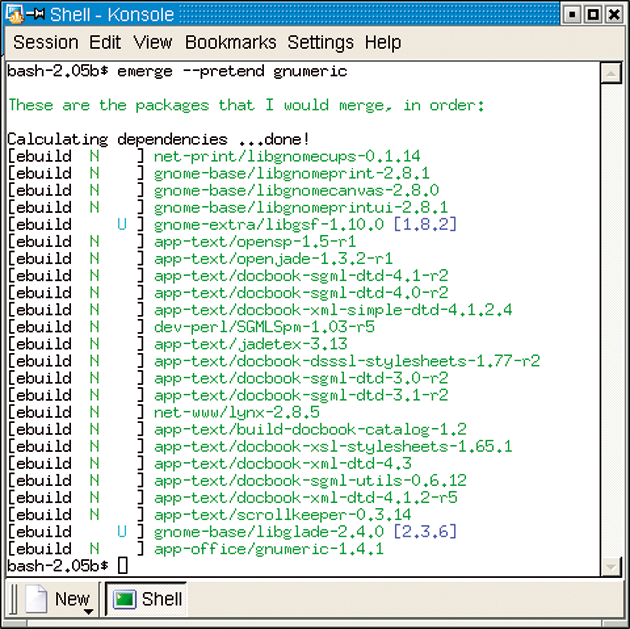
The Portage software management tool is extremely flexible and gives administrators an incredible range of options. Before you use Portage, you should be aware that anything you do will be based on the Portage branch stored on your system, so make sure you update your ebuilds regularly (or at least before you install a new program). The emerge -sync command updates your ebuilds. emerge program_name installs a program. To find out which programs Portage would install to resolve dependencies, type:
emerge --pretend program_name
Figure 4 shows you what the output from this command might look like. The program lists details of the packages that would be installed (in the straight brackets.) The following list will help you with the abbreviations:
When you tell Portage to set up a program, the tool downloads any required sources from the Internet before immediately going on to build and install the package. If you do not have a leased line or a fixed-rate broadband connection, you might like to download the required packages first and postpone the build and install steps. The following command tells emerge to download without installing
emerge --fetchonly program name
You can then launch the build and install steps at your leisure by entering emerge program name.
There are times when you need to update the whole system, rather than just set up a program. The following command handles this task of updating your Gentoo system:
emerge --update world
This command updates all the programs installed on your system, but without updating the dependencies. To update dependencies too, enter the following command:
emerge --update --deep world
Portage also has the ability to remove orphaned packages. The following command handles this for you:
emerge --update --deep --newuse world
emerge depclean
revdep-rebuild
You need to install the Gentoolkit to run the revdep-rebuild command.
Besides having the ability to install programs directly from the source code, Gentoo also lets you install prebuilt program packages. The following command handles this for you:
emerge --usepkg --getbinpkg program_name
You can uninstall a program by entering emerge unmerge program_name. Note that Portage will not check if the program in question is required by other programs.
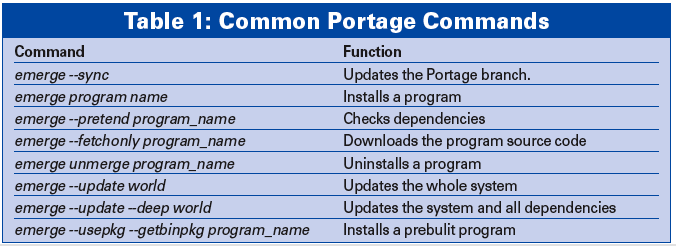
For more information on the use of emerge, read the manpages (you need to type man emerge to access the manpages.) The Gentoo documentation at [2] also has a detailed description of the tool. Table 1 has an overview of the most common Portage commands.
At the beginning of this article, I mentioned that Gentoo's ability to optimize more or less any system is one of its strongest features. Gentoo provides so-called use flags for this purpose. Use flags can be global or local.
As the names suggest, global use flags optimize system parameters for all programs, whereas local use flags optimize a single program. A list of all global use flags is in /usr/portage/profiles/use.desc. Gentoo defines a default for many use flags. The defaults are listed in the /etc/make.profile/make.defaults file. You can change default settings by adding or removing use flag keywords. The use variables are defined in /etc/make.conf.
To remove a variable, simply add a dash before the variable, for example: -gnome. If you are defining use flags for specific programs, you need to edit the /etc/portage/package.use file. This means specifying both the program package and the use flag you wish to define, for example dev-php/php -java.
To declare a temporary use flag that will be used for a single emerge operation, specify the flag before the emerge statement:
USE="-java" emerge php
emerge info shows you the current settings for the use flags on your system. The command outputs details of the compiler version, kernel version, use flags, etc. for your system.
You also have the option of displaying the use flags for a specific program. The following command does this for you:
emerge --pretend --verbose program_name
etcat uses program name gives you more detailed output; note that you need to install "Gentoolkit" to run this command.
2004 saw the introduction of a new release labeling format comprising the year and version (e.g., 2004.3, 2005.0, etc.). The project has a quarterly release cycle, but note that these releases are only relevant to the CD image. Once you have installed a Gentoo system, Portage will help you keep it up to date.
It is nice to see how quickly recently released programs find their way into the Portage branch. For example, it normally takes less than a month for a KDE release to enter the stable Portage branch.
New software goes through three integration stages in Gentoo: masked, testing, and stable. A program is referred to as masked immediately after entering the Portage branch; it then goes through the testing stage until the maintainers decide that it is stable. Of course, this will not prevent you installing programs from any of the three "development stages."
At present, the Gentoo developers are working on a program wizard that will simplify the system installation procedure and make Gentoo more accessible to Linux newcomers. Although this is a welcome development for some, many serious Linux users frown at it. The current installation really forces a user to get to know the system; after completing the install, new users are familiar with many of the basic Gentoo system commands. In contrast to this, a Suse or Fedora GUI-style installation removes the user from this very important learning process. Users with the new Gentoo installer will no longer need to plum the depths of the Gentoo system in order to get their systems running.
I hope this peek behind the drapes at the fascinating Gentoo distribution has whet your appetite for more Gentoo. Let me just restate that we have only scraped the surface; if you really want to get to know the Gentoo system in detail, the techniques described in this article will help you get started on your Gentoo journey.
Despite the fairly convoluted install, Gentoo's popularity is growing by the minute, and this growing popularity is reflected in the growing numbers of participants in the various Gentoo forums. Let's hope that you too catch the Gentoo bug and have fun moving your system to Gentoo.
| INFO |
|
[1] Gentoo homepage: http://www.gentoo.org.
[2] Gentoo documentation: http://www.gentoo.org/doc/en. [3] Gentoo forum: http://forums.gentoo.org [4] Linux Installation, Configuration and Use, by Michael Kofler; Addison-Wesley, 2004. [5] Grub: http://www.gnu.org/software/grub [6] Planet Gentoo homepage: http://planet.gentoo.org [7] Linux Installation and Getting Started, by Welsh, Dalheimer, Dawson, and Kaufman; O' Reilly, 2003. |
| THE AUTHOR |
|
Dr. Alexander Reiterer is an author and scientist who works for the Technical Universiy of Vienna, Austria. If you wish contact Dr. Reiterer, you can reach him at alexander.reiterer@tuwien.ac.at. |