
By Ric Shreves
OsCommerce is an Open Source catalog and shopping cart system that comes loaded straight out of the box with a wide range of features. The osCommerce system is head and shoulders above the crowd in terms of functionality and options, and osCommerce is often lauded not simply as an excellent open source product, but as an excellent e-commerce product by any standard.
The system embodies a great deal of flexibility, but like any complex application, it also has its share of limitations and peculiarities. In the course of this article, I'll show you what it takes to get up and running with osCommerce.
With little technical expertise you can get an osCommerce site online in about 30 minutes. However, if you wish to customize or modify the default package extensively, you will need (or need to know someone with) PHP skills. Be advised that osCommerce is not the simplest system to customize, but the good news is that it can be done - and for a fraction of the cost of a proprietary solution.
Before you begin you will need to address two preliminary matters. The first step is to create a mySQL database on the web host. For most people this will involve accessing phpMyAdmin to create and name a new database. Take note of the database name, and your username and password, as you will need them later in the installation process.
The second step is to obtain the archive containing the osCommerce files, extract them, and then move them to your server. To get the files, make a quick trip to the osCommerce site [1] or to the osCommerce page at SourceForge [2]. The archive comes as a tar file and weighs in at a mere 871k.
The files can be extracted from the archive using WinZip or a similar file compression utility. Once the files are extracted, you will find that the default structure of osCommerce is as follows:
/oscommerce-2.2ms2
       /catalog
       /extras
Set up the directory structure you desire on your server, and then move the entire set of files up to your server via FTP. If you have shell access at your server, you can save some time by moving the archive file to the server and extracting the files on the server. While the end result is the same with either method, extracting the files on the server saves a bit of fussing about with FTP transfers and the chance that you may miss something if problems occur during the transfer.
The simplest and probably most common configuration of the directory structure places the files inside the /oscommerce-2.2ms2 directory at your web host root. The extras directory is not necessary for your installation. The admin directory, located inside of the catalog directory, contains the admin access to the catalog.
Once you have the files on your server, direct your browser to http://yourroot/catalog. If the extraction is successful, you will be greeted by the welcome screen of the installation utility.
Click Install a New Online Store and you are off... The next screen prompts you for the database information you wrote down earlier - the name of the database, your username, and your password. You'll also need your host name or IP address. (In the vast majority of cases, the correct answer to this question is localhost, though you should check with your web host if in doubt.)
If all is correct, the system will confirm that the initial installation was successful and warn you prior to performing the installation of the SQL data. Once that is completed, you are almost home.
The next screen shows you some important system data you should take note of, including the full URL of the catalog you have just installed, the web server root directory, the HTTP cookie domain, and the path where cookies are stored. You should not attempt to change any of this data unless you have a very good reason and really know your way around a server.
Note that this page also contains one other item of importance - a check box that allows you to enable SSL. I encourage you to select this option, as it adds a modicum of security to your site. Be aware that support for this feature depends on whether your web host provides SSL as an option for your account.
Once you've noted down the information for future reference and made a decision concerning the use of SSL, click Continue. The next screen repeats your database info for your reference (but you already wrote that down earlier, didn't you?). Click Continue and move on.
At this stage you may be prompted with a warning that the permissions for certain files are not set as osCommerce requires. Should that be the case, you will need to use your FTP program to CHMOD the directories to their required state. Once the changes have been made click the Retry button. If all is in order, you will be shown a confirmation message that setup is complete. (If not, check the information again and CHMOD the necessary files.)
The osCommerce installation routine is a breeze to use and generally not problematic. There is one task that it omits, however, and to remedy that you will need to fire up your FTP program. Access the site via FTP and create a directory named backups inside of /catalog/admin. This directory is missing from the set up procedure and is needed for you to make backups of your database by way of the backup function in the admin system. Note that you will also need to set permissions on this directory to 777 for the osCommerce backup function to work properly. Hopefully the next release will fix this oversight in the Installer routine.
That's all there is to it. Check your new catalog and the admin section to verify that all is working properly.
Once you are happy that the site installation is correct, you will need to take a couple of simple steps to secure your installation from unwanted visitors.
First, use your FTP program to re-name or delete the /installation directory; this is absolutely necessary to avoid someone from re-running the installation routine and thereby overwriting your site files or gaining access.
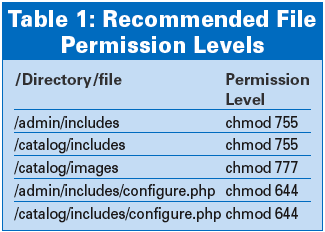
Second, you will need to limit permissions on key directories. During construction and customization of the site, I find it easiest to leave directory and file permissions set to 777, but don't forget to use CHMOD to lock these files down prior to launch, as shown in Table 1.
Third, to be on the safe side, I normally insert a blank index.html file in all directories that I don't want browsed. The index.html file results in anyone who tries to access that directory being fed a dead-end (blank) file, rather than a listing of the directory contents. It's a very simple way to keep prying eyes out of your directory structures.
Finally, the default installation of osCommerce does not include password protection for the admin section. This is a major security hole that you will need to patch yourself. Again, keep your fingers crossed that this gets fixed in the next release, but until then, you must take steps to address this problem. The most common solutions involve either using your web host control panel to password protect the admin directory, or modifying your .htaccess file to add password protection. There are also third party solutions that address this issue. It doesn't really matter which option you choose, but you do need to put one of them into effect, or else any slightly resourceful individual can gain access your admin control panel - and that is not a good thing.
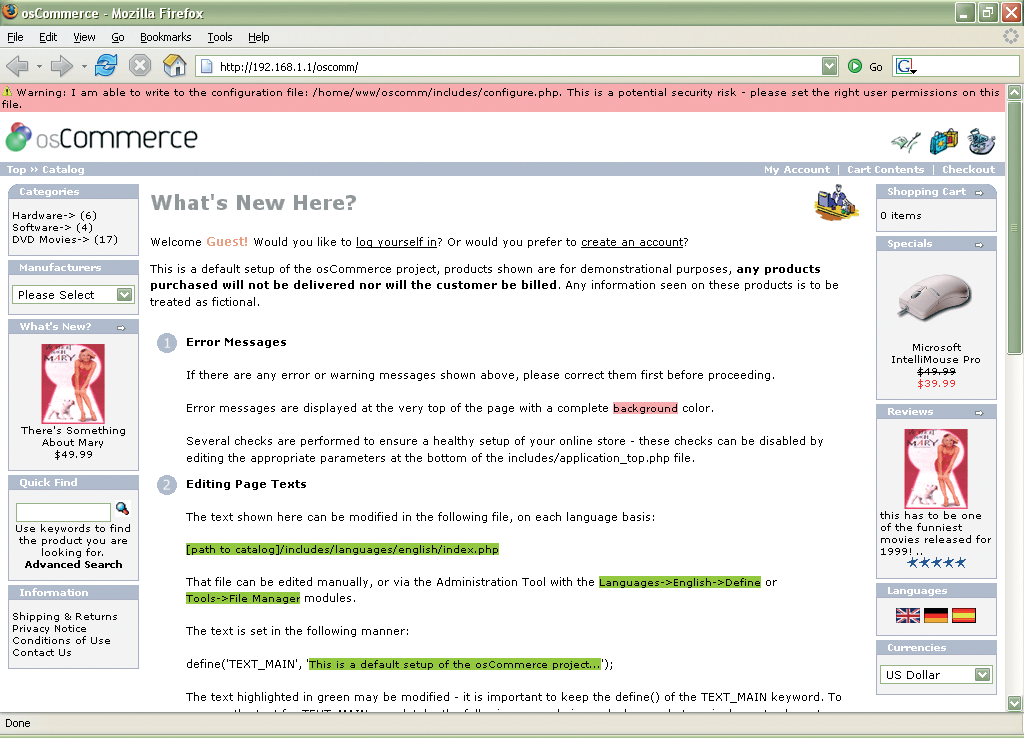
When you first visit the front end of your virginal site you'll find that a number of the site features have been activated and illustrated with sample products (see Figure 1). You'll also see some explanatory notes occupying the central position on the catalog home page. Take a minute to read through this text, as it contains useful information. You'll note that one of the notes explains the text at the top of your page with the pink background - this is the area where major warning messages appear from the system. Odds are the first time you look at your site, you'll see a warning at the top of the page:
Warning: I am able to write to the configuration file: [your path]/includes/configure.php. This is a potential security risk - please set the right user permissions on this file.
As noted above, you'll probably want to hold off on fixing this issue until you finalize things and are ready to go live. Until then, you'll have to live with this little reminder on all your pages.
At first glance, the initial screen may seem a bit of mess - lots of information, modules, products, and so forth. Don't be daunted by it. The information can be hidden, the modules customized, and the products deleted and replaced with your own categories and information. What you see initially is simply the developers' attempt to give you some idea of what you can do with the system; in no way does it limit what you may choose to do as you go through the configuration and customization process.
Before we get into what you can't do, or what you might want to change or add to make the system do more, let's take a look at what osCommerce will do straight out of the box.
A number of useful features are enabled by default. Site visitors are provided with a search function, the ability to sort by manufacturer, the ability to read product reviews or post some of their own. Useful product marketing features include a What's new? function and an option for Specials. Users can also subscribe to product notifications by email and are provided with an option to email product information to their friends.
The system can support a great deal of information about each product, including manufacturer, weight, net and gross prices, options (which can be tied to the pricing as a variable), thumbnail and large images, as well as generous space to input whatever text is needed to explain the product. At this stage it is probably a good idea to spend a little time clicking through your new installation to explore the default examples. Note that the default layout isn't all that sexy, but fear not, we'll look later at how you can improve the appearance.
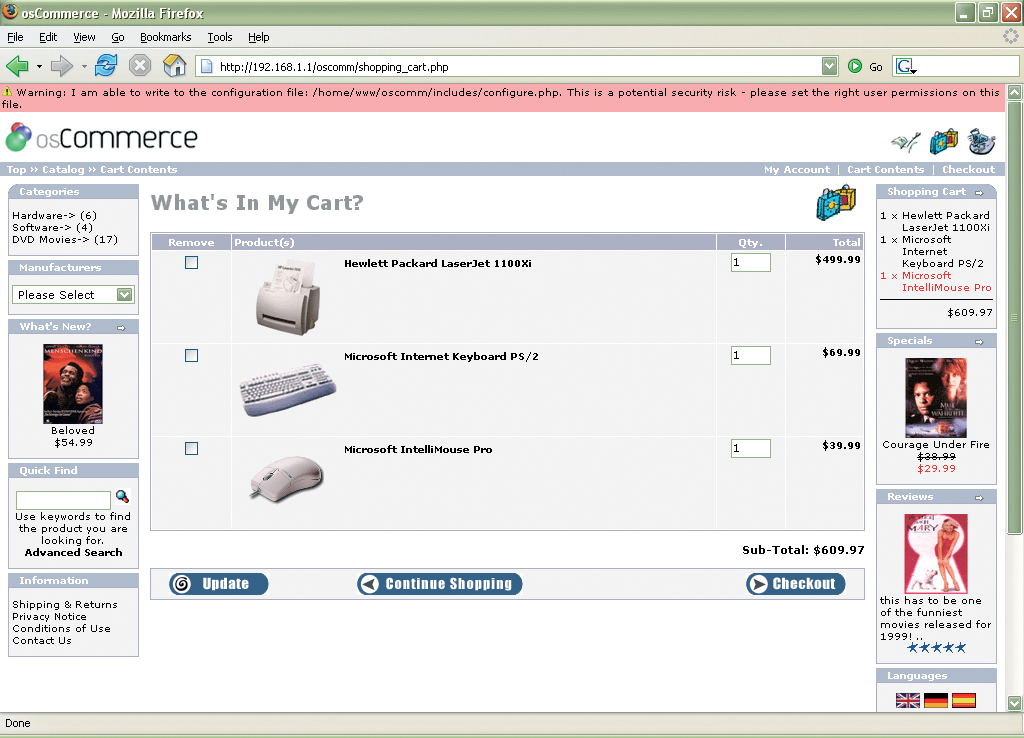
The osCommerce shopping cart (Figure 2) is a solid piece of work. It is reliable and easy to use, and it supports temporary carts; that is, visitors to the site can add products to a shopping cart without having to be registered users. If a visitor later decides to proceed to checkout and execute the order, the system prompts them for login (or registration). By default, the system is set to calculate shipping at a flat rate and to accept payment via credit card or cash on delivery. These options, and most others mentioned above, can be changed easily via the admin console. Most common payment gateways and shipping methods are supported in the default installation, and many others can be added to the system by installing various third party solutions.
Registered users benefit from a variety of features, including the ability to store multiple shipping addresses and maintain order histories.
osCommerce includes a variety of useful management tools for administering the catalog and handling orders. The quality of the management tools is one of the best reasons for choosing osCommerce.
Product listings carry all the information necessary for order processing, including product names, descriptions, weight, images, and model numbers (Figure 3). You can include pricing at both net and gross rates and select tax classes. Note in Figure 3 that I've included HTML tags inside the description text field. With just a little basic HTML formatting of the text field, you can achieve a much enhanced layout for your individual product details.
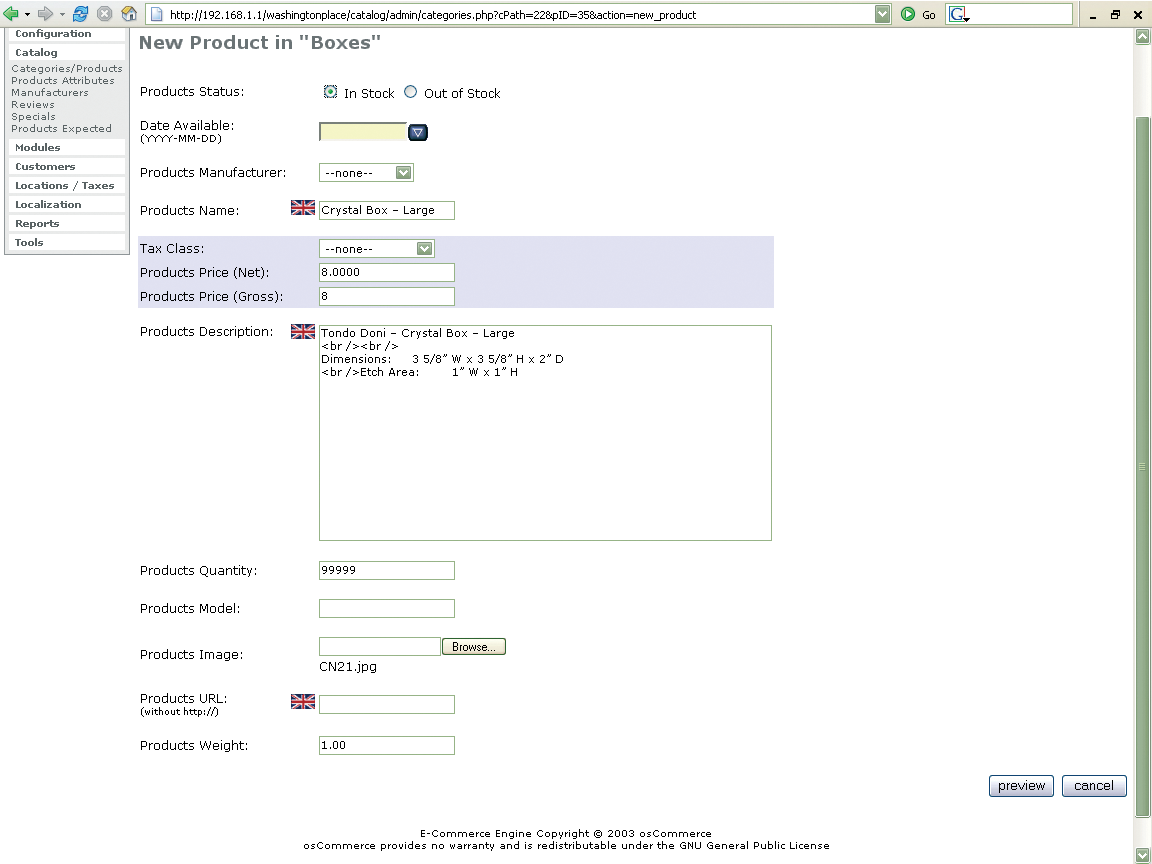
One of the more advanced features supported by osCommerce is inventory tracking. The system allows you to input the number of units in stock, then as orders are placed, the available total is automatically updated. You can set automatic re-stocking reminders that are triggered when user-defined inventory levels are reached. If you don't need this feature, simply leave the Number of units field blank.
Orders run through the system can be tracked by the catalog managers via the admin interface. The system generates basic invoices and shipping slips, and as orders progress through your system, you can log the order status and send email updates to clients. Note the Order Admin screen (Figure 4) is set up as a work space for a catalog manager. You can update the order's status and even add a note to the user that will be sent out via email. Your customers are also able to log into the front end of the system to view the status of their orders.
osCommerce also produces a variety of basic order history reports, allowing managers to identify the most valuable customers and the most popular products.

osCommerce comes with only one template. The default installation, while it does include all the features one needs to get the system going quickly, is frankly neither very attractive nor very flexible.
It would appear the osCommerce team was more comfortable with the functionality aspects of the project than with the design aspects. When I speak of design, I am referring to both the look and feel and the usability. Part of the problem is that the interface was designed years ago and is not aging very well - it just looks old.
The dated approach shows in the way the pages are built - layer upon layer of nested tables. The system is absolutely clogged up with tables. CSS is not implemented effectively, and even basic pages have hundreds of lines of code. Hence, customizing the front end's appearance makes for some long hours in front of a screen.
But let's step back a moment. Say, you're not totally unhappy with the default installation. Say, instead of a complete facelift, you only want to change the colors and upgrade the appearance with some improved graphics. If your ambitions are limited, you can do this easily by one of the oldest and simplest tricks in the book: overwrite the existing files with files of your own.
osCommerce images are stored in two primary locations. The images directory holds a number of the generic icons and product-related images. Note also that the subdirectory infobox contains the rounded corners you see on the boxes in the left and right column on the front end of the default site. You can overwrite these with your own versions easily. Replace the osCommerce logo with your company's logo to re-brand the site.
If you want to go further and re-do the graphical buttons on the site, you have to look a bit harder. Buttons with text in them are kept in includes/languages/ english/images/buttons. To access the buttons in the other two default languages, simply change the word english in the path to the desired language name. Again, overwriting these with buttons of your choice is an easy task and a fast and simple way to skin the site, assuming you like the default layout.
Say you don't like the default layout. You want two columns, not three, or you want to move a box from one side of the page to the other. The next level of hacking the presentation of osCommerce requires you to dig into the underlying PHP files. You had best be comfortable with working at the code level, as WYSIWYG editors are of little help with osCommerce. So, fire up your favorite editor and let's look at 4 key files.
osCommerce relies heavily on server side includes as a way of emphasizing reuse of blocks of code. As a result, knowing where to look for the key includes sets you on the right track.
The header and footer are the easiest to deal with, being named respectively, header.php and footer.php and being located logically in the includes directory. Hacking either of those files is a pretty simple matter and does give you quite a bit of room to maneuver.
The left and right columns are a bit more difficult. First, the columns themselves are the files column_left.php and column_right.php, which can be found in the includes directory. So far so good. However, it turns out that the contents of the columns are almost entirely located inside of the units that osCommerce calls "boxes," and those are different files altogether.
If you wish to remove a box from one of the columns, you can access the appropriate column file, find the line that refers to the box, then comment out the include line or remove it totally. You can also move boxes from one column to another by cutting and pasting.
| Cleaning Up |
|
Now if all this so far has seemed pretty non-threatening, well, you are right. You want to change the colors and the graphics - no problem. You want to move around or delete some boxes and have a custom header and footer - really no problem there either. But now let's say you don't like the way the page layouts themselves are done. This kind of customization is where osCommerce becomes really fun, and where developers earn their money as they guzzle liters of caffeine and rip out their hair. It turns out that the default osCommerce file structure means that, despite numerous includes and database calls, the system basically uses different files for every single page, and making changes means going through every single page and making the changes over and over again (all the while testing and double checking to make sure you don't introduce your own crafty little errors). The good news is that at least you can use all the comment tags to help you. Unfortunately, osCommerce comment tags are essentially limited to "header," "footer," "main body," "left nav," and "right nav," which means that, for all the hundred of lines of nested tables, the system offers few meaningful comment tags. OK, that said, we live with what we get, so while you are in there hacking away you might want to go ahead and clean up that horrible nest of unnecessary tables and spacer gifs. You can knock out 20% of the page weight pretty consistently by simply killing off redundancy and shifting to a more aggressive CSS approach to positioning items. Why not go all the way and dump these pages in favor of a pure, or at least mostly, CSS approach? This is one area where you should beware the sirens' call. While it may initially seem tempting to just toss the whole structure, I urge you to think carefully and take the word of one who has gone down that path before: osCommerce is a complex system, and you will likely find that the slash and burn approach winds up having unforeseen negative effects. So, while you may be tempted, I urge you to resist. Look for other less destructive approaches to achieving your goals. |
The large and resourceful osCommerce community has responded to the lack of certain necessary and useful features by providing their own solutions. osCommerce calls the third party solutions "contributions" and they are invaluable resources [5].
Contributions will make your life much easier, but they were not developed by the core osCommerce Team, and therefore they often employ non-standard solutions. While any particular contribution may work with the core, it may not work with another contribution. If you plan to use a contribution, plan carefully and test thoroughly before you deploy.
One of the most powerful and popular contributions is called STS - Simple Template System. It allows you to build HTML page designs and then drop placeholders that call different osCommerce functions into your design. STS really opens up the front end of osCommerce and makes it possible to do heavily customized interfaces without delving deeply into the PHP pages of the default site.
Another personal favorite of mine is called Easy Populate. I love it because it lets me move large catalogs of products in and out of the system in a few clicks.
Contributions enable support of a wide variety of languages, define pricing and discount structures, create catalog features. The Contributions page at the osCommerce site lists more than 2,000 contributions, ranging from mundane to marvelous.
| INFO |
|
[1] osCommerce Homepage: www.oscommerce.com
[2] osCommerce at SourceForge: sourceforge.net/projects/tep [3] Knowledge Base: www.oscommerce.info [4] osCommerce Forums: forums.oscommerce.com [5] Community contributions: http://www.oscommerce.com/community/contributions |