By Peter Kreussel
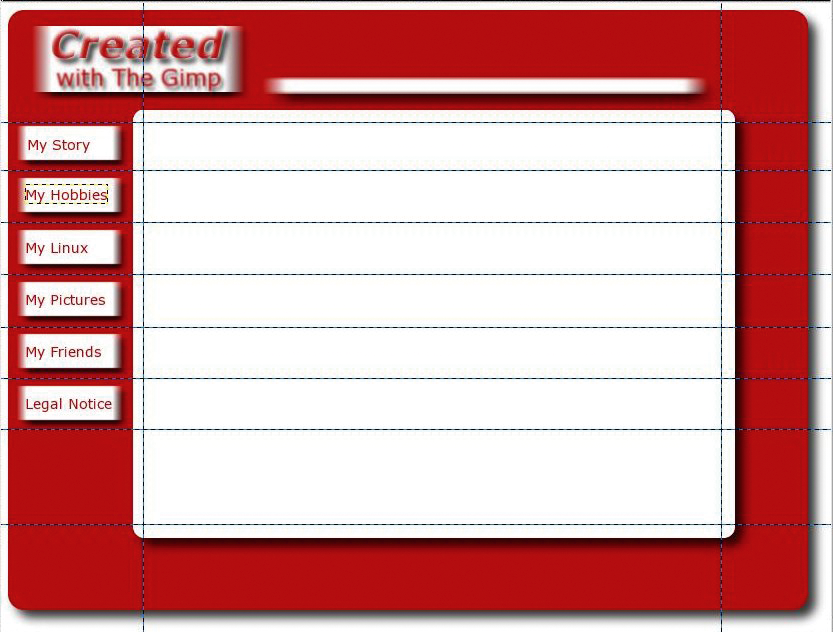
Some purists believe they must compose HTML code line by line in a text editor to achieve clean results, but other developers are occasionally willing to consider alternatives. One little known alternative is the option of creating a graphics file in GIMP and then converting the file directly to HTML. GIMP version 2 (www.gimp.org) or newer includes the Py-Slice plug-in, which converts the image into a collection of tiles, and then creates an HTML table that organizes the tiles into an image that looks like the original. The results can easily be used for homepages with attractive graphics, like the example shown in Figure 1.

Most current distributions give you GIMP version 2.2; we will be using this version for the remainder of this article. Suse users will need to add the Python extension and the Py-Slice plug-in manually [2]. After doing so, launch GIMP and create a new image (File | New). Then select the 800x600 entry in the Templates drop down. This is the resolution we will be using for the homepage. Then enter a name for the file; you will be storing the file under this name later. Make sure you use GIMP's native .xcf format to have access to all of GIMP's features.
GIMP uses so-called layers. You can compare the GIMP layer system to a stack of photographic slides. The layers may be viewed together for the complete image, or you can edit each layer separately.
Dialogs | Layers or [CTRL+L] will open the Layers dialog. Clicking New Layer creates a new layer. In the dialog, enable Transparency below Layer Fill Type, and confirm by pressing OK, to create a new layer. Everything you add to the image now will be placed in this layer.
Press [Ctrl+A] to select the whole image. The dotted line surrounding the image shows the boundary of the selection. Then select Rounded Rectangle in the Select menu; set the value for Radius to five percent. This gives you a selection with rounded edges, as shown in Figure 1.
Now fill the whole selection with a red color. To do so, click on the foreground color selection in the toolbox and set the values for red, green, and blue to 190, 0, and 0, respectively, to use a dark red tone. Select the fill tool in the toolbox and enable Fill whole selection below Affected Area. Then click on the selection to apply the fill color.
For your next step, you need some guides. To draw a guide, click on Image | Guide | New Guide, select the horizontal Direction, and choose a position of 100. Repeat the steps to create another horizontal guide, using a value of 525 this time, and then add two vertical guides at positions 125 and 725. The guide intersections mark the corners of the white rectangle at the center of the page.
Make sure you have enabled the option Snap to Guides in the View menu. Then select the scaling tool from the toolbox and click on Transform selection below Affects in the main GIMP window. Now, when you click on the drawing, the Scaling information dialog appears. Drag the small boxes at the corners of the dotted selection rectangle to the guide intersections so that the selection matches the empty white area. The guides will automatically attract the mouse to improve positioning accuracy. Then click Scale to complete the procedure.
To fill the selection with white color, add another layer via the layers dialog. Select the top entry and click on New Layer, again making the background transparent. Then set white as the foreground color in the toolbox palette; that is, you need to set the values for red, green, and blue to 255. Then click the selected area with the fill tool to color the selection white. You can then press [CTRL+A] to disable the selection.
The 3D effect comes courtesy of the Drop Shadow in the Script-Fu | Shadow menu. In the layers dialog, select the layer you just created, and then apply a drop shadow. GIMP will automatically add enough space for the shadow to the graphic image. However, the white background will not grow to match. After selecting the background layer in the layers dialog, click on Layer | Layer to image size to resolve this.
The 3D label is still missing. Start by adding normal text with the text tool. Our example uses the Sans Bold Italic font and a slightly lighter red than of the background color, with values of 250, 225, and 225 for red, green, and blue, respectively. Clicking with the text tool in the white area opens a dialog window where you can enter Created.
Select Sans or any other non-italic font as the font for the shorter piece of text and reduce the size. Clicking with the text tool below the piece of text you have already added will create a new text block. Both texts will appear as separated layers in the layers dialog. Select one of the blocks and, in the toolbox, click the Create path from text button, which appears when you select a text. Then repeat this step for the second block of text.
A path has a similar function to a guide; however, it is in fact an embedded vector graphic with an arbitrary shape. A path will not appear in a print-out, and you can't export it to an image format such as JPEG or PNG. However, you can convert the form described by the path to a selection.
After creating a path from the text, select Paths in the Dialogs menu. There will be two path objects in the path list for this example. The button bar at the bottom allows you to convert the path into a selection. Apply this function to the first path.
The selection is the basis for a so-called layer mask. Select the Created entry in the layer palette - the name will reflect the text you typed - and duplicate the entry. When you click on the text with the text tool, you can change the color in the main window. The color selection dialog shows the last two colors you used; select the dark red used for the background.
Now open a dialog box via Layer | Mask | Add Layer Mask, enable Selection, and click OK to confirm. Click on Move to in the main window and move the dark red text using the arrow keys; press the down arrow twice and the right arrow once to achieve the results shown in Figure 2. Remember that it is important for the Affects: field to be set to the layer containing the object you want to move.

Now let's apply the filter. To do so, select Filter | Blur | Gaussian Blur (horizontal and vertical: 5 px) and apply the filter to the light and dark red texts (select the layers, and then apply the filter). We are just one step away from completing the 3D effect. Select the lighter of the two text layers and add a drop shadow to the image (Script Fu | Shadow | Drop Shadow). This gives you the second line in the logo box in our example.
Now align the texts to be left justified and below one other, and then move them to the required position. To do so, click on all six text layers in the layer dialog (two for the texts and the copies, plus the Drop Shadow layer) in the empty space on the right of the eye symbol. This setting links the selected layers so that you can move them together to their final position by dragging the mouse.
All we need now is the white box with the label. To create the white box, draw a rectangular selection around the text, create a new layer, and fill the selection with white. Use the same approach to draw the white bar. To achieve the shadow effect shown in our example, add a drop shadow to both the white boxes.
In our example, the menu bar on the left will be used for navigating the website. To do this, first create the top box by drawing another rectangular selection, creating a new layer with the selection and filling with white color. Then duplicate the new layer and move the duplicate downward. Repeat this step until you have a box for each menu item. Then apply the effects for the 3D look, motion blur and drop shadow, to all layers. Finally, use the text tool to label the buttons.
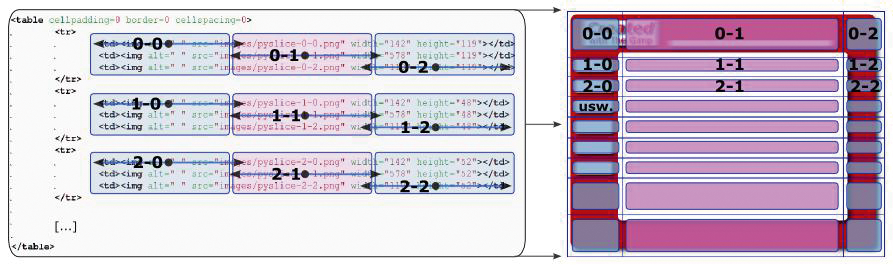
We will use a table to convert the bitmap image to HTML. The individual menu buttons will be the cells in the table; they can be assigned to links that will change the content in the main central area. GIMP uses guides to divide the image. Set the guides as shown in Figure 3 by clicking on one of the rulers, holding down the mouse button, and dragging the mouse down or to the left.
Additionally, you can only export one layer. As layering information is lost when you combine the image, you will want to save a backup copy of the image under a new name before you continue. Then right click in the layer palette and select Flatten image.
There is nothing to stop us converting the image now: Filter | Web | Py-Slice will call the tool we need to do this. In the settings, select png below The format of the images. This format is more suitable than the other two alternatives: JPEG uses a so-called lossy compression algorithm, and this may cause lines to blur. GIF images do not have this disadvantage, but they are restricted to to 256 colors. This would affect the color gradients in our example. The PNG format supports up to 16.7 million colors, uses non-lossy compression, and any major browser will render it.
Enable the Use separate directory for images? option to store the individual images cut from the main image in a separate directory. Confirm by clicking OK; you can then view the results in your browser under the filename and path specified in your Py-Slice settings.
If you now load the HTML file in your editor, you will note that GIMP has created an HTML encoded table. The table cells contain the image sections as defined by the guides in GIMP. Figure 4 shows the link between the HTML code and the image; each column comprises three rows of cells.
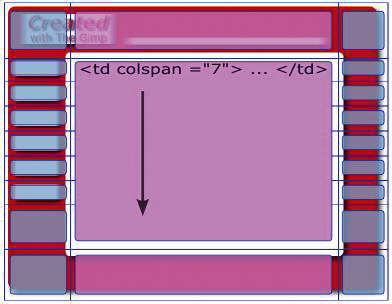
In our example we wanted the central white area to be a uniform block. We only need the cell structure, as applied by GIMP, for the menu items. To achieve this, we need to change the central cell in line 2, that is, cell 1-1, in the ninth line of HTML code to <td rowspan="7"valign="top">. Also, delete the <img alt=" " src="images/pyslice-1-1.png" width="582" height="48"> section. This leaves the area free for your own content. Anything you add at this position in the source code, text, images or other HTML elements, is placed in the white area.
You can delete the following six central cells (that is from 2-1 through to 6-1, as represented by lines 14, 19, 24, 29, 34, and 39 in the HTML source code), as they simply represent the individual sections of the white area at the center of the page. Figure 5 gives you an idea of the result.
To make sure the menu bar really gives you menu functions, you will now need to manually add the appropriate links. In the code lines for cells 1-0 through 6-0 (Figure 4), add the HTML code for the link immediately after <td>, that is: <a href="path/filename">. Close the link tag at the end of the line by adding </a> before the </td> tag.
You also need a HTML rump segment to complete the HTML document. Even though most browsers will render the Py-Slice HTML code correctly without the rump segment, remember that the HTML standard requires you to include the following lines in the header for this kind of file:
<HTML>
<HEAD>
<TITLE>[My Page Title]</TITLE>
<META HTTP-EQUIV="Content-Type" ??
CONTENT="text/html; charset=??
iso-8859-1">
</HEAD>
<BODY BGCOLOR=#FFFFFF>
<div align="center">
And the footer for the HTML file is as follows:
</div>
</BODY>
</HTML>
The <div> tag aligns the whole page in the center of the screen to ensure that the page will be correctly positioned for a higher resolution web browser. The remainder is the HTML header and footer, which are indispensible for any HTML page. For more details on creating elegant and efficient web pages, read the article on Cascading Style Sheets elsewhere in this issue.
The options that GIMP provides for converting an image into HTML can really simplify the task of creating a skeleton page for a website. The technique described in this chapter may not be your best option for every conceivable web page, but many designers recommend this approach as an efficient alternative for creating eye-catching graphical web pages.
| THE AUTHOR |
|
Peter Kreussel studied German, English and philosophy. Today, he is an editor of both online and print media. Peter has had a computer ever since the days of the C64. |