
By Mirko Dölle
A typical firewall configuration denies everything that isn't strictly needed for daily work. Even relatively harmless tools such as a webcam or a personal IRC server won't operate through a firewall. Apart from begging the sysop to change the ruleset, the only workaround may be to dig a private tunnel through the firewall with OpenVPN.
This article describes how to tunnel through a firewall with a VPN connection. I'll assume you already have OpenVPN installed on your Linux system or that you know where to find it. OpenVPN is a very common application that is included with many popular Linux distributions. See your vendor documentation for more on setting up OpenVPN.
OpenVPN does not require root privileges to set up a VPN. As long as the program has access to the virtual TUN/TAP devices, it is quite happy to run with user privileges in userspace. In a simple scenario, all you need are a few parameters to set up the VPN. The only file you need is a shared secret, which you can create client-side by entering openvpn --genkey --secret secret.key and copy to the server.
A connectionless protocol such as UDP is your best option for tunneling TCP/IP: this avoids the scenario where OpenVPN and the encapsulated TCP connection time out at the same time, which could cause a landslide of retry packets if you are unlucky. Unfortunately, most firewalls and routers in businesses or Internet cafés do not allow clients to receive UDP packets off the Internet.
The only alternative in this case is to opt for a TCP connection. This means using the client to establish the VPN with the server listening on a specific port for the incoming connection.
Listings 1 and 2 show two short scripts for the server and client. OpenVPN does not require configuration files, provided the command line parameters supply all the settings required for creating the tunnel. Some options that users need to change from case to case are shown at the beginning of Listings 1 and 2.
The server does not need much information: OpenVPN requires the IP addresses of the server-side (LOCALIP) and client-side (REMOTEIP) VPN interfaces, the tunnel device, the port number, and the file with the key. The MAXRATE variable is only needed for traffic shaping and sets the maximum outgoing transfer rate in bytes per second.
If the server script is running on a root server, for example, traffic shaping may not seem to make much sense at first - unless the idea is to keep a low profile and hide the tunnel in the general network traffic.
The main benefit of traffic shaping will typically be in SOHO networks with DSL connections. Because the upstream bandwidth is a lot less than a DSL client's downstream, the Internet connection beyond the tunnel can become unusable. I use a limit of 16 kbps, as shown in Listing 1, for a DSL connection with a maximum upstream bandwidth of 256KBits/sec - setting this limit means I have at least half the bandwidth for other services such as Apache or for normal surfing.
The OpenVPN syntax in lines 10 through 15 uses the variables defined at the top. The critical parameters here are --daemon, --proto tcp-server, and --persist-tun. --daemon launches OpenVPN in daemon mode, allowing the server script to continue. This is not important in Listing 1, as the loop in lines 17 through 21 prevents the script from exiting while OpenVPN is running. However, if you need to open up the firewall, enable masquerading, or change your routing parameters, lines 15 through 17 are the best place to do this. You can append any cleanup commands you need at the end of the script.
| Listing 1: openvpn-server.sh |
01 #!/bin/bash
02
03 DEVICE="tun0"
04 PORT="1194"
05 LOCALIP="192.168.8.1"
06 REMOTEIP="192.168.8.128"
07 KEYFILE="/etc/openvpn/shared.key"
08 MAXRATE="16000"
09
10 /usr/sbin/openvpn --daemon --dev $DEVICE \
11   --proto tcp-server --port $PORT \
12   --ifconfig $LOCALIP $REMOTEIP \
13   --secret $KEYFILE --persist-tun --ping 30 \
14   --ping-restart 180 --shaper $MAXRATE \
15   --writepid /var/run/openvpn-${DEVICE}.pid
16
17 while true; do
18   if [ ! -e /var/run/openvpn-${DEVICE}.pid ]; then
19     break
20   fi
21 done
|
The --proto tcp-server parameter enables OpenVPN on the server and tells OpenVPN to listen for incoming TCP connections. The client service uses the tcp-client protocol, as shown in line 13 of Listing 2.
| Listing 2: openvpn-client.sh |
01 #!/bin/bash
02 DEVICE="tun0"
03 REMOTE="athome.dyndns.org"
04 GATEWAY="192.168.1.254"
05 PORT="1194"
06 LOCALIP="192.168.8.128"
07 REMOTEIP="192.168.8.1"
08 REMOTENET="192.168.42.0/24"
09 KEYFILE="/etc/openvpn/shared.key"
10 MAXRATE="16000"
11
12 /usr/sbin/openvpn --daemon --dev $DEVICE \
13   --remote $REMOTE --proto tcp-client \
14   --port $PORT --ifconfig $LOCALIP $REMOTEIP \
15   --secret $KEYFILE --persist-tun --ping 30 \
16   --ping-restart 180 \
17   --writepid /var/run/openvpn-${DEVICE}.pid
18
19 for ((i=0; i<10; i=$[$i+1])); do
20   ifconfig $DEVICE >/dev/null 2>/dev/null
21   if [ "$?" -eq 0 ]; then
22     route add $REMOTE gw $GATEWAY
23     if [ "$?" -eq 0 ]; then
24       route del default gw $GATEWAY
25       route add -net $REMOTENET gw $REMOTEIP
26       route add default gw $REMOTEIP
27       ping -c 1 $REMOTEIP >/dev/null 2>/dev/null &
28       break
29     fi
30   fi
31   sleep 5
32 done
33
34 while true; do
35   if [ ! -e /var/run/openvpn-${DEVICE}.pid ]; then
36     break
37   fi
38 done
39
40 route del $REMOTE gw $GATEWAY
41 route add default gw $GATEWAY
|
Without --persist-tun, the TUN interface would be closed and reopened whenever the tunnel was interrupted, which would mean losing the routing entries for the tunnel and dropping all connections.
The loop given in lines 17 through 21 of Listing 1 is a simplified version in comparison to the loop in the script at [2]; it lacks failsafe mechanisms that check if OpenVPN is still running - in which case the loop terminates and the script processes the cleanup commands below line 21. openvpn-server.sh can easily be called using an init entry in /etc/inittab.
The client script for OpenVPN in Listing 2 is twice as long as the server script, as it needs to set up the routing environment for the client machine after calling OpenVPN in lines 12 through 17. This assumes that OpenVPN has established the network device, which is verified by checking the exit status of ifconfig in lines 20 and 21.
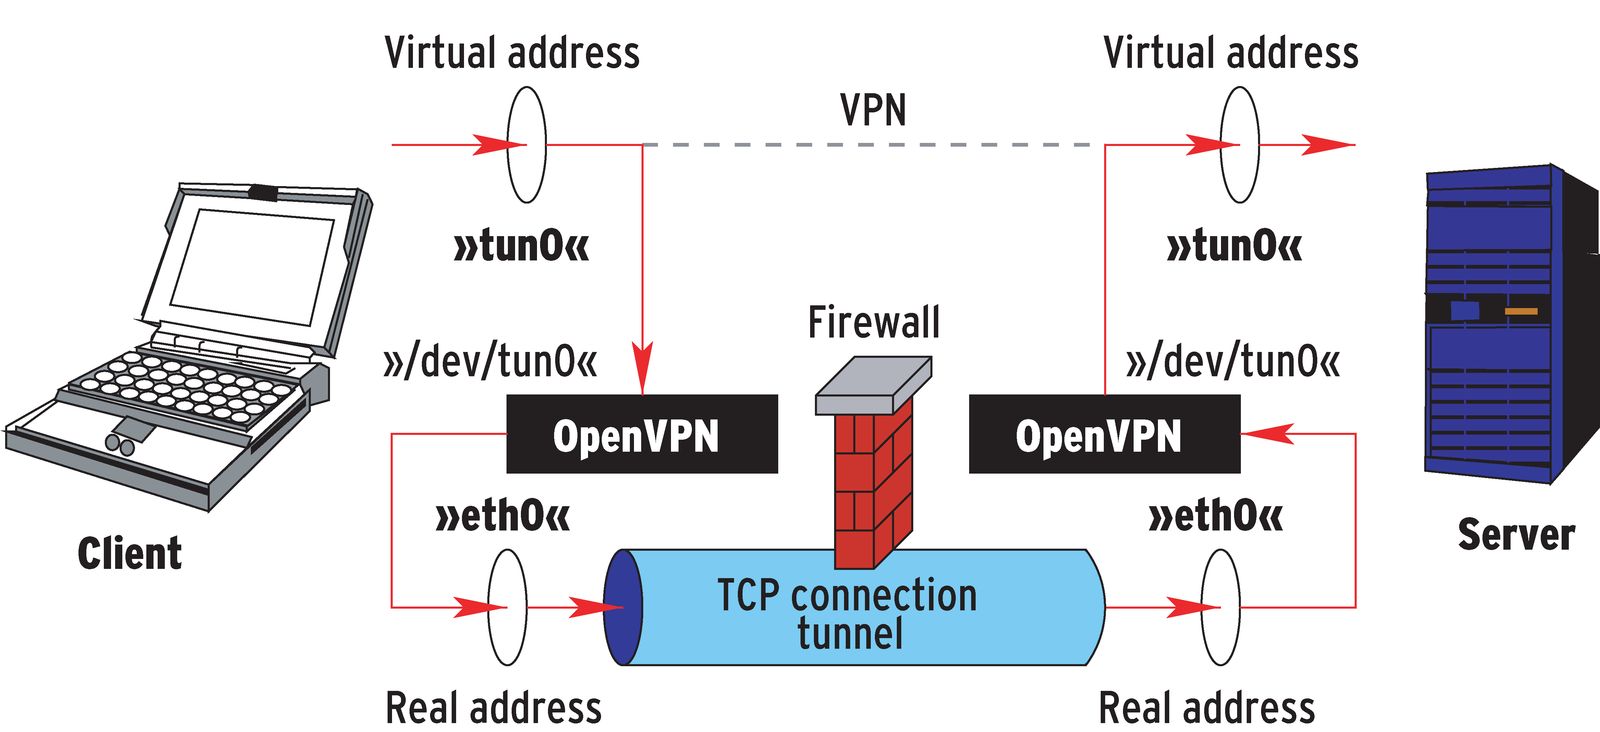
Now that the tunnel device is up and operational, line 22 sets up a static route to the OpenVPN server - the VPN connection is now independent of the default route so that line 24 of the script can delete the default route, which is then set up again in line 26 using the OpenVPN server as the gateway. From this point on, any new network connections will be routed through the VPN to the server (Figure 1) - OpenVPN has now undermined your company firewall, and the client machine has unrestricted - and unobserved - access to the Internet. The ping command given in line 27 opens up the VPN tunnel, which has been set up but is still closed until this point.
To prevent the client script from being obstructed by routing issues, the routing commands in the loop between lines 19 and 32 are repeated ten times at the most. The loop in lines 34 through 38 is curtailed just like the server script in Listing 1, although this has no effect on the functionality - it waits until OpenVPN is terminated. Lines 40 and 41 then delete the static route to the OpenVPN server and reestablish the default gateway.
The approach to establishing an OpenVPN tunnel demonstrated in this article requires a server for every VPN client. This requirement of a server for every client could easily get out of control if you need to support multiple clients or if your network encompasses several company offices. For users with more complicated requirements, OpenVPN version 2.0 or newer provides Public Key Infrastructures, CAs, and multiple client support for more advanced scenarios. But for a personal IRC server or a webcam, a simple command line based configuration such as the configuration described in this article should be just fine.
| INFO |
|
[1] OpenVPN: http://openvpn.net
[2] OpenVPN scripts: http://www.mirko-doelle.de/linux/openvpn-server.sh and .../openvpn-client.sh |