By Achim Schefczyk and Joe Casad
Modern digital imaging technology offers solutions to some of the problems that have plagued photographers since the invention of the camera. But digital photographs have also introduced new kinds of problems, and the very power of the medium has awakened new possibilities for image processing.
All these new possibilities have ushered in a new generation of tools. The Linux environment provides many excellent utilities for viewing, editing, and processing digital photographs, and in this month's cover story, we'll examine some of those tools.
We'll start with a look at imgSeek, a futuristic tool that lets you sort photos by the shape of an object in the image. We'll also look at Xnview, an image viewer and editor that reads an incredible 400 file formats. You'll learn about the XSane front-end for managing scanners, and we'll show you how to edit JPEG files from the command line.
The articles in this month's cover story don't require any particular expertise in digital photography, but it helps to know about some of the problems associated with managing images. Many readers are probably very familiar with these problems, but for those who have not yet joined the digital revolution, a brief introduction is in order.
Most digital cameras store images in at least two common file formats (see the box titled "Common Graphics Formats".) Besides providing different image qualities, these formats take up different amounts of space on the chip card. Some cameras do not actually specify the file format but offer a generic description instead, such as Extra, Fine, or Standard. You will need to check your camera manual to find out what these terms actually mean - different vendors sometimes have completely different definitions.
Typically, JPEG is fine even for good print quality. But to avoid affecting the image quality too much, you should choose a compression rate somewhere in the top third of the available options.
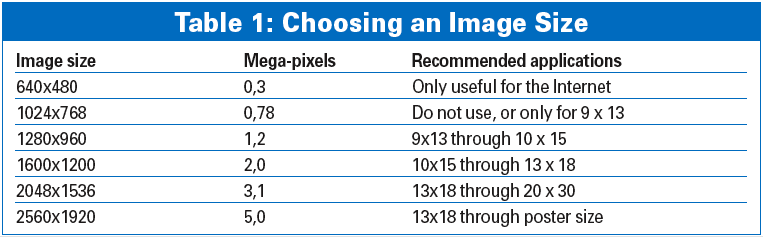
The image size has a big influence on the image quality (Table 1). Modern cameras typically give a range of options starting at 640x480 (0.3 mega-pixels) to what is more or less the standard resolution today, 2560x1920 (5 mega-pixels.) Unfortunately, bigger is not always better. Vendors are quite happy to let users think that the resolution is the decisive factor for quality, but this completely ignores factors such as the lens, the CCD, and the internal camera software.
Before you attempt to modify your images, it is a good idea to burn the unmodified originals on CD or DVD. Then delete any images that can be ruled out for further processing. These might include completely overexposed images or photos with too much camera shake.
The next step is to view the photos, assign meaningful names, and rotate any images that are not correctly oriented. Viewers such as Xnview (see the article in this issue) are fine for viewing, archiving, and simple processing of images.
If you will be using the images for viewing on screen or as mail attachments, you can scale them down and compress them to a size of 640 x 480 at a medium (50-60%) JPG compression rate. The receiving end will be grateful, especially if they only have a slow modem connection. If you need to retouch your photos, make sure you make any changes before scaling down. The smaller the image size and the higher the compression ratio, the less information you have to work with.
If some of your images need editing or fine tuning, you might find that the tools described in this month's cover story are exactly what you need to make the necessary corrections. The following sections describe some of the common problems associated with digital images.
| Common Graphics Formats |
|
TIFF TIFF (Target Image File Format) is the most important format for exchanging data in the pre-press phase. The format originated in the desktop publishing field and is typically used in professional applications. TIFF images use a loss-free compressed format. The highest quality level for many digital cameras uses TIFF, which is perfect for really large-scale printed images because it avoids compression artifacts that occur in JPEG. RAW The RAW format is not really a file format but is instead a data type. Every manufacturer has a proprietary standard, and the standards are not typically compatible. Cameras typically store RAW image data on the memory card. Tools that your camera might apply to enhance image quality are disabled. This format only makes sense in professional environments. Additionally, a RAW image takes about three times the space of a comparable JPEG formated image. If you insist on working with RAW format, check before you buy a camera to ensure that Linux tools for editing and reading the RAW files actually exist. JPEG JPEG stands for Joint Photographic Experts Group, the name of the committee that introduced the standardized approach to lossy and no-loss compression of digital images in 1992. During the compression process, a window moves sequentially through the image and collects the information in blocks. The higher the compression rate, the bigger the scanning window. This leads to loss of detail and focus if too high a compression rate is selected. In the worst case, compression artifacts such as blocks, alias effects, and other problems (see Figure 1) can occur. PNG Portable Network Graphics (PNG) was designed as a free replacement for the GIF format, which was patent protected for a long while. PNG combines the benefits of GIF and JPEG. PNG has the same characteristics as GIF with a few exceptions, animation being one, but with superior compression. Just like GIF, PNG can handle pixels from a color palette of 256 colors, as well as grayscale images with 1, 2, 4, 8, or 16 bits, and (RGB) color images with 8 or 16 bits per channel. Loss-free compression is used to store the data. Unfortunately, not all browsers support all the format's abilities, and this is why it is not typically used with digital photography. Most digital cameras do not support the PNG format. GIF GIF (Graphics Interchange Format) can handle a maximum of 256 different colors. This format is slightly antiquated today, although GIF is still fine for graphics and drawings. Due to the poor color depth, the format is not suitable for color photos. The format's strengths are its ability to display transparency and animated graphics. |
To ensure that the photos on your screen match your hard copies or prints, use the Gamma Correction feature of your image manipulation software. The Gamma value for digital graphics is the relationship between the color values in the digital graphics and the color values displayed on screen or in printer output. A ratio of 1:1 - that is, the printer actually prints what you see on screen - is an unachievable dream, as every monitor (and operating system) displays colors differently.
Good image manipulation programs provide a double Gamma correction feature - a basic correction for the monitor, and more granular controls for each individual graphics file. The first correction achieves a balance between the color values and the way they are displayed on your screen, but only within this specific image manipulation tool, of course. This is normally achieved by comparing graphic templates.
The second correction is part of the image manipulation process. You can use Gamma correction for each image file to rectify color problems caused by the source of the graphic. Most digital cameras create images that appear to be too dark. When a digital camera calculates RGB values by converting the light values when capturing an image, differences can occur. An individual Gamma correction for each image can help solve this issue.
Irritating details at the edge of an image can spoil the impression of a photo. To prevent this from happening, just apply your digital cropping scissors. Remove that dangling branch, or take that jogger out of your fantastic sunset scenario. If performed properly, cropping can help you present your motif more impressively.
Another flaw is caused by skewed or slightly out-of-focus exposures. Your best shot of the beach is useless if the horizon slants. To fix this, you can skew the image until the horizon really is horizontal. This may leave black spots in the corners, but you can easily remove them by cropping the image. You can remove the pitch on buildings caused by aliased verticals by applying the opposite pitch.
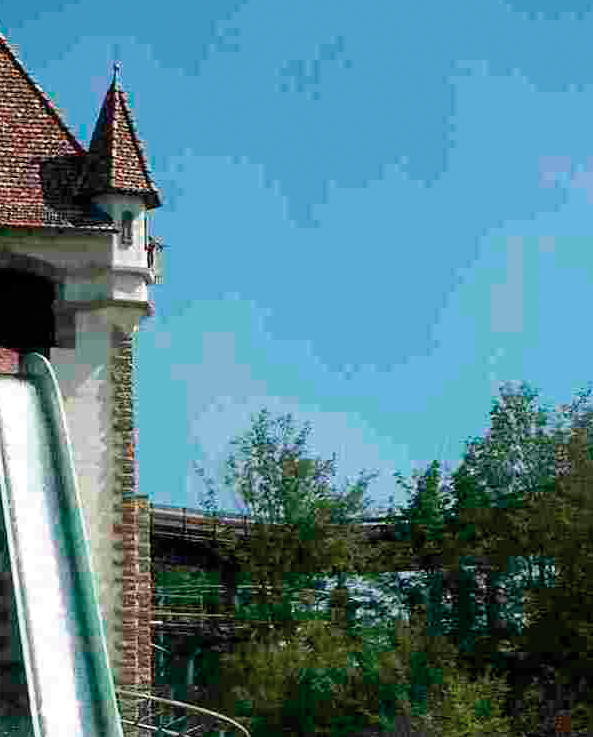
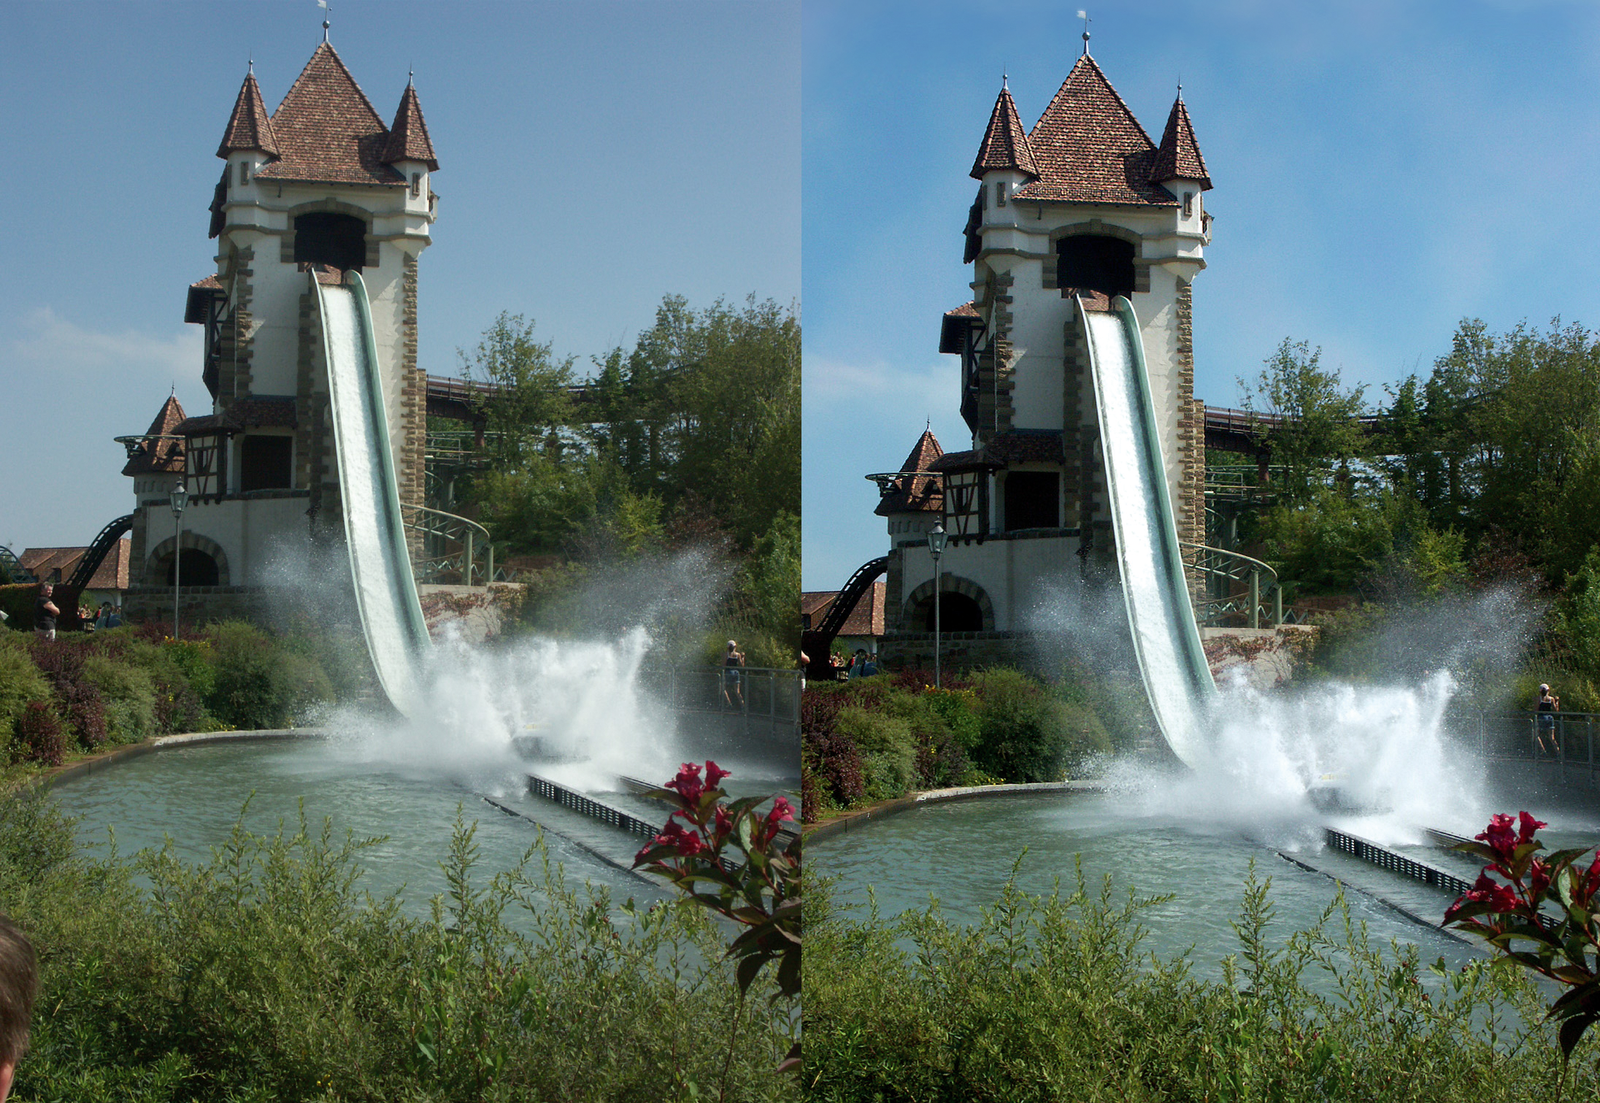
Photos often lack contrast or look too dark. The colors do not portray the image as you recall it. If this effect is not too extreme, you can apply the correction tools provided with your image manipulation program to the whole image. Try applying the contrast and brightness controls first. Location shots in particular benefit dramatically from increasing the contrast (Figure 2). Just turning up the brightness rarely improves the results, but you might like to try a combination of more contrast and more brightness. You can control the brightness and contrast in a more granular way by applying a color enhancement tool. If you need to focus on getting the details for these values right, color curves are the preferred approach. Both options require a feature-rich image manipulation program such as the GIMP.
If your photo is too pale, you can achieve the required color intensity by increasing the saturation values. You can also change color values or experiment with the color balance.
Sometimes photos turn out quite well on the whole - the colors are rich, the contrast is good, and the motif really shines - but camera shake or a slightly overdone exposure can still put the photo out of focus. If the image is just slightly out-of-focus, you can apply a sharpening tool. Some image manipulation programs include an unsharp mask tool, which lets you sharpen the image quite granularly. It does not make sense to go over the top with the sharpening tool. If you do, wrinkling or semi-transparent halos may start to appear. To accentuate a main motif, soften up the background. If both the foreground and the background are in focus, you can achieve a kind of 3D effect by applying a blur filter. To keep control of image manipulation, you should disable your camera's "pre-sharpening" function, which will typically be enabled by default.
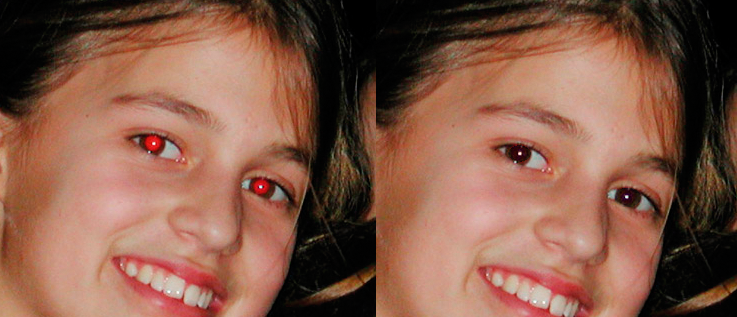
Redeye is another problem that you can correct in just a few seconds. Redeye occurs when people or animals in a relatively dark environment are photographed using a flash. The reason for this is that the light from the flash is reflected back into the lens by the retina. The distance and angle between the camera and the eye, as well as the pupil size, can all contribute to this undesirable effect. You can combat the effect on location by using a pre-flash before taking the photo - this causes the subject's pupils to contract.
Almost any image manipulation tool will give you a special redeye remover, either built in or in the form of an optional plugin. With many programs, you can simply draw a selection around the eyes and launch the routine. The tool analyzes the brightness of the red values and replaces them with more moderate, darker values (Figure 3). With a little skill, you can do this manually; the results improve with practice.
It is difficult to scale up an image. Of course, there are no physical restrictions, but even scaling up slightly can reduce the quality. Various resampling algorithms (Figure 4) help to achieve the best possible results. Xnview has no less than eight resample methods, although some of these methods create a softer focus and others produce artifacts.

This month's cover story is about digital photography, but it is also about Linux. The following articles offer a glimpse at how the Linux environment adapts to the emergence of new technologies through the development of useful new free and Open Source tools.
Most digital photographers know how easy it is to fill up a hard drive with images. The question is what to do with the images once they are on your computer. This month's cover story will help you get started with editing, managing, and scanning digital photographs in Linux.