By Thomas Leichtenstern
Your collection of digital images just keeps on growing, but you still don't have the right tool for image management and editing. Specialist programs abound, but they give you more than you need, and feature overkill only adds to the confusion. If you're looking for a practical tool for managing images, Xnview [1] may be the answer.
Xnview reads over 400 image formats and writes almost 40, yet it is simple enough for the everyday user. The tool is free for private use. The prices (in Euros) for commercial use are shown in Table 1.

Xnview is both an image browser and a viewer with several editing options. The package also comes with a batch converter, a slide show feature, and a thumbnail generator, which is useful if you want to host your best images on a website. The program reads and writes meta information in IPCT format, and it also reads EXIF data, that is, the technical information for an image.
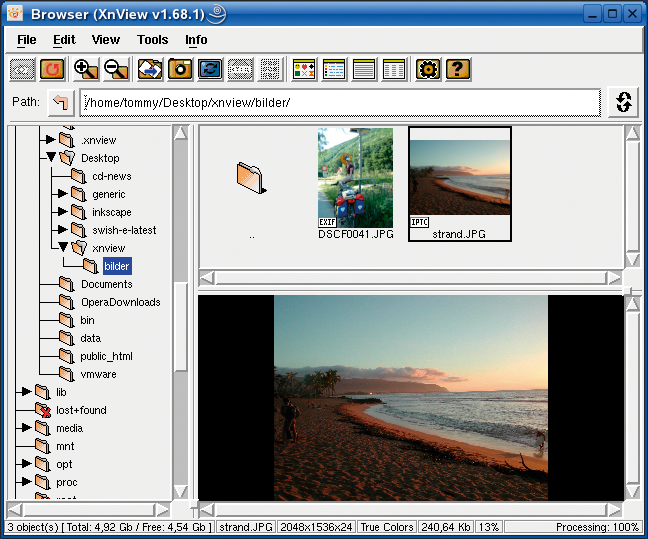
When launched, Xnview comes up with the Image Browser (Figure 1), which is divided into three frames: the directory tree on the left of the window, the thumbnail preview at top right, and the image preview below it. Clicking on a thumbnail displays the corresponding image. The View | Layout menu item allows you to change the browser window setup or the thumbnail size.
The file history is a useful navigational aid; it is accessible via the File menu. To check the directory history, click on the icon to the right of the address bar. This icon also takes you to the program's bookmark function, which allows you to store the paths to directories you need to access frequently.
Xnview offers two approaches to creating collections of images. Clicking on the HTML button in the toolbar creates a website with thumbnails of the selected images. You can use the dialog to specify parameters such as the thumbnail size, the number of columns and lines, and the gaps in between. To help you keep track, Xnview creates two subfolders in which the original images and the thumbnails are stored. You can upload the overview directly to a webserver.
The second approach follows a similar principle to create a Contact Sheet. In this case, Xnview does not create a website but a new image containing thumbnails of the selected originals. Clicking on the icon to the right of HTML pops up a dialog where you can specify how you want the files to be displayed and what information (file size or name) the contact sheet should provide.
If your images contain meta-information in EXIF or IPTC format, a small box in the lower right corner of the thumbnail points this out. EXIF [2] tells you the camera settings used to take the photo, for example, information about the f/stop, the exposure time, or the resolution settings. IPTC [3] contains entries such as the genre, creator, origin, or copyright notices. These entries are mainly used for image archive management. Programs such as Imgseek can categorize images based on this information.
To read this information, right click the required thumbnail, then select Properties... in the drop-down menu. In the new window that appears, click on the tab with the information you wish to view at the top of the image. The Edit IPTC... item in the drop-down takes you to IPTC information editing mode.
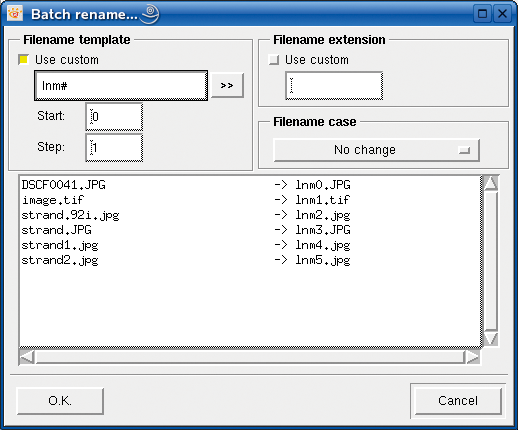
Fresh from the camera, digital images typically have intuitive names such as IMG_0815.JPG. Xnview has the Batch rename tool (Figure 2) to assign more meaningful names. Select all the images you would like to rename, then press the right button and select Batch rename... from the drop-down. You can set a prefix for all the images on the left of the dialog. Let's use Vacation# Start:0, Step:1 as an example. This tells the program to rename all your files based on the pattern of Vacation0.jpg, Vacation1.jpg.... If you would like to standardize the case, you can set your preferred values in Filename case.
Xnview also has a screenshot tool. Clicking on the camera symbol in the toolbox pops up the capture dialog. Besides the individual applications, which are organized in a list, you can also grab the whole screen, which is displayed in the viewer. Unfortunately, the tool does not give you the ability to hide the capture dialog, and this reduces its usefulness.
Double clicking a thumbnail opens the corresponding image in the image viewer (Figure 3). The new image is a completely new instance; it comes with extended functionality and buttons not found with the browser. You can also launch directly into this view mode by entering Xnview imagename at the command line.

The arrow buttons in the toolbox allow you to navigate the images in a directory. You can set the image display size by selecting View | Auto Image Size. The menu gives you options for scaling the image to the window size, and vice-versa. The option only affects the current image. To scale any images you view to the window size, you need to select Tools | Options to pop up the configuration window; then click on the View entry in the left-hand column and set the Auto Image Size: to your preferred value.
If you have a mouse with a scroll pad, the Mouse section lets you specify whether to use the scroll pad to navigate or zoom images. By default, the zoom steps are quite dramatic, and you might like to tone them down. To do so, click View in the Options dialog and enable the Change zoom in fixed steps check box. Then enter a value (in percent) in the box to define the zooming steps.
The High zoom quality item tells Xnview to recalculate the image on zooming. This means that you get more detail for higher zoom factors. On the downside, you do need reasonably quick hardware to benefit from this feature; a slow machine can take up to a few minutes to recalculate an image.
Clicking on Full Screen in the toolbox, or pressing the keyboard shortcut [CTRL F], toggles the program to full screen mode. You can then use the right and left mouse buttons to navigate to the next or previous image; [Esc] closes the full screen view.
Xnview has a slide show feature for viewing multiple images in succession. To launch the slide show, select View | Slide Show..., and then select the images or directories for the slide show in the dialog that appears.
The Display Color Information tooltip is a feature that web designers and graphic artists will really appreciate. The Display Color Information item in the View enables the feature, which shows you the hexadecimal and RGB values for the color below the current mouse position. Unfortunately, the window is visible through any other windows behind which it happens to be hiding, and this does tend to get on your nerves after a while. It is hard to say whether this persistence is a feature or if it is just a bug.
The program really shows its merit when you need to manipulate digital images. All the tools you need to do this are hidden in the Image and Filter menus. Just like other image manipulation tools, the Filter items define operations for aliasing the image, whereas the Image actions affect the size, the contrast, or the color depth.
The Image | Resize option does exactly what you expect. If you need to convert an image to a standard size, you can select a standard in the Custom pull-down. Otherwise, you can enter the height or width of the image in Screen Size in the top third of the dialog. To avoid distorting the image, enable the Keep ratio check box.
The program has a selection of eight different resizing algorithms for power users, from Nearest Neighbor to Lanczos - this is something that not even a program like the Gimp or Photoshop can give you.
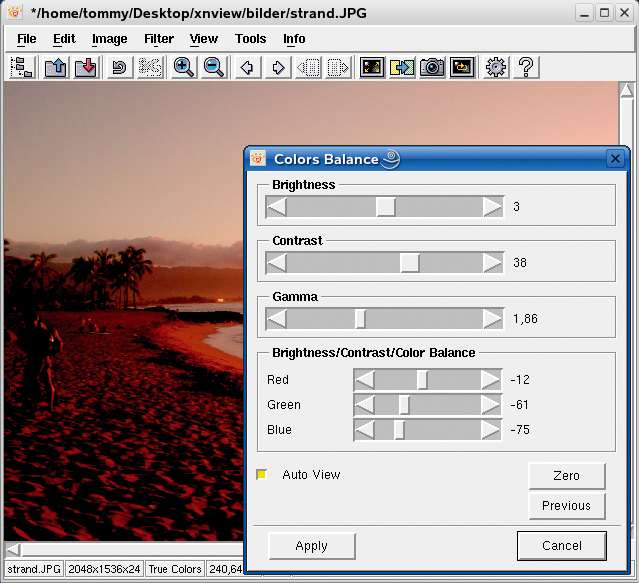
To adjust the brightness and color balance, select the Adjust | Brightness/Contrast/Color Balance item in the Image menu (Figure 4). You can use the sliders to set the required value. If you have enabled Auto view at the bottom of the window, you can monitor the effect of your changes.
To rotate and flip JPEG-formated images, select the JPEG Lossless Transformations tool. The changes are applied to the image immediately, and the change is loss-free, meaning that you can repeat these actions multiple times without affecting image quality.
With the exception of global changes such as color conversions or scaling, more or less any of the available image manipulation tools can be applied to a selection within an individual image. To define a selection, just hold down the left mouse button, and drag a frame over the required area. The squares at the edge of the frame are so-called handles that allow you to scale the current selection. Clicking on the scissors in the toolbox crops the selection.
Xnview also has a red-eye tool to help you touch up flash photos that have gone wrong. As the function changes any red hues within a specific range to darker hues, you need to precisely select the target area before applying the tool. It is a good idea to home in on each eye individually and then select Image | Edit red eye correction to make the changes. If the results are not to your liking, just click the Undo button to restore the original state.
If you need to apply the same procedures to a number of images, Xnview's batch processing feature can be a big help. Batch processing helps you apply all of Xnview's functions and filters to multiple images.
To modify the size and brightness for a number of images, start by selecting Tools | Multi convert... (Figure 5), then click Add... to add the images you want to process. If you would like to store the images in a new directory, use the Directory field to specify the name of the directory. If you do not select a directory, Xnview will write the new files to the original directory.
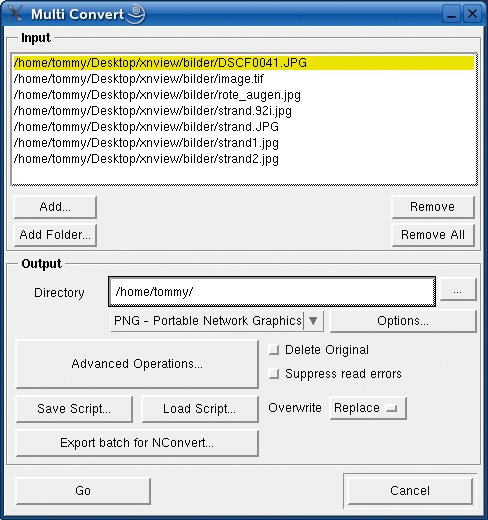
In Directory, select the required image format from the drop-down menu. The Options... button allows you to specify settings such as the compression level. Now open the filter selection dialog by clicking Advanced Operations.... In the list on the left, select the resize and Brightness entries. Press [Ctrl] to select multiple entries at the same time. When you are ready, click on the right arrow button to apply your selection.
To fine tune an operation, click on the operation in the right-hand window. A dialog appears in the lower part of the window, showing you the options for the current operation. Finally, to start converting, click on Go.
You can click the Save Script... icon to save your settings. Note that the script will store the selected operations but not the formats and directories.
Xnview's many useful features, and its support for an incredible 400 image formats, make it a universal tool. On the other hand, the program lacks genuine documentation, and you can easily trip over the non-intuitive controls.
A few minor bugs, such as the pesky Display Information window showing through any window on top, are annoying, but perhaps more disturbing is the fact that the Undo feature only allows you to undo the last action. The program also lacks a drag & drop function that allows users to move images from a directory to the program.
| INFO |
|
[1] Xnview-Homepage: http://www.Xnview.com
[2] EXIF Specification: http://www.exif.org/specifications.html [3] IPTC specification: http://www.iptc.org/IIM/ |