
By Kristian Kißling
A scanner sometimes comes bundled with free software you can use for operating the device. Unfortunately, the software often only runs on Windows or (maybe) Windows and OS X. If you are a Linux user and you're looking for a GUI to talk to your scanners, try XSane.
XSane [1] is a graphical scanner front-end based of the Sane programming interface [2]. Sane is an acronym for Scanner Access Now Easy. The Sane programming interface sets a standard for access to image processing devices. The drivers for the image processing devices used with XSane, including scanners, are referred to in the Sane world as back-ends.
If Sane has a back-end that matches your scanner, the installation process is really quite simple (see the "Setting Up Your Scanner" box.) Sane operations are controlled by front-ends. XSane is one example of a Sane front-end. Other Sane front-ends include tools such as Kooka [3] and QuiteInsane [4]. This article describes how to operate your scanner from a Linux computer using the XSane front-end.
| Setting Up Your Scanner |
|
Generally speaking, successful scanning depends on whether XSane has a back-end for your scanner. The chances that it has a back-end are higher if your scanner is an older and more popular model. Installing the Canon LiDE 30, which we used for our tests, was painless using the plustek back-end no matter which Linux distro we tried - this said, Debian did require us to use root mode. To find out how well Sane supports your scanner, check out the overview of supported scanners on the project homepage [5]. The list shows that support for our scanner is complete. Another list at [6] tells you which scanners the plustek back-end supports apart from the Canon model. Make sure you install the software first, before you attach your the scanner. The packages will differ depending on your distribution. Suse 9.3 users need Sane, Xsane, Sane-frontends; Suse 9.2 users will require Sane, Yast2-scanner, and XSane. For Ubuntu, you need to run Apt-get to install Sane, Sane-utils, Xsane, Xsane-common, Libsane, and Libsane-extras. Debian requires Xsane, Sane, and Libsane. Mandriva 10.2 users can use the control center to install Sane, Sane-frontends, and Xsane. After completing the installation of XSane and all the necessary background tools, you can proceed to attach your scanner. On Mandriva, the control center helps you check if your scanner has been detected correctly. After completing the check, press [Alt-F2] and launch XSane by entering the xsane command. Users with Suse 9.2/9.3 can launch Yast2 to install the scanner via the entry in the Hardware tab. To configure the scanner, simply select the right model from the list. Then again press [Alt-F2] and enter the xsane command to launch XSane. That just leaves us with Debian and Ubuntu. The sane-find-scanner and scanimage -L commands detect the scanner - you may need to run these commands as root. You can then press [Alt-F2] and enter xsane to launch the program. |
To launch XSane, press [Alt-F2] to pop-up a quick launch window, and type xsane. The program might ask you for the graphics device you want it to use before it opens various windows.
The main window is easily identified by the xsane label; the name of your scanner appears to the right.
The Window menu allows you to hide or display various windows. Go to the Preview window first (Figure 1). Put a colored original on the scanner plate and click on Acquire preview.
After a short warming up phase, the scanner will show you a low-res preview. This preview is designed to help you define a section of the original for scanning and adjust the colors.
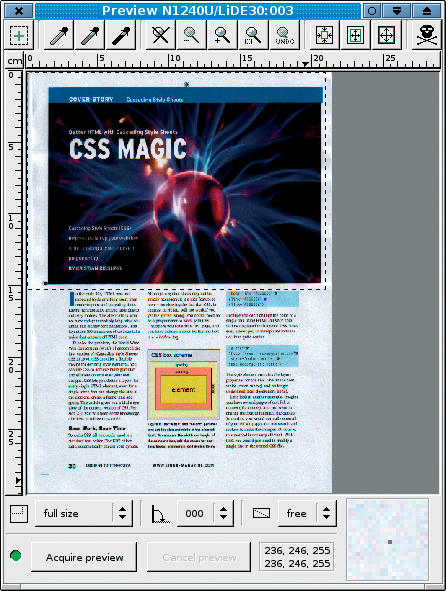
The five magnifying glass icons at the top allow you to inspect the document. The magnifying glass with the cross on the left shows the full image; the second magnifying glass from the right allows you to zoom to the current selection.
To select an area of the document for scanning, hold down the left mouse button, and drag the mouse over the required area. The scan area is indicated by a dotted line. There are three arrow icons to the right of the magnifying glass; click on the left arrow to tell the Xsane program to automatically select a scan area of the image - the icon on the right side of the screen selects the image's full scan area. The skull icon on the far right side deletes the current preview cache.
Let's assume you need to scan a series of 10 x 15 cm photographic images; in this case, you would select 10cm x 15cm rather than full size in the drop-down menu bottom left. This option allows you to scan a smaller area and speed up the process.
If the photo is upside down after scanning, the drop-down menu to the right can help. The 180 entry - this refers to 180 degrees - allows you to put the photo back on its feet; the 000 | entry says you will be flipping the photo vertically. The menu on the far right assigns a fixed aspect to the selection.
Color management takes place in preview mode. For normal applications, you can typically opt for one of the scanning programs automatic color selections without applying manual corrections.
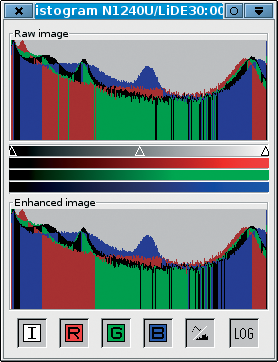
If your original has a color cast or is too pale, dark, or light, you will need to apply manual corrections. The Histogram window is used for this purpose, as are the main window and the three pipettes in the Preview.
You can use the pipettes to define a color space for your image. Assign the pipettes - from left to right - to white, gray, and black points in the preview image. XSane then calculates new brightness values for the image based on these mappings.
The Histogram window shows you the color distribution in graphical form (Figure 2). You can click on the I, R, G, and B icons to hide or display a color. To change the image brightness, move the small triangles to the right or left along the bar.
To modify individual color values, open the main window and click on the colored icon in the bottom row on the left. This opens a feature-rich menu for precise color fine tuning (Figure 3); at the same time, the corresponding color sliders are displayed in the Histogram window. You can use the slider next to the gamma symbol for gamma correction (put simply, gamma correction modifies the color values in a spectrum between black and white). The sun icon is for brightness settings, and the black and white circle icon is for contrast.
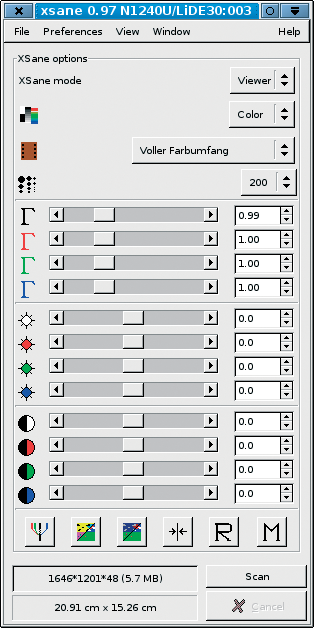
We have selected a scan area and finished the color management settings. You can now go to the main window for the remaining settings. First of all, think about what you will be using the image for; based on this, set a suitable resolution using the fourth button from the top. The dpi (dots per inch) value is important. For good-quality printing, you might like to set 300 dpi, but be aware that an A4 sized image will take up 20 to 50MBytes on disk.
If you will be going on to process the scanned image, first select the default value of Viewer in the XSane Mode menu. Then set the scan quality: depending on whether your original is a text, a fax, or a color photo, select Color, Grayscale, or Lineart. The Full color range setting is required for positive originals, but not if you are scanning a film negative. In this case, select the vendor from the list.
Clicking on the second square icon at the bottom left inverts the colors in the scanned original. This converts negatives to positives. If you click on the icon to the right, XSane will suggest color enhancements. If the suggestion does not meet with your approval, you can click R to revert to the color distribution in the original scan; press M to save. Clicking on the double-arrow icon tells XSane to apply average values for hue and brightness.
The numbers next to the Scan button tell you the screen resolution of the current scan area, how much memory the scanned image will take, and the color depth. The field below this gives you the size of the scan area in centimeters. Assuming these settings are what you need, you can start scanning by clicking on Scan.
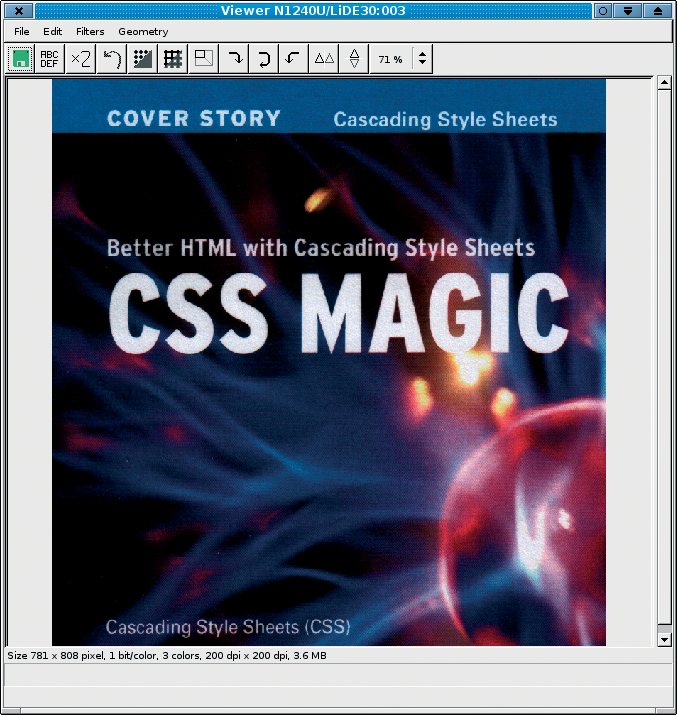
The scanned image appears in the Viewer (Figure 4). You can retouch the image here if necessary by rotating, mirroring or scaling the image, removing spots, or applying a soft-focus tool. You can even launch an Optical Character Recognition (OCR) job from here, but you do need an external OCR software to do this.
The only question left now is what to do with the scanned image? Let's start with saving it. To do so, select Save as the XSane mode in the main window. XSane uses pnm format by default, but you can use the Type drop-down to select a different image format. You can specify a standard compression rate for saving images below Configuration in the XSane Preferences window.
The Image tab allows you to select which quality to use when saving JPEG, PNG, and TIFF formated images. The other tabs here are Copy, Fax, or E-Mail; each one has a number of configuration options for external image manipulation programs. It is possible to mail scanned images, to run them through an OCR tool, to fax them, or to print them. For example, the Copy tab gives you the ability to select the resolution and the borders for printing photos.
You can add the SMTP settings for your mail program using XSane's E-Mail option. Then, when you select E-Mail, Copy, or Fax as the XSane Mode in the main window, XSane will pass your images to an external mail program. This means you can even send those compromising party photos to all your friends!
XSane is a handy front-end for managing scanning devices supported by the Sane interface [5]. You'll find it quite easy to scan documents in Linux, if your scanner is Sane enough.
| INFO |
|
[1] XSane: http://www.xsane.org/
[2] Sane Project: http://www.sane-project.org/ [3] Kooka: http://www.kde.org/apps/kooka/ [4] QuiteInsane: http://quiteinsane.sourceforge.net/ [5] Sane scanner support: http://www.sane-project.org/sane-supported-devices.html [6] The Sane back-end for the Canon LiDE 30 and related chipsets: http://www.sane-project.org/man/sane-plustek.5.html |