
By Daniel S. Haischt
Experts acknowledge the danger of transmitting plans, personal data, and confidential agreements in clear text across the Internet, but end users rarely heed their warnings. Users typically don't turn to tools such as PGP, GnuPG [2], and S/Mime by choice. CTOs can either bemoan their fate or take proactive steps: so-called PGP servers provide centralized user key management and handle the encryption and decryption processes. These services remove the need for time-consuming installation and configuration of a PGP client on every user workstation.
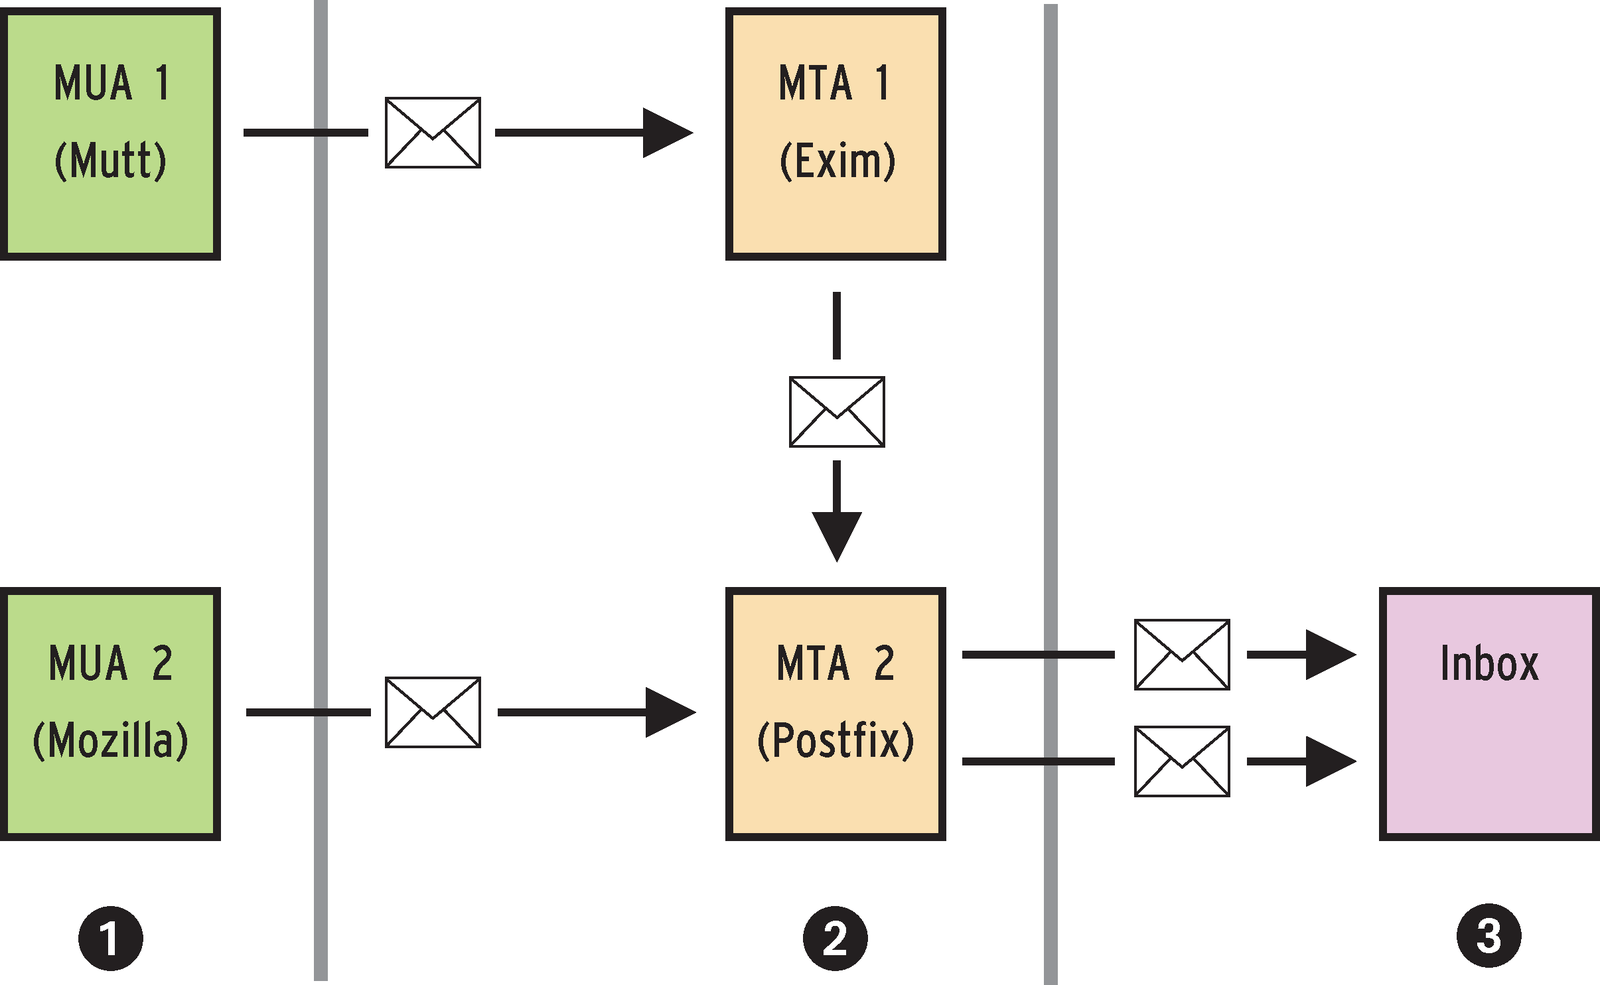
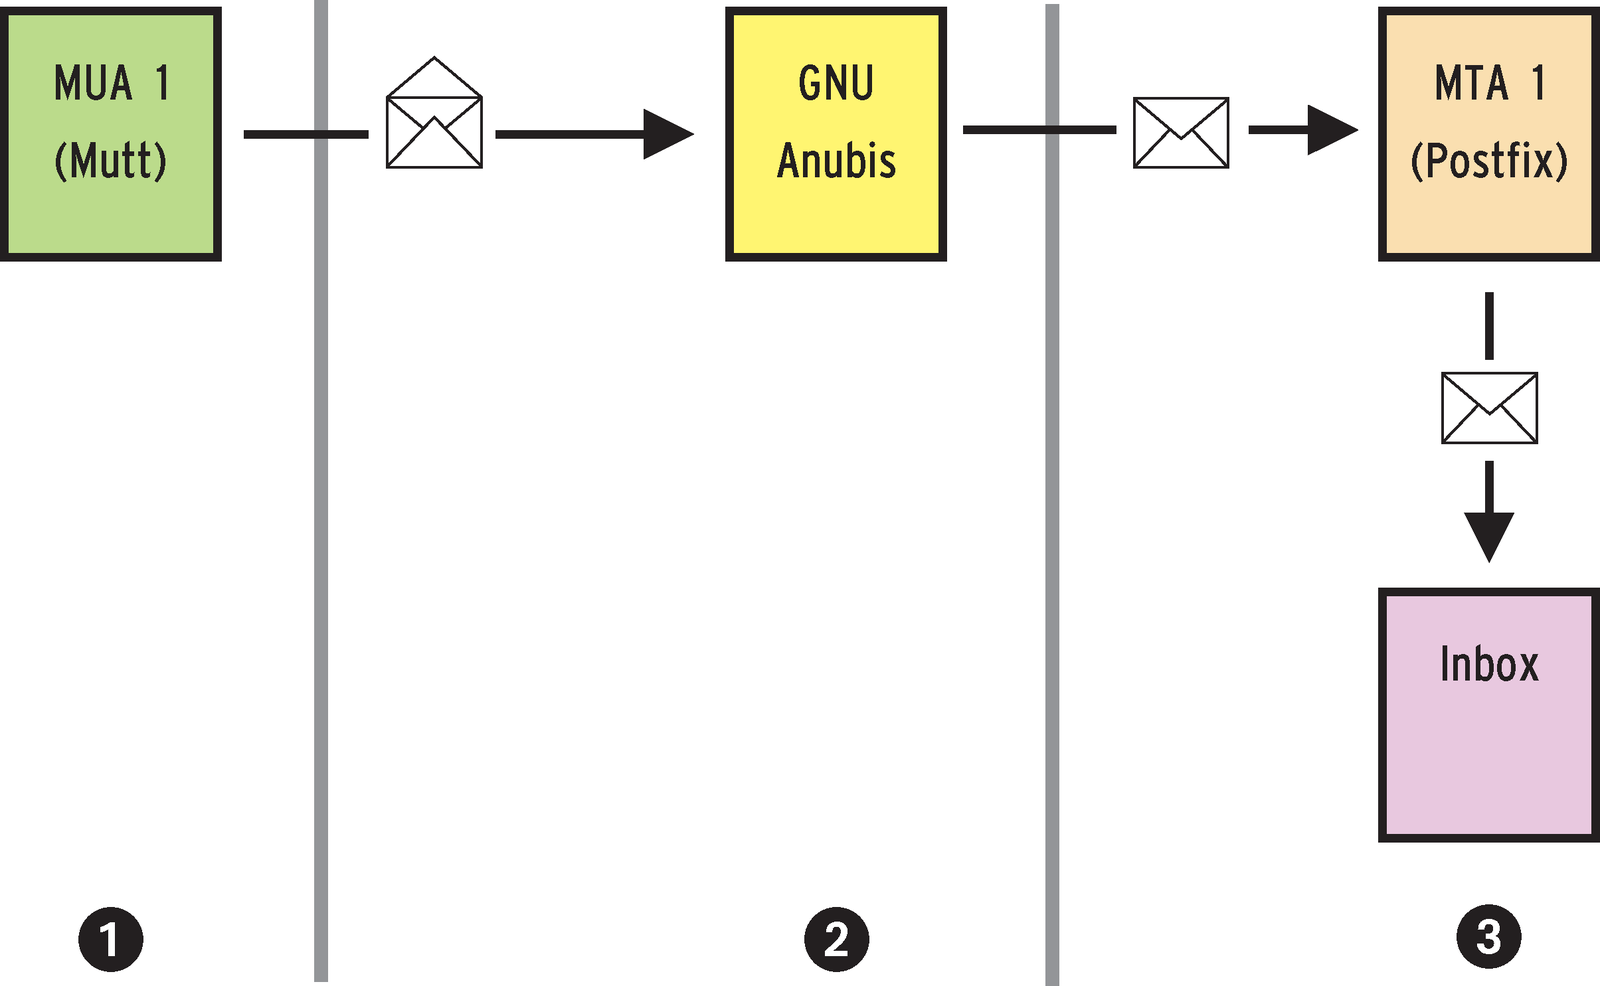
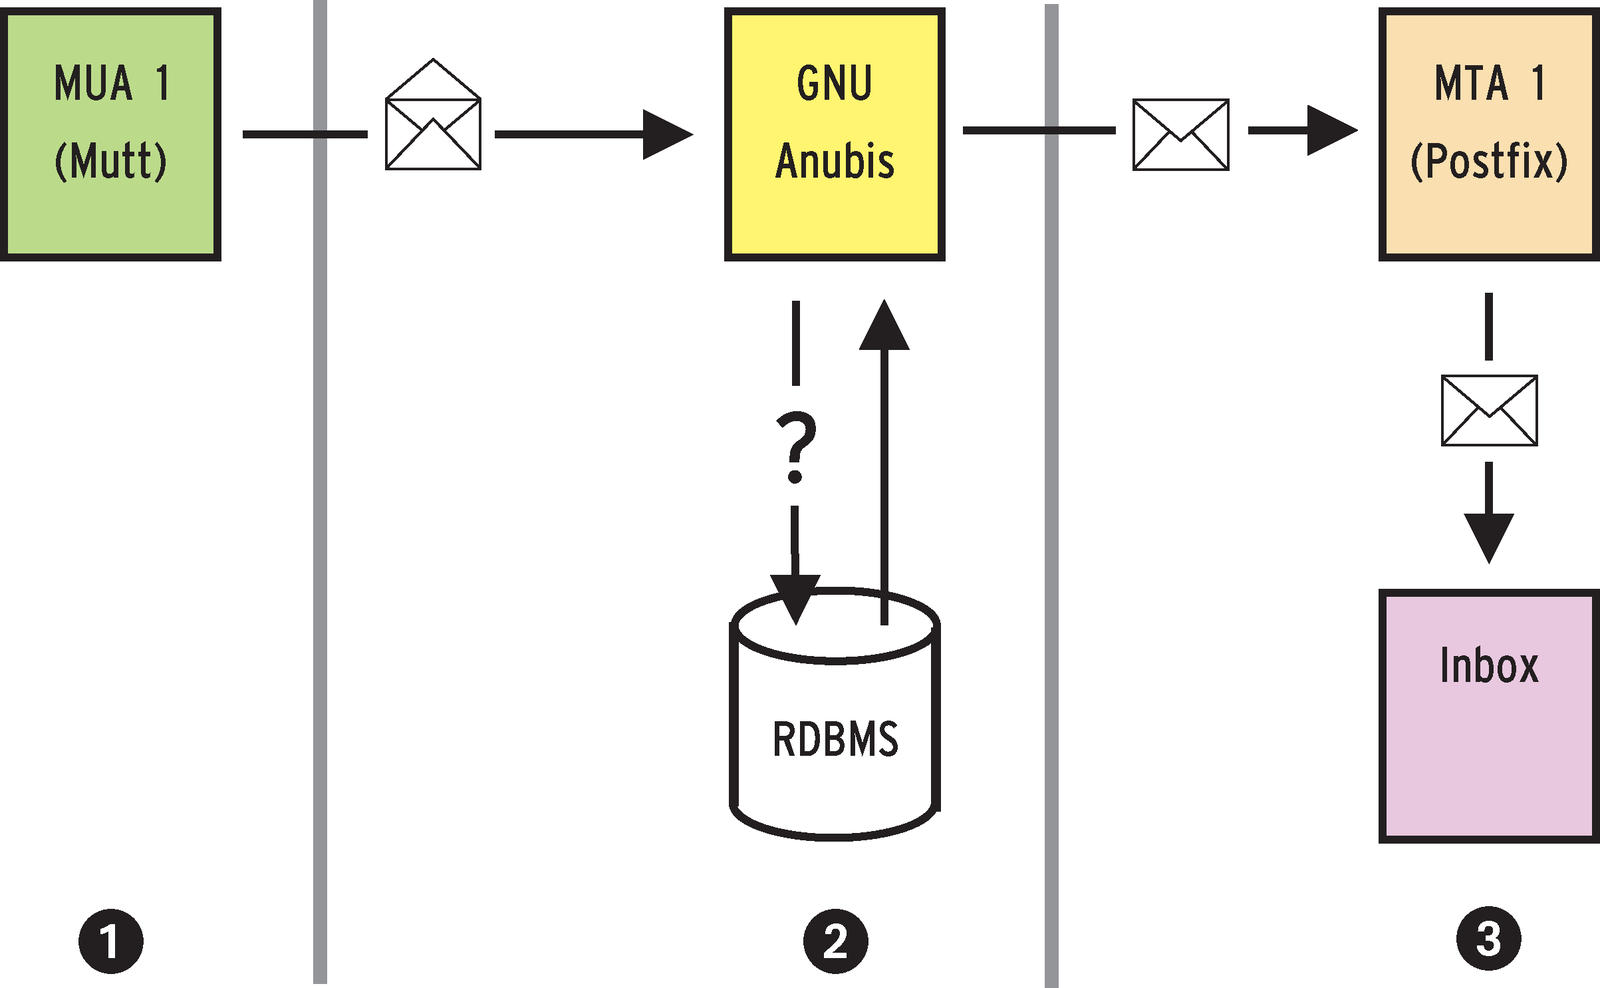
Linux admins have a choice of free encryption programs such as GPG-Relay [3] or Kuvert [4], and there are a number of commercial applications (such as [5] and [6]), some of which are also available for Windows. But if you prefer to avoid specialized applications, your best option may be the universal mail manipulation program, GNU Anubis [1]. Anubis, which is named after an ancient Egyptian god, is an SMTP pre-processing daemon. The Anubis daemon receives messages from a Mail User Agent (such as the Mutt client shown in Figure 2), then modifies the messages before passing them to the Mail Transfer Agent (such as the Postfix server shown in Figure 2). Anubis can process messages in a number of different ways, but in this case, one of Anubis' more useful tricks is the ability to encrypt mail using GnuPG.
The Anubis mail manipulation tool is a mature, Open Source solution that allwos admins to set up a centralized PGP infastructure. Automatic decryption of incoming mail or the use of the PGP/Mime standard to process file attachments requires a programm such as GPG-Relay or Kuvert, but Anubis is the perfect choice for encrypting and signing outgoing mail.
A most common technique for encrypting or signing email messages is for each client to use a PGP plugin such as Enigmail [9]. A tool like Anubis, on the other hand, offers an alternative approach. Anubis provides centralized processing that is often easier to manage for a large user base. The client no longer sends mail directly to the mail provider, but routes the message instead to the Anubis software. Anubis acts as a proxy, reshaping the message content, signing or encrypting the message, and finally forwarding the message to the provider.
Anubis can run on a separate server, or on the same machine as the client or MTA. Users just need to configure the Anubis machine as the mail server on their email clients (see the "SMTP Tricks" box).
| SMTP Tricks |
|
Some mail programs, Mutt for example, call the sendmail binary directly to send mail. In this case, it is impossible to change the SMTP host and port in the mail client configuration, as sendmail behavior is configured by the administrator. Additionally, some mail clients do not support authentication based on the SMTP-AUTH mechanism. Programs such as MSMTP [10] or ESMTP [11] can help by acting as mail proxies. Users can configure these command line tools individually, with the ~/.esmtprc configuration file in ESMTP's case: hostname = anubis.abyssworld.de:24 username = "haischt" password = "access4anubis" starttls = disabled The service sends mail to the Anubis server (anubis.abyssworld.de, port 24) and authenticates with the user's credentials. STARTTLS encryption is disabled. Mutt needs to know that it should call ESMTP rather than the sendmail binary: set sendmail="/usr/local/bin/esmtp" This line in the Mutt configuration file tells the email client which service to use. |
Thanks to autoconf, Anubis is really easy to configure and install. But make sure you specify in advance which database will hold the user data. In Pixie mode, you can additionally authenticate users via an Ident daemon running on the local workstation. This variant does not need a relational database. It is also possible to compile all the modules and decide on a setup later:
Other components are optional and only make sense in specific scenarios:
Unfortunately, Anubis does not have LDAP directory service support. This would be a useful feature to have, as both user data and PGP keys are often available via OpenLDAP or an Active Directory server. For a long time, the Anubis application only used text or GDBM-based databases; support for relational systems is still fairly new to Anubis. So let's hope that LDAP support will soon follow.
You can check the config.log after you complete the ./configure stage to see if the modules were configured as expected. After completing the installation, typing anubis -show-config-options tells you if the required modules really are available.
Anubis expects to find its configuration data in /etc/anubisrc. This path is hard-coded in src/header.h, but you can modify the location on the fly using the --altrc file. The make install stage does not actually create a configuration file; however, there is a examples/2anubisrc template file in the Anubis source code package.
Additionally, users who need the ability to send mail via the Anubis daemon can create a ~/.anubisrc file in their home directories. examples/1anubisrc gives you an example.
For initial testing, the Anubis daemon also has a debug mode:
anubis --altrc /usr/local/etc/anubis/anubisrc--mode=transparent -v -D -f
This tells Anubis to run in transparent mode without authentication, to provide verbose output (-v), create debugging output (-D), and run in the foreground (-f), instead of avoiding the standard input and output channels in normal daemon mode.
Anubis has a number of approaches to identifying users. Pixie mode is one of the more simple approaches to authentication. Pixie mode is enabled by the mode transparent entry in the control block of the the global configuration file. In this setup, an Ident daemon (AUTH protocol) runs on the user workstation. Anubis requires the user to authenticate before handling mail (see Figure 3.)
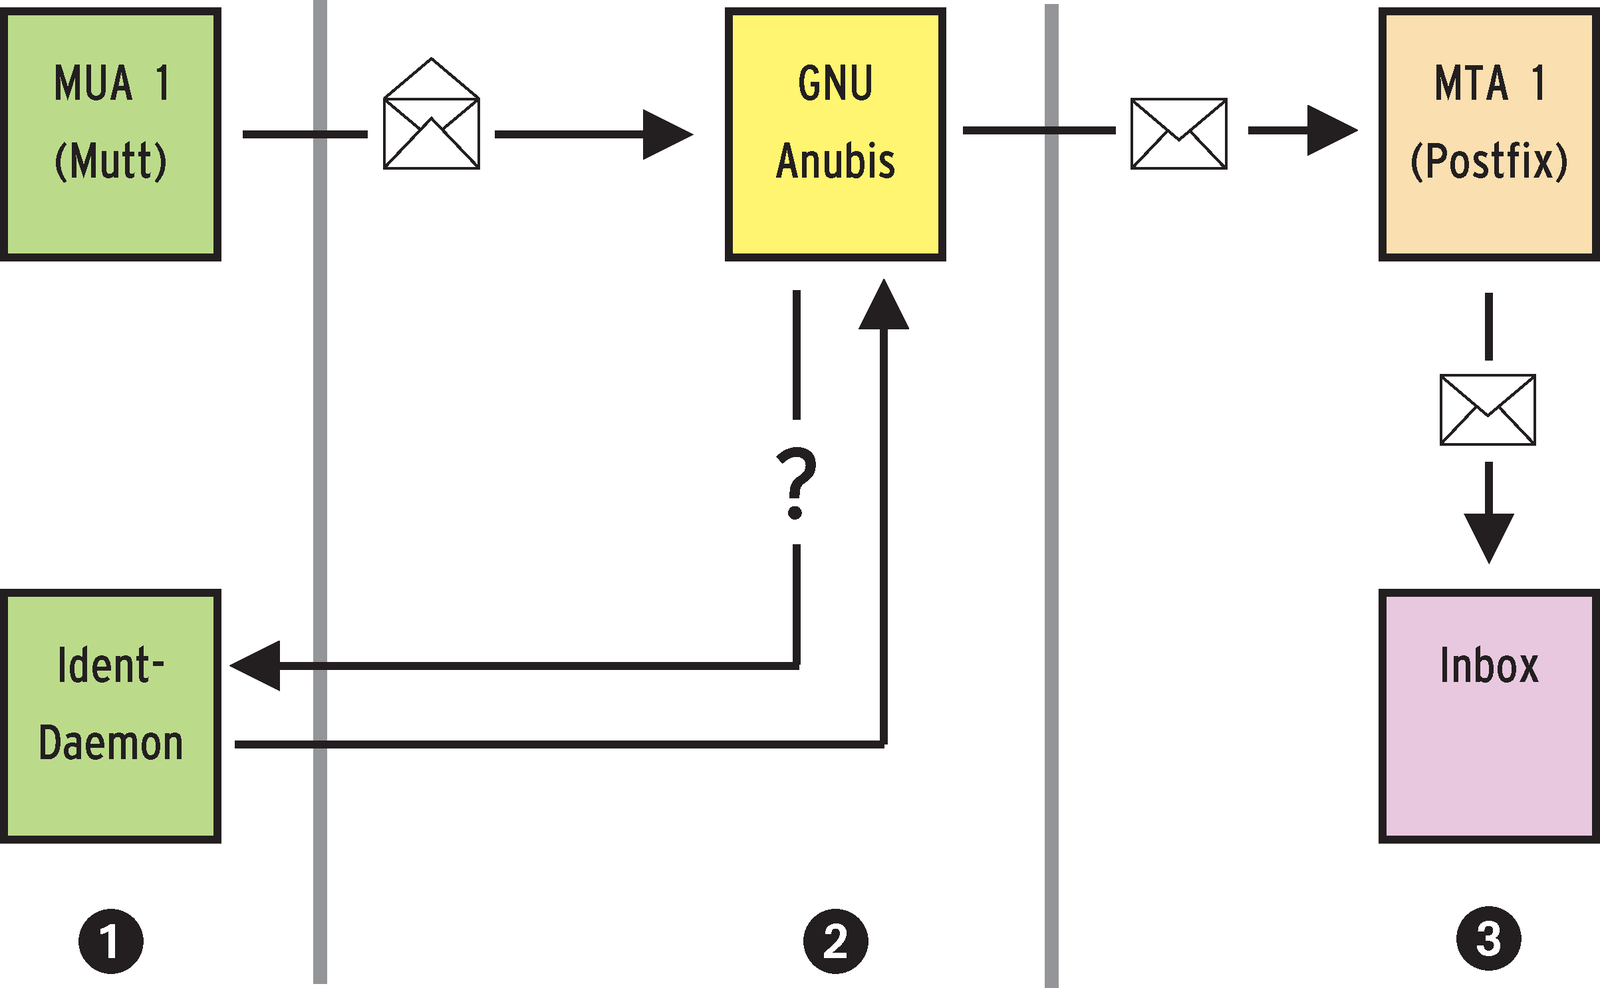
However, this technique only makes sense in a very specific scenario. The server has to trust the Ident daemon, and this type of client-side security check only works if the workstation is used by responsible admins who know their users, and who can be sure that nobody will tamper with the network settings. Best practices would suggest avoiding the use of this operating mode.
Although the protocol name, AUTH, might suggest otherwise, Identd does not actually perform authentication. The daemon is designed for tracking attacks: the administrator of the attacked system can use Ident to check the ID of the users on a source machine in a TCP connection. Based on this data, the administrator can then contact the administrator responsible for the source machine. Many Ident implementations simply use a default ID ([7], [8]).
Listing 1 shows an Anubis session in Pixie mode. Lines 6 (Ident authentication attempt) and 8, where the mail user is mapped to the local haischt Unix account, are of interest. After the authentication phase, the GNU Anubis daemon passes the message on to the mail server (Lines 11 through 14).
Windows XP client systems often have an integrated firewall that can cause trouble during the test phase. In the default configuration, the firewall understandably restricts all Ident requests to port 113. This needs to be changed (by unblocking port 113 or disabling the firewall.) Additionally, the mail program can't use SMTP-AUTH user names in Pixie mode.
| Listing 1: Pixie Mode |
01 #> Reading system configuration file /usr/local/etc/anubis/anubisrc... 02 #> UID:0 (root), GID:0, EUID:0, EGID:0 03 #> GNU Anubis bound to 192.168.1.6:24 04 #> [68239] GNU Anubis is running... 05 #> [68239] Connection from 192.168.120.239:1310 06 #> [68244] IDENT: connected to 192.168.120.239:113 07 #SERVER >>> 1310, 24 : USERID : UNIX : haischt(36) 08 #> [68244] IDENT: resolved remote user to haischt. 09 #> [68244] UID:65534 (nobody), GID:65534, EUID:65534, EGID:65534 10 #> [68244] Getting remote host information... 11 #> [68244] Connected to 192.168.1.6:25 12 #> [68244] Transferring message(s)... 13 #SERVER >>> 220 smtp.abyssworld.de ESMTP Postfix (2.2.3)(46) 14 #CLIENT <<< 220 smtp.abyssworld.de (GNU Anubis v4.0) ESMTP Postfix (2.2.3)(64) |
Dixie mode (Figure 4) is newer and better than Pixie mode. The Dixie alternative is based on the SMTP-AUTH standard. Anubis reads the username, password, and other credentials from a database (a simple text file or a relational database system). The text variant includes the user ID (SMTP-AUTH-ID), the password and optionally the Unix account, and the path to the user-specific configuration (Table 2).
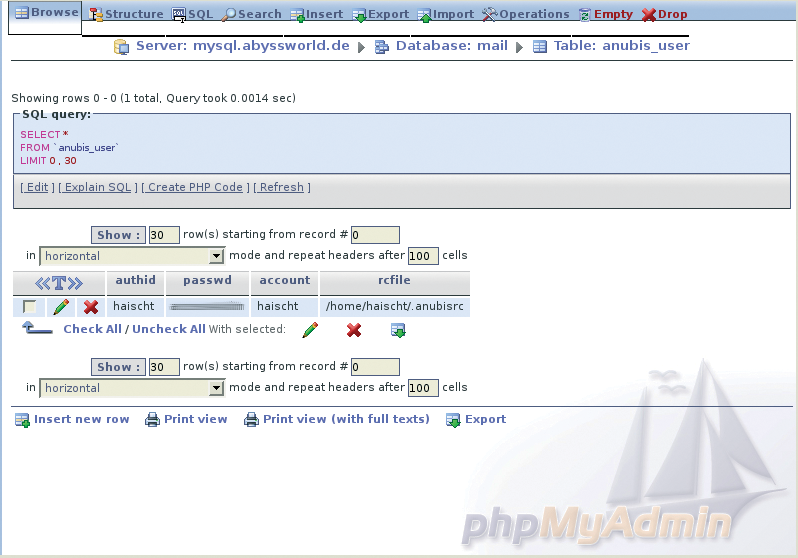
The text file has a line for each user; the fields are blank-separated. According to the official documentation, the fields should be colon-separated, but this syntax does not even work in Anubis 4.0. The text variant is fine for initial testing and smaller environments. If you need to manage a larger number of users, you might prefer to work with a database instead of a text file. Figure 5a shows an appropriate table schema for this database.
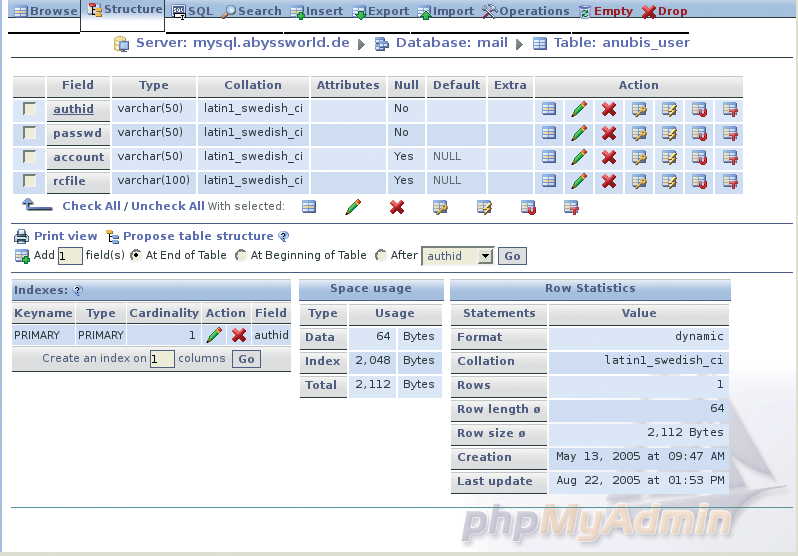
The authid is defined as the primary key; the fields are all text type. As you can see in Figure 5b, the table content reflects the text file. The following command imports the text file to the MySQL database:
anubisadm --create 'mysql://mail:access4anubis@mysql.abyssworld.de/mail;table=anubis_test' < /usr/local/etc/anubis/anubisdb.txt
The command specifies the target table as a URL parameter - the notation is confusing, as the parameters are not separated by ampersands (&), as they would be in an HTTP address, but by semicolons. The URL and the parameters must be quoted to prevent shell mangling.
To tell Anubis to use the new table, the administrator has to change the authentication mode from mode transparent to mode auth in the control section of the global anubisrc configuration (see Listing 2, lines 1 through 5). It is also necessary to add the path to the user credentials to the AUTH section (lines 7 through 15). Listing 2 shows you how to do this for a MySQL database. Additionally, users have to tell their mail programs to use SMTP-AUTH authentication when sending mail.
| Listing 2: Dixie Configuration |
01 #---BEGIN CONTROL--- 02 ## ... 03 #mode auth 04 ## ... 05 #---END--- 06 # 07 #---BEGIN AUTH--- 08 #smtp-greeting-message ESMTP Anubis (4.0.0) 09 #smtp-help-message help message 10 ### Simple text database: 11 ## sasl-password-db file:/usr/local/etc/anubisdb.txt 12 ### Relational MySQL Database 13 #sasl-password-db mysql://mail:access4anubis@mysql.abyssworld.de/mail;table=anubis_user 14 #sasl-allowed-mech NTLM GSSAPI DIGEST-MD5 CRAM-MD5 15 #---END--- 16 # 17 #---BEGIN TRANSLATION--- 18 ##translate [USER@]ADDRESS into USERNAME 19 #translate me@daniel.stefan.haischt.name into haischt 20 #---END--- |
Listing 3 shows a working Dixie session. Line 7 and following show a mail program talking to the Anubis daemon. The client can use the SASL mechanisms DIGEST-MD5 and CRAM-MD5 to authenticate. Both approaches transmit a password hash across the wire rather than the cleartext password.
| Listing 3: Dixie Session |
01 #> Reading system configuration file /usr/local/etc/anubis/anubisrc... 02 #> UID:0 (root), GID:0, EUID:0, EGID:0 03 #> GNU Anubis bound to 192.168.1.6:24 04 #> [68643] GNU Anubis is running... 05 #> [68643] Connection from 192.168.120.10:40501 06 #CLIENT <<< 220 abyssone.abyssworld.de GNU Anubis ESMTP; Identify yourself(64) 07 #CLIENT >>> EHLO [192.168.121.2](22) 08 #CLIENT <<< 250-Anubis is pleased to meet you.(36) 09 #CLIENT <<< 250-STARTTLS(14) 10 #CLIENT <<< 250-AUTH DIGEST-MD5 CRAM-MD5 (31) 11 #CLIENT <<< 250 HELP(10) 12 #CLIENT >>> STARTTLS(10) 13 #[68647] anubis.pem: No such file or directory 14 #CLIENT <<< 454 TLS not available due to temporary reason(47) 15 #CLIENT >>> AUTH CRAM-MD5(15) 16 #SASL mech=CRAM-MD5, inp=NULL 17 #CLIENT <<< 334 PDE0MTU0NTMyOTUzMDA2MzI0MTIzLjBAbG9jYWxob3N0Pg==(54) 18 #CLIENT >>> aGFpc2NodCA5ZmQ1MDhkYTYzYzQ3ODRiOGUwMzMzZTNhMmUyM2VjZQ==(58) 19 #> [68647] Found record for `haischt'. 20 #> [68647] Authentication passed. User name haischt, Local user haischt. Welcome! 21 #CLIENT <<< 235 Authentication successful.(32) 22 #> [68647] UID:1001 (haischt), GID:20, EUID:1001, EGID:20 23 #> [68647] Reading user configuration file /home/haischt/.anubisrc... 24 #> [68647] Getting remote host information... 25 #> [68647] Connected to 192.168.1.6:25 26 #> [68647] Starting SMTP session... 27 #SERVER >>> 220 smtp.abyssworld.de ESMTP Postfix (2.2.3)(46) |
In Line 9, you can see the mail program issuing the STARTTLS command to establish a secure SSL connection to the Anubis daemon. This fails because Anubis is not yet configured for secure SSL. In line 16, the mail program and Anubis agree on the SASL mechanism CRAM-MD5. The daemon then searches the MySQL database for a record that matches the user haischt`s credentials, and finds the record (Lines 18 through 20.)
Line 20 has an interesting detail. This line is where Anubis maps the user with the mail address me@daniel.stefan.haischt.name to the local user haischt. The TRANSLATION section takes care of mapping mail addresses to local names (see the last four lines of Listing 2.) This TRANSLATION section of the configuration file can also map all the addresses in a domain to a shared name (translate Domain into User.)
Dixie mode is useful, as it leverages current standards such as SMTP-AUTH, and it gives mail users without Unix accounts access to the service. This said, it is also true that the current implementation of the Anubis Dixie mode has a few annoying weaknesses:
Passwords in the database are stored in the clear. The database field for the user's Anubis configuration file points to an existing file. It would be more practical to store parameters in a BLOB field or in a separate table.
As Anubis has the user's credentials, targeted message processing is now possible; for example, you can configure Anubis to sign or encrypt email. To allow this to happen, users need to add entries to the RULE section of their ~/.anubisrc files. You'll find that it is quite simple to add attributes to the email header using the add header [name] value notation:
add header[X-Processed-By] "GNU Anubis"
Anubis also understands conditional execution. If an email has a with-signature header that contains an arbitrary value (regular expression .*, see the "Regular Expression Formats" box), the following lines are all it takes to remove the header and add a text-based signature at the end of the message:
if header [with-signature] :re ".*"
    remove [with-signature]
    signature-file-append yes
signature-file-append yes adds a separator - , followed by the content of the ~/.signature file, and body-append adds the content of an arbitrary file at the end of a message, whereas body-clear-append removes the original message text before doing so.
| Regular Expression Formats |
|
Anubis understands a few variants of regular expressions. The configuration uses the following tags to identify regular expressions:
A statement can contain a sequence of tags: :perl:scase means case-sensitive PCRE expressions. The regex :perl :scase statement sets this variant as a permanent default. |
Some mail clients make it difficult for users to add headers. Anubis simplifies this process for users by parsing the subject line:
if header [Subject] "^ *\\[sig\\](.*)"
    remove [Subject]
    add [Subject] "\1"
    signature-file-append yes
This if instruction checks if the subject line starts with [sig] (Posix extended syntax, as not precisely specified). It then removes the subject line entirely and adds a new line that reflects the part of the original subject that followed [sig]. To do this, the \1 references the string in round brackets passed by the regular expression.
The subject line is so useful for commands that Anubis has its own syntax to handle this: Trigger. Users can trigger events via mail by appending the command at the end of the subject line following two at characters (@), such as anystring@@sign. The following trigger takes care of everything else:
trigger "sign"
 gpg-sign me@daniel.stefan.haischt.name
done
The gpg-sign command signs the email body with the specified key ID. To allow this to happen, the user's GPG keyring must be available in the ~/.gnupg directory, and the user's ~/.anubisrc config file must contain the GPG password (gpg-passphrase "mypassword"). GPG needs the user's key ID for encrypting. An extended trigger that parses additional subject line data can handle this:
trigger :extended "^encrypt:(.*)"
   gpg-encrypt "\1"
   add [X-GPG-Comment] "Encrypted for \1"
done
The subject line contains the encrypt trigger followed by the receiver's key ID: Hello John Doe!@@encrypt:Receiver-Key.
More complex tasks need a more powerful programing language, and Anubis gives you this in the form of the Guile scripting language (a dialect of Scheme). You can also use external programs for mail manipulation. In combination with the integrated commands, GNU Anubis thus supports extremely flexible techniques for processing email headers and content. This software's true strength is its ability to perform any kind of mail manipulation you can imagine. At the same time, integrated PGP/GnuPG support saves you a lot of configuration work.
User authentication still has much room for improvement. (Pixie mode applies the insecure Ident approach, and Dixie mode stores cleartext passwords in the database.) PGP keyrings and user-specific configurations are stored in the filesystem rather than in the database. And add to this the lack of LDAP and PGP/Mime support, along with the fact that Anubis is not yet capable of decrypting incoming messages. We'll hope that ongoing development work will continue to improve this wily god of outgoing mail.
| INFO |
|
[1] GNU Anubis: http://www.gnu.org/software/anubis/
[2] GNU Privacy Guard: http://www.gnupg.org [3] GPG Relay: http://sites.inka.de/tesla/gpgrelay.html [4] Kuvert: http://www.snafu.priv.at/mystuff/kuvert/ [5] PGP Universal: http://www.pgp.com/products/universal/ [6] GPG Shell (Windows): http://www.jumaros.de/rsoft/ [7] Python Ident Daemon: http://www.alcyone.com/software/fauxident/ [8] Windows Identd: http://identd.dyndns.org/identd/ [9] Enigmail plugin: http://enigmail.mozdev.org [10] MSMTP: http://msmtp.sourceforge.net [11] ESMTP: http://esmtp.sourceforge.net |
| THE AUTHOR |
|
Daniel S. Haischt has a degree in Business Information Systems/Technology, and is now studying Business Information Management in Reutlingen. On his leisure time, Daniel works for a number of open source projects, and enjoys tackling difficult server configurations. |