
By Nico Golde
WIMP ("Windows, Icons, Menus, Pointing device") is a common method of interacting with GUIs. It involves controlling menus, windows, and colorful buttons by pointing and clicking. According to Anselm Garbe, the author of Wmii (Window Manager Improved 2), this method is inefficient and obsolete.
Wmii (Figure 1) is a complete rework of the Wmi window manager. Wmii supports keyboard controls throughout, just like its predecessor Wmi. This extensive system of keyboard controls means that there is no need for a mouse, although you can still use one if you like.

Keyboard-based window managers have been around for many years, but Wmii combines the attributes of venerable and popular developments such as Ratpoison [1], Ion [2], and Larswm [3]. For example, it uses multiple layouts and tabbing. But one thing is new: Wmii can be controlled via a Socket-based, virtual file system. The file manager also has a modular structure. Wmibar provides the status bar, and Wmimenu the menu. Wmikeys handles keyboard shortcuts, Wmifs is responsible for the the file system, and Wmir manages file system manipulation.
You need the wmii-2.tar.bz2 package for the install; the package is available from the download area of the Wmii project homepage [4]. Users can add to the Wiki-based site, which also offers an assortment of packages for Debian, Gentoo, or Arch Linux. Give the tar xvzf wmii-2.tar.gz command to unpack the package. This step creates a wmii-2 subdirectory with the config.mk configuration file, which you can modify to reflect your environment. Wmii deliberately does without a configure script, but the defaults are fine in most cases.
Type make, and then make install to build and install the program. The only requirements are the GCC C compiler and the X header files. (Debian users need the libx11-dev package, which Suse 9.3 calls xorg-x11-devel.) To launch the window manager, Debian users can create a .xsession file in their home directories and enter the following lines:
#!/bin/sh
exec /usr/local/bin/wmii
To add Wmii to the list in your standard login manager on Suse 9.3, create a wmii.desktop file in /usr/share/xsessions, and add the following lines to that file:
[Desktop Entry]
Encoding=UTF-8
Type=XSession
Exec=wmii
TryExec=wmiiwm
Name=wmii
Comment=window manager improved 2
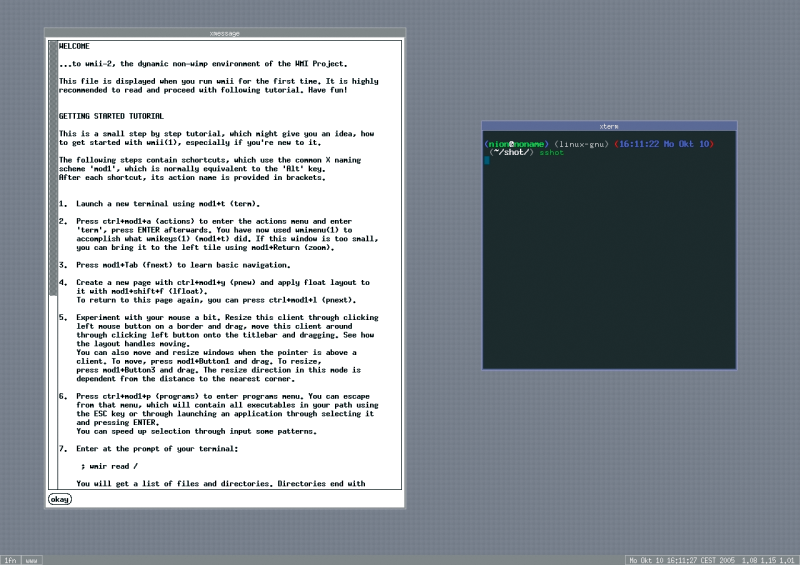
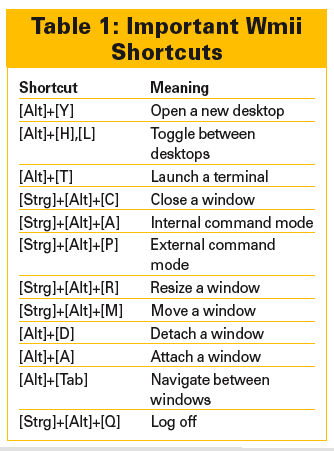
When you launch Wmii for the first time, a window with a tutorial appears, and it makes sense to read the tutorial carefully before you start pressing keys (Figure 2). [Alt]+[T] pops up a terminal window, and [Ctrl]+[Alt]+[Y] creates new desktops ("pages"); you can toggle between desktops by pressing [Alt]+[H]. [Alt]+[Shift]+[P] takes you to pager mode, which gives you an overview of the active desktops and lets you directly change to a desktop. To close a window, just press [Ctrl]+[Alt]+[C].
The default layout is called "tiled" (see the "Layouts" box), and as you would expect, the windows automatically share the space available on the desktop. Pressing [Alt]+[Enter] moves the selected window from a small frame to a large frame - this is what Wmii refers to as "zooming." If you need a temporary full screen view of a window, you can press [Alt]+[M] to maximize the page. Iconizing works the same way. [Alt]+[Tab] shifts the current focus to the next window.
The status bar populates the bottom of the screen. It displays the number of the current desktop, followed by a letter as an abbreviation of the layout, and another letter for the current shortcut mode (n for "normal," r for "resize," m for "move," and b for "bare.") Adjacent to this is a www button that launches a browser when clicked. The button is freely configurable and also has a neat trick: right clicking www opens a Google search based on a selection in any program. If you click with the middle mouse button, Wmii interprets the selected text as a URL. The date and system load are displayed on the right of the status bar. This is also where program output is displayed, and this allows you to view the results of any scripts you happen to write.
Pressing [Ctrl]+[Alt]+[P] displays a command line in the status bar, letting you call external programs, and providing command completion. Pressing [Ctrl]+[Alt]+[A] gives you a similar function for internal window manager control commands. Directional commands in Wmii use the [H],[J],[K] and [L] keys (just like in Vi), where [H] stands for right, [J] for down, [K] for up, and [L] for left.
You can use the keyboard to expand windows. To do so, press [Ctrl]+[Alt] +[R] and press one of the directional keys. To quit expand mode, press [Esc] in good old Vi style. As you will have gathered by now, Wmii has a number of modes that resemble the Vi Editor. There is also a mode for moving windows, which is entered by pressing [Ctrl]+[Alt]+[M]. Again, use the directional keys to say which direction to move the window.
| Layouts |
|
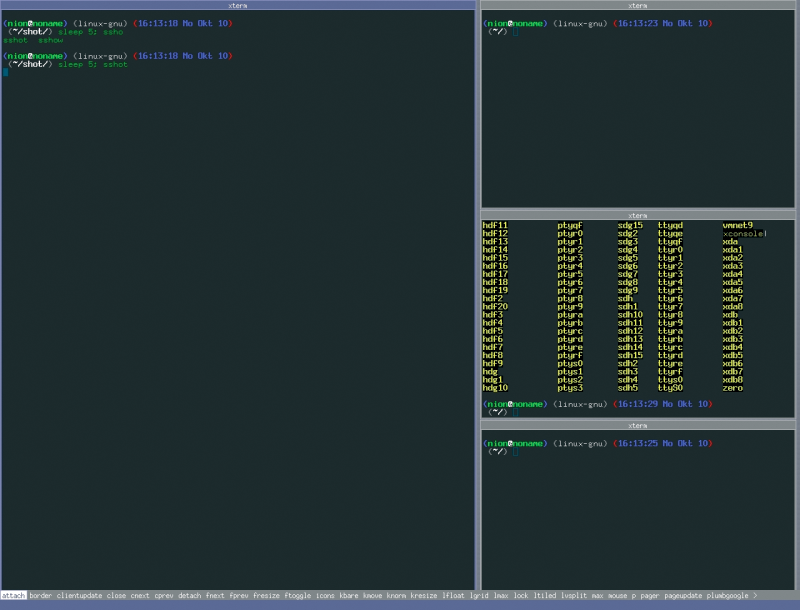
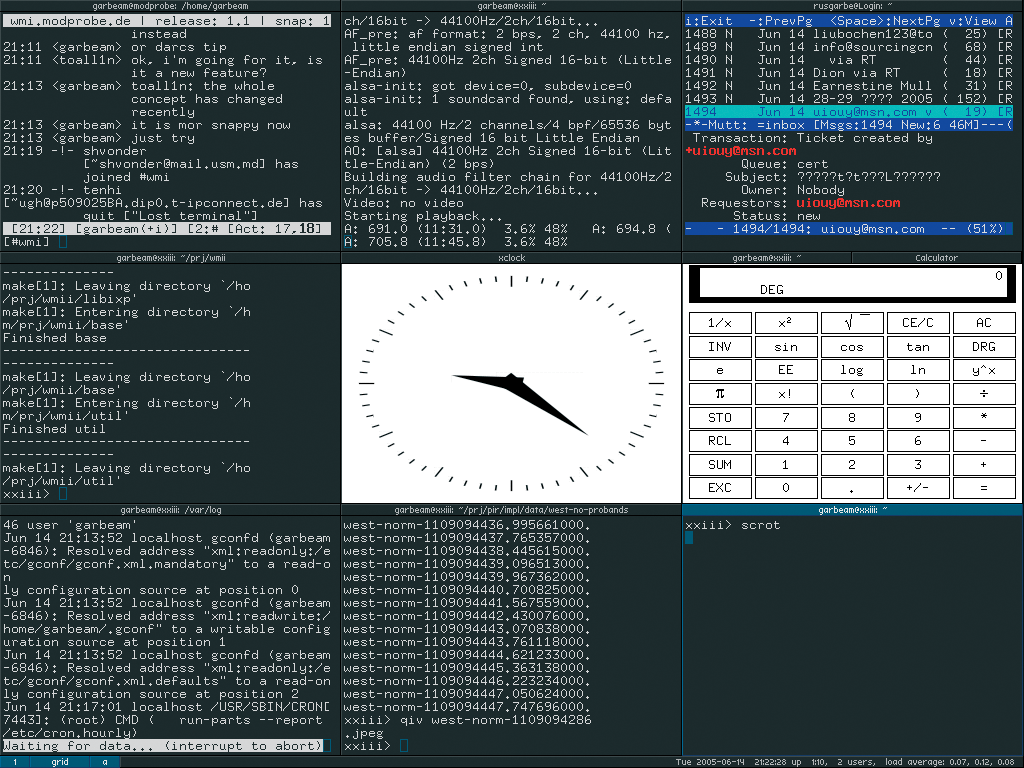
Wmii offers a variety of screen layouts, which apply to just one virtual desktop. Tiled Layout The "tiled" layout was originally implemented in Larswm. It gives one window a large proportion of the space on the desktop, and the other windows share the remaining space (Figure 3). You can enable this layout by pressing [Alt]+[Shift]+[T]. Grid Layout Pressing [Alt]+[Shift]+[G] gives you the "grid" layout. It assigns equal amounts of space to each window, and arranges the windows in a grid (Figure 4). Maximized Layout Press [Alt]+[Shift]+[M] to maximize all the windows on the desktop; you can then press [Alt]+[Tab] to navigate between windows. Floating Layout The floating layout is the one favored by most window managers and desktop environments. It allows applications to choose their own window size. This is the layout you need for image manipulation programs such as Gimp. |
Wmii has a virtual filesystem (VFS), which allows you to control the window manager via commands and scripts, just like Procfs in Linux. In fact, the keyboard shortcuts just implement commands that use VFS under the hood.
To read from, and write to, the VFS, you need wmir, which is part of the distribution. The read and write command line parameters read and write, and create allows you to define new entries, such as files and directories. Thus, wmir read / will show you the root directory of the file system. VFS takes some adjustment but is a pleasure to use after you learn it. To apply a different color to a window frame, type the following:
wmir write /wm/page/sel/mode/sel/sel-style/bg-color '#FF00FF'
The following command maximizes the current window:
wmir write /wm/page/sel/ctl 'select zoomed'
Tabbing displays multiple (application) windows in a single frame and lets you navigate between tabs. To use tabbing, you first need to unlock the current frame to allow it to hold multiple windows. You can press [Alt]+[U] to do this.
If you then launch a terminal, by pressing [Alt]+[T], the terminal window will appear in the same frame - the title bar of the frame is divided to reflect this. To navigate between the two windows, press [Alt]+[Shift]+[Tab] instead of the normal keyboard shortcut. As tabbing is a mode like any other, this function will work in combination with any layout. Lock the frame again by pressing [Alt]+[Shift]+[U] to avoid more new windows opening within the frame.
The default installation puts the configuration files in /usr/local/etc/wmii. You can start by copying the whole directory to ~/.wmii. This gives you the files bar, keys, menu, rc, rc.conf, status.sh and wm, and a directory titled action. The files are normal shell scripts. The bar script takes care of the status bar; keys handles keyboard shortcuts. The menu script controls the internal and external command menu, and wm the window manager itself. The status.sh script creates the status bar output. The most important file for us right now is rc.conf (Listing 1): you can use this file to modify settings such as the wallpaper and window colors.
| Listing 1: rc.conf |
01 TAB_HEIGHT=16 02 BAR_HEIGHT=16 03 BORDER_WIDTH=3 04 SELECTED_BG_COLOR="#666699" 05 SELECTED_TEXT_SIZE=10 06 SELECTED_TEXT_ALIGN=center 07 SELECTED_TEXT_FONT="fixed" 08 SELECTED_FG_COLOR="#FFFFFF" 09 SELECTED_BORDER_COLOR="#9999CC" 10 NORMAL_BG_COLOR="#888888" 11 NORMAL_TEXT_ALIGN=center 12 NORMAL_TEXT_FONT="fixed" 13 NORMAL_TEXT_SIZE=10 14 NORMAL_FG_COLOR="#FFFFFF" 15 NORMAL_BORDER_COLOR="#BBBBBB" 16 WALLPAPER="xsetroot -mod 2 2 -bg #666699 -fg #888888" 17 DEFAULT_LAYOUT=tiled # tiled, max, grid or vsplit 18 TILE_WIDTH=60 19 MODKEY=mod1 # modifier key used by the default key bindings 20 NORTHKEY=k 21 SOUTHKEY=j 22 WESTKEY=h 23 EASTKEY=l |
Lines 01 through 18 in Listing 1 modify the appearance of the window manager by setting shell variables, which are referenced by the shell scripts referred to earlier. For example, to set the wallpaper, just change the value of the WALLPAPER variable in line 16:
WALLPAPER="Esetroot -scale -center /home/test/.wmii/wallpaper.png"
You can also use these files to modify the keyboard shortcuts for the directional keys. MODKEY (Line 19) defines the modifier key that initiates a command. The configuration in Listing 1 uses mod1, which maps to the [Alt] key. If you prefer to use a different keyboard combination, you will need to modify the keys file.
To make temporary changes, just run the wmir command; to make your changes permanent, add the changes to your configuration files. To apply changes on the fly, you can simply reload the individual components rather than relaunching the window manager. The rc ("run command") file, a simple init script that calls the typical command line parameters start, stop, and restart, helps you relaunch Wmii. Thus, typing the command ./rc restart will reinitialize Wmii on the fly.
The action directory has a shell script for each option. Whenever you press [Ctrl]+[Alt]+[A] to run a command from the action menu, or press a keyboard combination, what you are actually doing is launching a script from the action directory.
The keys file, for example, tells you which script you are actually launching: pressing [Alt]+[T] runs the term script. If you prefer to use aterm rather than xterm, you can simply modify the term script to reflect your choice. To modify the keyboard shortcut, simply modify the keys file. The content is fairly self-explanatory, although the changes do require some patience. The scripts mainly use the wmir program, which lets you modify the window manager to suit your needs. For example, the following command:
wmir write /bar/default/70_status/label/text 'WMII rocks!'
will output the string WMII rocks! in the status bar until you update the status.sh script. This useful feature gives users the ability to display the output of almost any command line program in the status bar.
In addition to the normal documentation, wmirefcard opens a PDF document with the most important keyboard shortcuts. The Wmii project homepage [4] has a whole bunch of useful information, including a Wmii intro for beginners [5] by Steffen Liebergeld. (The intro is now available in English, German, and Spanish.) As the site is Wiki-based, new items are added daily, and you will probably discover various Wmii themes and additional programs written by Wmii users. There is also an active #wmii channel on the irc.oftc.net IRC server.
Wmii-3 is due for release in November 2005 and looks likely to introduce a few interesting changes. Until the new release is forthcoming, the project will be releasing snapshots of the software at regular intervals. The most important new features are 9P2000compatibility [6] for the virtual file system and a dramatically simplified configuration thanks to a new shell (9rc).
Wmii-3 also comes with a new "column" layout, based on Rob Pikes Acme programming environment [8] for Plan 9, which replaces and integrates previous layouts, such as "tiled," "grid," and "maximized."
Plan 9 is a Unix-style operating system developed by Bell Labs. The Plan 9 OS was released under a free license in 2002. It treats all resources (such as computers, users, devices etc.) as files, and uses a standard protocol, 9P, to address them. The proc file system in Linux was inspired by this approach and uses something similar.
9P2000 is a revised and vastly improved version of the Plan 9 protocol, 9P, which was released in 2002 with Plan 9 Fourth Edition. 9P2000 compatibility supports mounting the Wmii file system on the existing file system as of kernel 2.6.14, and allows users to configure standard programs such as cp, mv, echo, or vi via Wmii. This, in turn, removes the need for the wmir tool in Linux (although wmir will be retained to avoid breaking downward compatibility to BSD systems and other flavors of Unix). Kernel 2.6.14 is the first to support the 9P protocol.
The dramatic configuration simplification draws on a Unix port of the powerful Plan 9 tools, the Rc shell [8] in particular, and additional tools for shell scripts, which the Wmi project bundles to provide 9rc. The advantage of the new Plan 9 Rc shell is that it is statically linked, and it runs shell scripts far faster than Bash.
| INFO |
|
[1] Ratpoison: http://www.nongnu.org/ratpoison
[2] Ion: http://modeemi.cs.tut.fi/~tuomov/ion [3] Larswm: http://home.earthlink.net/~lab1701/larswm [4] Official Wmii homepage: http://wmii.de [5] Introduction to Wmii: http://wmii.de/index.php/WMII/BeginnersGuide [6] Introduction to 9P: http://www.cs.bell-labs.com/sys/man/5/INDEX.html [7] Rc shell: http://www.star.le.ac.uk/~tjg/rc/misc/td [8] Acme programming environment: http://www.cs.bell-labs.com/sys/doc/acme/acme.ps |
| THE AUTHOR |
|
Nico Golde is 19 years old and a student of Computer Science at the Technical University in Berlin. He is a member of various free software projects, including the Debian project - and mainly interested in programming and security. |