
By Kristian Kißling
You have a new hard disk, but it still takes ages to copy files? And you get jerky pictures when you play a movie via your DVD drive? How can this be?
Many hard disks and other drives - especially if they are a bit older - do not perform as they might. The operating system and the BIOS do not leverage the true potential of the mass storage device's features. Interestingly, enabling or optimizing DMA - an important function - can enormously improve the data throughput for hard disks, CD-ROM, and DVD drives.
DMA is the abbreviation for Direct Memory Access. This technique routes data from a drive or disk via a DMA channel directly to main memory. The DMA controller on your computer's main board handles the data transfer operation. Of course, this assumes your computer's BIOS and drives all support DMA. DMA improves the data throughput; that is, more data can be transferred in the same period of time. The technique also reduces the CPU workload, and this explains why movies run more smoothly, data copying is faster, and fewer problems occur when burning DVDs.
Current Linux distributions typically detect and enable DMA during the install. Suse Linux versions 9.3 and 10.0 both harness the full power of mass storage media, whereas other distributions apply more conservative values. And there may be good reasons for this, as these features can cause complications. Enabling DMA may cause your computer to crash regularly; it may fail to detect drives, or the system may freeze during normal operations, or even before you complete the install.
These seemingly arbitrary symptoms might be caused by the cables, that connect your hard disks and other drives to the motherboard. Cables should be a maximum of 45 cm long, and not twisted - this is very rarely the case. More recent hardware will handle these issues in a more robust way, but there are still any number of warnings on the hdparm man pages (man hdparm). Look for the words "Dangerous" or "Massive filesystem corruption" and make sure you back up your data before you start to experiment, especially if you are using an older kernel or older hardware. As an alternative, mount your disks read-only while you experiment.
The hdparm [1] program, which you can install via your distribution's package manager, is a command-line program that requires root privileges. The tool gives you status information for mass storage media functions and can enable or disable them. Typing mount as root displays the names of your hard disks and other drives. The command lists the mounted devices and matching device files. Our example uses a "Samsung-SP1203N" hard disk as /dev/hdc.
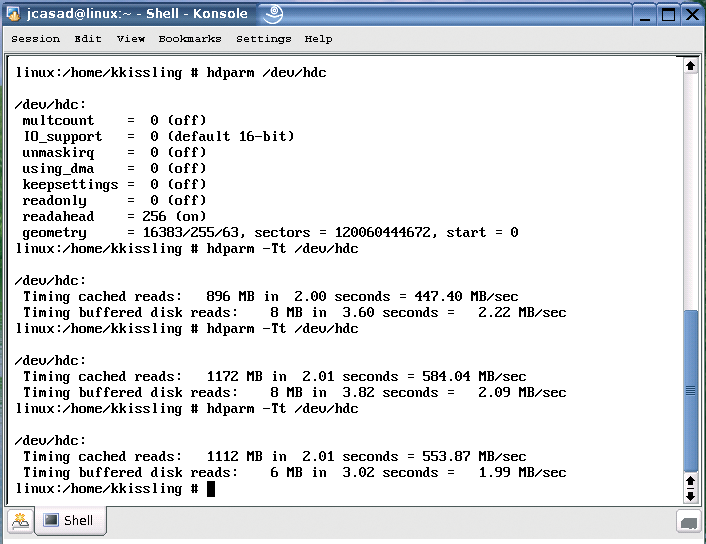
To harness the full power of a mass storage device, you first need to find out what features are already enabled. To do so, give the hdparm /dev/hdc command. This should give you output, as shown in Figure 1. 0 (off) indicates that the current feature is disabled. You can then proceed to enable hard disk features one by one. However, in our lab, the only genuine data transfer speed improvements were achieved by enabling DMA. Enabling all other features had no noticeable effect. However, this need not be true of older disks and drives, or of your specific distribution: just experiment!
DMA has been around since about 1989 and was a part of the ATA specification [2]. Whereas disks and drives that used DMA single 2 mode achieved transfer rates of 8.3Mbps, so-called Ultra DMA (UDMA) drives achieved about 16.7Mbps in UDMA0 mode. Today's UDMA standards typically specify the data transfer rate to indicate the version. The current UDMA133 standard thus achieves a theoretical data transfer rate of 133 Mbps. In practical applications, the actual rate is typically far below the theoretical value.
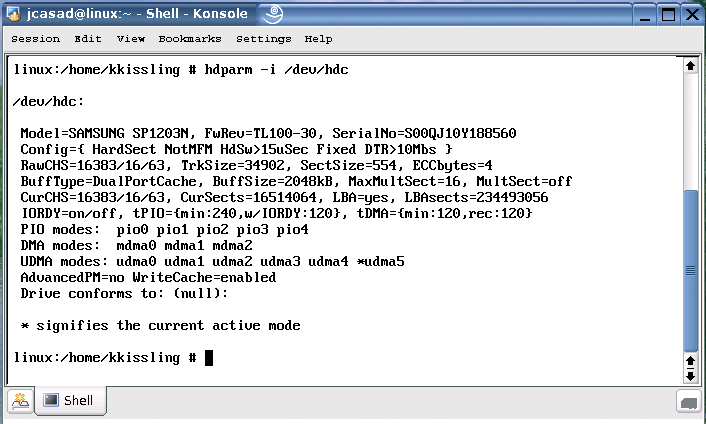
Before you enable DMA, first check which DMA modes your drive supports. The output from hdparm -i /dev/hdc gives you the information you need (Figure 2). The line starts with UDMA modes, and it lists the preferred mode on the right.
Before you enable one of the options, run a simple performance test that gives you a data transfer rate value for comparison's sake. Typing hdparm -Tt /dev/hdc gives you two results - as you can see in Figure 1. The top value measures the data throughput for a read operation against the Linux Buffer Cache; the more decisive value below this tells you the transfer rate when reading from a hard disk or drive. The best time to run this test is when your computer is not performing any other task, and make sure you repeat the test a couple of times to ascertain a reliable value.
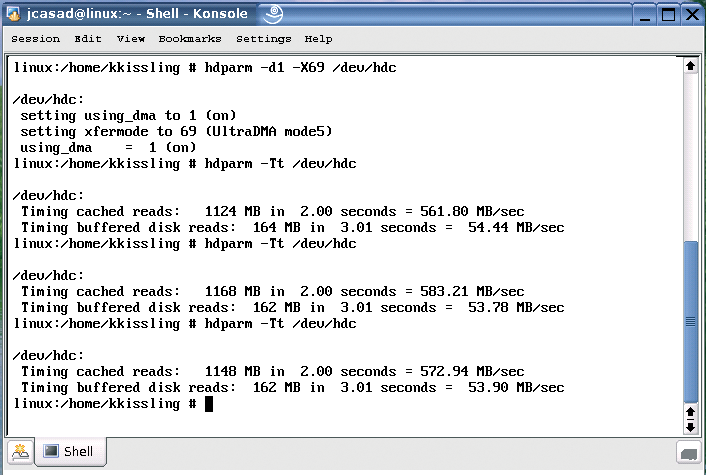
When none of the functions is enabled, the hard disk achieves a data rate of 1.99 Mbps - this is just 2 percent of the theoretical limit of 100 Mbps. Time for action! Type hdparm -d1 -X69 /dev/hdc to enable DMA for your hard disk, making sure to replace hdc with the appropriate device file name for your disk. The -d1 option enables DMA and selects the best value available. But to make quite sure, you might prefer to set the mode manually by specifying the -X69 option. The number is simple math: add the best possible UDMA mode to the number 64: UDMA5 + 64 gives you 69. You need to perform similar calculations to set up DMA and PIO (see man hdparm for more details). Now rerun the performance test (Figure 3), and prepare to be amazed. Thanks to DMA, the data transfer rate is now 53.90MBps - an enormous gain.
To check if the change is stable, just play some music, or a movie from DVD, or copy a large file back and forth between disks. If the computer crashes, opt for a slower DMA mode, or disable the function - as explained further down.
DMA can help you boost the data throughput, but the other features don't do a lot for disk performance. The performance boosts the manual boasts of relate to older hardware. The -m16 option enables "Multiple sector mode." This tells the system to read 16 sectors at the same time, instead of just one. The hdparm -i /dev/hdc command (Figure 2) tells you the maximum number of sectors; you will find the value next to the MaxMultSect entry. When we enabled this option, data throughput increased to 54.74MBps on our lab machine, a comparatively small gain. A quick glance at the hdparm man pages also indicated that the option can cause issues with some hard disks - for example, Western Digital recommends keeping this value down to 4-8 sectors.
The -c3 option lets you enable (E)IDE 32 bit input/output support, which controls the data flow between the PCI bus and the controller and accelerates requests to mass storage media. This leaves -u1, which lets you set the so-called "unmask" flag for interrupts, allowing the system to take care of other tasks while it is waiting for data from the hard disk.
To set the right parameters automatically at boot time, add the hdparm command to one of the Linux start scripts. Mandriva users need to open the /etc/rc.d/rc.local file with root privileges; the file is titled /etc/rcS.d/bootmisc.sh for Debian users. Then add the complete command to the file - in our example, this is hdparm -d1 -X69 -u1 -m16 -c3 -k1 /dev/hdc. Thanks to the -k1 option, the settings remain in place despite a soft reset of the device for error correction. Suse Linux calls this file boot.local, but you might prefer to enable DMA in Yast. To do so, launch Yast, go to the Hardware tab, and select the IDE DMA Mode entry. This option lists the DMA information for the attached mass storage devices. A drop-down menu in the lower part of the screen lets you select the DMA mode. If your system becomes unstable, try a different DMA mode - for instance, -X67 instead of -X69.
Suse users need to disable DMA twice. Both the BIOS and the operating system enable DMA. Start by disabling DMA in the boot manager. For Suse - and also Debian - open the menu.lst file in /boot/grub/ with root privileges. Look for the section that starts with title SUSE LINUX or title Debian GNU/Linux. At the end of the line that starts with kernel, add ide=nodma to tell the BIOS not to use DMA mode when you reboot. For Mandriva 2006, add ide=nodma to your /etc/lilo.conf file, and in the label="linux" section, add this to the line starting with append.
If your computer crashes when you enable DMA, you can boot a recent Knoppix system to rescue your installation. Become root and give the command mount -t auto /dev/hdc /harddisk to mount your disk in the harddisk directory. You need to create this directory below the Knoppix root directory. Then enter cd /harddisk/etc/rc.d to change to the folder with the start scripts.
Type mv boot.idedma boot.idedma.old to remove the file that enables DMA from the boot process. The next time you boot, the operating system will ignore DMA. You can now become root again, change the name of the file back - mv boot.idedma.old boot.idedma - and use Yast to disable DMA. If you added a manual hdparm command to your start scripts, simply comment out the command in the script.
| INFO |
|
[1] The hdparm page at Sourceforge: http://sourceforge.net/projects/hdparm/
[2] Overview of the ATA standard: http://en.wikipedia.org/wiki/Advanced_Technology_Attachment |