
By Michael Schilli
It's not so long ago that users had to write their own device drivers to add hardware. But with the standardization of USB, and with fully-functional hot-plugging support in kernel 2.6, things have become far easier.
The temperature sensor used in this article, a Dallas Semiconductor DS18S20 ([3]), can be controlled via the one-wire bus, which is driven by a USB dongle attached to the computer. The free owfs control software at [2] can request data via a Perl interface. Instead of one-wire, the bus should really be called two-wire, as two thin copper wires (typically in a single sheathing) connect the sensor to the USB dongle (see Figure 1). At the other end there is a western connector (RJ11), which plugs into the USB dongle.

The DS18S20 temperature sensor is available from most electronics stores for about US$5 (for example from digikey.com). It can handle a temperature range between -55°C and +125°C. The DS9490R one-wire USB dongle, to which multiple sensors can be connected using western plugs, costs about US$15 to US$25 (at hobby-boards.com for example).
The owfs project ([2]) at Sourceforge offers a number of interfaces for reading temperature values from the sensors. One uses the FUSE user filesystem and maps the sensor data on the filesystem, much like the /proc hierarchy in Linux. Figure 2 shows what kind of data gets transferred from a dongle with two attached sensors. You can read the temperature values and also the unique sensor IDs, type designations, and other things. The sensor housing contains a micro-controller with surprising capabilities.
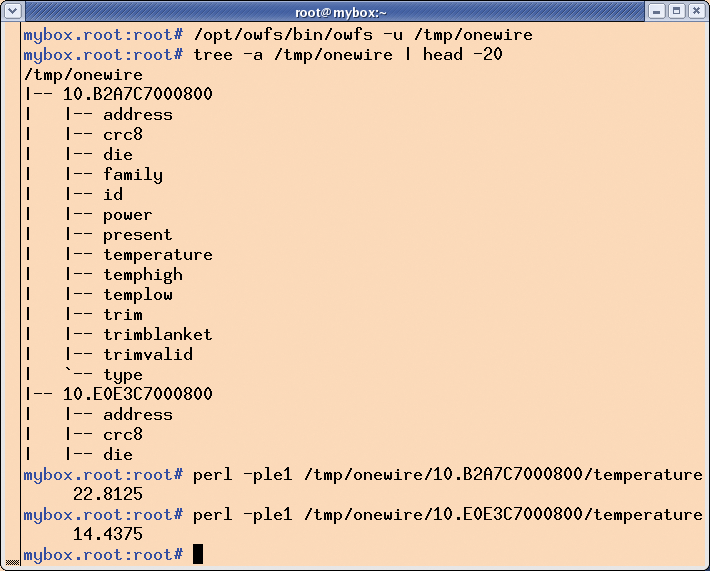
Measured values can be read simply by running cat against the FUSE-controlled files, although I used perl -ple1 to add a newline to the output in Figure 2. Below the 10.B2A7C7000800/temperature entry, you can see the value measured by the first sensor, 22.8125 degrees Celsius. The second sensor with the ID of 10.E0E3C7000800, which I left outside overnight in San Francisco, returns a cooler value of 14.4375 degrees (it never gets really cold in California). The type entry gives us the sensor type designation ("DS18S20"); this allows you to query the type of sensor connected to the one-wire bus via the interface. The vendor, Dallas, has all kinds of equipment on sale, including switches, and voltage and current meters, which can all be attached to the same one-wire bus.
The USB dongle has a western socket (RJ11). To connect the three-legged sensors to the socket, I first had to solder a long wire with a western plug onto the temperature sensor pins.
The easiest way of doing this is to buy a normal phone extension lead with plugs at both ends, and just cut off one end with wire cutters. Then strip the insulation and you should see either two or four thin wires.
We will just be using the red and green wires, so we can just cut the remaining ones. The temperature sensor has three pins, one of which is not needed - this is the pin on the right (when the flat side of the sensor case is facing towards you with the pins pointing down). This pin is used to provide a power supply to the sensor, but the sensor is quite happy to use the current flowing through the data line ([8]). You can use wire cutters to remove the superfluous pin. Then go on to prepare the telephone wire by adding heat shrinkable tubing, as shown in Figure 4. We will be heating this tubing later to shrink it, making the appearance of the sensors easier to live with.
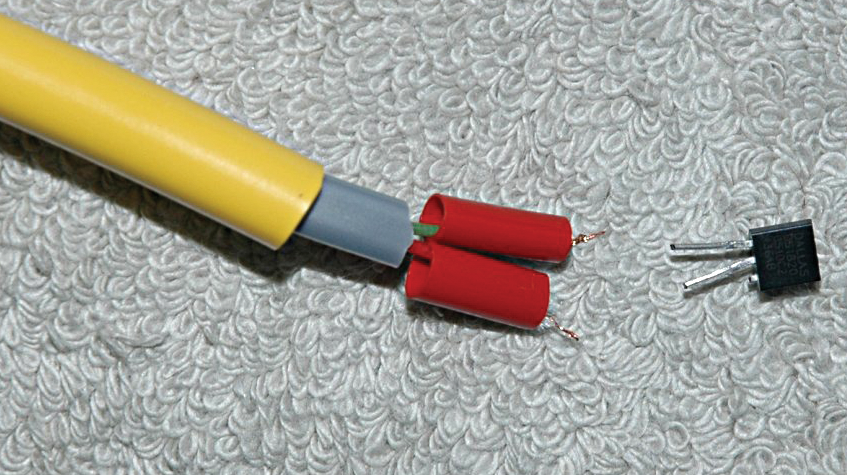
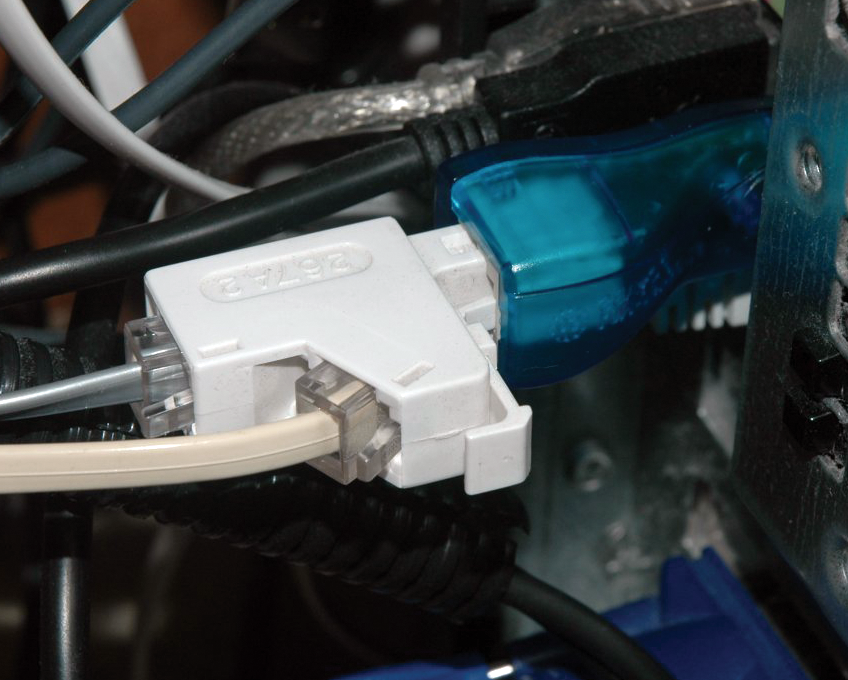
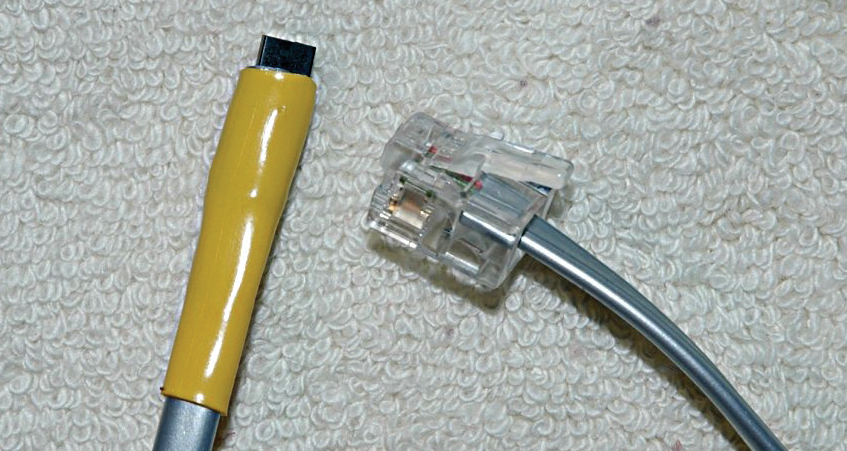
Now solder the green inner wire of the telephone lead onto the left pin of the DS18S20, and solder the red wire onto the pin in the center. Hold your soldering iron near the two red inner heat shrinkable tubes to shrink them over the stripped wire ends. If the tubing does not shrink as much as you would like, you can always add some insulating tape. This is just to prevent the bare wires touching and causing a short circuit. Then adjust the position of the thicker (yellow) heat shrinkable tubing until you can just see the tip of the sensor, and follow the same procedure to heat-shrink the tubing. Figure 5 shows you the finished sensor; you can either plug the telephone connector directly into the dongle, or you can use an extension, if you have more than one sensor (Figure 3).
For test purposes, I will now leave one sensor in the room, while routing the other through the window outdoors. The owfs project provides a generic Perl interface in the form of the OW module. The module in Listing 1 customizes the module to match the type of temperature sensor we will be using.
| Listing 1: OWTemp.pm |
001 #############################
002 package OWTemp;
003 # Mike Schilli, 2005
004 # (m@perlmeister.com)
005 #############################
006
007 use Log::Log4perl qw(:easy);
008 use OW;
009
010 #############################
011 sub new {
012 #############################
013  my ($class, @options) = @_;
014
015  my $self =
016    { type => "DS18S20", };
017
018  bless $self, $class;
019
020  OW::init('u');
021
022  $self->{devices} =
023    [ $self->discover() ];
024
025  return $self;
026 }
027
028 #############################
029 sub temperatures {
030 #############################
031  my ($self) = @_;
032
033  my @temperatures = ();
034
035  for my $dev (
036   @{ $self->{devices} }) {
037
038   my ($val) = owread(
039    "$dev/temperature");
040   $val =~ s/\s//g;
041   push @temperatures,
042     [ $dev, $val ];
043  }
044
045  return @temperatures;
046 }
047
048 #############################
049 sub DESTROY {
050 #############################
051  OW::finish();
052 }
053
054 #############################
055 sub discover {
056 #############################
057  my ($self) = @_;
058
059  my @found = ();
060
061  for my $entry (owread("")) {
062   DEBUG
063   "Found top entry '$entry'";
064   next if $entry !~ /^\d/;
065
066   my ($type) =
067     owread("$entry/type");
068
069   DEBUG "Found type $type";
070   next
071     if defined $type
072     and $type ne
073     $self->{type};
074   push @found, $entry;
075  }
076  return @found;
077 }
078
079 #############################
080 sub owread {
081 #############################
082  my ($entry) = @_;
083
084  my @found = ();
085
086  my $result = OW::get($entry)
087    or LOGDIE
088    "Failed to read $entry";
089
090  DEBUG
091    "owread result='$result'";
092
093  for my $entry (
094    split /,/, $result) {
095   $entry =~ s#/$##;
096   push @found, $entry;
097  }
098
099  return @found;
100 }
101
102 1;
|
At first, we have no way of knowing how many devices are attached to the bus, which of them are temperature sensors, and what their unique IDs are. The discover method, which is called by the new constructor, finds this out for us by opening the type entries for all the devices attached to the bus and checking for a DS18S20. OW::init(`u') then tells the module to contact the USB dongle, and the following call to the temperatures() method returns pairs of sensor IDs and measured temperature values. The destructor in line 49 calls OW::finish() to close the connection to the USB dongle.
The script in Listing 2 shows a typical sensor application. It uses the RRDTool::OO module from CPAN to provide an object-oriented interface to Tobi Oetiker's rrdtool.
| Listing 2: rrdmon |
01 #!/usr/bin/perl -w
02 #############################
03 # rrdmon -Temp sensor monitor
04 # Mike Schilli, 2005
05 # (m@perlmeister.com)
06 #############################
07 use strict;
08 use Getopt::Std;
09 use Log::Log4perl qw(:easy);
10 use Sysadm::Install qw(:all);
11 use RRDTool::OO;
12 use OWTemp;
13
14 Log::Log4perl->easy_init(
15                      $DEBUG);
16
17 my $RRDDB =
18   "/tmp/temperature.rrd";
19 my $GRAPH =
20   "/tmp/temperature.png";
21
22 my %sensors = (
23  "10.E0E3C7000800" =>
24    "Outside",
25  "10.B2A7C7000800" =>
26    "Inside",
27 );
28
29 getopts("g", \my %o);
30
31 # Constructor
32 my $rrd =
33   RRDTool::OO->new(
34  file => $RRDDB);
35
36 # Create a round-robin DB
37 $rrd->create(
38  step        => 300,
39  data_source => {
40   name => "Outside",
41   type => "GAUGE"
42  },
43  data_source => {
44   name => "Inside",
45   type => "GAUGE"
46  },
47  archive => { rows => 5000 }
48   )
49   unless -f $RRDDB;
50
51 if ($o{g}) {
52
53  # Draw graph in a PNG image
54  $rrd->graph(
55   start => time() - 24 *
56     3600 * 3,
57   image          => $GRAPH,
58   vertical_label =>
59     'Temperatures',
60   draw => {
61    color  => '00FF00',
62    type   => "line",
63    dsname => 'Outside',
64    legend => 'Outside',
65   },
66   draw => {
67    type   => "line",
68    color  => 'FF0000',
69    dsname => 'Inside',
70    legend => 'Inside',
71   },
72   width       => 300,
73   height      => 75,
74   lower_limit => 0,
75  );
76
77 } else {
78
79  my $ow = OWTemp->new();
80
81  my %values = ();
82
83  for my $station (
84   $ow->temperatures())
85  {
86   my ($dev, $temp) =
87     @$station;
88   $values{ $sensors{$dev} } =
89     $temp;
90  }
91
92  $rrd->update(
93   time   => time(),
94   values => \%values
95  );
96 }
|
Without specifying any options, this script reads all the sensors and stores the current temperature values in a round-robin database. If the database does not exist, the create method in line 37 of the script creates the database with two data sources, "Inside" and "Outside," for the temperature inside the room and the temperature outside the window. Lines 23 and 25 map the sensor IDs to these intuitive names. The IDs are globally unique; any sensors you buy will have different IDs.
The step parameter in Line 38 sets the refresh interval to 300, that is, 300 seconds or 5 minutes; the database stores 5000 values before it starts to overwrite the older values. Reading and refreshing starts in Line 83 using the methods provided by OWTemp, and update() from RRDTool::OO.
Lines 23 and 25 map the non-intuitive sensor IDs to human-readable values: "Outside" and "Inside." It is easy to find out which sensor has which ID by just attaching one sensor, and then viewing the directory structure, as shown in Figure 2.
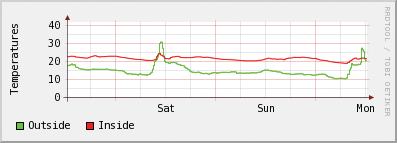
If you call rrdmon with the -g parameter, it creates a graph of the temperature curve from the RRD data from both sensors and stores it in the /tmp/temperature.png file (Figure 8). The inside sensor is shown in red, and the outside sensor in blue.
If you prefer remote, text-based access to the temperature output (say, you are on vacation and want to know whether you have left the oven on), you can write an IRC bot like the one shown in Listing 3. The bot connects to the IRC server at irc.freenode.org and opens a chatroom called #sftemp.
| Listing 3: tempbot |
01 #!/usr/bin/perl -w
02 #############################
03 # tempbot-Temp sensor IRC bot
04 # Mike Schilli, 2005
05 # (m@perlmeister.com)
06 #############################
07 use strict;
08 use Bot::BasicBot;
09
10 package TempBot;
11 use base qw( Bot::BasicBot );
12 use Log::Log4perl qw(:easy);
13 use RRDTool::OO;
14
15 #############################
16 sub said {
17 #############################
18  my ($self, $mesg) = @_;
19
20  return
21    unless $mesg->{body} eq
22    "temp";
23
24  my $rrd =
25    RRDTool::OO->new(file =>
26     "/tmp/temperature.rrd");
27
28  my $dsnames =
29    $rrd->meta_data(
30      "dsnames");
31
32  $rrd->fetch_start(
33   start => time() - 5 * 60,
34   end   => time()
35  );
36
37  my $string;
38
39  while (my ($time, @values) =
40   $rrd->fetch_next()) {
41
42   for (my $i=0;
43        $i < @$dsnames; $i++){
44    $string .=
45      sprintf "%10s: %.1f\n",
46      $dsnames->[$i],
47      $values[$i];
48   }
49   return $string;
50  }
51 }
52
53 $^W = undef;
54
55 TempBot->new(
56  server =>
57    'irc.freenode.net',
58  channels => ['#sftemp'],
59  nick     => 'tempbot',
60 )->run();
|
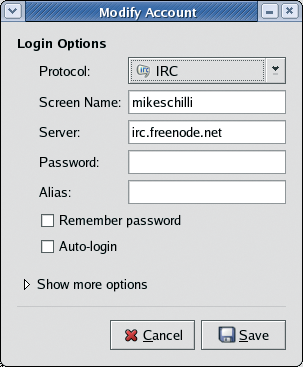
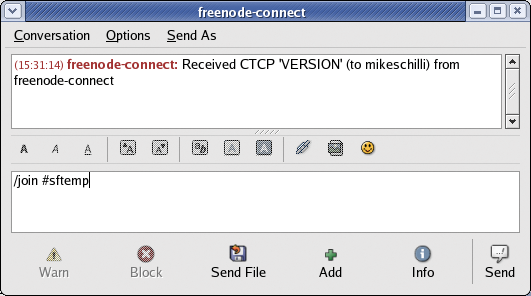
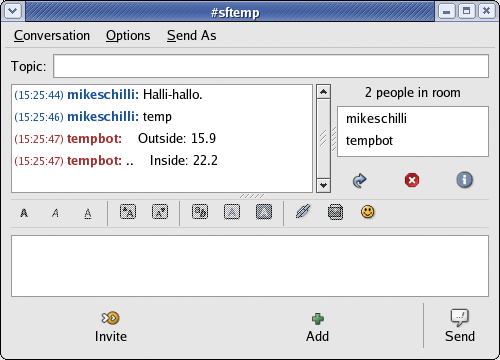
To dispel your worries, so that you can get on with your vacation, just launch an IRC client or the gaim IM client to visit the bot in its chatroom. Figure 6 shows the gaim configuration and Figure 7 gives you the command for entering the chatroom, where the bot is waiting for you to enter the "temp" keyword. The bot listens to the conversation in the chatroom, and if anyone says "temp", it extracts the last temperature values from the RRD archive and sends them back to the chatroom (Figure 9).
Bot::BasicBot is a good example that shows you how to complete highly complex tasks with a CPAN module and just a bit of code. You just derive a class from Bot::BasicBot, and define the said() method for the class; the method is called when someone says something in the chatroom. said() receives the message as a parameter, and can then check if the bot wants to respond, and either return a message or undef. If you have version 0.65 of Bot::BasicBot, you will see a message when you launch that says Use of ->new() is deprecated, please use spawn(), but you can just ignore the warning.
The owfs software distribution, which uses a USB interface to talk on the one-wire bus, is available at [2]. When this article went to print, only the latest version from the owfs project's CVS repository worked; enter cvs -d:pserver: anonymous @cvs.sourceforge.net:/cvsroot/owfs co owfs to get the version. There is also a tarball at [5] that has been shown to work with the scripts in this issue.
You need the latest version of SWIG ([7]) to install owfs; the developer version 1.3.27 worked fine. If you will be installing the owfs command line tool to access the one-wire bus via the command line (Figure 2), along with the Perl interface, you also require the FUSE user filesystem from [4], unless your distribution happens to provide it (test by entering ls -l /usr/local/bin/fusermount). Then enter the following:
./bootstrap
./configure
make
to start the build. Then run make install to install the command line tool. The following steps install the OW Perl module:
cd module/swig/perl5
perl Makefile.PL
make install
from the owfs distribution. A cronjob which runs every five minutes fills the RRD archive: */5 * * * * cd /path; ./rrdmon; ./rrdmon -g;.
You need both rrdmon and the OWTemp.pm Perl module in your /path. The files created by rrdmon are stored in /tmp, but you can change the path variables in rrdmon (lines 18/20). As each sensor has a unique ID, you need to modify lines 23 and 25 to reflect your environment. Use the approach shown in Figure 2 to discover the sensor IDs.
The remaining modules, Sysadm::Install and Log::Log4perl, are available from CPAN. RRDTool::OO requires either a working rrdtool installation, or it will try to download a working installation. For the bot, you need Bot::BasicBot, which automatically installs the POE distribution.
When you plug the USB dongle into your computer, the hot-plug mechanism creates a USB device, something like root -rw-r--r-- /proc/bus/usb/003/008. As owfs needs write access to the dongle, root privileges are required to read the temperature values. An executable hot-plug script in /etc/hotplug/usb/ds2940 gives you a workaround to avoid running the scripts as root:
#!/bin/bash
# /etc/hotplug/usb/ds2940
chmod a+rwx "${DEVICE}"
To allow the hotplugger to run the script when the dongle is inserted, append the following code to /etc/hotplug/usb.usermap:
# /etc/hotplug/usb.usermap
# DS2940 one-wire USB device
ds2940 0x0003 0x4fa 0x2490 0x0000 0x0000 0x00 0x00 0x00 0x00 0x00 0x000x00000000
This allows all our scripts to run with non-privileged user IDs, which keeps the host security people from jumping on your back.
| INFO |
|
[1] Listings for this article: http://www.linux-magazine.com/Magazine/Downloads/65/Perl
[2] The one-wire file system project: http://owfs.sourceforge.net [3] DS18S20 temperature sensor: http://www.maxim-ic.com/quick_view2.cfm/qv_pk/2815 [4] The Fuse project website: http://fuse.sourceforge.net [5] CVS snapshot for owfs: http://perlmeister.com/devel/owfs-2.2p0RC-cvssnap.tgz [6] DS9490R one-wire USB dongle datasheet: http://pdfserv.maxim-ic.com/en/ds/DS9490-DS9490R.pdf [7] SWIG developer version : http://prdownloads.sourceforge.net/swig/swig-1.3.27.tar.gz [8] One-wire bus: http://en.wikipedia.org/wiki/1-Wire |