
By Andreas Bohle, Jörg Luther
An individual boot screen, a tasteful login background, and an upbeat desktop theme can help you personalize your Linux system. But which controls will you need to tweak? This article describes some techniques for personalizing your desktop.
Before your get started with customizing, it is a good idea to think about the way the system starts. When you switch your computer on, the BIOS loads the bootloader, which then initializes the kernel. The kernel then hands over control to the init process, which launches the services. This process finally takes you to the login manager on most systems.
Some recent systems skip this step, automatically logging you on and landing you in your preferred desktop environment.
Grub has replaced the venerable Lilo bootmanager on most state-of-the-art distributions. But this does not mean that Lilo has nothing to offer in the line of optical highlights. Raphaël Quinet shows you how to add an animation as the bootmanager background on his homepage at [1], and he gives you a number of examples.
If you prefer something more simple, the Lilo manpage might help. The manpage describes the bitmap=filename configuration option, which lets you add your own wallpaper at boot time via the /etc/lilo.conf file. The bootmanager expects a bitmap formated image with a resolution of 640x400 and 16-bit color depth.
Three options, bmp-color, bmp-table, and bmp-timer, let you modify the boot menu color scheme and the timeout display. If you put some thought into how you use these options, even an oldtimer like Lilo can give you appealing results.
Fortunately, most distributions now use the Grub bootloader, and that makes things a bit easier. For Grub, you can specify an XPM-formatted, compressed background image, by pointing to the file in the Grub configuration file, /boot/menu.lst. A Grub bootsplash can have a maximum resolution of 640x480 pixels and a maximum of 14 colors. Despite these restrictions, you can still create attractive boot screens, as long as you choose the image carefully. Vector graphics and comic-style images are best suited for use with Grub.
You can use the convert command-line tool to create an image with Grub-compatible resolution and color depth.
convert -resize 640x480 -colors 14 Bild.png Bild.xpm
Gimp might be a better choice for images with more color depth. After modifying the image size, select Image | Mode | Indexed... to reduce the number of colors. Gimp has various algorithms that can visibly improve the results, depending on the original image.
You can now compress your designated Grub bootsplash by giving the gzip image.xpm command. Although this is not strictly necessary, it will typically reduce the time needed to load the image. Finally, copy the resulting file image.xpm.gz to the /boot/grub directory, and add the following line at the start of the menu.lst configuration file, which is in the same directory:
splashimage=(hd0,0)/boot/grub/image.xpm.gz
If needed, replace (hd0,0) with the Grub notation for the hard disk and partition that store /boot on your computer (this was hda1 in our example). After storing the configuration, your individual Grub splashscreen will be displayed the next time you boot your machine.
If the boot menu does not contrast well enough with the background, you can modify the foreground and background text colors in the configuration file. To do so, specify the hexadecimal color values. The following two lines:
foreground 000000
background ffffff
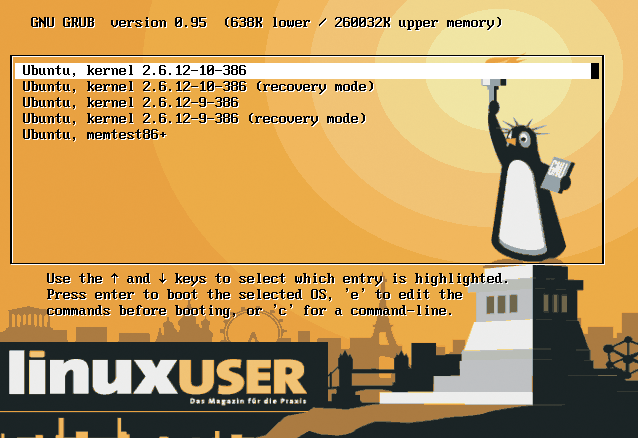
at the start of menu.lst, give you a boot menu with a black font on a white background - the default setting for Grub is exactly the reverse of this (Figure 1).
Suse does its own thing with respect to the boot manager spashscreen. The menu.lst file has an entry that looks something like this: gfxmenu (hd0,6)/boot/message. This is Suse's way of bringing complex image wizardry to the screen. Again, this technique is tunable, and the Suse Wiki at [2] has details.
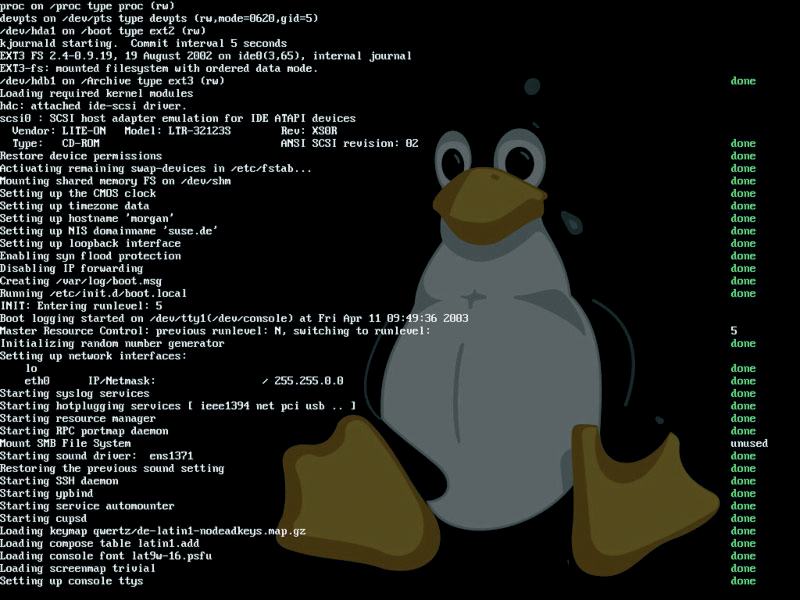
Once the kernel has launched, you can move on to the next option for customizing your system. You can have a splashscreen as a background for the boot messages (Figure 2), or you can cover them to leave just a progress indicator on display. The [F2] key lets you toggle between these two views.
You'll need some background knowledge to modify these images. It involves patching the kernel sources, compiling and installing the new kernel image. If you do not feel comfortable with one of these steps, you might like to skip this option.
Stefan Reinauer has a website with information on the steps at [3].
As we mentioned previously, many installations now move on to the login at this point. Besides the venerable XDM [4], today's distributions use the KDM display manager (by the KDE project [5]) and GDM (by the Gnome project [6]).
Users have two approaches to modifying the design: you can either change the background or use a theme to modify buttons and other controls. Themes typically provide matching backgrounds.
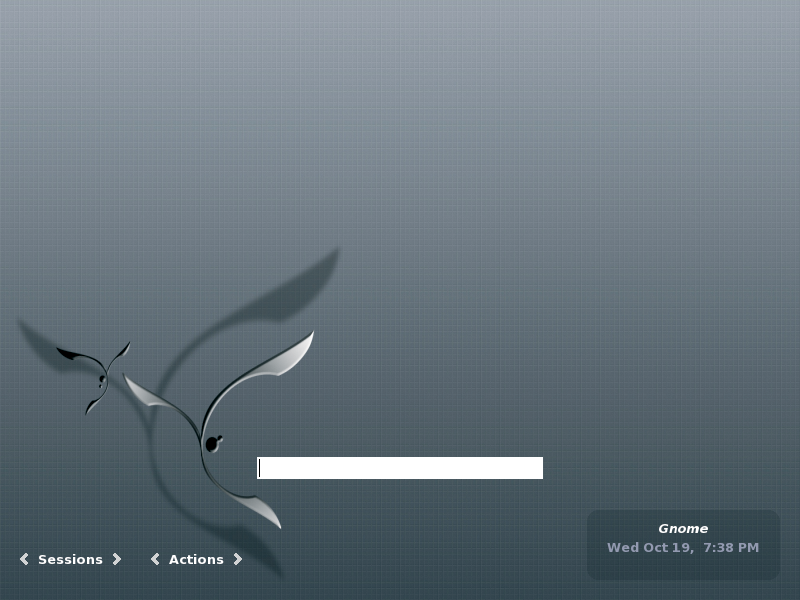
Numerous designs are available both for KDM and for GDM (Figure 3). Both desktop projects have whole groups of developers who focus entirely on the design. The Gnome ("Arts&Themes" [7]) and KDE ("KDE-Look" [8]) servers host the results of this work, organized by category and application.
Follow these steps to install login manager themes on KDE: download the required file from the KDE-Look server, and store the file in your home directory. The file will normally be a tar archive, which you can unpack in the normal way.
Due to the extent of the changes throughout the course of the various KDE versions, there is no single integrated mechanism for installing these files en bloc. In fact, you need different files for different distributions.
Changing your current theme basically just means moving the theme files (images and XML descriptions) to the right folder. By default, these files are stored in /usr/share/apps/kdm/themes/. You can then edit the KDM configuration file (/etc/kde3/kdm/kdmrc) as follows:
UseTheme=true
Theme=/usr/share/apps/kdm/themes/Theme-folder
Unfortunately, the popular Suse distribution does its own thing here. Suse stores the configuration file below /etc/opt/kde3/share/config/kdm/kdmrc. The theme directories are located in /opt/kde3/share/apps/kdm/themes/.
If you prefer to use a GUI-based approach to changing the login screen design, first launch Yast2, and then open the /etc/sysconfig editor. Look for the Display manager key below Desktop. You might expect that changing the DISPLAYMANAGER_KDM_THEME variable would load the new theme. But this didn't happen in Suse 10.0.
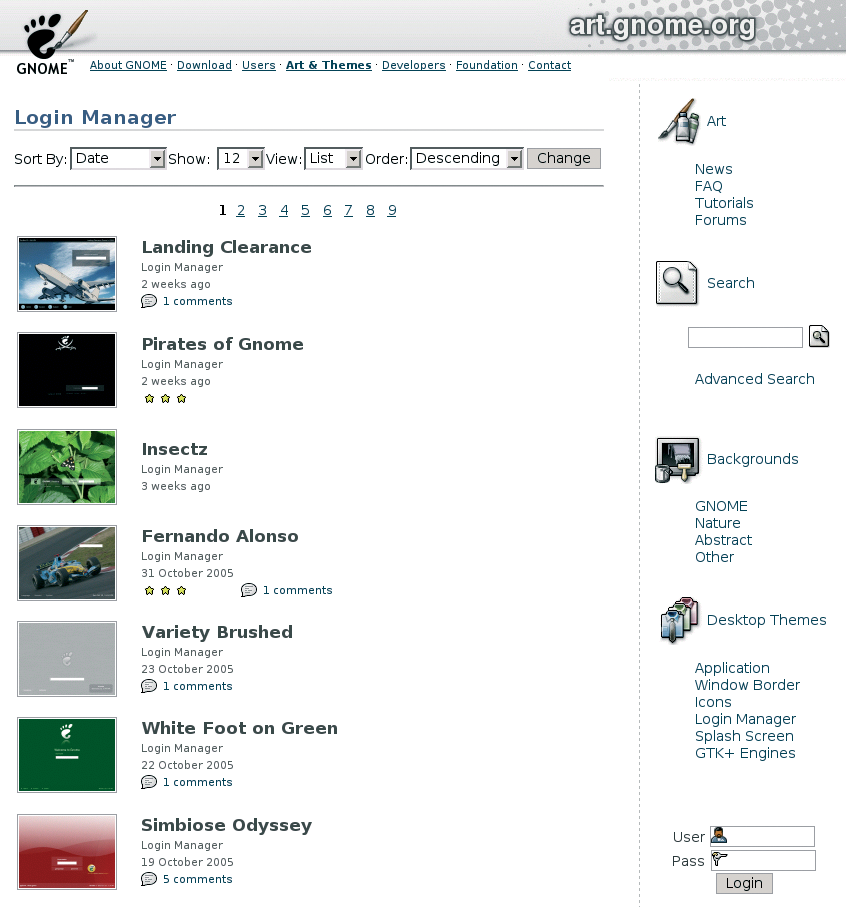
The Gnome project's display manager is slightly more user-friendly. Start by choosing and downloading an interesting theme from Desktop Themes below Login Manager at http://art.gnome.org (Figure 4).
Depending on your distribution, the GUI-based front-end might hide the Gnome display manager configuration tool at a different location. For example, in Ubuntu, you need to select System, Administration, Login screen setup in the menu at the top of the screen to access the GDM configuration tool.
This opens a dialog with multiple tabs for various GDM settings. The strangely named Themed Greeter item takes you to the options for the login screen. You can then click on Install new theme, and select the archive you downloaded, to unpack the archive in /usr/share/gdm/themes/. This step creates a new subdirectory.
A quick glance at the subdirectory reveals that a GDM theme mainly comprises images, an XML-formated description file, and a .desktop file with a short description (this also applies to KDE).
The XML file defines the dialog positions. The structure of the file is more or less self-explanatory. The configuration typically references a background image stored in an item with the pixmap attribute. This configuration is the first step towards defining your own login manager.
If you enjoy experimenting with alternatives to popular programs, you might like to take a look at the Qingy (http://qingy.sourceforge.net) login manager. This C program uses the framebuffer to draw graphics and dialogs, rather than using X11; this makes Qingy quick and gives you plenty of leeway for creativity.
You need to remove the existing display manager for this installation. You will only want to attempt this if you feel confident enough with your system to restore the original state in a text-only mode.
After navigating the login phase, you are taken to your preferred desktop, and again this gives users enormous opportunity for customizing. Both Gnome and the big K give users countless tweaks to experiment with.
Before you grab your digital screwdriver, you might like to think about where you will be heading with your personalized system. The more features, gimmicks, and graphical ballast you load onto your computer, the slower the system will be. This even applies to programs that are not directly related to KDE.
Of course, adding memory, or investing in more CPU power can compensate for the performance hits. But both these approaches can dent your household budget and provoke unnecessary discussions about the benefits.
Both major desktop environments support less invasive modifications that make windows more attractive without forcing your hardware to its virtual knees.
If you are looking to add individual nuances to the KDE desktop, your first stop has to be the KDE Control Center. Appearance and Themes groups a number of items for configuring desktop features. Besides colors, frames, icons, and the background, you will also find an item labeled Theme manager.
A similarly-named item on the KDE-Look website [8] suggests that you might just need to download an archive to dress KDE in its new clothes. But this is not necessarily true. The theme archives do not always honor the rules for packaging complete themes, so you might need to manually add a few design elements after installing a theme.
In other words, if you intend to change the desktop appearance, it makes more sense to tune the individual elements. Modifying the icons is probably the easiest approach.
While you are searching the KDE-Look site, you might like to take a look at the highest rated and most downloads categories. These items take you to the most popular icon sets with the most downloads. This is no guarantee of quality, but a safe choice at least, judging by the numbers.
When choosing an icon set, be aware that not all of these collections are complete. Right now, designers and developers are trying to put together a reference collection and style guidelines under the Tango [9] project umbrella.
Admittedly, the guidelines are not mandatory, and the KDE project shows little inclination of following the style guides. At the same time, KDE has launched its own icon project, Oxygen [10]. The members of the Oxygen project are working on a completely new KDE desktop infrastructure within the scope of the larger Appeal framework.
The next version 4 of KDE will see a major boost to visual features. But before KDE 4 is released, you still have enough time to launch your favorite graphics tool and editor, find an interesting motif, and design a completely new theme for your Linux machine to take you from power-on through to the desktop.
The offerings on the Gnome project's "Arts&Themes" website [7] are not restricted to themes for the Gnome display manager. There are countless desktop tuning aids in the Desktop Themes area. The choice is organized like this:
All of these elements can be downloaded as individual archives, and you can compile your own theme by carefully combining your favorite elements. To do so, select System | Preferences | Theme in the menu at the top of the screen. Gnome takes you to the Theme Preferences dialog, where you can select an installed theme or compile your own theme.
Press Install Theme, and in the dialog that appears, type the path to your preferred theme archive - this can be a package from the "Arts&Themes" Application, Window Border, or Icons categories. Gnome unpacks the theme elements and sets them up for use. After completing this step, Gnome displays a message telling you that the theme has been set up correctly.
You can now press Theme Details to compile your dream desktop from various elements of the types Controls, Window Border, and Icons. When you do so, a custom theme appears in the Theme Preferences. You can store the custom theme on disk for future use by pressing Save Theme.... While you are doing so, why not add an intuitive name and a comment?
If you are not happy with the collection of motifs on the KDE and Gnome websites, there are any number of tips on pages actually targeted at Windows and applications that run on it. One of the most interesting harbors for this kind of work is DeviantART [11], a collection of several hundred thousand wallpapers, skins, themes, and icons.
Another approach to customizing your desktop takes you to the useful - or less at least definitely attractive - applets provided for KDE by Superkaramba, which are referred to as gDesklets in the world of Gnome. The applets sit on the desktop background and monitor various system parameters, providing all kinds of information from various sources.
Although shadows or translucency are attractive options, the CPU power they require is prohibitive. Depending on how powerful your CPU and graphics adapter are, these lavish graphic features will either slow your computer down or make it completely unusable.
| INFO |
|
[1] Animated bootscreens for Lilo: http://www.gamers.org/~quinet/lilo/
[2] Customizing Grub in Suse: http://www.susewiki.org/index.php?title=Change_GRUB_background [3] Using a bootsplash: http://www.bootsplash.org [4] X Display Manager: http://www.tldp.org/HOWTO/XDM-Xterm/ [5] KDE project: http://www.kde.org [6] Gnome Display Manager: http://www.gnome.org/projects/gdm/ [7] Gnome "Arts&Themes": http://art.gnome.org [8] KDE-Look: http://www.kde-look.org [9] Tango project: http://www.tango-project.org [10] Oxygen: http://www.oxygen-icons.org [11] DeviantART: http://www.deviantart.com |