By Jon Watson
Podcasting is a popular technique for delivering radio-style content to Internet users. Podcast programs are easy to produce, and the RSS-based podcast delivery process offers convenience with minimal overhead. Aspiring performers, interviewers, and analysts who would not have had the time or resources to broadcast a program through more conventional technologies are finding a ready, wordwide audience for their podcasts. In this article, I'll show you how to create your own podcast audio file using the Audacity sound editor.
A true podcast is delivered directly to the user through an RSS feed. Several web hosting companies offer podcast hosting. The podcast hosting service attends to the technical side of maintaining the RSS feed, which means you can concentrate on the creative side of the broadcast. Of course, you also have the option of configuring and maintaining your own RSS feed if you would prefer to manage the RSS feed yourself. In either case, the details of the RSS configuration may vary depending on your situation. In this article, I'll concentrate on the audio content. I'll show you how to create, edit, and tag a podcast audio file.
Audacity is a mature audio editor that is free (as in both meanings) and comes in versions for GNU/Linux, Windows, Mac, and whatever other OS you can get it to compile on. Although Audacity is not a podcasting tool specifically, the Audacity editor includes a formidable set of tools for both beginning and experienced podcasters.
It's likely that you will find a version of Audacity straight from your distribution's repositories, but if you're unable to, or if you are looking for a cutting edge version, take a visit to the Audacity website [1]. As of this writing the current stable version is 1.2.4b, and there's a beta 1.3.0b available. There are some stern warnings about data loss and crashes attached to the 1.3.0b beta, but I used it without incident. The screen shots in this article are from the 1.3.0b beta version running under KDE on my Linspire laptop. I don't feel quite right recommending a beta version, however, so although I haven't had any problems with 1.3.0b beta, I'm officially recommending the use of version 1.2.4b.
The Audacity sound editor is a monster application with enough goodness packed into it to make it suitable for any size of audio project. Podcasting is a relatively uncomplicated matter, and therefore I am only going to look at a subset of Audacity's full tool set. In broad strokes, a podcaster needs to be able to use Audacity to record from a microphone, import audio clips from other sources, edit the audio stream, create the final audio file, and tag the file.
I'm going to assume you've managed to install Audacity, but if you're running into problems with the compile or install, the Audacity help page [2] contains links to the support forums, FAQs, documentation, and tutorials.
An important aspect of Audacity is its use of project files. When you save a recording for the first time, Audacity will want to save it in its XML *.aup format. I highly recommend allowing Audacity to use this format as you work on the project rather than exporting your project to an MP3 or OGG at every step of the way. The *.aup format is much easier to edit than an MP3 or an OGG because all of the track data and layout is saved individually and it's all saved uncompressed. Editing an *.aup file is much easier than picking your way through the single mushed-together track of an MP3 or OGG file.
In most cases Audacity will correctly detect your sound system, and you will simply be able to click the big red record button and start talking. However, you should check a few settings after the first launch to ensure that the mainstream podcaster and audience community will be able to use the file.
First, I prefer to be recorded in stereo rather than mono. Out of the box, Audacity will record in mono. If you're familiar with audio editors at all, you will likely recognize this right away because the GUI representation of your voice will be shown as a single mono stream rather than a double stereo stream (Figure 1).

To make the change from mono to stereo, select Edit | Preferences. Select the Audio I/O tab and select 2 (stereo) from the Channels drop down list. You can record up to 16 channels, but given the relative simplicity of podcasting, that is usually unnecessary.
If you have more than one sound device on your system, Audacity may select the wrong one. To tell Audacity which sound device to use, select it from the drop down list boxes under both the Playback and Record sections of the Audio I/O tab in Preferences (Figure 2).

That should be all you really need to do to get Audacity ready for recording. Click the OK button to close the Preferences window and return to the main Audacity screen. Along the top of the main window is a line of fairly intuitive VCR-like buttons to start recording, stop recording, playback, rewind, and fast forward. To record, just click the big red record button and start talking. (Figure 3) As you speak, you should see a track much like the one in Figure 1, along with a blue soundwave.

As easy as this part is, there are a couple of considerations to keep in mind.
Audacity offers a variety of ways to control the volume level of your voice. Some of the tools are built in, and some are part of the standard Linux environment, such as KDE's Kmix. One of the tools that Audacity offers is a meter at the top right of the main Audacity window (Figure 4). As you record, the meter dances around to show you how loud your voice is. It seems intuitive to try and keep the meter around the halfway mark, but I've found that it has to be pretty firmly maxed out to the right or my audio won't be loud enough to hear comfortably. You can also control the overall input level by using the microphone slider slightly to the left of center underneath the VCR-like controls in the tool bar (Figure 3). Lastly, each track has a small input volume control slider (that "+ and -" slider to the left of each track in Figure 1) that controls the volume of that particular track.

After much experimentation and some lousy sounding shows, I've come up with the following settings and philosophies. I believe that it's best to record everything so that it sounds comfortable at middle volume for me on my machine. Remember that your listeners are going to be enjoying your show on many different types of players in many different types of environments. About the only common denominator is that most of them will be wearing headphones. Therefore, if it sounds OK to me using headphones, then I feel fairly confident that my listener's individual players will have proper volume controls to make whatever adjustments they need to listen comfortably.
I have found it better to totally disregard Audacity's meters. As I mentioned, my shows have to be firmly to the right in order to have any decent volume. If I keep it in the seemingly preferable middle of the road, I can't be heard. Your mileage may vary as different sound systems may affect this meter differently. Next, put the microphone meter shown in Figure 3 at 0.5 (halfway) and leave it there. Ditto with the individual input level meters on each track (Figure 1).
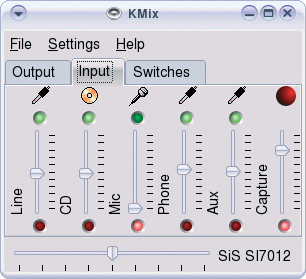
I let KMix take care of my sound levels. Not only do I find the interface easier to use, but I also feel a little better controlling that type of stuff at the operating system level rather than the application level. Within KMix, I put my microphone input barely above zero (Figure 5) and switch on the Mic Boost.
That's it. The only setting that I play with from time to time is the individual input slider on specific tracks (Figure 1). Sometimes when I import a piece of audio, it comes in too loud or too quiet, so I tweak it using the slider on the import track.
I didn't have too many shows under my belt before I realized that a show comprised solely of what I could stuff through my microphone is a pretty boring show. At the very least, you'll likely want to create a show intro that you'll need to import into every episode. I've imported Skype interviews, sound effect clips, viewer voice mails, and podsafe music from Magnatune. Varied content makes a show interesting and engaging.
Audacity can import WAV, MP3, OGG, AIFF, AU, Flac, Midi and some other audio formats that I've never heard of before. Importing audio is a simple as selecting Project | Import Audio. To import Midi, select Project | Import Midi. If you have an audio file in a format that isn't directly supported by Audacity, you may have some luck with Project | Import Raw Data.
When importing audio, it's best to import uncompressed audio whenever possible. Keep in mind that at the end of the day, you're likely to be producing an MP3 or OGG file; both of which are lossy compression formats. Remember the JPEG paradox of the late 90's? Inexperienced would-be graphic artists would edit a JPEG image and save it, then edit it some more and save it again, then touch it up just a little bit more and save it for a final time. Each save compressed the image a little more and stripped some data from it to do so. By the time they were finished with the file, it generally looked pretty bad.
The same idea pertains to importing audio. If you import an already compressed MP3 file into your project, and then you export your entire project into a compressed MP3 again, the imported portion, in effect, loses data twice. I generally try to only import uncompressed WAV or AU files into my projects, but I am not always able to be so selective. The general rule of thumb is to use the highest quality file you can get your hands on.
Strangely, you cannot import a native Audacity *.aup file into Audacity. If you want to import something that you've recorded in Audacity, first save the recording you want to import as an uncompressed WAV file and then import the WAV file instead.
Few podcasters do an entire show in one take. I still have to edit each show before it goes live. No matter how good I get, however, I have no control over my dog barking or the doorbell ringing. Some podcasters choose to leave all the gaffs in, but I choose to take them out.
There are only three tools that I use frequently in Audacity. They are the stop and pause buttons, the time shift tool, and the normalize effect. On the more obscure front, I have had to use the noise removal filter on more than one occasion to get rid of some unintended background noise.
The start and pause buttons operate in very different ways. If you hit the stop button while recording, that track will end and a subsequent click on the play button will cause Audacity to start a new track. Conversely, when you hit the pause button, the track will not end and a subsequent click on the play button will cause Audacity to resume recording on the same track.
In general it's easier to move entire tracks around by grabbing the left side of it and dragging it up or down into its new spot. However, if you find yourself hitting the stop button a lot, the sheer number of tracks can become unmanageable very quickly. As a general rule, I press pause when I need to do something that won't require an edit later (like I want to take a drink). If I flub something badly enough (like an errant doorbell ring) that it will need to be edited out, I generally hit the stop button. It's easier to find the flubs at the end of each track than pick them out of the middle of each track.
Unless you and everyone else in your show is a timing genius, you'll have to move tracks around. I use this tool frequently, but just to give a nudge here and there to tighten up tracks. The time shift tool can be found among the tool buttons to the left of the VCR-like buttons. Specifically, the time shift tool is the button with the double-headed arrow icon on it. To move a track around, click the time shift tool button. The button will remain depressed, and when you move your cursor over a track in the main Audacity window, it will take on the double-arrow appearance. Place the cursor over the track that you wish to move and drag it. Unfortunately, Ksnapshot won't capture the mouse cursor so I am unable to supply a screenshot of this step.
Nothing has saved my butt more often than the normalize effect. Audacity comes with an impressive list of effects (check out the Effects menu), but I generally only use the normalize and noise removal functions. I should point out that the effects are meant to be applied to a track or selection of a track after it has been recorded. You don't use these effects while recording.
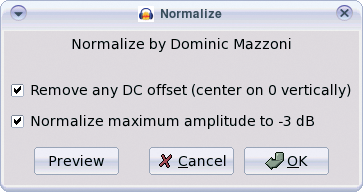
The normalize effect will take the selected section of audio track and mellow it out so the high points aren't so high and the low points aren't so low. There are only two options in the normalize tool, Remove and DC offset and Normalize maximum amplitude to -3 dB (Figure 6). I leave both of them checked and it works well. If you normalize one track, you should generally normalize them all. Since the normalize tool only affects the selected audio, you'll have to select each track individually and run the tool. I find that the differences in pitch between my voice and the voice of my co-host, Kelly Penguin Girl, requires normalization to preserve our listener's sanity. About the only type of track I don't normalize is music. I figure the musician likely knows more about digital audio than I do and has put the file together to sound just the way he or she wants it. Normalizing a song just seems presumptuous to me.
The last tool that I've found useful is the Noise Removal tool (Figure 7). This tool literally saved JaK Attack! #4. Kelly and I were traveling and decided to record the show in the car while waiting for a ferry to take us over to an island. The laptop battery started to die and I had to plug in an inverter. I didn't know it until I listened to the show later, but as soon as I plugged the inverter in, it introduced this horrific background hum to the show. The last 15 minutes of the show seemed to be ruined. Fortunately, I tried the noise removal effect, and while it didn't restore the show 100%, it certainly removed enough of the noise that the show could go on.

The Noise Removal tool must be run twice. The first time is to sample the background noise that you'd like it to remove, and the second time is to perform the actual removal. The process is:
It's important to note that the success of this tool is deeply reliant on the type of background noise. The more predictable the background noise, the better chance this tool has to remove it. In the case of my background noise, it did very well because the noise was a relatively predictable humming. If you try to remove rapidly changing car acceleration noises or unpredictable horn honks, the odds of this tool being able to remove all of it lessen dramatically.
Podcasting is old enough now that some expectations have evolved, and the closer you can meet these expectations, the easier it will be for your listeners to find and subscribe to your show. The two broad areas to pay attention to are file type and file quality.
If I weren't a free software enthusiast, I probably wouldn't even consider a discussion about file types in relation to podcasting. The MP3 file format is by far the most common. It is supported by all of the digital editors and all of the digital players. Why would anyone want to produce a show in any other format?
The MP3 format is a proprietary format which is owned by Thomson and Fraunhofer. Many people are unaware that the MP3 format isn't a free for all since it's in such wide use. I certainly didn't realize it until Richard M Stallman agreed to come on show #13 of my GNU/Linux User Show and asked me to start producing shows in OGG Vorbis format. I started producing an OGG along with the MP3 file from that point on.
I would love to produce only an OGG version of the JaK Attack!, but I'm pretty sure that would be podcast suicide. There simply isn't wide enough support by either listeners or the digital audio player industry for OGG format yet. There are certainly some players that can handle OGG Vorbis, but there aren't many, and even some of those can't handle the variable bit rate of OGG Vorbis files.
Our stats show that only about 25% of our listeners download the OGG. The remainder prefer the MP3. I'd highly recommend that you produce an MP3 at least, and an OGG if you can.
Due to the licensing issues with MP3, Audacity cannot encode MP3's out of the box. In order to encode into MP3 format, you'll need to source out the libmp3lame.so file and tell Audacity where to find it. Download the libmp3lame.so file to a known location on your machine. Then use the File | Preferences | File Format tab | Find Library button to point Audacity to it. Audacity can encode OGG Vorbis with no intervention.
Before encoding anything, though, you need to ensure the encoding will be done with the optimal settings. The first setting of concern is the sample rate. To get at the sample rate, click the File | Preferences | Quality tab and look at the Default Sample Rate drop down list box. In an incredibly simplified way, the sample rate controls how often Audacity will dip into the audio stream and grab a bit of audio to encode into digital bits - expressed in Hertz (Hz). The higher the sample rate, the higher the audio quality. Unfortunately, high sample rate also means a big file. Since your listeners are going to be transferring this file over the Internet, the smaller the file the better. The sample rate setting will affect both the MP3 and OGG file.
Bit rate is another setting that plays a big part in file quality. Unlike the sample rate, Audacity has separate settings for MP3 and OGG Vorbis bit rates.
To get at the MP3 and OGG Vorbis bit rate settings, select File | Preferences and choose the Format tab. The areas we're interested in are the OGG Export Setup section and the MP3 Export Setup section.
Audacity's OGG Export consists of a single slider from zero to 10. The MP3 bit rate setting consists of a drop down list box ranging from 16 Kbps to 320 Kbps.
The holy grail of podcasting is the smallest file that will deliver a decent level of quality. There is no single combination of bit rate and sample rate settings that will suffice for all podcasts. The correct settings depend largely on your content.
A speech podcast, for example, can be suitably encoded at 22050Hz sample rate and 48Kbs bit rate. A pure music podcast should be encoded at a much higher level around 96000Hz sample rate and 128Kbs or higher bit rate. These settings represent the high and low points, and finding the right middle point is up to you.
The JaK Attack! is largely speech with a single song in the middle. I find that since the music part of the show is only 2 or 3 minutes, there's no real advantage to encoding the entire file as if the show were a pure music show. Therefore, we generally encode at 22050Hz and either 48Kbps (for the MP3) or zero (for the OGG). A typical JaK Attack! episode is about 5 or 6 MB per 15 minutes. You will likely want to make adjustments based on your content. If you have more music, then you should encode at a higher rate. With less music, use a lower rate. Experimentation is the key. Some experimentation with the settings and small audio streams will quickly serve to illustrate the massive file size and quality difference these settings can create.
In any event, once you've set your bit rate and sample rate, you can encode the file by selecting File | Export as MP3 or File | Export as OGG Vorbis.
ID tags are little bits of data embedded in the audio file. Most digital players can read these tags and display some of the information in them on the screen while the show is playing. Audacity has a built in tool to apply ID tags, but the tool isn't podcast aware, so it's not perfect.
To tag your file, select Project | Edit ID3 Tags (Figure 8). Note that these tags will only be applied to MP3 files and not OGG files. You'll need a third party ID tagger such as EasyTag [3] to tag your OGG Vorbis files.

Personally, I use EasyTag to tag both my MP3 and OGG files, but this article isn't about EasyTag. The reason why I chose not to use Audacity's built in tag tool is two-fold. First, it constrains my genre setting to a pre-populated list that, sadly, does not contain the item `podcast.' Secondly, it won't tag my OGG files. EasyTag has a free form genre field and will tag MP3 and OGG files.
Regardless of the tool you use, the bare minimum tags that you should fill out are:
There are many other ID fields, but the ones above constitute the three that you should most strongly consider supplying.
Your podcast's RSS feed is the magic element that makes your show "podcatchable." Without a properly formatted RSS feed to deliver your show, your listeners won't be able to subscribe with a podcatcher. This doesn't necessarily put you out of business, since listeners will still be able to direct download your audio files, but a certain segment of the population likes the podcatching format.
Simply put, podcatcher is the affectionate name given to the genre of RSS readers that are capable of recognizing the RSS 2.0 <enclosure> element. The <enclosure> element heralds the presence of a URI to a binary file. A podcatcher [4] has the ability to check subscribed feeds for new shows, and if it finds one, to download the show to your local machine.
Different podcatchers have varying features above and beyond these basics, but any podcatcher must be able to perform at least the "check and download" tasks. Some of the more popular podcatchers in the wild are Bashpodder and its GNU GPL'd variants for GNU/Linux and iTunes for Windows or Mac. amaroK also has some advanced podcatching functionality.
For the detail-oriented geeks amongst us, the enclosure element is a sub-element of <item> and it has three required attributes: the protocol (must be http) and URI to the binary file, the length in bytes, and the file format. A typical enclosure element looks like:
<enclosure
url="http://www.podcastingrocks.com/media/mypodcast_20060224_12.ogg"
length="16257377" type="audio/x-ogg">
or
<enclosure
url="http://www.podcastingrocks.com/media/mypodcast_20060224_12.mp3"
length="16257377" type="audio/mpeg">
Most, if not all, podcast hosts will generate a properly formatted RSS feed for you as part of their service. If you opt to host your own media, some blogware tools can now create enclosure elements and Feedburner definitely can. Probably the best place to get vanilla information on how RSS and podcasting work together is the Wikipedia entry on Podcasting [5] or the entry on RSS Enclosures [6].
Once you create, edit, encode, and tag your show, all you have to do is find a place to upload it and provide a properly formed RSS feed. Happy `casting!"
| INFO |
|
[1] Audacity: http://audacity.sourceforge.net
[2] Audacity Help page: http://audacity.sourceforge.net/help/ [3] EasyTag: http://easytag.sourceforge.net/ [4] "Audio Delivery: Podcatching without an iPod," Linux Magazine #56, July 2005 www.linux-magazine.com/issue/56/Podcatching.pdf [5] Wikipedia on Podcasting: http://en.wikipedia.org/wiki/Podcasting [6] Wikipedia on RSS enclosures: http://en.wikipedia.org/wiki/RSS_Enclosures |
| THE AUTHOR |
|
Jon Watson is a Canadian GNU/Linux enthusiast. When not podcasting on The JaK Attack! http://jon.libsyn.com, Jon can be found writing on b5 Media's New Linux User http://www.newlinuxuser.com blog, or his personal blog, Tales from the Motherboard http://www.jonwatson.ca. Jon lives in mountainous Calgary, Alberta with his fiancee, the infamous Kelly Penguin Girl, and their two dogs. |