
By Heike Jurzik
Rsync keeps your data up to date and helps you stay on top of confusing version changes. The Rsync synchronization tool gives you options that help you manage file properties; Rsync works well with SSH, and it is perfect for quickly transferring large volumes of data if the target computer already has a copy of a previous version. Rsync checks for differences between the source and target versions of the data and only transfers the data that has changed.
Rsync compares the data on two machines. The generic syntax for this is rsync [options] source target. The choice of source and target is critical. Decide carefully in which direction you will be synchronizing to avoid loss of data. The box labeled "Data Unison" discusses an alternative to this one way street based on the Unison tool, which can sync in both directions.
Rsync gives you a lot of support for monitoring the data transfer operation: calling Rsync with the -n flag tells the program to perform a trial run:
$ rsync -n dir1/* dir2/
skipping directory dir1/dir1
skipping directory dir1/dir2
skipping non-regular file "einl.
tex"
kap01.tex
kap02.tex
kap03.tex
...
As the output shows, Rsync would transfer normal files and directories but leave out the symbolic links. The tool refers to the latter as non-regular files. To transfer subdirectories recursively down to the lowest level, specify the -r option. Adding the -l flag additionally picks up your symlinks: of course, a combination of these options is possible:
$ rsync -rl ordner1/* ordner2/
building file list ... done
einl.tex -> einl_neu.tex
kap01.tex
...
Rsync has an alternative approach to handling symlinks: if you replace -l with -L, the program will resolve the link, and your former symlinks end up as normal files in the target directory.
| Data Unison |
|
Unison [1] is another great synchronization tool that not only syncs in both directions, but also supports non-Linux operating systems. The program is available for Linux, Windows, Mac OS X, and Irix, as a quick glance at the download area of the website tells me. You can run Unison from the command line as well as from the GUI. To synchronize two directories on your local machine, just type: unison -ui text folder1 folder2, for example. If the content of the two folders differs, Unison will let you know, show you the sync direction, and say if the file is new or has been changed: folder1 folder2 new file ----> kap01. tex [f] <---- changed kap02. tex [f] To accept this suggestion, just press the [F] key. If a conflict that Unison can't resolve occurs, because, say, both versions of a file have changed since the last time the program was run, Unison displays a question mark <-?->, prompting you to make a decision. Alternatively, you can type < or >, or press [Shift-7] (/) to postpone the decision this time, or press [Shift-I] to postpone infinitely. Type a question mark (?) for an overview of the available commands. Right at the end, the program just checks once more if you really do want to apply the changes: pressing [Y] launches into the sync operation. Proceed with propagating updates? [] y Propagating updates UNISON started propagating changes at 20:20:34 on 28 Feb 2006 [BGN] Copying einl.tex from /home/huhnix/ordner1 to /home/huhnix/ordner2 ... Saving synchronizer state Synchronization complete It is just as simple to sync with remote machines. First, ensure that the same Unison version is installed on both machines, and then type unison -ui text folder1 ssh://user@targetmachine/folder. The syntax looks a little different from Rsync: instead of a colon, you have a slash. To use an absolute pathname, you need to add another slash: unison -ui text folder1 ssh://user@targetmachine //scratch/folder1. |
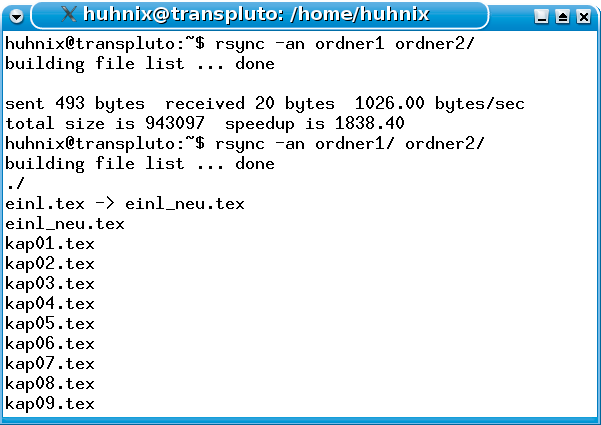
Appending a slash to a directory name influences the way Rsync handles an operation. For example, if you give the rsync -a source/folder target command, Rsync will transfer the folder directory and its content to the target directory.
If you append a slash to the target directory, Rsync will just transfer the contents of folder to the target, dropping it directly into the target directory (Figure 1).
If you will be using Rsync to create backups, it makes sense to keep the file attributes of the original files. The attributes include both permissions such as read, write, and execute, along with timestamps, that is, information on the last access time (atime), the last status change (ctime), and the last modification (mtime).
Additionally, administrators can benefit from parameters that preserve owner and group data, and support device files. To keep the permissions, just specify the -p option; -t handles the timestamps, and -g keeps the group membership.
Whereas any normal user can specify these parameters, the -o (keep the owner data), and -D (device attributes) flags are only available to root. The complete command line with all these options reads rsync -rlptgoD home/huhn/* backup/. But there is a shortcut: Rsync has a special option that combines these parameters for this case. Instead of -rlptgoD, just type -a.
Rsync has a practical option that allows you to exclude certain files from the synchronization process. To leverage this, specify the --exclude= option and a search pattern, and define the files to exclude. You can use wildcards for this: rsync -a --exclude=*.bak ~/article/* backup/
This excludes files that end in .bak. If you need to exclude files that end in a tilde, just append another --exclude: rsync -a --exclude=*.bak --exclude=*~ source target.
You can save time by storing your exclusions in a text file. You need a separate line for each search pattern. Specify the --exclude-from=Exclude-File parameter to parse the file.
Rsync can even synchronize data across a network. Just pass the -e ssh parameter to encrypt and transfer files using SSH. You need to replace the source and target with the name or IP address of the local and remote machines. If you have a different account name on the remote computer, add your remote username followed by an @ sign, as in rsync -e ssh source user@targethost:target/.
Type either a relative path to your own home directory, or an absolute path after the colon. An environmental variable saves you from entering the parameters for SSH encryption each time you run the command. The command for Bash is:export RSYNC_RSH=ssh
As the variable is only valid within the current Shell context, you need to add the export line to your Bash configuration file, ~/.bashrc, to assign the variable permanently, and then run source ~/.bashrc to reparse the file.
Rsync is perfect for transferring large volumes of data. If you specify the --partial parameter, and the transfer is interrupted for some reason, you can pick up the transfer from the point where you left off. Specifying the --progress option gives you a progress indicator to let you keep track of the transfer operation:
$ rsync --progress --partial debian.iso transpluto:/scr
atch/debian/
Password:
debian.iso
    22543992   3%    5.15MB/s
0:02:14
At the other end of the connection, the partial file is hidden in the target directory at first. Typing ls -a reveals a file that looks something like .debian.iso.wtKNr7. The dot at the start of the filename keeps the file hidden, and the arbitrary extension removes the danger of overwriting existing files.
When the transfer completes, the file gets its original name back. If the transfer is interrupted, you can restart by specifying the --partial option again.
There is a downside to the --partial option. If you use Rsync to update an existing file and the transfer is interrupted, the previous file on the target machine disappears and is replaced by the partial file you transferred. You can work around this problem by creating a hardlink for the original file first: ln debian.iso debian_orig.iso. If the transfer fails now, you do not lose the ISO image; instead the partial file is given a new name without destroying the original.
| INFO |
|
[1] Unison homepage: http://www.cis.upenn.edu/~bcpierce/unison/
|