By Michael Schilli
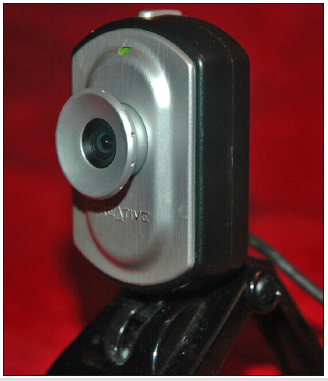
Most webcams are accompanied by some kind of Windows software, which is of no use at all to Linux users. Luckily, more recent Linux distributions include Video4Linux, which gives you simple controls for many hot-pluggable USB cameras. The Creative NX Ultra camera I use for my experiments normally provides video output and costs about US$ 70. In fact, it is a waste of the camera's abilities to use this camera as a simple webcam, but then again, it was just lying around in one of the drawers down at the Perlmeister lab, so why not use it? The camera does not need an external power supply, and it was detected immediately by the hot-plugging subsystem when I connected it to my PC. The video data typically goes to /dev/video0. The Linux::Capture::V4l Perl module from CPAN locks into the device entry, grabs the frame data, and lets programmers change exposure parameters such as the camera sensitivity on the fly.
Listing 1 shows a simple application that first sets the camera sensitivity to 40000 before grabbing an image from the video stream, and then storing the image on disk as a JPEG photo (Figure 2).
| Listing 1: single |
01 #!/usr/bin/perl 02 use strict; 03 use warnings; 04 use Camcap; 05 06 my $cam = Camcap->new( 07 width => 640, 08 height => 480 09 ); 10 11 $cam->cam_bright(42_000); 12 my $img = $cam->capture(); 13 14 $img->write( 15 file => 'office.jpg') 16 or die "Can't write: $!"; |
The Camcap module used by single is shown in Listing 2. It adds an abstraction layer for access to the video stream. The constructor in Line 12 defines a few default parameters, such as the image width and height, along with the minimum and maximum brightness settings (br_min, br_max). The code then uses the Video::Capture::V4l CPAN module to latch onto the video device, /dev/video0. If another entity is already listening to the device, the connection fails.
| Listing 2: Camcap.pm |
001 #############################
002 package Camcap;
003 #############################
004 use strict;
005 use warnings;
006 use Video::Capture::V4l;
007 use Imager;
008 use Imager::Misc;
009 use Log::Log4perl qw(:easy);
010
011 #############################
012 sub new {
013 #############################
014  my ($class, @options) = @_;
015
016  my $self = {
017   width   => 320,
018   height  => 240,
019   avg_opt => 128,
020   avg_acc => 20,
021   br_min  => 0,
022   br_max  => 65535,
023   @options,
024  };
025
026  $self->{video} =
027    Video::Capture::V4l->new()
028    or LOGDIE
029      "Open video failed: $!";
030
031  bless $self, $class;
032 }
033
034 #############################
035 sub cam_bright {
036 #############################
037  my($self, $brightness) = @_;
038
039  my $pic =
040    $self->{video}->picture();
041  $pic->brightness(
042   $brightness);
043  $pic->set();
044 }
045
046 #############################
047 sub img_avg {
048 #############################
049  my ($img) = @_;
050
051  my $br =
052    Imager::Misc::brightness(
053   $img);
054  DEBUG "Brightness: $br";
055  return $br;
056 }
057
058 #############################
059 sub calibrate {
060 #############################
061  my ($self) = @_;
062
063  DEBUG "Calibrating";
064
065  return
066    if img_avg(
067        $self->capture(
068          $self->{br_min}
069        )
070       ) > $self->{avg_opt};
071
072  return
073    if img_avg(
074        $self->capture(
075          $self->{br_max}
076        )
077       ) < $self->{avg_opt};
078
079    # Start binary search
080  my ($low, $high) = (
081   $self->{br_min},
082   $self->{br_max}
083  );
084
085  for (
086     my $max = 5 ;
087     $low <= $high && $max ;
088     $max--)
089  {
090   my $try =
091     int(($low + $high) / 2);
092
093   my $i =
094     $self->capture($try);
095   my $br = img_avg($i);
096
097   DEBUG
098     "br=$try got avg=$br";
099
100   return
101     if abs(
102    $br - $self->{avg_opt}) <=
103     $self->{avg_acc};
104
105   if ($br < $self->{avg_opt})
106   {
107     $low = $try + 1;
108   } else {
109     $high = $try - 1;
110   }
111  }
112    # Nothing found,
113    # use last setting
114 }
115
116 #############################
117 sub capture {
118 #############################
119  my ($self, $br) = @_;
120
121  $self->cam_bright($br)
122    if defined $br;
123
124  my $frame;
125
126  for my $frameno (0, 1) {
127   $frame =
128     $self->{video} ->capture(
129          $frameno,
130          $self->{width},
131          $self->{height});
132
133   $self->{video}->sync(
134     $frameno) or LOGDIE
135       "Unable to sync";
136  }
137
138  my $i = Imager->new();
139  $frame = reverse $frame;
140
141  $i->read(
142   type => "pnm",
143   data =>
144    "P6\n$self->{width} "
145    . "$self->{height}\n255\n"
146    . $frame
147  );
148  $i->flip(dir => "hv");
149  return $i;
150 }
151
152 1;
|
The cam_bright() method defined in Line 35 sets the camera sensitivity. It expects a value between 0 and 65535, calls the picture() method to retrieve the camera's picture structure, calls brightness() to set the sensitivity value defined there, and then finally calls the set() method to set the value in the Video4Linux layer.
The capture() method defined in Line 117 optionally accepts a brightness value, before going on to grab the next frame from the video stream. The first available frame carries the number 0, the next frame is available as 1. Calling the capture() method of Video::Capture::V4l in line 128 requests the specified frame from the video device; the following call to sync() ensures that the image data got transferred into the $frame scalar.
Some tests showed that the first frame to zip past may not be useful, as the brightness level set for the camera just prior to grabbing the frame has not been applied. To work around this, capture always grabs two frames and discards the first.
When the sync() method returns, the $frame variable stores the raw image data in BGR format. Each pixel is described by three consecutive bytes containing the blue, green, and red values (between 0-255). To generate a format that normal image manipulation tools understand from the raw data, the reverse command first reverses the byte string, which gives us the more common RGB format.
If we now add a P6 header, and this happens in line 144, and specify the image width and height, the CPAN Imager module's read() method can give us an image in PNM format. The previous trick to reversing the byte order also reversed the pixel order, leaving the image standing on its head. But this is easily fixed by calling the flip method, which uses the dir => "hv" parameter to flip the image through 180 degrees. Finally, the capture() method returns an image as an object of the Imager class, which will then be processed by the calling function.
To adjust the camera to the ambient light level, the calibrate method investigates a test image, determines its brightness, and then manipulates the camera sensitivity. If the new image still isn't perfect yet, the process continues. But how do you go about measuring whether an image is too light or too dark?
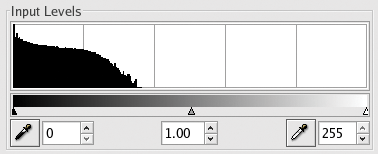
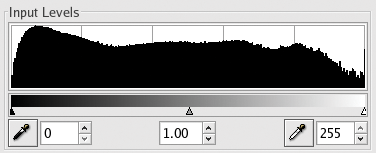
Figures 3 and 4 show the distribution of all RGB values for the pixels in two different images. The histogram in Figure 3 is taken from a heavily under-exposed image, which has a few RGB values in the lower ranges, but then abruptly drops off and does not give us any brighter tones. In contrast, Figure 4 shows a histogram for a normally exposed image, and you can see the even spread of values between 0 and 255.
To evaluate the brightness of the test image, we will use a primitive algorithm: aggregate all RGB values and divide by three times the number of pixels. If this gives about half of 256, then the average color reading point is in mid-range, and the image is more or less well-balanced.
However, Perl isn't designed for fast work like this. A 320 by 240 pixel image, where each pixel contains a value for the red, blue, and green channels, contains 230,400 data points. Running through these takes time, and this kind of number crunching can be a problem, unless we eliminate all overhead.
Fortunately, you can extend the Imager module using C, so we can zip through the data structures at warp speed and hand the results back to the Perl script. To do this, we need to create an Imager-Misc directory in the unpacked CPAN Imager module directory structure (we need to use some of its C header files) by typing the following:
$ cd Imager-0.51
$ h2xs -Axn Imager::Misc
In the emerging Makefile.PL below the Imager-Misc directory you need to change the INC => -I. line to INC => -I.. to allow the calls to perl Makefile.PL and make to find the Include files of the Imager distribution. h2xs also creates a Misc.xs file for the new speedy C code and a glue layer (see Listing 3).
| Listing 3: Misc.xs |
01 #ifdef __cplusplus
02 extern "C" {
03 #endif
04 #include "EXTERN.h"
05 #include "perl.h"
06 #include "XSUB.h"
07 #include "ppport.h"
08 #ifdef __cplusplus
09 }
10 #endif
11
12 #include "imext.h"
13 #include "imperl.h"
14
15 DEFINE_IMAGER_CALLBACKS;
16
17 /* ======================= */
18 int
19 brightness(i_img *im) {
20   int     x, y;
21   i_color val;
22   double  sum;
23   int     br;
24   int     avg;
25
26   for(x = 0; x < im->xsize;
27              x++) {
28     for(y = 0; y < im->ysize;
29                y++) {
30
31       i_gpix(im, x, y, &val);
32
33       br = (val.channel[0] +
34             val.channel[1] +
35             val.channel[2])
36            / 3;
37       sum += br;
38     }
39   }
40
41   avg = sum /
42         ((int) (im->xsize) *
43          (int) (im->ysize));
44   return avg;
45 }
46
47 /* ======================= */
48 int
49 changed(i_img *im1,
50         i_img *im2,
51         int diff) {
52   int     x, y, z, chan;
53   i_color val1, val2;
54   int     diffcount = 0;
55
56   for(x=0; x < im1->xsize;
57              x++) {
58    for(y=0; y < im1->ysize;
59             y++) {
60
61     i_gpix(im1, x, y, &val1);
62     i_gpix(im2, x, y, &val2);
63
64     for(z = 0; z < 3; z++) {
65       if(abs(val1.channel[z]
66             - al2.channel[z])
67          > diff)
68           diffcount++;
69     }
70    }
71   }
72
73   return diffcount;
74 }
75
76 MODULE=Imager::Misc PACKAGE=Imager::Misc
77
78 PROTOTYPES: ENABLE
79
80 int
81 brightness(im)
82         Imager::ImgRaw im
83
84 int
85 changed(im1, im2, diff)
86         Imager::ImgRaw im1
87         Imager::ImgRaw im2
88         int diff
89
90 BOOT:
91         PERL_INITIALIZE_IMAGER_CALLBACKS;
|
Line 18 of Listing 3 shows you the C code for the brightness() function; the Perl XS voodoo required to bind this to the Perl script follows starting in Line 80. The width of the image passed in is given in pixels by im->xsize, the height is in im->ysize. Two for loops iterate through the pixels, and the i_gpix macro extracts a pixel's color values. It returns an i_color structure in the variable val. The red value, for example, of a pixel can then be referenced as val.channel[0].
To build and install the new Imager::Misc module, just follow the normal steps: perl Makefile.PL; make; make install. use Imager::Misc loads the module; you can then access the new Imager::Misc::brightness function, which accepts an Imager image and returns an integer value to express the brightness of the image.
The simple algorithm gives us a brightness() value of 7 for the dark picture in Figure 3, and a value of 125 for the normally exposed picture shown in the histogram in Figure 4.
To set the camera to ambient light, the calibrate() method from Camcap.pm first shoots a test image, determines the return value passed in by the fast brightness function, and compares this return value with the ideal value of 128. If the measured value is under par, calibrate() calls cam_bright() to adjust the camera sensitivity. If the measured value is below the ideal value, that is, if the image is under-exposed, cam_bright() sets a higher value for the next test image.
calibrate() starts by shooting two images with maximum and minimum camera sensitivity. If the image is two dark at maximum exposure (or too bright at minimum exposure), the function will just keep the current value, as there is nothing it can do for a better image.
In all other cases, Capcam.pm starts a binary search for the optimum exposure between 0 and 65535. If the image is too dark, the algorithm continues its quest in the top half of the interval, and if the image is too bright, it uses the lower half. If all goes well, the camera should give you an image with a brightness value of 128 +/-20 (fuzzy parameter avg_acc). Also to avoid delays, the search terminates after five attempts.
If you let the webcam run 24x7, you will end up with an enormous number of images. But for monitoring purposes you will only want to keep the images that have changed considerably when compared with the previous image.
To filter out uninteresting footage, Misc.xs defines a changed function that returns the number of RGB values that have changed between two images. Besides two pointers to i_img structures (Imager::ImgRaw objects at Perl level), it expects a diff parameter for the difference between channel values. If the red value for one pixel in the first image is 15, and the red value for the same pixel in the second image is 30, the diffcount score counter is incremented, if a value of 15 or more is set for the diff parameter. This helps compensate for statistical deviation that occurs due to CCD chip noise or natural changes in the ambient lighting.
The tracker script in Listing 4 runs in an infinite loop, shooting one picture after the other but only storing new pictures if Imager::Misc::changed() signals a major change, caused by 2000 or more pixels exceeding the trigger threshold. If the count is below, it just overwrites the last image in the cache to keep track of gradual changes.
| Listing 4: tracker |
01 #!/usr/bin/perl
02 use strict;
03 use warnings;
04 use Camcap;
05 use Imager::Misc;
06 use Log::Log4perl qw(:easy);
07 use Cache::FileCache;
08 use Time::Piece;
09 use List::Util qw(maxstr);
10
11 my $c =
12     Cache::FileCache->new({
13  namespace => "tracker",
14  auto_purge_interval => 3600,
15  default_expires_in  =>
16                   48*3600 });
17
18 Log::Log4perl->easy_init(
19                      $DEBUG);
20
21 my $cam = Camcap->new();
22
23 while(1) {
24  my $lkey = maxstr grep /\d/,
25               $c->get_keys();
26
27  if(!$c->get("calibrated")) {
28   $cam->calibrate();
29   $c->set("calibrated",
30           1, 300);
31   my $img = $cam->capture();
32   saveimg($img, $c, $lkey);
33   next;
34  }
35
36  my $img = $cam->capture();
37
38  if($lkey) {
39
40   my $limg = Imager->new();
41   $limg->read(
42     type => "jpeg",
43     data => $c->get($lkey));
44
45   my $dpix =
46       Imager::Misc::changed(
47             $limg, $img, 80);
48   DEBUG "$dpix pixels changed";
49
50   if($dpix >= 2000) {
51    saveimg($img, $c);
52    next;
53   } else {
54       # minor change,
55       # refresh reference
56    saveimg($img, $c, $lkey);
57   }
58  } else {
59       # save first img
60    saveimg($img, $c);
61  }
62  sleep(1);
63 }
64
65 #############################
66 sub saveimg {
67 #############################
68  my($img, $cache, $date) =@_;
69
70  if(! $date) {
71   $date = localtime()->
72    strftime(
73         "%Y/%m/%d-%H:%M:%S");
74  }
75
76  DEBUG "Saving image $date";
77  $img->write(type => "jpeg",
78     data => \my $val) or die;
79
80  $cache->set($date, $val);
81 }
|
Stored images end up in a Cache::FileCache disc cache and are automatically deleted after 48 hours. A date key (such as 2006/03/28-11:21:22) is stored with the images. To retrieve the last image from the cache, tracker simply calls get_keys() cache, which returns all known keys. The maxstr function provided by the List::Util module then picks the most recent date value. And the get() cache function returns the matching image, expecting the key as an argument.
We want the camera to re-calibrate every five minutes to account for changing ambient light. To allow this to happen, a pseudo entry named calibrated is stored in the cache and deleted every 300 seconds. If the tracker fails to find the entry, it recalibrates and writes the value again.
The cacheprint script picks up images from the cache created by the tracker. It then creates JPEG images from the cache data and stores them on disk in a new temporary directory. Then cacheprint calls the montage program from the Image-Magick toolbox to create montages that look like contact prints. The xv viewer displays the thumbnails and matching date values (Figure 6).
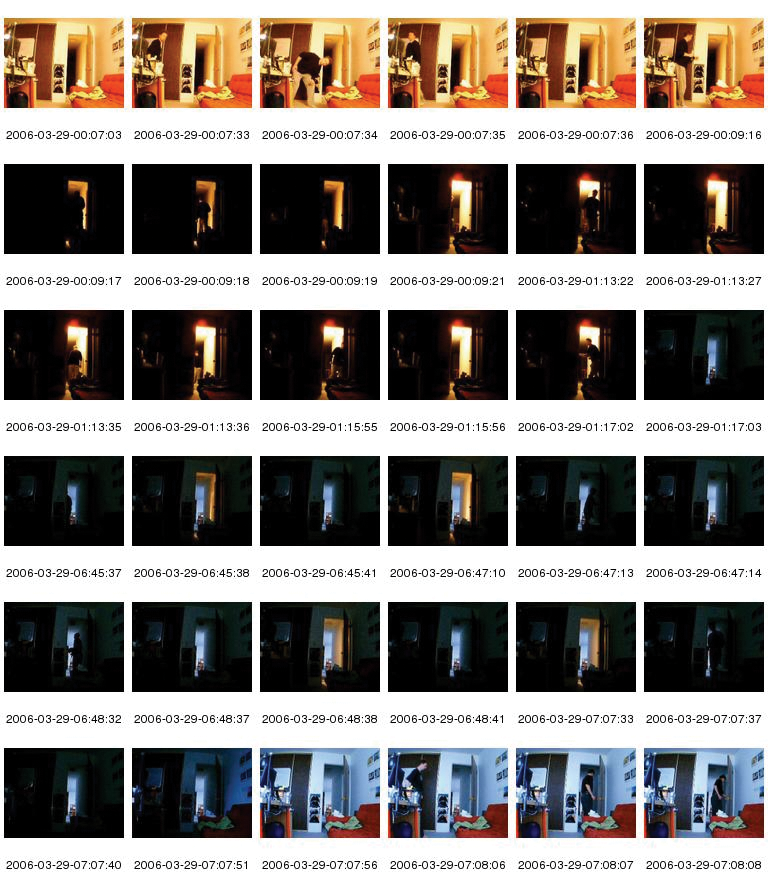
Figure 6 shows a half a day's worth of images that had enough changes so that tracker thought they were worth keeping. The images show the surreal world of the Perlmeister Studios. At 0:09, the light in the office goes out, and as of 1:17, all is quiet in the visible part of my apartment. Gradual changes between 1:17 and 6:45 are just overwritten with the 01:17:03 timestamp, until finally at 06:45:37 a person stumbling in the dark changes a significant number of pixels, causing tracker to register the movement. At 07:07:56 somebody opens the drapes, and daylight sweeps into the room.
| Listing 5: cacheprint |
01 #!/usr/bin/perl -w
02 use strict;
03 use Imager;
04 use Cache::FileCache;
05 use Time::Piece;
06 use List::Util qw(maxstr);
07 use Sysadm::Install
08   qw(rmf mkd cd);
09 use File::Temp qw(tempdir);
10
11 my $dir =
12   tempdir(CLEANUP => 1);
13
14 my $c =
15   Cache::FileCache
16   ->new({
17    namespace => "tracker" });
18
19 for my $date (
20  sort $c->get_keys()) {
21
22  next unless $date =~ /\d/;
23
24  my $val = $c->get($date);
25  my $img = Imager->new();
26
27  $img->read(
28   type => "jpeg",
29   data => $val
30  );
31
32  $date =~ s#/#-#g;
33  $img->write(
34   file => "$dir/$date.jpg")
35    or die "Can't write $!";
36 }
37
38 cd $dir;
39 my $str = "";
40
41 for (<*.jpg>) {
42  (my $date = $_) =~
43    s/\.jpg//g;
44  $str .= "-label $date $_ ";
45 }
46
47 `montage -tile 6x6 $str sequence.jpg`;
48 `xv $_` for <sequence*>;
|
| INFO |
|
[1] Listings for this article: http://www.linux-magazine.com/Magazine/Downloads/68/Perl
[2] Definition of brightness: http://en.wikipedia.org/wiki/Brightness [3] Marc Lehmann, "Capturing Video in Real Time," The Perl Journal, 2005/02 [4] Perl Imager module website: http://imager.perl.org |
| THE AUTHOR |
|
Michael Schilli works as a software developer at Yahoo!, Sunnyvale, California. He wrote "Perl Power" for Addison-Wesley and can be contacted at mschilli@perlmeister.com. His homepage is at http://perlmeister.com. |