
By Heike Jurzik
The command line has many applications for burning data CDs or DVDs. But before you can actually burn a disk, you first need to create a so-called ISO image. ISO (or ISO 9660, to use the full name) is the standard filesystem for managing files on CDs.
mkisofs and dd are command line tools that help you create ISO images. The mkisofs utility supports the Rockridge and Joliet extensions (see the sidebar titled "Rockridge and Joliet"). You can even use mkisofs to automatically back up your data, excluding individual files if necessary. dd is an alternative tool that might be your last chance for rescuing data on a dying hard disk.
| Rockridge and Joliet |
|
The Rockridge extension adds Unix-style file information - such as owner, group, access privileges, and symbolic links - to the ISO filesystem to avoid loss of data when copying from a Unix filesystem to a CD. At the same time, Rockridge supports longer file names. The Microsoft Joliet extension for the ISO 9660 standard also supports long file names. |
The practical dd tool really should be called cc, for convert and copy. But as this name had already been assigned to the C compiler, the developers just went for the next letter in the alphabet.
dd creates 1:1 copies of media, no matter whether these are hard disk partitions, CDs, or DVDs. dd supports reliable, block-wise reading and writing operations. As dd does not process or interpret these blocks, the underlying filesystem is not important. In fact, dd isn't even fazed by hard disks with errors (see the "Last Ditch Rescue" section). The basic command syntax for dd is:
dd if=source of=target
The if option lets you tell dd where to read the source data, and the of option defines the output.
The source and target are often devices such as hard disk partitions or CD/DVD drives. As an alternative, you can use an equals sign to point to a file. To copy the hard disk partition hda1 1:1 to /dev/hdb1, you type:
dd if=/dev/hda1 of=/dev/hdb1
You can also use dd to quickly copy a CD or DVD at the command line. To create an ISO image:
$ dd if=/dev/hdc of=myimage.iso
9153728+0 records in
9153728+0 records out
4686708736 bytes transferred in
 1209,649659 seconds (3874435
 bytes/sec)
When you are using dd, there is no need to mount the medium to perform a quick copy with dd. Replace the /dev/hdc drive designator with the device name for your drive.
The ISO image is written to a file called myimage.iso in the current directory.
dd has a number of flags. One practical parameter that speeds the program up considerably is bs (for "block size"). By default, dd will use 512 byte blocks - it reads 512 bytes at a time, and writes them to the output file. If you select a larger block size, you can speed this process up. For example, typing the following:
dd if=/dev/hda1 of=/dev/hdb1 bs=2k
This command tells dd to copy the partition in blocks of 2Kb (2048 bytes). If the last block is smaller than the specified block size, dd will not pad it:
$ dd if=/dev/hda1 of=/dev/hdb1bs=6k 16059+1 records in 16059+1 records out
98670592 bytes transferred in 13,801482 seconds (714927 bytes/sec)
The output tells us dd has copied 16059 blocks that each contain 6144 bytes with one remaining block of 4096 bytes.
Besides the block size, you can specify how many blocks you want dd to read. To copy 40MB, just write bs=1M count=40. The count option specifies the number of blocks. This makes sense if you want to save a hard disk boot sector - you would just copy the first 512-byte block by doing this:
dd if=/dev/hda of=bootsector bs=512 count=1
dd is an essential tool if you are faced with the daunting task of rescuing data from damaged file systems. Before you repair the damage, first create a backup copy. To do so, use dd to create a 1:1 copy of the damaged system, and then use the copy for your rescue attempt.
As dd will exclude defective sectors from the copy by default, you will need to enable the conv=noerror,sync option:
dd bs=512 conv=noerror,sync if=/dev/hda of=/dev/hdb
This tells dd to continue reading and storing data, even if it discovers defective sectors. The noerror tag tells dd not to stop on errors, and sync pads unreadable sectors with zeros.
The mkisofs ("make ISO9660 filesystem") tool simply creates ISO images, but it does so in a very capable way, and it gives you a number of additional features. The basic syntax is:
mkisofs parameter -o myfile.iso /directory/data
The -o flag lets you define the target file name. This is followed by the data you want to store in the image. As an optional parameter, you can tell mkisofs to enable Rockridge extensions by setting the -r option. You could specify -R instead to set privileges and file ownership. The Joliet extension is enabled by the -J flag:
mkisofs -J -R -o myfile.iso /directory/data
The -V lets you specify a name (volume ID) for the CD/DVD. If the name includes blanks and/or special characters, don't forget to use quotes:
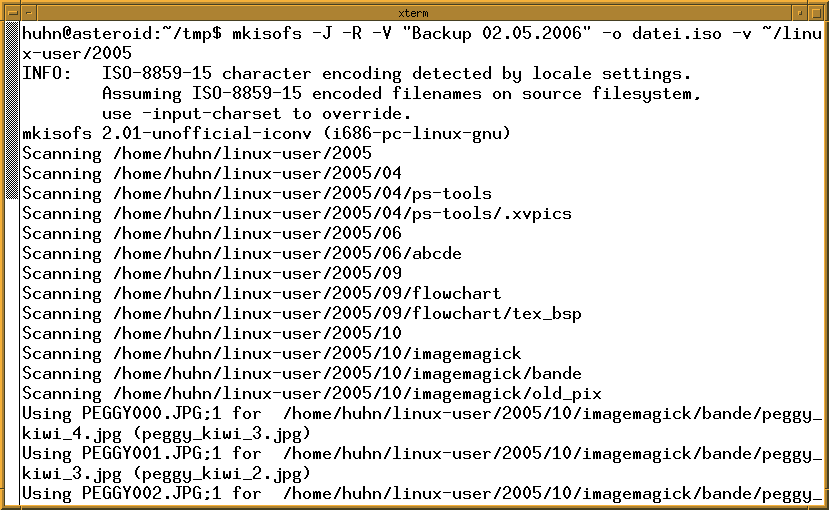
mkisofs -V "Backup 20060502" ...
For more detailed output, you could enable the -v (for "verbose") option (Figure 1). The opposite of the verbose option is -quiet. If you prefer to avoid status message output in your terminal window, but don't want to do without the information these messages provide, why not just pipe the output of the mkisofs command to a logfile:
mkisofs ... -log-file log.txt ...
Mkisofs has a number of practical options for creating regular backups. For example, the -m option lets you exclude files from an image. The file name arguments just follow the option. Mkisofs can even handle wildcards and multiple names. For example, to exclude all HTML files from your ISO image, you just do this:
mkisofs ... -m *.html -m *.HTML-o backup.iso /home/huhn
The -x option lets you exclude whole directories; multiple arguments are supported:
mkisofs ... -x /tmp -x /var -o backup.iso /
When you use these parameters, make sure you avoid using wildcards when specifying the files you wish to write to the image. The following command
mkisofs ... -m *.html -m *.HTML -o backup.iso *
tells the shell to resolve the final wildcard, thus adding all your files to the image.
If you want to exclude files with typical backup extensions, such as files ending in ~, #, or .bak, just specify the -no-bak option.
To create bootable media, just add the Isolinux bootloader [1], which works hand in hand with mkisofs:
mkisofs -J -R -o bootcd.iso -b isolinux/isolinux.bin -c isolinux/boot.cat -no-emul-boot -boot-load-size 4 -boot-info-table /folder/data
You may have noticed some additional mkisofs options in the preceding comamnd: the -b flag is followed by the boot image name, and -c lets you specify the boot catalog.
The -no-emul-boot parameter tells the program not to create an emulation when installing from this CD, but to instead write the contents of the image file to disk. The -boot-load-size 4 option specifies that the BIOS should provide four 512-byte sectors for the boot file. Finally, the -boot-info-table option stipulates reading of the medium's layout information at boot time. Note that this information must be stored in the isolinux directory below /folder/data.
The mount utility gives you a practical approach to testing ISO images before burning them on CD. To test your image, just mount it on your filesystem, specifying the -o loop option:
mount -o loop myfile.iso /mnt/tmp
Note that the mount point must exist, and you do need root privileges for this command. After completing the test, you can unmount the ISO image again by entering umount /mnt/tmp.
| INFO |
|
[1] Isolinux: http://syslinux.zytor.com/iso.php
|