
By Kurt Garloff
The long-expected Xen version 3 was finally released late last year. Xen, which is sponsored by the University of Cambridge, England, has developed into one of the leading virtualization solutions for Linux. Global Linux players, including Novell, RedHat, HP, IBM, Intel, and AMD, have thrown their support to Xen. Thanks to its excellent performance and low cost, the Xen virtual machine monitor could be the catalyst we have all been waiting for to boost virtualization in Linux.
The recent evolution of virtual computing has centered on the problem of delivering a virtualized environment with minimal system overhead. So-called full virtualization involves mapping computer chips, such as the CPU or the keyboard controller, to software. Full virtualization makes the virtual machine independent of its physical underpinnings, and is thus very flexible, but the structure necessary to maintain full virtualization adds complexity that significantly affects performance.
The goal of full virtualization is to emulate the CPU, which interprets every single machine instruction. Even if you just emulate machines with the same CPU architecture - in other words, even if the machine code can run natively - the emulator still needs to intercept any attempts to access the hardware in order to convince the operating system on the virtual machine that it has exclusive and unrestricted control. Emulators that control their guests in this way are often referred to as hypervisors.
One variation of this model is called para-virtualization. Para-virtualization allows specific, privileged virtual machines to communicate directly with the hardware. Instead of all the virtual machines communicating with the host, the privileged machine manages the interaction, and other virtual systems pass their calls to the privileged machine.
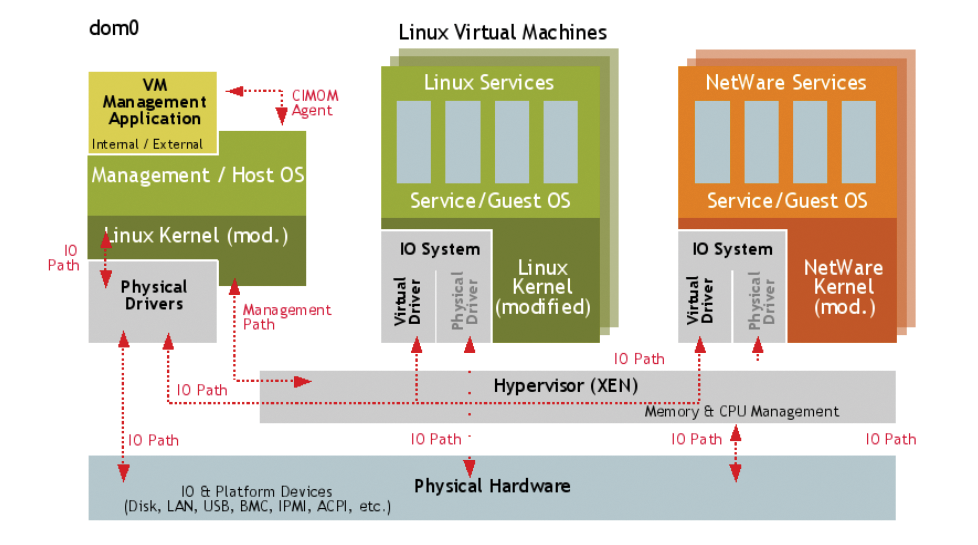
Xen is a popular virtualization system that uses the para-virtualization model. While the 1.x versions used their own device drivers, version 2 (fall 2004) focused on keeping the hypervisor as small and safe as possible. Hardware access is restricted to privileged domains. The first domain to boot, domain 0, has extended privileges, more specifically, the right to configure, launch, or stop other virtual machines. Domain 0 is launched directly after starting the hypervisor, and the hypervisor can't do much without it. In contrast to Domain 0, or dom0 for short, the unprivileged machines are referred to as domU (see Figure 1).
Xen shows an impressive turn of speed. Although most virtualization solutions look convincing when asked to tackle computationally expensive tasks, the true quality of a virtual machine is revealed by the way it handles applications that make heavy use of system calls, typically hard disk or network input/output operations. Xen scores top grades here. The overhead for building a kernel was just 2%, and still below 10% for Webbench via Gigabit Ethernet. You would have to shrink the MTU to see Xen with Gigabit break a sweat. According to the Xen project, Xen clearly outpaces VMware and User-Mode Linux [2].
Version 2 or later of Xen has the ability to migrate virtual machines (apart from Domain 0) from one physical host to another. When a virtual machine is migrated, its memory content is transferred over the network - without having to shut down the machine except at the very end of the process to copy the last few changed memory pages. The Xen developers have demonstrated this feature with web servers under load, and even with streaming video. The typically interruptions are of a magnitude of about one tenth of a second.
The release of Xen version 3 in December 2005 was a major milestone. Besides the many new features version 3 supports (see the New Features in Xen 3 box), the interface between the para-virtualized operating systems and the hypervisor was frozen to ensure that any work put into para-virtualizing an operating system kernel only needs to be done once in the future. This means we can look forward to more operating systems being ported to the virtual Xen3 architecture in the near future, including Netware, for example.
| New Features in Xen 3 |
|
Some of the new features included with Xen 3 are:
|
The easiest approach to getting started with Xen is to convert an existing Linux installation to a Xen dom0, to note the difference between the dom0 and a normal system, and to resolve any issues that occur. The second step would be to set up more domains to handle other tasks, or to migrate services that previously ran in dom0 to their own domains.
The first step in the conversion process is to install the hypervisor and the accompanying tools. The exact procedure depends on your distribution. The packages for Suse Linux 10.0 are titled xen, kernel-xen, and xen-tools, for example. You may need to install a few additional Xen packages; for example, Suse Linux stores the documentation in a separate package. And the documentation is definitely recommended reading.
If the packages are pre-December 2005, you will definitely want to check for updates. In the run up to the official 3.0 release, many bugs were squashed, greatly improving Xen's stability.
After installing the packages, it makes sense to add a boot loader entry for Xen. This gives you a dual boot system, where you can decide on booting whether to run the machine with the native kernel or to load the Xen hypervisor with the para-virtualized dom0 kernel. The boot loader entry for Grub might look something like this:
title XEN
   root (hd>X,Y>)
   kernel /xen.gz XENPARAMS
   module /vmlinuz-xen KERNELPARAMS
   module /initrd-xen
In this example, (hdX,Y) stands for the partition with the /boot directory, and KERNELPARAMS represents the normal kernel parameters, which you would pass to the native kernel. Xen will also accept parameters: for example, you can specify dom0_mem=XXX to set the memory size for dom0 (in Kbytes). If you do not specify the memory allocation, the whole memory will be assigned to dom0. lapic lets you enable an existing APIC interrupt controller, if the BIOS has disabled it; this could resolve interrupt issues.
That completes the count down: the computer can now load the hypervisor and dom0 instead of the native kernel. To be honest, this is a fairly unspectacular event: the boot process looks quite normal, and the Linux system will appear to be unchanged at first glance. But on closer inspection you will see that the hypervisor outputs a few initialization messages. If your distributor enables a bootsplash screen, the screen will be disabled and you will be treated to a view of VGA text mode.
The reason for text mode is that the Vesa Framebuffer driver does not work in Xen. As the hypervisor launches the kernel in the CPU's protected mode, the kernel is unable to call the VGA BIOS's real mode routines to set up the screen.
There are a few more hardware drivers that will not work in Xen. The reason for this is often buggy mapping of physical addresses to machine addresses; in some cases, the driver handles this rather than the hypervisor. Device drivers programmed to be portable should not cause any issues, but there are still a few drivers that will not work in Xen, including various wireless drivers, as well as the proprietary 3D drivers by nVidia and ATI - the free drivers will work. Also, expect trouble with ISA cards that use DMA transfer.
If you experience an issue with a hardware driver, the best you can hope for is that the driver will not work - the worst case would be a dom0 kernel crash. If this happens, virtualization will not help you one iota, as the hypervisor is useless without the dom0 kernel. In fact, the hypervisor doesn't even have its own keyboard and screen drivers that would let you debug the installation.
If your system crashes, your best bet is to disable the offending driver - this will typically be the last driver that output a message on your screen. The usual suspects are 3D drivers for X11, and the easiest way of remedying this is to set option 3 at the command line to boot Linux in text mode. Remember you have to pass this option to the kernel, and not to the hypervisor. To do so, you have to quit the graphical menu in Xen, type e to modify the kernel command line, and then press b for boot.
If this all works out, you should now have a Linux system running in dom0, and it should not look much different from your native system. This is the ideal setup: business as usual. On closer inspection you will notice that you have 50MB less memory available than normal. Xen reserves this memory at launch time.
When you boot dom0 in Xen, the init scripts should launch Xend, the daemon that runs in dom0 and allows you to control the other virtual machines. If the daemon is running, the root user can run the xm tool to display information about the other virtual machines, launch new virtual machines, stop existing machines, migrate, destroy, and so on. Xend also allows you to define the memory allocations for the virtual machines, along with their CPU priority.
For an overview of the basic xm commands, type xm help. xm info gives you information about the current Xen version. dm dmesg displays the hypervisor boot messages. xm list is a command that you will need quite frequently: it displays a list of active virtual machines and their memory consumption.
| xm list |
01 root@tpkurt:~ [0]# xm list
02 Name          ID Mem(MiB) VCPUs State  Time(s)
03 Domain-0      0      364     1 r-----   421.3
04 iSCSI0        1      128     2 ------   111.5
Besides Domain 0, you can see that a second virtual machine called "iSCSI0" is running; 128MB RAM have been allocated to the machine, along with two virtual CPUs. The virtual machine has consumed 111.5s worth of CPU cycles thus far. |
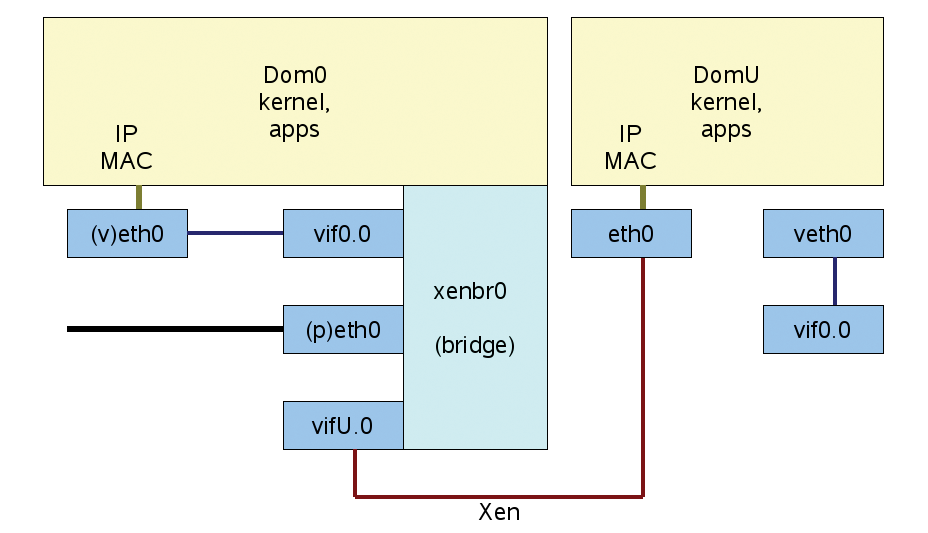
The Xend configuration is stored in a configuration file titled /etc/xen/xend-config.sxp. The default network settings in this file use bridging, with a Linux bridge in dom0. The xenbr0 bridge simply passes network packets fed in by one interface to all other network interfaces. The setting is complicated by the fact that Xen renames network interfaces on launching.
The eth0 interface becomes peth0; the hardware (MAC) and IP addresses are copied to the veth0 interface, which is then renamed to eth0. Internally veth0 is linked to vif0.0, which is connected to the bridge, as is peth0. Packets from applications in dom0 are now routed via the new (virtual) veth0, and via vif0.0 to the bridge xenbr0, and from there to the physical interface peth0 and to the network wire.
You may be wondering if there is a reason for this complicated setup. As soon as other domains are launched, their virtual interfaces just connect to the bridge, and this gives them access both to the physical network, and to dom0. Figure 2 gives you an overview of the setup.
Bridging is fairly complex - but you can set Xen up to avoid network interface renaming and bridging by using routing. This also makes sense if you use a wireless network interface - you can't just send Ethernet packets across the bridge in wireless packets because the format is different.
Figure 2 shows another domain that we will be launching shortly. As the domain boots its own kernel, it needs its own filesystem, which will also be booted virtually. There are a few approaches to providing a filesystem for the domain:
Only one virtual machine should access the file system images at any given time. If multiple machines mount a filesystem (without using a clustering filesystem), this would cause data corruption, just like it would with physical machines.
Configuring the virtual machines is a simple process (see the Sample Configuration box).
In Xen you will find a few well-documented sample configuration files below /etc/xen. In the sample file, the kernel is configured first, followed by Initrd (optional). These files are loaded from the dom0 filesystem when the domU is launched; this can be an issue, but we will be talking about this in more detail later. 128MB RAM are allocated to the virtual machine; a virtual network interface is created with the specified MAC address, and the interface is connected to the bridge, xenbr0. The logical partition /dev/VG_new/LV_iSCSI1 is assigned to the virtual machine as disk hda1. The boot parameters passed to it are root= and the virtual machine. The virtual machine's name is iSCSI1.
Instead of a single network device, we could have set up multiple devices. The same applies to hard disk partitions. It is also possible to emulate a whole hard disk instead of just a partition; the partition we use for this must contain a partition table. Specifying file: lets you export files with filesystem images as partitions, or files with hard disk images as virtual hard disks to the virtual machine.
When the virtual machine launches, the devices in dom0 are enabled by hotplugging. Dom0 is sent an event each for the network and the hard disk. The event is part of the Xen back-end subsystem and uses the kernel names vif* for the network, and vbd* for the hard disk. Udev should then call the appropriate scripts in /etc/xen/scripts/. After the scripts have completed, and the device has appeared in the Xenstore database, a hotplug event is triggered in the domU to make the device visible, following the approach used for physical hardware at boot time.
Hotplug is one of the stumbling blocks for production use of Xen. Older distributions use the old hotplug system instead of Udev. The /etc/hotplug/xen-backend.agent file is used instead of /etc/udev/rules.d/40-xen.rules. If hotplug is not configured correctly, an error message is issued. On the upside, if you use the Xen version that came with your distribution, this issue is unlikely to occur.
xm create -c configfile launches the virtual machine. The -c flag binds a virtual console to the virtual machine, so that you can watch the VM boot. Pressing Ctrl-] separates the terminal and the VM, but you can connect again by entering xm console.
The boot process will probably fail with a message to the effect that there is no memory available as Dom0 grabs the available memory on booting. You can either reduce the memory allocation for dom0, or set Xend up to do this automatically. Use xm mem-set 0 XXX for the former, and a setting of dom0-min-mem in /etc/xen/xend-config.sxp for the latter. After negotiating this obstacle, you should be able to boot the domU.
In older versions of the Linux kernel, a special balloon driver was used for memory manipulation. The driver occupied memory as needed, handing it to the Xen hypervisor, and accepting it back. Memory was tagged as reserved on Linux. The latest 2.6 kernels use a memory hotplug infrastructure so that free returns a different memory size after a mem-set operation.
At this stage it makes sense to go on a tour with the xm tool. You can stop, backup, and restart the virtual machine, modify the memory size and CPU priority, and many other things.
| Sample Configuration for a Xen Domain |
01 # Kernel and initrd to be loaded 02 kernel = "/boot/vmlinuz-2.6.13-15.8-xen" 03 ramdisk = "/boot/initrd-2.6.13-15.8-xen" 04 memory = 128 05 # Name, virtual CPUs, virtual network and hard disks 06 name = "iSCSI1" 07 #vcpus = 2 08 vif = [ 'mac=aa:cc:10:00:00:a1, bridge=xenbr0' ] 09 disk = [ 'phy:VG_new/LV_iSCSI1,hda1,w'] 10 # Parameters to pass to VM 11 dhcp = "dhcp" 12 hostname = "iSCSI1" 13 root = "/dev/hda1 ro" 14 # extra = "" |
If you have followed the steps to this point, you can now boot a Xen domU in text mode. You will note that a few system scripts have failed: anything that attempts direct hardware access is bound to fail, such as loading hardware-specific kernel modules, or trying to access the CMOS clock (hwclock).
In most cases, you can just disable the scripts. Hardware access does not make any sense, and the time on the virtual machines is automatically synced with the physical clock.
To boot a graphical desktop, the easiest approach is to launch Xvnc rather than a normal X server. The following entry in /etc/X11/xdm/Xservers will do this: :0 local /usr/X11R6/bin/Xvnc -br -geometry 960x720 -depth 24 -rfbwait 120000 -rfbauth /root/.vnc/passwd -rfbport 5900 -httpd /usr/share/vnc/classes.
The entry launches a virtual X server with 24-bit color depth and a resolution of 960x720 pixels. The server listens on port 5900, and you can use a VNCviewer client to talk to it. For security reasons you will be prompted for the password set by vncpasswd.
Changing the entries in corresponding configuration files will let you use KDM or GDM instead of XDM. Figure 3 shows a screenshot of a graphical virtual machine - this virtual machine is a minimal GUI configuration of SUSE Linux 10.0 that uses the openbox window manager. You can download a pre-built image of this setup from [4]. The machine is kept minimal for a reason; you can use it as a basic installation and install any other packages you need on top.

The ability to migrate a virtual machine from one physical host to another is one of Xen's most useful features. This feature gives administrators the ability to schedule planned hardware maintenance, or shift the load off an overstressed machine, or just swap a specific service out to a new machine. Other possible uses are for test and development environments, network and cluster simulations, or separate execution environments for security reasons.
The virtual machine moves house along with its kernel, and this implies taking the IP address and the kernel settings with it. Active server processes will just keep running (after a short interruption) and continue to use the same IP address.
The virtual machine needs access to its filesystem before and after migration. If the machine does not reside on a ramdisk, you need to use a network filesystem or network storage. In server applications, network storage is typically based on FibreChannel, to which both physical machines need access.
iSCSI is a low-budget approach. UNH or Enterprise Linux Target give you two software iSCSI servers that support network drive emulation.
Using Network Block Devices is even simpler. Typing nbd-server 20001 FILE exports the file (with a filesystem image) for nbd; the matching client-side entry is disk = [ `nbd:IP 20001,hda1,w' ]. The performance is quick enough if you have FastEthernet, and the migration just takes a few seconds on Gigabit Ethernet.
Xen 3 brings versatility - of the kind formerly restricted to mainframes - to PC platform-based virtualization. At this time of writing, installing most distributions involves some manual tweaking. But as integration continues to make progress, we can all look forward to a virtualization boom thanks to the flexibility it provides for applications.
| INFO |
|
[1] Xen: http://www.cl.cam.ac.uk/Research/SRG/netos/xen/
[2] Xen performance benchmarks: http://www.cl.cam.ac.uk/Research/SRG/netos/xen/performance.html [3] The latest news about Xen from the Wiki: http://wiki.xensource.com/ [4] Images for guest machines; http://www.suse.de/~garloff/linux/xen/images/ |