
By Wilhelm Meier, Torsten Kockler
Para-virtualization systems such as Xen inhabit a popular corner of the virtualization landscape, but other technologies are also emerging. The Linux-VServer project represents a different approach to virtualization.
VServer [1] and similar projects use a technique known as kernel-level isolation. Kernel-level isolation provides the virtual system with an isolated share of resources on the physical system. Other virtualization schemes typically require a separate kernel and separate memory and disk space for each virutal system. With VServer, on the other hand, the virtualization occurs at the interface of the virtual process with the host kernel. All virtual systems share the same kernel, and virtual processes actually run as regular processes on the host.
From a security viewpoint, VServer is similar to a jail mechanism. Processes within the virtual environment are isolated from the rest of the system, so that even if an intruder exploits a vulnerability to gain access to the virtual machine, the intruder will not be able to break out of the "jail" created by the system level isolation.
The philosophy behind VServer is to offer a system that makes maximum use of host resources and therefore requires minimal overhead for managing the virtual environment. VServer and other kernel isolation systems offer high performance and scale well for increased numbers of virtual units.
Because of its high efficiency, scalability, and built-in jail-like security, VServer is often used for web hosting services, although the benefits of VServer also lead to many uses on the corporate LAN. This article describes how to get started setting up a VServer system. You'll also learn about an alternative virtualization solution similar to VServer called OpenVZ [2].
VServer operates as part of the Linux kernel. Unfortunately, the benefits of VServer are not currently available with the plain vanilla kernel on Linux. Although the standard kernel has all the ingredients required to support partitioning, you will need to add a number of patches from the Linux VServer project.
Most distributions provide special kernel packages with the required patches, removing the need for users to patch the kernel themselves. If you prefer to avoid recompiling the new kernel, pre-built kernels are available for Linux VServer [1] and OpenVZ [2] on the project homepages.
The examples in this article are based on a Gentoo host system. Although the details may differ for other Linux distributions, the concepts are similar.
Gentoo's vserver-sources package has the patched kernel sources and util-vserver, the userland tool suite for the Gentoo distribution. Note that there is another package with a misleadingly similar name: vserver-utils [5]. This package is still under heavy development and will only work with developer versions of Linux VServer.
To install the VServer packages on Gentoo, just enter the following commands
emerge vserver-sources util-vserver
rc-update add vserver default
The last command launches the virtual servers when you reboot. You can then go on to build the new VServer kernel for the host, using genkernel, for example. Then modify the boot loader configuration and reboot. Before you do so, make sure you introduce the new kernel to the VServer helper script by entering echo `kernel.vshelper=/usr/lib/util-vserver/vshelper' >> /etc/sysctl.conf.
This script is used to halt and reboot a virtual server: after all, you only want to stop or start one virtual server while the host system keeps on running.
It is easy to set up a VServer environment. Start by specifying the name and context ID - these values have to be unique, of course. Then specify a network interface for the virtual server, along with the alias name and static IP address. The following command creates the configuration for an instance called VS01 in /etc/vservers/vs01. At the same time, it creates a minimal directory tree below /vservers/vs01; the installation will overwrite the skeleton tree later. vserver vs01 build -m skeleton --hostname vs01 --initstyle plain --context 1001 --interface vs01=eth1:192.168.39.11/24.
We can now carry on with the installation of the Gentoo guest system below /vservers/vs01 in the usual way and unpack a stage3 archive, along with a portage snapshot. If you are using a Gentoo host, like we are, you can ignore the bit with the portage snapshot and use a read-only bind mount to let the guest access the portage filesystem in the installation phase.
mount /usr/portage /vservers/vs01/usr/portage -o bind,ro
mount /usr/portage/distfiles /vservers/vs01/usr/portage/distfiles -o bind,rw
It is quite common to want to give all or a group of virtual servers shared access to a specific section of the filesystem. This is what bind mounts are used for in Linux. What this does is to mount a subtree of the filesystem at a different position. If you want to restrict this to read-only access, you will encounter one of Linux's less memorable features: the ro flag in combination with the bind option is silently ignored by the mount command. You would expect an error message here that the mount options for the source directory will apply.
In the virtual server's chroot() environment, now change the profile to vserver:
(vs01 chroot) gs / # rm /etc/make.profile
(vs01 chroot) gs / # ln -s
/usr/portage/profiles/default-linux/x86/2005.1/vserver /etc/make.profile
To complete this stage of the configuration, install the Syslog NG and Openssh packages and assign them to the default run-level. Of course, you won't need to build a kernel or install the boot loader for the virtual server. Instead just replace the normal boot scripts with the scripts from the baselayout-vserver package (see the box titled "Gentoo Baselayout VServer").
It is important to swap these packages, as virtual servers are not allowed to access devices directly, and this makes some actions, such as loading modules, meaningless to the virtual server. The same principle should apply to OpenVZ, however, some modifications are required in this case [4].
At this point you will also need to change the Syslog NG configuration (see Listing 2), as access to /proc/kmsg is impossible in a VServer environment. The VServer patches prevent the opening of this pseudofile and also block /proc/uptime.
Before leaving the chroot() environment, don't forget to modify the content of your /etc/conf.d/hostname and /etc/conf.d/domainname files.
Time to launch the new server, by entering vserver vs01 start. The border between the host system, that is context 0, and the VServers is semi-permeable. In other words, you can enter the virtual servers without authenticating, although this does not apply in the opposite direction.
Checking the process list tells shows there are quite a few differences between the virtual world and a native environment. So what exactly happens when you launch the VServer?
| Gentoo Baselayout VServer |
|
To use the installed Gentoo guest system in the virtual world of VServer, you need to replace the Baselayout package with the Baselayout-VServer package. This mainly modifies the boot scripts, causing some quite dramatic changes to /etc/init.d/ (Listing1). |
| Listing 1: VServer-Baselayout |
01 (vs01 chroot) gs / # emerge baselayout-vserver 02 (vs01 chroot) gs init.d # ls -l 03 total 84 04 -rwxr-xr-x 1 root root 2871 Jan 16 14:48 bootmisc 05 lrwxrwxrwx 1 root root 5 Jan 16 14:48 checkfs -> dummy 06 lrwxrwxrwx 1 root root 5 Jan 16 14:48 checkroot -> dummy 07 lrwxrwxrwx 1 root root 5 Jan 16 14:48 clock -> dummy 08 lrwxrwxrwx 1 root root 5 Jan 16 14:48 consolefont -> dummy 09 ... 10 ... 11 lrwxrwxrwx 1 root root 5 Jan 16 14:48 urandom -> dummy |
| Listing 2: syslog-ng.conf |
01 options {chain_hostnames(on);
02         sync(0);
03         stats(43200);};
04 source src { unix-stream("/dev/log"); internal();};
05 destination server { udp("192.168.39.10",port(514)); };
06 log { source(src); destination(server); };
|
First of all, the vnamespace tool sets up a new Linux namespace for processes by calling clone() with the CLONE_NEWNS flag. A namespace is a process-specific view of the filesystem tree. If you run mount in the namespace for process A, this will not be visible to process B in another namespace. This explains why mounts for virtual servers do not affect the host system's namespace. Additionally, the VServer root filesystem for the new namespace is recursively bind mounted as /, making it impossible to break out of the chroot jail. An attacker who broke out of the jail would end up on the VServer filesystem.
Following this, aliases are set up for the network interfaces. The chbind tool binds the other processes to the VServer IP address.
The interface configuration for the VServer is located below /etc/vservers/vs01/interfaces/0/. If the virtual server has multiple interfaces, you can add more directories /etc/vservers/vs01/interfaces/[1-9] and copy the files.
The next step is to mount the required directories in the namespace. The root directory comes first; it is specified as a link in /etc/vservers/vs01/vdir, followed by the mounts in /etc/vservers/vs01/fstab. You will need entries for /proc and /dev/pts as a minimum. If you also want to mount the host system's portage tree at runtime, you can use the fstab in Listing 3 to do so.
| Listing 3: fstab for VServer |
01 none /proc proc defaults 0 0 02 none /tmp tmpfs size=16m,mode=1777 0 0 03 none /dev/pts devpts gid=5,mode=620 0 0 04 # shared portage tree 05 /usr/portage /usr/portage none bind,ro 0 0 06 /usr/portage/distfiles /usr/portage/distfiles none bind,rw 0 0 |
Exercise caution if the VServer is untrusted. Although checksumming will protect you against files being replaced, the guest system will be able to inject data into the host and other VServers in this configuration.
Finally, enter vcontext to define the process context for the first process on the VServers, and chbind to restrict binding to the virtual server's IP addresses. Only set scheduling parameters and resource limits if the administrator decides to use them. For a Gentoo VS, the first process to launch is /sbin/init; for a Debian VS, this would be /etc/init.d/rc 3.
On a Gentoo system, launching init would normally just run the scripts for the boot soft level before going on to run default. Of course, you can't use the original Gentoo scripts for this purpose, as the original scripts assume a native system and privileged access such as to /dev/hda1 for a filesystem check, or to set the clock. This is why the baselayout-vserver package modifies /etc/inittab and replaces the boot scripts to run just the following:
bootmisc
domainname
hostname
local
net.lo
rmnologin
ssh
syslog-ng
It makes sense to stop the VServer at this point by running vserver vs01 stop, and to back up the complete filesystem as a template for later virtual servers: cd /vservers; tar zcvf vserver-gentoo-template.tgz ./vs01
A virtual server should appear just like a native Linux environment to applications and users. Some mapping is required to achieve this aim. One example of this is the PID of the init process. Although this is not strictly required, many programs implicitly assume that init is PID 1. There is no way for this to be true of a VServer. Thus, the entry for init has to be explicitly PID 1 when virtualizing the /proc filesystem.
If the guest is a Debian VS, only /etc/init.d/rc 3 is run on booting, and this means that an init process does not even exist. In this case, the /proc/1 has to be simulated. This also applies to the other entries below /proc, such as /proc/uptime.
Adding more environments is quite simple now. Use vserver to create a new VS configuration, and copy the VS filesystem. Then change the network settings. The vserver-new tool makes this even simpler:
vserver-new vs02 --context 1002
--hostname vs02 --interface
vs02=eth1:192.168.39.14/24 clone vs01
The interesting thing about virtualization based on kernel level partitioning is that the kernel is the same for all partitions, or virtual servers. This is not a major restriction, as it does not stop you installing third-party distributions as guest systems. In our example, we will be setting up a Debian guest on a Gentoo host.
This is amazingly easy to do using debootstrap. Instead of setting up a VServer skeleton as described above, you can allow vserver to cooperate with debootstrap. After running emerge debootstrap, do this to complete the VServer installation.
vserver vs03 build --context 1003 --hostname vs03 --interface \
vs03=eth1:192.168.39.23/24 -m debootstrap -- -d sarge
The more VServers you set up, the more storage capacity you will need. If all your servers are created using the same template, most of the files will be identical for multiple servers. To streamline the process, you might like to allow your virtual servers to share parts of the filesystem.
If guest administrators will not be making any major changes to the servers, one option is to mount the root filesystem read-only with the exception of /etc, /var, and the data filesystems. Unfortunately, this is too restrictive in many setups.
Linux VServer uses a different technique: unification and copy-on-write link breaking. First, the virtual subtrees are unified by means of hardlinks. Hardlinks are removed on writing, and replaced by modified files (see the following section, Unification and Copy-on-Write Link Breaking).
| The Address Binding Trap |
|
You have to make sure that server processes in the host context do not bind to all available interfaces and aliases. Failure to do so means that the daemons running on the virtual servers will be unable to bind. The ssh daemon is a typical troublemaker. The daemon is configured to bind to all addresses by default. To avoid this trap, make sure you enter the right addresses in /etc/ssh/sshd_config, and make sure there are no entries for the VServer aliases. ListenAddress 192.168.1.0 ListenAddress 192.168.39.10 ListenAddress 192.168.48.10 |
If the virtual server directories reside on one filesystem, you can use the vhashify to group identical files in a central directory and replace the files by hardlinks on the virtual servers, leaving just one instance of each file object, and thus saving storage space. Of course, write access can only happen on the executing virtual server. The approach that allows this is known as copy-on-write link breaking (CoWLB). The hardlink that points to the central directory is removed, and the file is replaced by the modified copy. CoWLB is supported by developer 2.1.0 of the VServer patches, or newer.
This approach can be applied to arbitrary directories, as the following example demonstrates. A file called x resides in the directories /vservers/a0[12]:
gs vservers # ls -li a0[12]/x
685511 -rw-r--r-- 1 root root 942 Jan 17 07:12 a01/x
685514 -rw-r--r-- 1 root root 942 Jan 17 07:12 a02/x
By calling
gs vservers # /usr/lib/util-vserver /vhashify --manually --destination
/vservers/.hash /vservers/a01 exclude /vservers/vexclude
we can replace the file with a copy that has inode 122620. Very small files are ignored.
For the a01/x file, the immutable and as unlink flags are set by vhashify. This prevents modification of the file but allows the hardlinks to be removed. This is used to implement copy-on-write.
gs vservers # showattr a0[12]/x
----UI- a01/x
----ui- a02/x
This hasn't had much effect thus far. So let's apply the same principle to the /vservers/a02 directory:
gs vservers # /usr/lib/util-vserver/vhashify --manually --destination /etc/vservers/.defaults/apps/vunify/hash /vservers/a02 exclude /vservers/vexclude
gs vservers # ls -li a0[12]/x
122620 -rw-r--r-- 3 root root 942 Jan 17 07:12 a01/x
122620 -rw-r--r-- 3 root root 942 Jan 17 07:12 a02/x
Now both entries exist as hardlinks to inode 122620. If we now change the file, the hardlink is removed, and the file replaced by a copy:
gs vservers # echo "test" >> a02/x
gs vservers # ls -li a0[12]/x
122620 -rw-r--r-- 2 root root 942 Jan 17 07:12 a01/x
685511 -rw-r--r-- 1 root root 947 Jan 17 07:14 a02/x
vhashify unifies the two directories on the VServer vs01 and the clone vs02. The /vservers/vexclude file contains an exception list with paths that we do not want to unify. This makes sense for inherently variable data such as the subtree below /var, or the device files below /dev. vhashify is the successor to vunify and can use the same default exception list in /usr/lib/util-vserver/defaults/vunify- exclude. If you now create a link, ln -s /vservers/.hash /etc/vservers/.defaults/apps/vunify/hash/0, you can unify simply by typing /usr/lib/util-vserver/vhashifyvs02.
You will see that the .hash directory has grown considerably, although nothing appears to have happened to /vservers/vs0[12].
gs vservers # du -sh /vservers/.hash /vservers/vs0[12]
391M    /vservers/.hash
331M    /vservers/vs01
331M    /vservers/vs02
The vdu tool can correctly distinguish between hardlinks. The space savings for a large number of VServers are enormous.
gs vservers # vdu /vservers/vs0[12]
/vservers/vs01  5K
/vservers/vs02  5K
Depending on what application you have in mind for your VServers, you may note that VS directories tend to drift apart.
Another elegant approach to unifying VServer subtrees uses UnionFS [6], and it supports unification across filesystem boundaries. UnionFS is (still) not included with the official kernel and is actually masked in Gentoo. This means installing the kernel module and userpace tools by running ACCEPT_KEYWORDS= "~x86" emerge unionfs. Development is making rapid progress, and the current version is stable enough for our purposes.
UnionFS [6] is a so-called fan-out filesystem. Filesystem operations are distributed across a fan of underlying filesystems (Figure 1). The farther left a branch is in the fan, the higher its priority. A search operation for a file, a, will start in the branch on the far left and end in the branch in which the file is found.
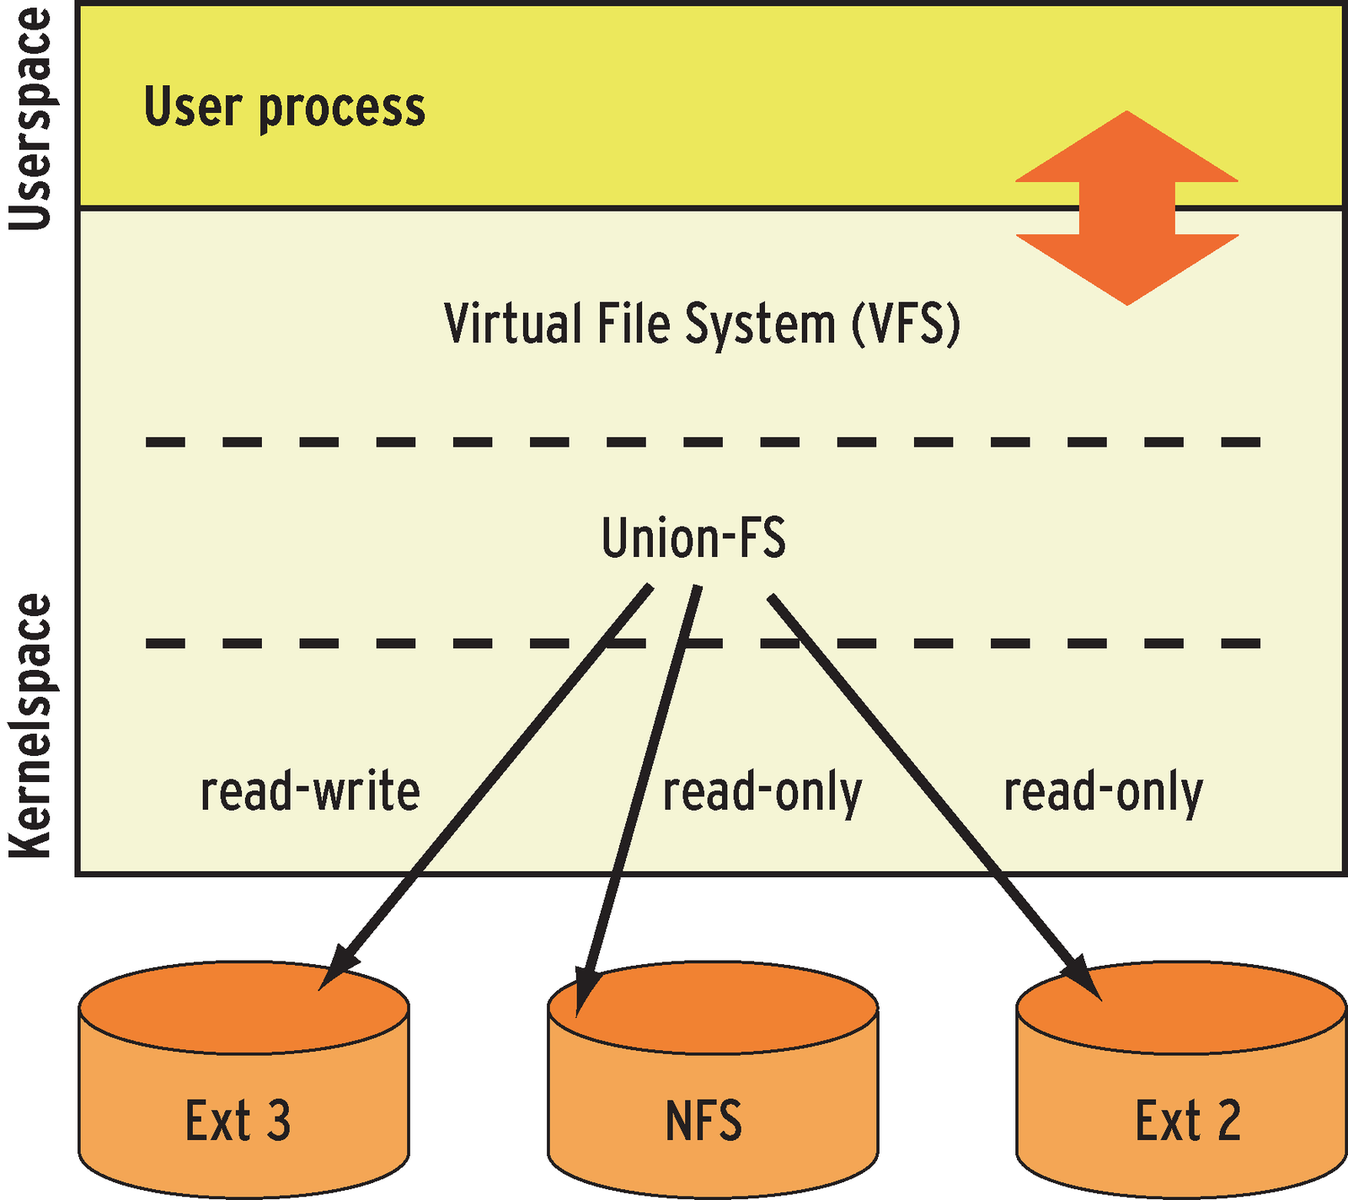
If the branch with the highest priority is mounted read-write in the fan, the array can be used for write operations. To delete a file, b, it is not sufficient to delete the file from the highest priority branch, as the file might exist in branches farther to the right. In this case, a whiteout file, .wh.b, is written to mask the files to the right. This is even necessary if the file is from a read-only branch. If you create a file, C, the file can only be created in the read-write branch. To modify a file, d, from the read-only branch, you first need to copy the file to the read-write branch with the next highest priority (copy-up).
We can use unionctl to dynamically insert the /vservers/vsnoportage branch into a unionfs filesystem in front of /vservers/vsmaster, and we will probably want to add an entry in /etc/fstab to make this persistent:
none /vservers/vs04 unionfs dirs=/vservers/vs04diff=rw:/vservers/vsnoportage=ro:/vservers/vsmaster=ro 0 0
After starting VS vs04 we have a system without portage package management. Of course, this principle can be applied to other packages that we need to add or remove independently of the master. However, package manipulation should be restricted to one branch of the UnionFS for consistency reasons.
If you intend to use BME and CoWLB, in combination with UnionFS on a host system, this currently means applying a UnionFS patch [7]. This step is made necessary by the vfs helper signature changes caused by the Linux VServer patches, and you lose compatibility to kernel modules that call vfs helper in the traditional way.
| Contexts |
|
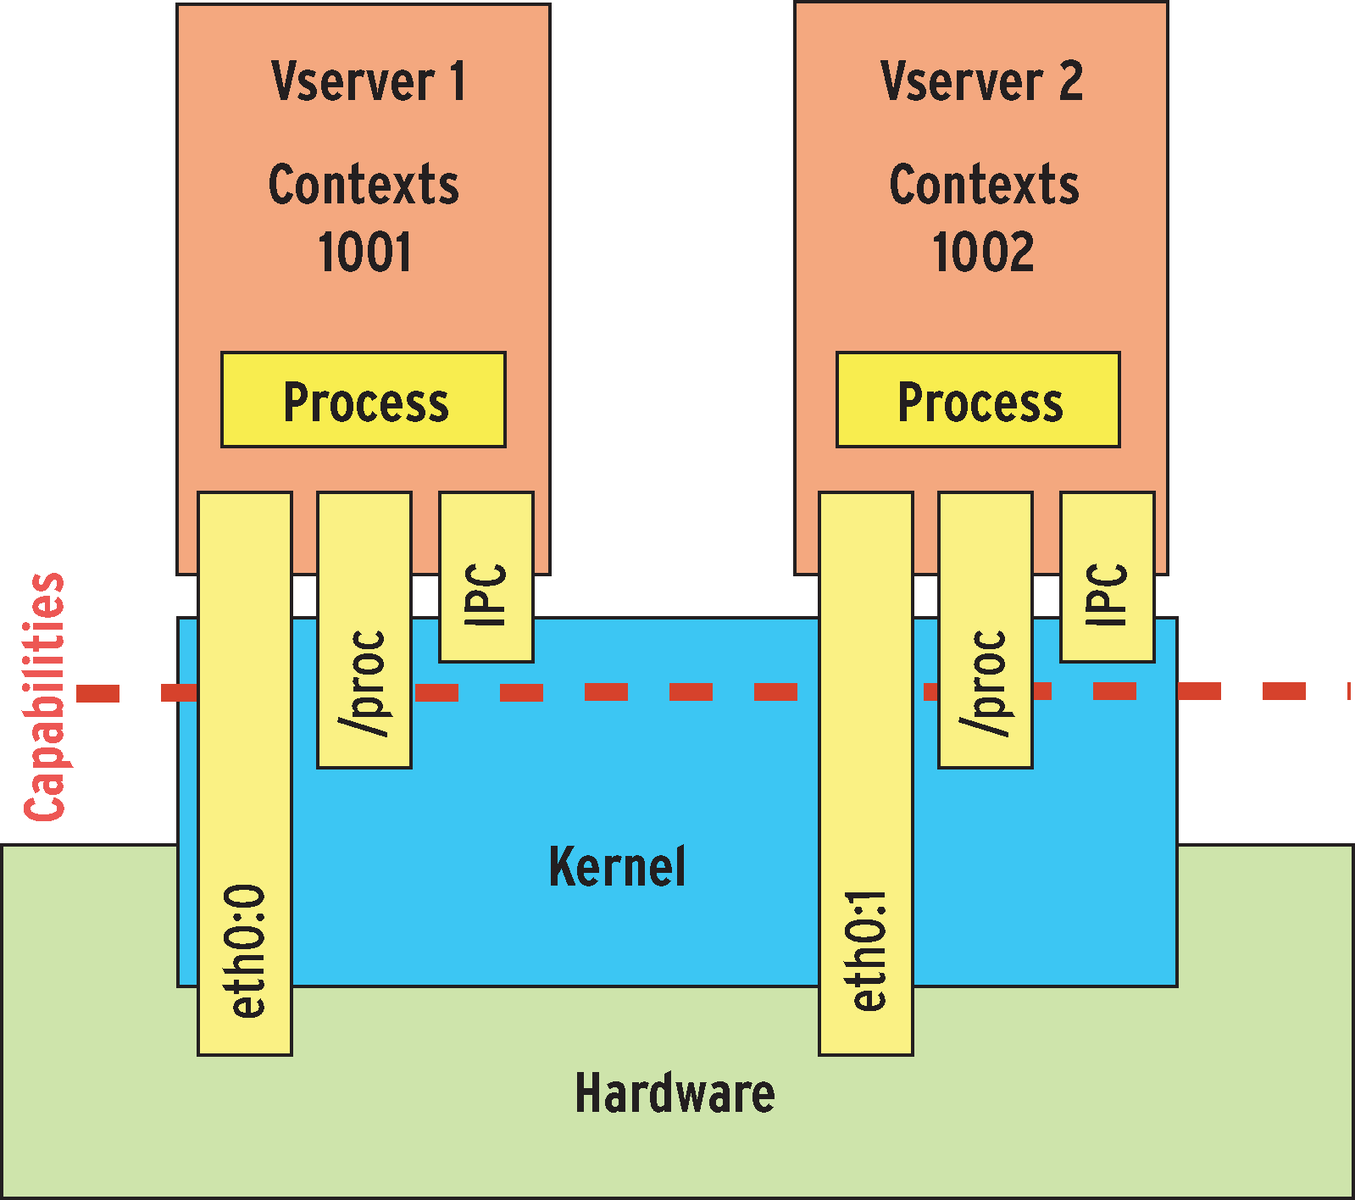
The introduction of contexts is one of the most significant modifications that the VServer patches make to the Linux kernel. A context defines the number of processes that cooperate and compete with each other. Processes in different contexts can no longer cooperate on the local system (see Figure 2). To allow this arrangement , a context ID is added to the PID to support unique process designation. The original context is assigned an ID of 0. This context is automatically generated when the kernel is booted. The root context does not play any special role in separating processes, and the processes in other contexts cannot be influenced from within it. To give administrators an overview of all the processes in all contexts on a system, the monitoring context 1 has been introduced. All the processes on the system are visible in context 1, which you can only enter from the root context. The vcontext command lets you create a new context, or enter an existing context. The vcontext --migrate --xid 1 ps aux command enters monitoring context 1 and launches ps aux in this context to output a process list for all contexts. The vps and vtop tools are available for simple administration work and will additionally list the context ID and context name. For reasons of security, the root context 0 should only be accessible for managing the other contexts on a Linux VServer system. Services run in their own contexts, and access to the root context should be secured. |
OpenVZ [2], the free variant of the commercial virtualization solution Virtuozzo [3], provides similar functionality to Linux VServer. The kernel patch is available on the OpenVZ website [2], as are prebuilt kernels. For Gentoo there is a openvz-sources package to help you integrate the OpenVZ patches and other critical patches. The required user level tools are located in the vzctl and vzquota packages. At this time of writing, the OpenVZ patches are designed for kernel version 2.6.8. Stable patches are not available for more recent kernels. A beta version of the patches is available for kernel version 2.6.15. And you can always run genkernel to build a kernel. But the easiest approach is to use a stable configuration from the OpenVZ website. Drop the version into /usr/src/linux as the .config. Then proceed to the build, as usual. To automatically launch the OpenVZ server, you will want to run rc-update add vz default.
Note that you will need to create the /dev/vzctl before launching for the first time: /bin/mknod /dev/vzctl c 126 0. If the RC_DEVICE_TARBALL="yes" option is set in /etc/conf.d/rc, the device file is saved to /lib/udev-state/devices.tar.bz2 when you down the host, and regenerated the next time you boot.
Another important thing is to make the required changes in /etc/sysctl.conf:
net.ipv4.ip_forward = 1
net.ipv4.conf.default.proxy_arp = 0
net.ipv4.conf.all.rp_filter = 1
net.ipv4.conf.default.send_redirects = 1
net.ipv4.conf.all.send_redirects = 0
kernel.sysrq = 1
After you generate the kernel, modify the bootloader, and install the userspace tools, you can then relaunch the system.
It might seem like a good idea to install a Gentoo guest system right now, and it will not be long until you can use the baselayout-vserver template mentioned earlier to do this [4]. Pack the VServer master, and store it in /vz/template/cache/vsmaster.tar.gz. You can then go on to create an OpenVZ guest like this:
vzctl create 2001 --ostemplate vsmaster --ipadd 192.168.39.21 --hostname ovz01
Again, in a similar fashion to VServer, we need to assign a context ID. Add .tar.gz to the value of the parameter for ostemplate, and rename the archive with the guest system to /vz/template/cache. This will not work in Gentoo, due to a few bugs that should be easy to remove but currently prevent production use.
On a brighter note, it is easy to install a Debian guest system. Use debootstrap to prepare a system, and compress the system for installation on OpenVZ:
cd /vz/template/cache
mkdir debian_sarge
debootstrap sarge ./debian_sarge
cd debian_sarge; tar zcvf ../debian_sarge.tar.gz .
The installation tool, vzctl, unpacks the archive, drops it into /vz/private/<id>, and runs the /etc/vz/dists/scripts/postcreate.sh script to make a few changes.
vzctl create 2005 --ostemplate debian-sarge --ipadd 192.168.39.25--hostname ovz05
Note that OpenVZ uses /sbin/init to launch the guest systems. The getty processes launched by init are useless, due to a lack of hardware access, and the same applies to klogd. Virtualization with OpenVZ removes /proc/kmsg. Make sure you disable these services to resolve these issues. As the boot scripts do not run any mount commands, you will need to replace /etc/mtab with a symbolic link to /proc/mounts.
Use vzctl enter 2005 to change to the VPS context. Make sure you verify, or explicitly set, the bash environmental variables. After running apt-get update, you can install any software you need. Save the modified guest system as a template for Debian when you are finished; you can then use the template to generate additional guest systems.
If you need to perform special actions when starting and stopping a virtual server, you can use scripts to do so. In contrast to what the OpenVZ manual tells you, the Gentoo host system expects these scripts in /etc/vz/<vsid>.{mount,umount,start,stop}. The mount/umount scripts run in the host context, whereas the start/stop scripts run in the VS context.
Templates for various distributions are at [2]. Besides Debian, the templates support CentOS and Fedora at present. These distribution templates give you an easy approach for installing both guest systems.
Unfortunately, the methods we referred to earlier to support managing large numbers of virtual servers are not currently supported by OpenVZ. Then again, SWsoft does offer a commercial tool for this, Virtuozzo.
UnionFS is no longer compatible to the fairly ancient kernel 2.6.8, and you can't apply the BME patches. This problem will disappear when support for more recent kernels is implemented. As a workaround for this issue, you can try swapping the VS filesystems out to a high-performance NFS server. This adds the benefit of painless migration of a virtual server from one physical machine to another.
Neither VServer nor OpenVZ has realized its full potential. Besides effective VServer management, it is also important for the system to have granular resource controls for managing hard disk space and CPU cycles. Again, both the VServer and OpenVZ projects do have mechanisms such as quotas and fair-share scheduling for resource control.
| INFO |
|
[1] Linux-VServer: http://linux-vserver.org/
[2] OpenVZ: http://openvz.org/ [3] SWsoft Virtuozzo: http://www.virtuozzo.com/ [4] Gentoo VPS: http://dev.croup.de/proj/gentoo-vps [5] Gentoo VServer-Utils project: http://dev.croup.de/proj/vserver-utils [6] UnionFS homepage: http://www.fsl.cs.sunysb.edu/project-unionfs.html [7] VServer development UnionFS patch: http://mozart.informatik.fh-kl.de/download/Software/VServer/vserver.html [8] VServer in Wikipedia: http://en.wikipedia.org/wiki/Linux-VServer [9] Freshmeat project details: http://freshmeat.net/projects/vserverl [10] VServer paper: http://linux-vserver.org/Linux-VServer-Paper |