By Markus Klimke
Linux has no end of options for backing up data, however, a one-to-one copy will always use the same amount of space as the hard disk partition. You can save space by bundling the backup data into a compressed archive.
tar is a die-hard tool from the early days of Unix, and a GNU variant of tar is included with any Linux distribution. The program, which was originally developed as a "tape archiver," has been continually extended over the years. Its original task of storing data on tape is just one of many tasks tar handles today.
At first glance it might seem strange to bundle a Linux installation in a tarball and unpack it at a different location. However, the following command:
tar -cvjpf /tmp/image-date.tar.bz2 /
writes a complete snapshot of your Linux installation to a file. You can unpack the file on a different disk, or a different filesystem, in case of emergency or if you need to create a copy.
The -c option tells tar to create an archive; -p passes in the permissions, and -v provides verbose output on screen. -f assigns a name to the file you are creating. The slash following the image name indicates the starting point for the archive, and the -j flag creates a Bzip2 compressed archive.
Instead of -j, you could specify -z to use gzip to compress the archive. The differences are the resulting size of, and the time taken to create, the archive file: gzip is quicker, but it creates larger files; bzip2 takes longer, but it uses a more efficient compression method. How long a backup will take, and the size of the resulting tarball, depend on the CPU and the data you are handling.
So far, so good: but if you attempt a backup like the one I just described, you will notice a number of error messages. We told tar to create an image of the root filesystem, so it will try to recursively add itself to the backup. And while doing so, tar tells us that the image file has changed during the archiving process. Although you might be able to live with this, there is not much point in adding all your files to the image.
You will probably want to back up the data in your home directory on an external storage medium, but volatile data like this should not be part of your recovery image. This data has nothing to do with restoring the system and only inflates the tarball unnecessarily.
To explicitly exclude files and directories from the tarball, tar gives you the --exclude-from option. The flag reads the file and directory entries to be excluded from the archive from a file:
user # cat << EOF >> /tmp/out
> /home/*
> /mnt/*
> /usr/portage/distfiles/*
> /tmp/backup-date.tar.bz2
> EOF
user # tar -cvjp --exclude-from=/tmp/out -f /tmp/backup-date.tar.bz2
The wildcards that follow the directory names remove all files and directories below the directory you want to exclude. If you leave out the wildcard, tar will exclude the whole directory from the archive. The exclude file should also include the image filename.
Before you create an image, run the mount command to check what you have mounted. Any external media or network shares will become part of the image if you forget to unmount or exclude. Some distributions do not mount the boot partition for security reasons. In this case, you should make sure that root is added to the image.
After creating an image with the content you need, the next step is to use a burning tool of your choice - say K3b - to burn the image onto a DVD.
During the recovery process - that is, the process of restoring the image you created - a Linux live CD can be a big help, as it lets you boot a minimal distribution. The most popular live CD has to be Knoppix [1]. As the steps for restoring the image take place at the command line, a text-based live CD, such as the Gentoo Live CD [2], Grml [3], or the Suse or Red Hat installation in rescue mode will be just fine. All of these distributions give you all the tools you need.
To free up the DVD drive for the disk with the recovery image after booting, you have to boot the live distribution in a way that places the operating system in your machine's memory. You can then unmount the live CD after booting and insert the medium with your image. Most live systems call this boot parameter toram. If you have Knoppix, you would enter knoppix toram; for Grml, this would be grml toram. And if you have the Gentoo Live CD, the gentoo docache command will do the trick.
Before restoring the image, partition and format your hard disk with the text-based fdisk partitioning tool.
In Linux, hard disks are reference by device names like /dev/hda (IDE), or /dev/sda (S-ATA/SCSI). The last letter in the device name (this is, "a" in our example) refers to the drive "number." For example, the second IDE disk in a PC has a device name of /dev/hdb, and so on. For partitions, a serial number is appended to the device name; for example, /dev/sda1 is the first partition on the first S-ATA or SCSI disk.
Let's launch into the recovery process at the live CD prompt. Start by typing fdisk /dev/hda to enter fdisk's command mode. Typing m at the fdisk prompt lists the available options. If the disk is not brand new, you may need to remove any partitions already on the disk. Type p (for "print") to output an overview of the current hard disk partitions; d ("delete") will delete the partitions.
Table 1 shows the commands you need to set up a hard disk with four partitions. Your requirements may be different. You can create an "extended" partition as partition four and then add a few logical partitions, but four partitions should be fine for a desktop system.
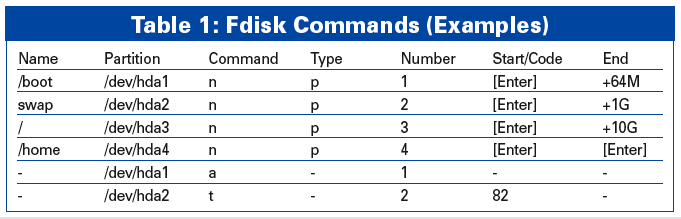
The n (for "new") command tells fdisk to create a new partition. Fdisk will ask you if this is a primary or extended partition. The tool also expects the partition number and the start and end cylinder numbers, or the size (in kilobytes, megabytes or gigabytes).
The a (for "active") command tags the first partition as your boot partition. For the swap partition, you will need to press t (for "type") and stipulate type 82.
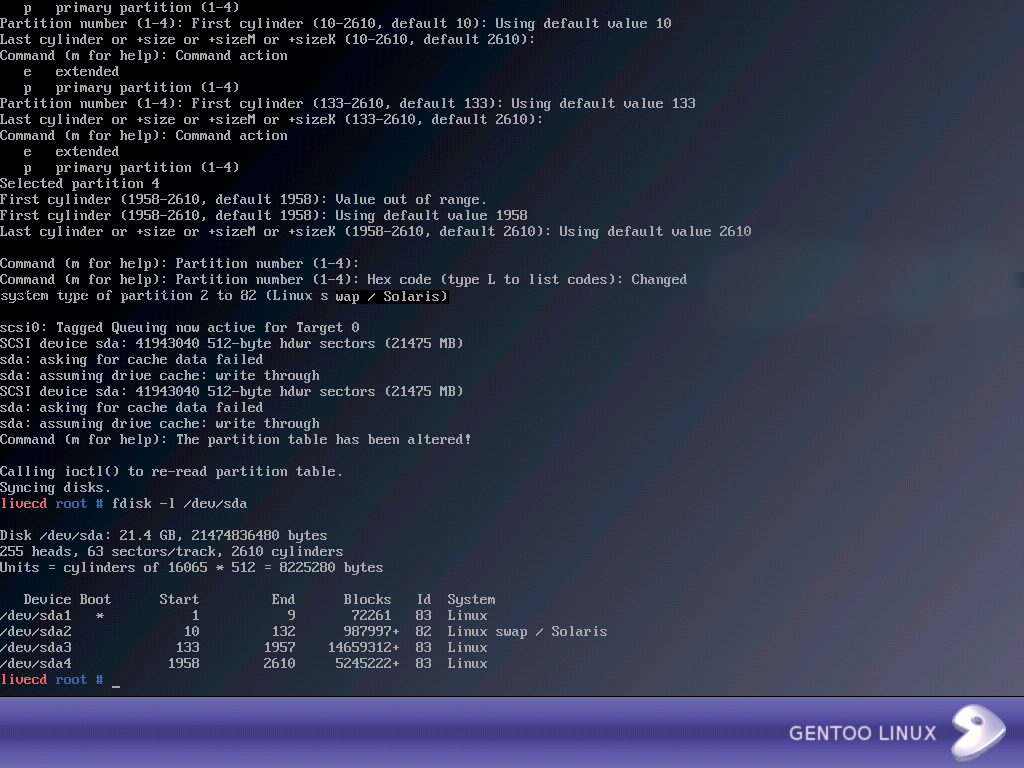
Now that you have set up the partitioning to your liking, you will want to write the partitioning information to disk by pressing w (for "write") to store the information in the Master Boot Record (MBR). It is a good idea to verify the partitioning at this stage by giving the fdisk -l /dev/hda command (Figure 1).
If you don't want to enter the partitioning commands interactively, you can store the commands in a control file and pass the file in to fdisk. A control file is shown in Listing 1.
| Listing 1: Control File |
01 livecd root # cat << EOF >> /tmp/fdisk.part 02 > n 03 > p 04 > 1 05 > 06 > +64M 07 > n 08 > p 09 > 2 10 > 11 ... 12 > w 13 > EOF 14 livecd root # fdisk /dev/hda < /tmp/fdisk.part |
The next item on the list is to format the partitions you just created with a filesystem to manage the files and directories you will be restoring. The most popular filesystems for Linux desktop systems are Ext2, Ext3, and ReiserFS. Journaling filesystems like Ext3 and ReiserFS need more space on disk. With a filesystem such as Ext2, 32 MB would be fine for /boot. The formatting commands for the three filesystems are mkfs.ext2, mkfs.ext3, and mkfs.reiserfs, followed by the partition name. To format the root partition from our example with ReiserFS, enter mkfs.reiserfs /dev/hda3. mkswap /dev/hda2 creates the swap partition. If you are interested in more details on the topic of partitioning, check out the Gentoo documentation at [4].
This more or less completes the preparatory work, and we can move on to restoring the image on disk. The last step is to mount the partitions you just created on the live CD's filesystem. We used Gentoo Live and did this:
user # mount /dev/hda3 /mnt/gentoo
user # mkdir /mnt/gentoo/{boot,home}
user # mount /dev/hda1 /mnt/gentoo/boot
user # mount /dev/hda4 /mnt/gentoo/home
user # swapon /dev/hda2
The mountpoint /mnt/gentoo is a Gentoo convention; don't forget to create a suitable mountpoint for other live CDs. Then start by mounting the hard disk root directory. The command in Line 2 creates mountpoints for the boot and home partitions. The last line enables the swap partition.
The hard disk is all set up for you to restore the image. To do so, first unmount the live CD. The command for this with most distributions is umount /mnt/cdrom. Then insert the DVD with the image file, and type mount /dev/hdb /mnt/cdrom to mount the file. In our example, /dev/hdb is the device name for the DVD drive; the device name can vary depending on your hardware. For computers with S-ATA disks, the required drive is typically /dev/hda; if you have two IDE disks in your machine, the name could be /dev/hdc.
Finally, to unpack the image in the right partition (/mnt/gentoo in our example), run the following commands
nonumber
cd /mnt/gentoo
tar -xvjpf /mnt/cdrom/image-date.tar.bz2
The -x (for "extract") option is the only difference between the commands for unpacking and archiving; it tells tar to unpack the archive. Unpacking will take a while, but it is quicker than a new install.
If your partitioning and drive hierarchy is unchanged with respect to your original installation, there should be no need to change the boot manager configuration or the partitioning table. However, you will need to enter any partitioning changes in the /etc/fstab file that you restore. If you move the image, by unpacking on your second hard disk instead of your first, for example, you will need to modify the entries in /boot/grub/grub.conf to reflect the move.
The decisive step in tidying up after restoring to a new disk is to install the boot manager, which will be missing at this stage, in the master boot record (MBR) of the first hard disk. If you don't do this, the boot process will fail. More or less all current distributions use the Grub boot manager (Grand Unified Boot Loader), which uses a small trick to reinstall the data from the restored image. The commands
user # mount -t proc none /mnt/gentoo/proc
user # chroot /mnt/gentoo /bin/bash
change to the unpacked image on the new hard disk - as if the system had just booted from the image - using chroot ("change root"). /proc has a variety of system information that grub needs, and this makes it imperative to mount the directory before changing root.
After calling grub from within the chroot jail, you should see a prompt:
livecd # grub
grub> root (hd0,0)
grub> setup (hd0)
grub> quit
The root command points to the boot partition, in our example using (hd0,0), that is, to the first partition on the first hard disk in the machine. This is the right command if your installation does not have a separate boot partition, but uses /boot below the root partition. If you are restoring the image to a second hard disk, the command would be root (hd1,0). Use the setup command to write the boot manager to the MBR on the disk; the boot manager typically resides on (hd0), that is, the first hard disk in a machine.
Before you boot into your "old/new" Linux from the live CD, don't forget to umount any partitions you have mounted by running umount. Disable the swap partition by entering swapoff /dev/hda2. Now you can tell your machine to reboot, lean back, and enjoy watching your restored installation launch.
| INFO |
|
[1] Knoppix: http://www.knoppix.org
[2] Gentoo Linux: http://www.gentoo.org/main/en/mirrors.xml [3] Grml homepage: http://www.grml.org [4] Gentoo Linux Manual: http://www.gentoo.org/doc/en/handbook/handbook-x86.xml?part=1&chap=4 |