By Charly Kühnast
Just recently, a colleague who was planning a trip tried to surf to a website run by a major city in Germany. Now this may just be a coincidence, or it may be a character defect, who knows, but this fellow ended up mistyping the URL. The page this took him to immediately tried to attack a vulnerability in his browser. One possible approach - besides regular updates, but I'm sure you've all heard that before! - is an anti-virus proxy such as HAVP [1].
The HTTP Antivirus Proxy install is a simple configure && make && make install. You need to specify your preferred virus scanner - which has to be pre-installed - at the configure step.
I opted for the ClamAV antivirus tool in this case, and that choice gives me a command line similar to the following: configure --with-scanner=libclamav.
Best practices also suggest creating a user and group for HAVP:
useradd havp; groupadd havp
Below the HAVP directory, there is a etc subdirectory; and below that the havp and init.d subfolders. The latter contains a start/stop script which I moved to /etc/init.d. I then entered cp -r havp /etc/ to copy the havp folder to the right path. Among other things the folder contains the central configuration file, havp.conf. The next step was to delete the following line:
REMOVETHISLINE deleteme
HAVP's author added this trap to make sure that users really do stop to take a good look at the configuration file.
The next step was to set up HAVP to run with the havp user account, and to configure it as a member of the havp group. The settings for various virus scanners are located lower down in the configuration file.
I opted to use libclamav and kept the defaults, which I can fine tune any time later. Of course, HAVP has a logging feature, so I set up the /var/log/havp directory and assigned write permissions to the havp user:
mkdir /var/log/havp
chown havp /var/log/havp
All I need now is a directory for HAVP to store temporary files in while scanning. I will be mounting an empty partition in this directory, as HAVP needs a filesystem that supports mandatory locks, and not just any old directory.
Unfortunately, I don't have a partition to spare, so I'll have to make do with a RAM disk for the time being. This setup is fine for test purposes, but this kind of configuration is not a good idea on a production system because a RAM disk will not give you enough space in the long run. Off we go:
mkdir /var/tmp/havp
chown havp /var/tmp/havp
mkfs.ext3 /dev/ram0
mount /dev/ram0 /var/tmp/havp
-o mand
This should have HAVP up and running, but it seems I'm out of luck. When the tool launches, it tells me that I haven't yet edited havp.conf, which isn't true, of course.
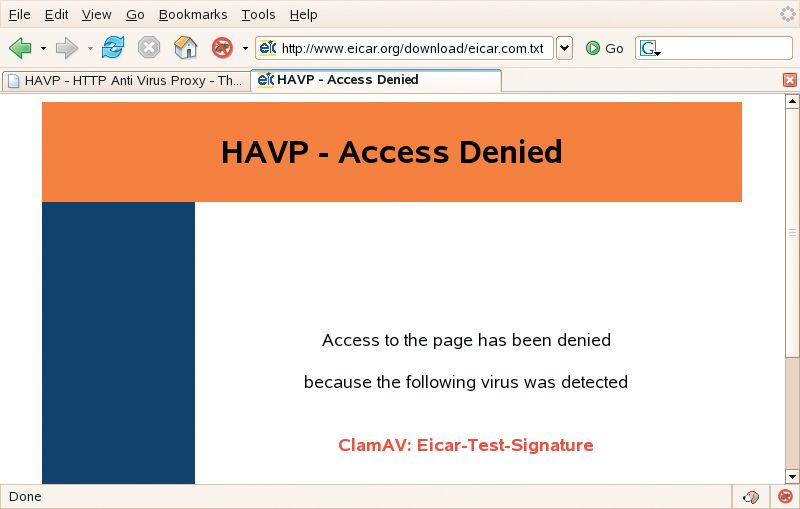
The answer to this dilemma is hiding in the init script, which still has /usr/local/etc/ as the path to the configuration file. After remedying this problem with the init script, HAVP comes up clean as a whistle. By default HAVP will listen on port 8080. After configuring Firefox to match, it's finally time for a test. Lo and behold, when I tried to download the EICAR test virus, HAVP hit me with the no go sign shown in Figure 1. Well done HAVP!
| INFO |
|
[1] HAVP: http://www.server-side.de
|
| THE AUTHOR |
|
Charly Kühnast is a Unix System Manager at the data-center in Moers, near Germany's famous River Rhine. His tasks include ensuring firewall security and availability and taking care of the DMZ (demilitarized zone). |