
By Jens-Christoph Brendel
Hotplugging is often considered an unfathomable feature that isn't especially responsive to the idiosyncrasies of the user. However, it may be easier than you think to build your own custom solution around the components of the Linux hotplug system.
This article looks at how you can use Ivman, a generic handler for Hardware Abstraction Layer (HAL) events, to create a custom hotplug solution. The solution described in this article addresses a common problem for users with portable computers. Although all computers need regular backups, a cron-based cyclical backup scheme is not especially effective for a laptop. The battery might be flat when the backup is due to start, or you might be hundreds of miles away from your server, tape drive, or backup disk.
A better answer might be to set up your computer to monitor plugging of a USB device and autonomously detect the disk with the backup partition. As soon as the partition is available, the computer mounts it at a specific place on the filesystem. An asynchronous backup job launches at regular intervals and checks the backup mountpoint before doing anything else. If the disk is missing, the job just goes back to sleep without bugging you.
When a disk is plugged in, the controller receives a signal and responds by triggering an interrupt. If your Linux distribution uses HAL [1], HAL receives the interrupt and converts it into an event that is advertised on the D-Bus (System Message Bus). Userspace programs listen to the bus, filter out messages intended for them, and trigger events, such as mounting a disk.
The Linux environment includes several tools that evaluate the information as a response to a hotplug event. On the Gnome desktop, the Gnome Volume Manager fulfills that function, whereas KDE uses Kioslaves for the same job. Along with these two desktop-specific solutions are independent approaches, such as Submount and Ivman [2].
In contrast to Submount, Ivman runs in userspace, and it can be used parallel to KDE or Gnome. Ivman is a volume manager and automounter that lets you run arbitrary commands in response to a hardware event. If your distro doesn't include Ivman, you can download it from the project website [2].
Ivman uses a ruleset to associate conditions with actions, investigating every HAL event to ascertain whether a condition is fulfilled. If so, Ivman triggers an action, which can be anything from a simple command to a complex script.
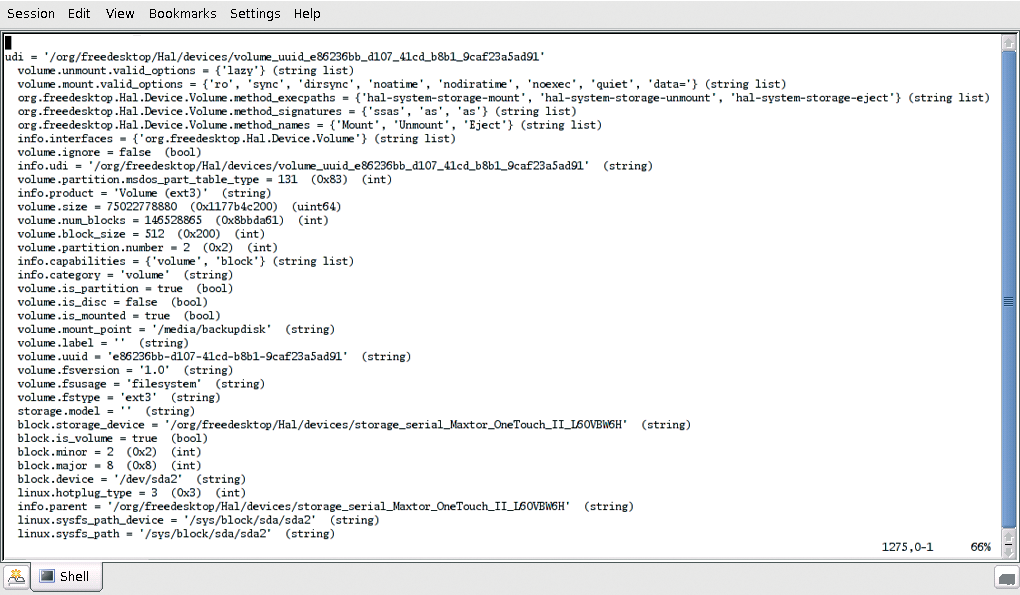
The rules can use any piece of information known to the Hardware Abstraction Layer in the condition. The lshal command gives you details (Figure 1).
The ruleset is mainly defined in two configuration files: IvmConfigActions.xml defines actions to perform when a new device is attached or a medium is inserted into a drive. IvmConfigProperties.xml contains the rules whose conditions are based on device properties. There is also a configuration file titled IvmConfigBase.xml with general defaults. For example, you can use the file to specify the user and group IDs that Ivman will allow. Finally, more recent Ivman versions have a file called IvmConfigConditions.xml, which defines conditions that must be fulfilled for the program to perform a specific action.
In our backup example, we want the system to respond when a specific hard disk is attached; thus IvmConfigActions.xml is the right place to start. The conditional part of any rule can use the ivm:Match key to specify a HAL property and supply a value that triggers an action. The following commands assign a mountpoint to a USB stick based on the model name:
<!-- Mounting an USBStick -->
<ivm:Match name="hal.storage.model" value="TS64MJFLASHA">
     <ivm:Option name="exec" value="mount $hal.block.device$ /media/usbstick" />
</ivm:Match>
The dollar signs indicate that the mount command will uses the HAL block.device property rather than the name.
In contrast to this, the backup partition needs a more specific property. We can use the unique volume ID to detect the partition. We also want to log plug and unplug events along with the backup progress report. We don't even need a script to do this; just a few lines in the action configuration file are all it takes (see Listing 1).
| Listing 1: IvmConfigActions.xml (Excerpt) |
01 <!-- Mounting the Backupdisc --> 02 <ivm:Match name="hal.volume.uuid" value="e86236bb-d107-41cd-b8b1-9caf23a5ad91"> 03 <ivm:Option name="exec" value="echo 'Attaching backup disk: '`date` >> /var/log/backup.log" /> 04 <ivm:Option name="exec" value="mount $hal.block.device$ /media/backupdisk" /> 05 <ivm:Option name="execun" value="echo 'Backup-Disk detached: ' `date` >> /var/log/backup.log" /> 06 </ivm:Match> |
Of course we could launch the backup at the same time, but this would be a one-of event. In our case, we want the machine to grab regular filesystem snapshots whenever the backup disk is attached. To allow this to happen, we will let Cron run the script in Listing 2 periodically to check if a disk is mounted at the backup mountpoint. If so, it has to be the right disk for the snapshot to be triggered. The output is sent to the same logfile where the disk mount status is stored (Listing 3). I'll create a snapshot using the tried and trusted rsnapshot tool, which saves space by copying only modified files. We could also specify a maximum number of snapshots and overwrite the first snapshot when the target number has been reached. This prevents the disk from overflowing and still gives you a series of snapshots from different dates. To recover, simply copy the files back.
| Listing 2: Cronjob for a Backup Snapshot |
01 #!/bin/sh 02 if [ `grep backupdisk /etc/mtab | wc -l` -gt 0 ] 03 # ok, backup disk found 04 then 05 if [ -f /var/run/rsnapshot.pid ] 06 # rsnapshot is already running -> exit 07 then exit 1 08 else 09 # let's take a snapshot 10 echo -e "\n ================================================== \n" >> /var/log/backup.log 11 echo "Starting hourly snapshot at `date`" >> /var/log/backup.log 12 /usr/bin/rsnapshot hourly 2>&1 1>> /var/log/backup.log 13 echo "Hourly snapshot finished at `date`" >> /var/log/backup.log 14 fi 15 else 16 # backup disk is not mounted -> exit 17 exit 1 18 fi |
| Listing 3: Logfile Excerpt |
01 Attaching backup disk: Thu Jun 22 11:00:52 CEST 2006 02 Backup disk /dev/sda2 mounted at /media/backupdisk: 03 Thu Jun 22 11:03:57 CEST 2006 04 05 ================================================== 06 07 Starting hourly snapshot at Thu Jun 22 12:00:01 CEST 2006 08 echo 25958 > /var/run/rsnapshot.pid 09 ... 10 mkdir -m 0755 -p /media/backupdisk/hourly.0/ 11 /usr/bin/rsync -ax --delete --numeric-ids --relative --delete-excluded \ 12 --exclude=media/backupdisk \ 13 --link-dest=/media/backupdisk/hourly.1/localhost/ / \ 14 /media/backupdisk/hourly.0/localhost/ 15 ... 16 rm -f /var/run/rsnapshot.pid 17 Hourly snapshot finished at Thu Jun 22 16:05:03 CEST 2006 18 ... |
This approach gives you a regular backup that runs automatically, apart from plugging in the disk; it is flexible, and it thus reflects the needs of mobile computing. You can perform almost any action with arbitrary devices following the same approach; for example, you could launch a track management tool when you plug in your MP3 player, or you could launch an image viewer when you plug in your camera.
| INFO |
|
[1] HAL: http://www.freedesktop.org/wiki/Software_2fhal
[2] Ivman: http://ivman.sourceforge.net/ |