
By Marc Seil
With the advent of the information society, office PCs spawned at mind boggling rates in most companies. These computers share most of their time with a common task: the idle task. Activities such as browsing the Internet or working on an office document aren't very challenging for contemporary CPUs. If you are sitting next to your PC, and you are not currently encoding audio or videos, invoke the uptime command. The average load will surely be far below 1.0. This low level of usage indicates a poor workload on your PC, which means that your boss paid too much for it.
A basic idea behind grid computing is to harness these idle CPU cycles for something useful. For instance, you could use an idle desktop computer to process biomedical signals or simulate an environmental model.
The most famous grid/distributed computing project is the SETI@home project. SETI (which stands for Search for ExtraTerrestrial Intelligence [1]) uses Internet-connected PCs around the world to search for intelligent communications from space. The SETI@home grid management tasks are organized through a system known as the Berkeley Open Infrastructure for Network Computing (BOINC) [2]. BOINC is also the engine behind other grid computing efforts, such as the BBC Climate Change Project, which lets home users assist with deriving climate models, and the Einstein@home project, which puts home PCs to work on the task of analyzing data from gravity wave detectors.
The free and open-source BOINC system is available to anyone who wants to download it, which means that you can use BOINC to create and deploy your own grid computing applications. If you have a big problem you want the whole world to work on, or even if you just want to give the PCs in your office network something to do in their idle time, BOINC provides the infrastructure for you to get started.
This article describes how to set up a BOINC grid infrastructure on a Gentoo Linux and how to run and deploy a demo application to dedicated BOINC clients.
The idea behind a grid system such as BOINC is to let client computers lend their CPU cycles to solving small parts of a large calculation. In order for the system to work, the grid needs a server system that attends to several important management tasks. The tasks fall into the following categories:
The efficiency of the grid system depends upon the efficiency of these management tasks.
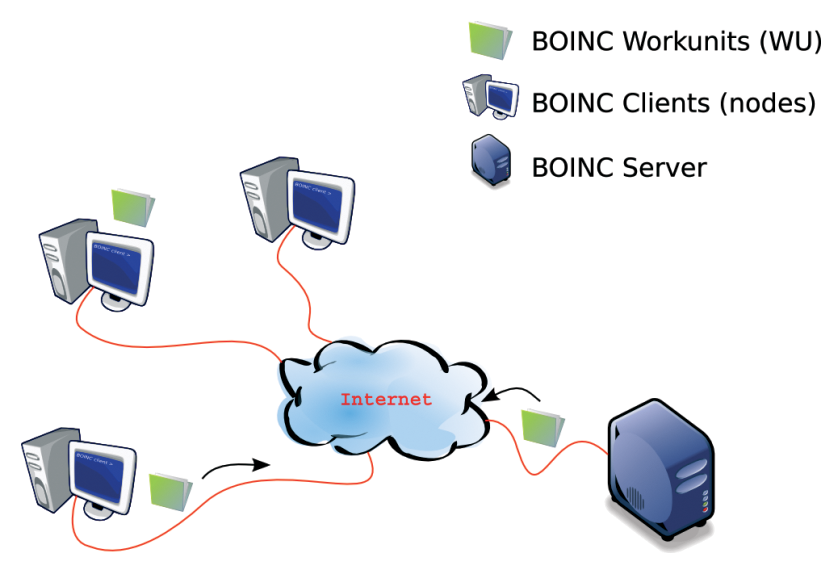
In a simplified view (Figure 1), a BOINC grid consists of a server and multiple computing clients (nodes). The BOINC server, which can spawn on multiple machines, manages the grid-related tasks and sends the computing jobs (work units) to the nodes. The nodes attach to a BOINC project through a BOINC client application. The Internet can provide the communication path between the nodes and the BOINC server.
Note that this article will not cover the security aspects of the configuration, which may vary depending on your network and the policies of your organization. Beside the next steps are based on a Gentoo Linux system. Nevertheless the procedures should be similar for other Linux distributions.
The BOINC server requires some packages that are part of most Linux distributions. Apache, PHP, and Python provide the user interface and the message passing system. A MySQL database is the backbone of the grid management tasks. During the installation of these mandatory tools, it is important that the cross package facilities are respected (e.g., mysql python facility).
[root] $ USE="mysql php xml" emerge -avt python apache mysqlphp mysql-python pecl-pdo-mysql
To activate the PHP module, the option -D PHP5 has to be present in the /etc/conf.d/apache2 configuration file. (PHP4 is also fine.) In order to check if the Apache PHP module is loaded correctly, a small PHP script (Listing 1) will report which PHP version is available.
| Listing 1: hello.php |
01 <?php 02 echo 'Hello world!'; 03 phpinfo(); 04 ?> |
Next, the user boincadm has to be created on the server. This user is responsible for executing the grid management tasks. The user should be in the same group as the Apache web server (apache) to simplify the configuration.
If the MySQL database is not running already, you can initialize and started it with the following commands as root.
$ mysql_install_db
$ /etc/init.d/mysql start
$ /usr/bin/mysqladmin -u root password 'mysqlpwd'
The user boincadm must have sufficient rights to access the database and create a new database. There are different possibilities for allowing database administration, but some SQL commands will also do the job.
$ mysql -u root -p
mysql> GRANT ALL ON *.* TO 'boincadm'@'localhost';
mysql> SELECT * FROM mysql.userWHERE user='boincadm';
The server backend software packages are now ready for BOINC.
To get the sources, you can invoke a cvs checkout as user boincadm. The checkout will download the BOINC client software, the server applications, and some tools for simplifying the creation and administration of BOINC projects.
$ cvs -d :pserver:anonymous:@alien.ssl.berkeley.edu:/home/cvs/cvsroot checkout -r boinc_core_release_5_3_31 boinc
The bundled configuration scripts _autosetup and configure will set up the source tree for compilation. A simple make will do the rest. In some cases, it may be necessary to install some libraries to resolve all dependencies and get the sources compiled. If unmet dependencies are encountered during the build, refer to the BOINC build dependency list, which is available on the official BOINC website[3].
$ cd boinc
$ ./_autosetup
$ ./configure --enable-server --disable-client --without-x
$ make
Invoke the sanity script to check if the crucial BOINC parts are set up correctly.
$ ./test/test_sanity.py
Before you can send jobs to the nodes, you must create a project.
$ ./tools/make_project --delete_prev_inst --user_name boincadm --drop_db_first --project_root $HOME/projects/test_setup --key_dir $HOME/projects/test_setup_keys --url_base http://boinc.tuxindustry.lu/ --db_user boincadm test_setup
After the project test_setup is created, the console will prompt with some messages to update the Apache configuration. This information is used to access the project through a web browser and the BOINC clients. You can adjust the user rights for the project with chmod.
$ cd $HOME/projects/test_setup/
$ cat test_setup.httpd.conf >> /etc/apache2/httpd.conf # as root
$ /etc/init.d/apache restart # as root
$ chmod -R a+r ~/projects/
The project is now available and can be accessed through a web browser. The target url is defined through the Apache alias settings (e.g., http://boinc.tuxindustry.net/test_setup). If the server has to be hardened, the chmod, key paths, and Apache settings should be reviewed; otherwise, the defaults are just fine. You can omit the cron entries at this point to simplify debugging.
An advantage of the BOINC grid is its dynamic scalability. This includes autonomous user (node) management, reducing the administrative tasks. The default project settings disable the user creation through the project web interface. To enable this feature, you must adjust the config.xml file, located in the project root directory. Toggle the tag entry <disable_account_creation> from 1 to 0.
The phpmailer package will help you ensure seamless user creation. Download phpmailer from the http://phpmailer.sourceforge.net website and install it in the php.inc extensions path. This small extension allows the project server to send information to the users registering with BOINC. You can configure this emailing facility by adding some lines to the php project file project.inc. This file is located in the html/project directory of the BOINC project (Listing 2).
| Listing 2: html/project/project.inc |
01 ...
02 define("EMAIL_FROM" , "boincmaster@tuxindustry.net");
03 $USE_PHPMAILER=true;
04 $PHPMAILER_HOST= "smtp.tuxindustry.net";
05 $PHPMAILER_MAILER="smtp";
06 ...
|
After creating an account through the web interface, it is time to add an application that will be executed by the nodes. The BOINC sources include an app directory, where some sample applications are located.
The sample application uppercase, which will serve as an example in this article, transforms all the characters of an ordinary ASCII file into upper case. The input dataset must have the filename in, and the correspon-ding output filename is out. This application can also be started without a BOINC client, which can help during debugging.
Copy the application into the project app/uppercase directory. APPNAME_VERSMAJOR.VERSMINOR_PLATFORM defines the naming convention. The version indicates which BOINC clients can execute the application. Only the major version is responsible to identify the client. (In the example below, a client with the version 5.4.9 could execute the application.) Due to the fact that the BOINC clients can run on a Windows, Mac OS X, or GNU Linux machine, it is also necessary to indicate the target platform. (You'll find platform naming conventions at http://boinc.berkeley.edu/platform.php.)
$ cd apps && mkdir uppercase &&
$ mv ~/boinc/apps/upper_case uppercase_5.0_i686-pc-linux-gnu
Now create the project.xml file (Listing 3) in the project root directory and finalize the "application add" workflow through executing the project commands ./bin/xadd and ./bin/update_versions.
| Listing 3: ./project.xml |
01 <boinc> 02 <platform> 03 <name>i686-pc-linux-gnu</name> 04 <user_friendly_name>Linux/x86</user_friendly_name> 05 </platform> 06 <app> 07 <name>uppercase</name> 08 <user_friendly_name>Linux Magazine sample application</user_friendly_name> 09 </app> 10 </boinc> |
Before the nodes can start to execute the application and process some data, it is necessary to create a work unit (WU). A WU defines the application and dataset that has to be executed and processed by the client. Work units are described through a work unit template and a result template. The work unit template (Listing 4) describe the input dataset reference (in this case, the filename in) on the target node. The result template (Listing 5), on the other hand, describes the result dataset reference (the result filename out). You can created both templates in the templates/ directory.
After creating the template files, copy the text file containing the text you will alter to upper case into the download directory. Everything is now prepared for the arrival of a work unit.
| Listing 4: ./templates/wu_uppercase |
01 <file_info> 02 <number>0</number> 03 </file_info> 04 <workunit> 05 <file_ref> 06 <file_number>0</file_number> 07 <open_name>in</open_name> 08 <!-- open_name is the name of the input file used by the application --> 09 </file_ref> 10 <delay_bound>600</delay_bound> 11 <!-- An upper time bound (seconds) between sending a wu to a client and receiving a reply --> 12 </workunit> |
| Listing 5: ./templates/re_uppercase |
01 <file_info> 02 <name><OUTFILE_0/></name> 03 <generated_locally/> 04 <upload_when_present/> 05 <max_nbytes>10000000</max_nbytes> 06 <url><UPLOAD_URL/></url> 07 </file_info> 08 <result> 09 <file_ref> 10 <file_name><OUTFILE_0/></file_name> 11 <open_name>out</open_name> 12 <!-- open_name identifies the filename of the application result file --> 13 </file_ref> 14 </result> |
Each work unit is identified by a unique ID, which is managed by the BOINC server and the database. The tool create_work is used to pass work to the grid.
./bin/create_work
-appname uppercase -wu_name wu_uppercase_01 -wu_template templates/
wu_uppercase.xml -result_template templates/re_uppercase.xml -min_quorum 1 -target_nresults 1 text.txt
The WU has the name wu_uppercase_01, which is stored like all the other options in the test_setup database. The argument min_quorum defines how many returned results must be equivalent to have a WU validated. The target_nresults must be at least equal to the min_quorum. The last argument test.txt defines the data set on which the WU should be applied. The data file must be present in the download directory. After creating the WU, a new subdirectory is created in download/, containing the dataset, which will be passed to an idle node that can be allocated by the BOINC server.
Keep in mind that the BOINC sources also provide an API to create work units and to insert them into the grid.
The BOINC server management tasks are performed by the so-called BOINC server daemons and server side queues. The daemons typically fill the queues and use them to trigger management tasks. Examples of the daemons include:
The simplified descriptions of the daemons should be sufficient to visualize the BOINC server work unit flow. (Check the BOINC wiki to get a detailed description [4]). The daemons can be found in the project bin/ directory and must be added to the project configuration file config.xml (Listing 6).
After updating the project configuration, you can start the BOINC server with ./bin/start. The server state can be fetched with http://boinc.tuxindustry.lu/test_setup/server_status.php and is updated about every 10 minutes.
| Listing 6: ./config.xml |
01 <boinc> 02 .... 03 <daemons> 04 <daemon><cmd>feeder -d 3</cmd></daemon> 05 <daemon><cmd>transitioner -d 3</cmd></daemon> 06 <daemon><cmd>file_deleter -d 3</cmd></daemon> 07 <daemon><cmd>sample_trivial_validator -d 3 app uppercase</cmd></daemon> 08 <daemon><cmd>sample_dummy_assimilator -d 3 app uppercase</cmd></daemon> 09 </daemons> 10 ... 11 </boinc> |
The server is now ready and waits for the clients to connect. Download a BOINC client with a number reflecting the uppercase application naming convention.
You'll find the client in the Download BOINC section of the test_setup project web page. The client application will ask for a project to attach to, which is http://boinc.tuxindustry.lu/test_setup in this case, and a valid email/password pair to authenticate.
$ sh boinc_5.*.*_i686pclinuxgnu.sh
$ cd BOINC
$ ./run_manager # start the client
After some idle time on the grid node, the client will start to download the WU and will upload the result to the server. Take a look at the client messages to see the client downloading the uppercase application and uploading the result.
If the WU is processed correctly, your credit will rise. You can check your credit in the Your account section on the project web page.
In order to get some feedback during work unit dispatching and processing it can be of interest to check the server side logs. They can be found in the log_boinc directory located in the test_setup project home directory. On the client side the BOINC application creates directories dedicated to the attached projects. These directories will contain the work units (application, description and data sets) which will be processed by the node.
Finally, you have a basic BOINC grid running. Now you can start to implement your own applications and scale the grid with more nodes. This article was only a brief introduction, but it should simplify the steps to getting a first test server up running. I hope you enjoyed this short trip to the futuristic world of distributed computing.
| INFO |
|
[1] Search for Extra Terrestrial Intelligence (SETI@home): http://setiathome.berkeley.edu
[2] Berkeley Open Infrastructure for Network Computing:http://boinc.berkeley.edu [3] Build dependencies:http://boinc.berkeley.edu/build.php [4] The unofficial BOINC Wiki:http://boinc-wiki.ath.cx/ |
| THE AUTHOR |
|
Marc Seil is a research engineer working at the "Centre de Recherche Public Henri Tudor - CR SANTEC" in Luxembourg. His research domain is dedicated to technology in the medical field. He can be contacted at marc.seil@tudor.lu. |